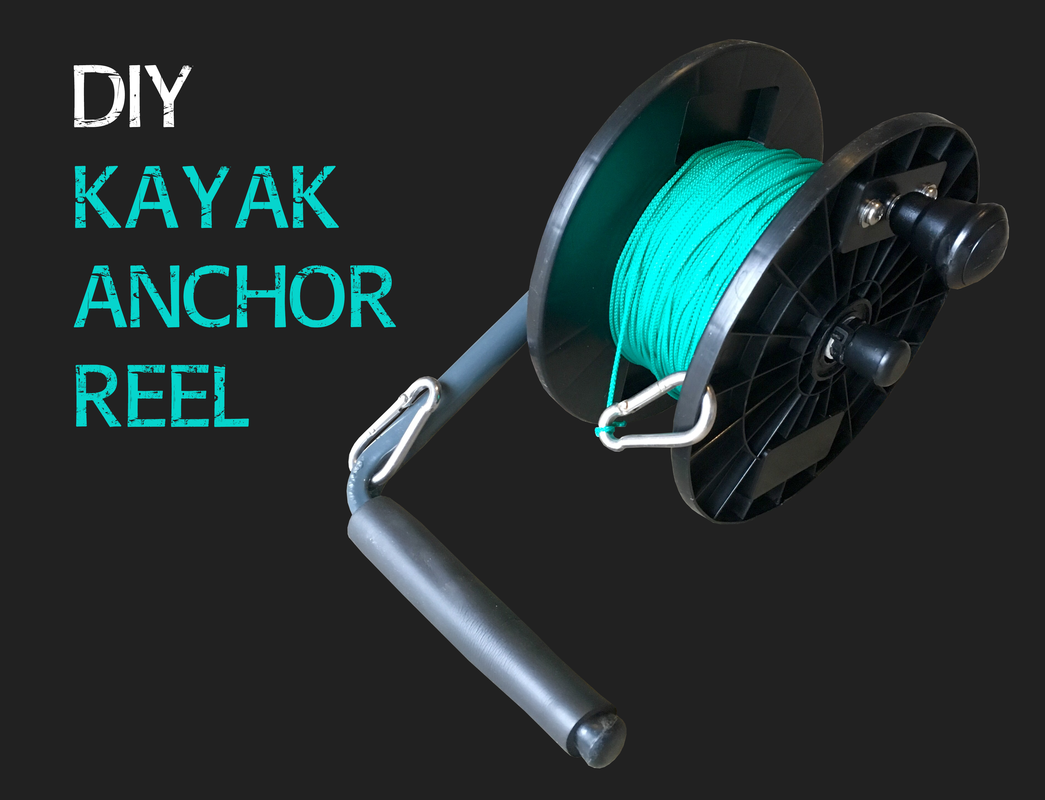
There are many incarnations of the anchor reel, ranging from expensive divers reels to simply wrapping the anchor line around a plank of wood! I've always opted for making my own anchor reel to suit my needs. I needed it to be strong, hold plenty of line for deep water anchoring, be easy to store on the kayak and be easy to retrieve the anchor line under tension if needed. Lets take a quick look at methods of anchoring a kayak, as this has dictated the design of my DIY kayak anchor reel. Methods of Anchoring a KayakThere are two main methods of anchoring a kayak - the quick-release method and the simple/direct method. The diagrams below show the principal behind each method but there are many variations of these methods, often tailored to the individuals specific anchoring technique. 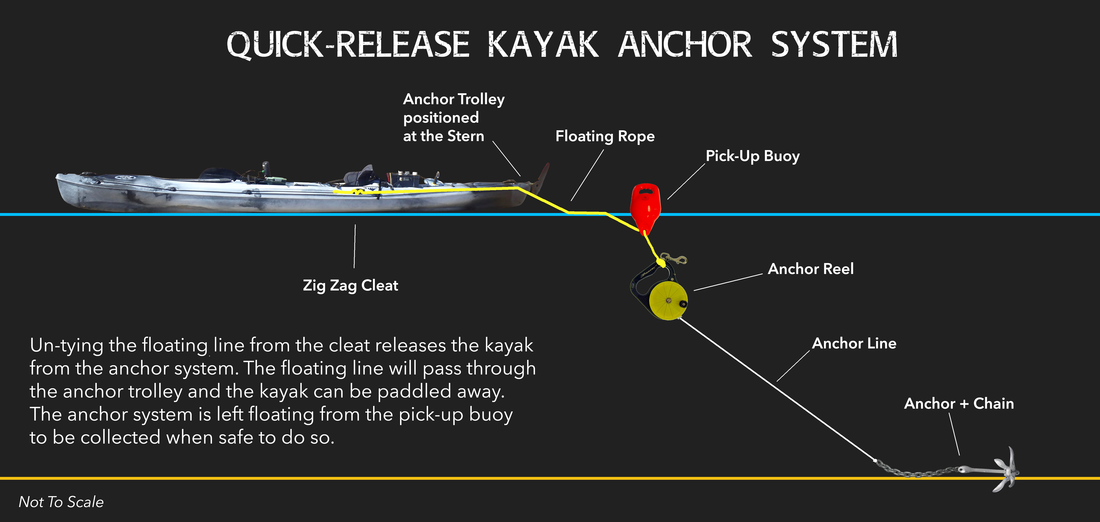  I use the simple/direct anchoring method. My anchor line runs directly from my cleat, through the anchor trolley karabiner, shuttled to the stern, and then down to the anchor, as in the diagram above. Once anchored my reel gets clipped off to the side of the kayak, or put in the tank well and is not subject to any tension from the anchored kayak. This is not a quick-release method that incorporates a pick-up buoy, which floats an anchor reel beneath it in the water - this method is recommended for those who haven't anchored before. If i am in serious danger and need to un-anchor at speed, i simply slice through my anchor line with a knife (always attached to my PFD) and the kayak is instantly free from my anchor. That is how i quick-release. I lose the anchor but if i am in a position that i need to un-anchor at speed then that will be the least of my worries! Once your finished fishing at anchor it is time to retrieve the anchor and line. There are two main ways people retrieve an anchor from the bottom back to the kayak:
I use a mixture of both methods depending on the conditions, but generally tend to use the first method most. Previous Anchor ReelsUp to now i have used two homemade anchor reels. These reels are designed to use with a simple/direct anchoring method. Anchor Reel MK1 was a quick build made from bits and bobs i had laying around in the garage. It was designed to be mounted in the scupper hole or flush mount rod holder on the kayak. Despite being a bit of a bodge job, with no stainless metal parts, it actually lasted quite well with around 3 seasons of use before MK2 came along. It was difficult to retrieve line direct under tension though if i needed too wind down directly onto the anchor during retrieval. I would have to pull the line up first by hand and then wind the loose line. Anchor Reel MK2 was a gift from fellow kayak fisherman Richi. This reel was a step up from MK1 and was certainly easier to use. It was easier to store on the kayak and it had a large capacity but like MK1 it was still awkward to hold when retrieving line under tension. But the design was nearly there, i just needed a better handle to provide a better hold of the reel whilst hauling the anchor line directly onto the reel. 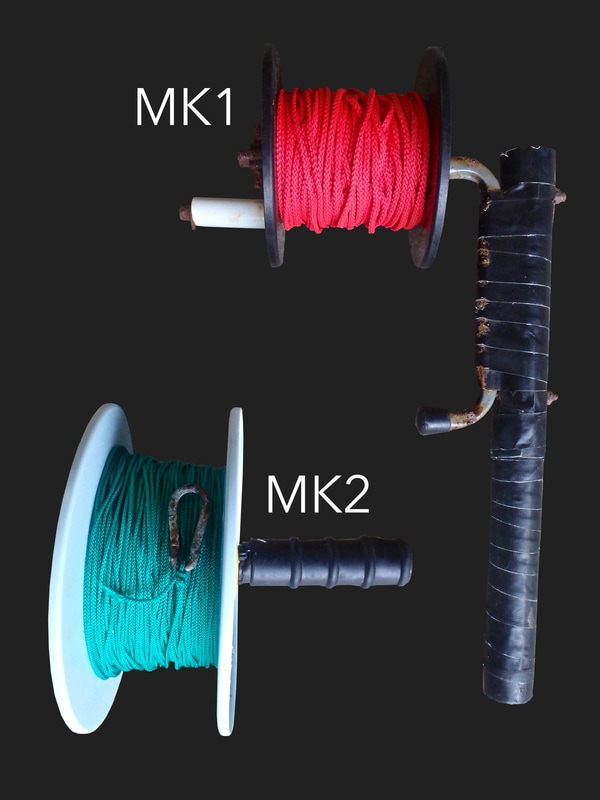 It was time to build MK3. The sticking point for ease-of-use was a decent handle/frame to hold and a decent handle on the reel to wind with. A little bit of thinking and searching around and i came up with an idea. Time to source the components! Making an Anchor Reel for Kayak FishingThe components used to make this anchor reel can be purchased from most chandlery and hardware stores. One part needed to be sourced from Cornwall Canoes. I used the following:
Tools Used:
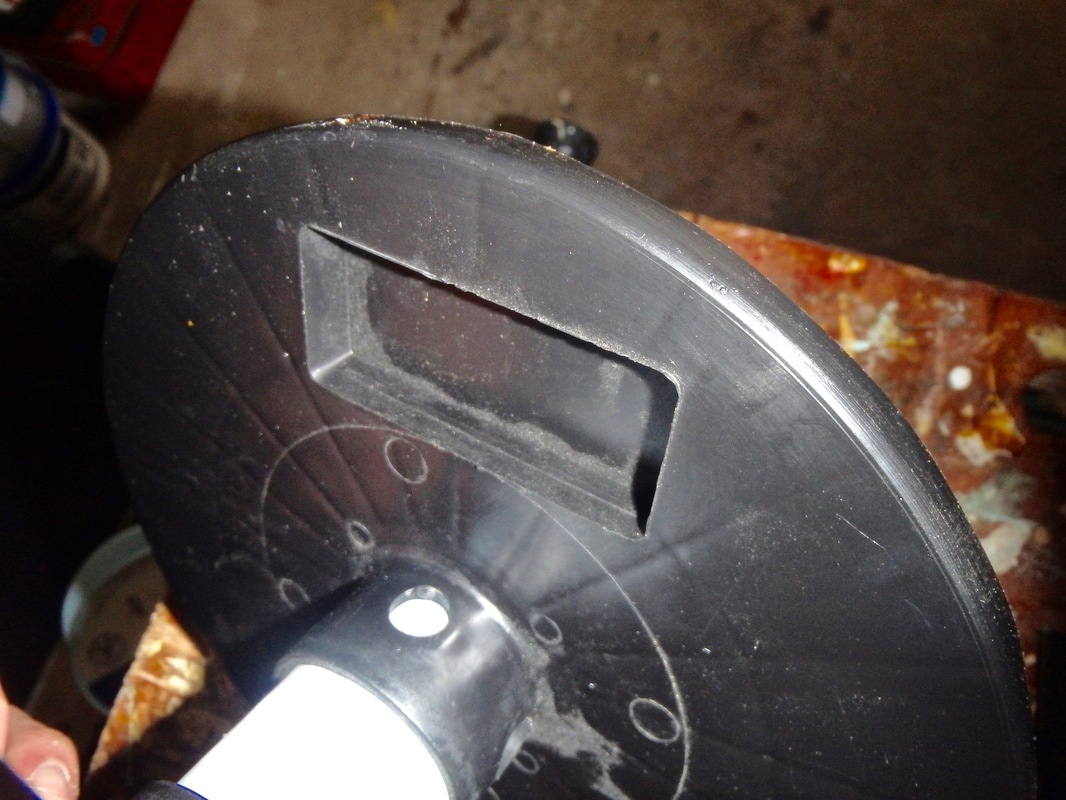
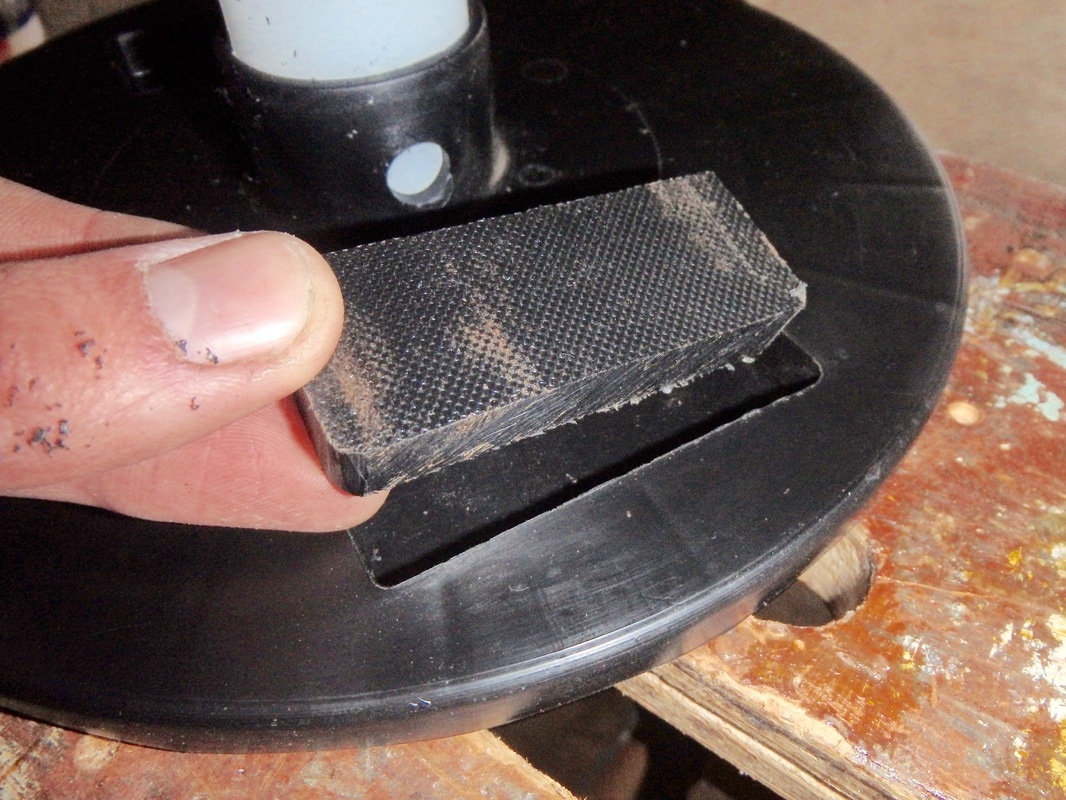
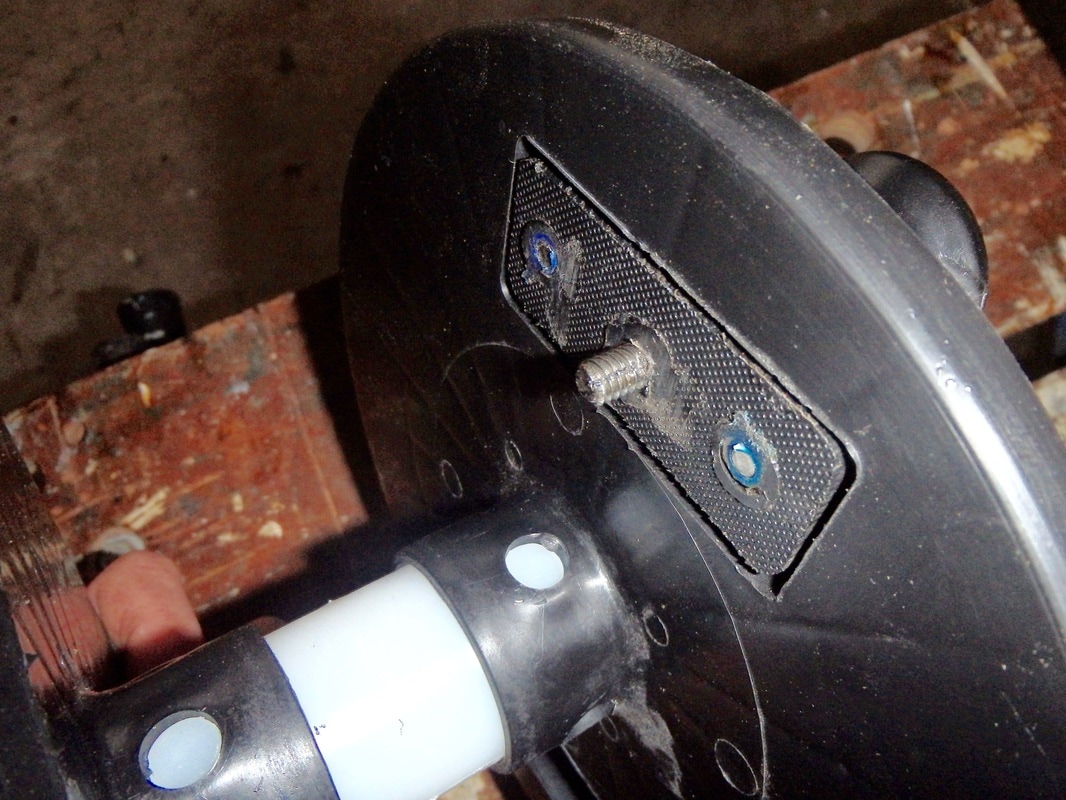
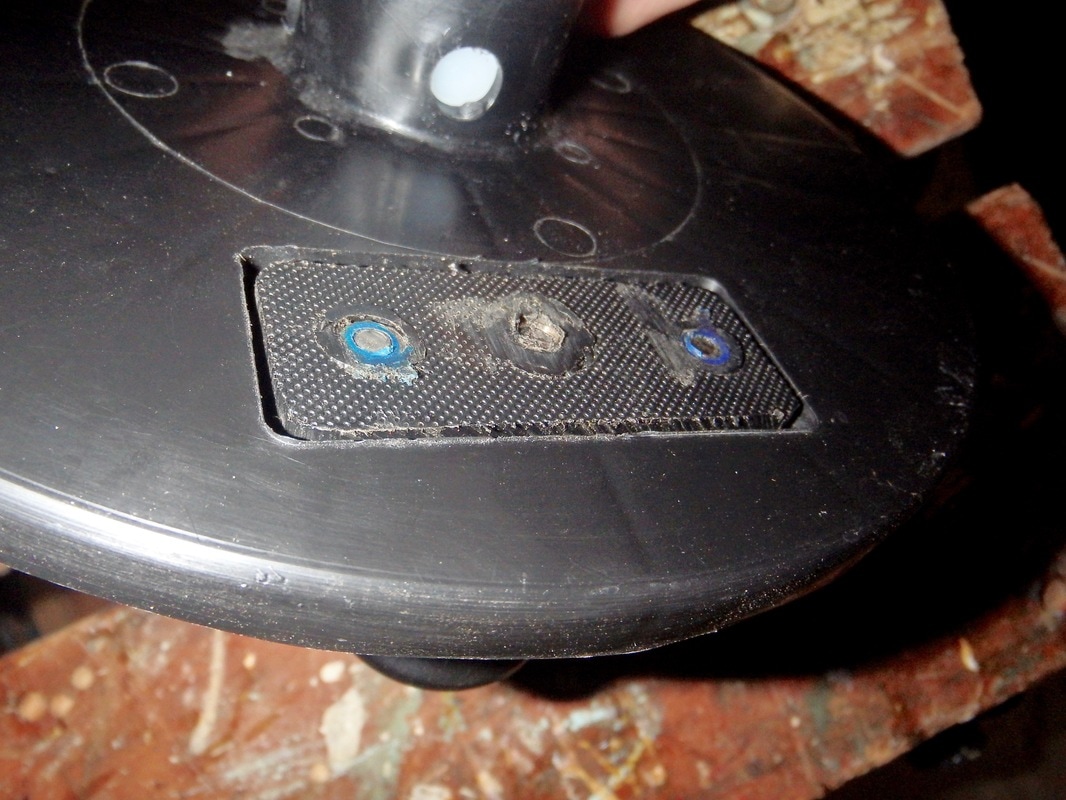
The major components are shown below... 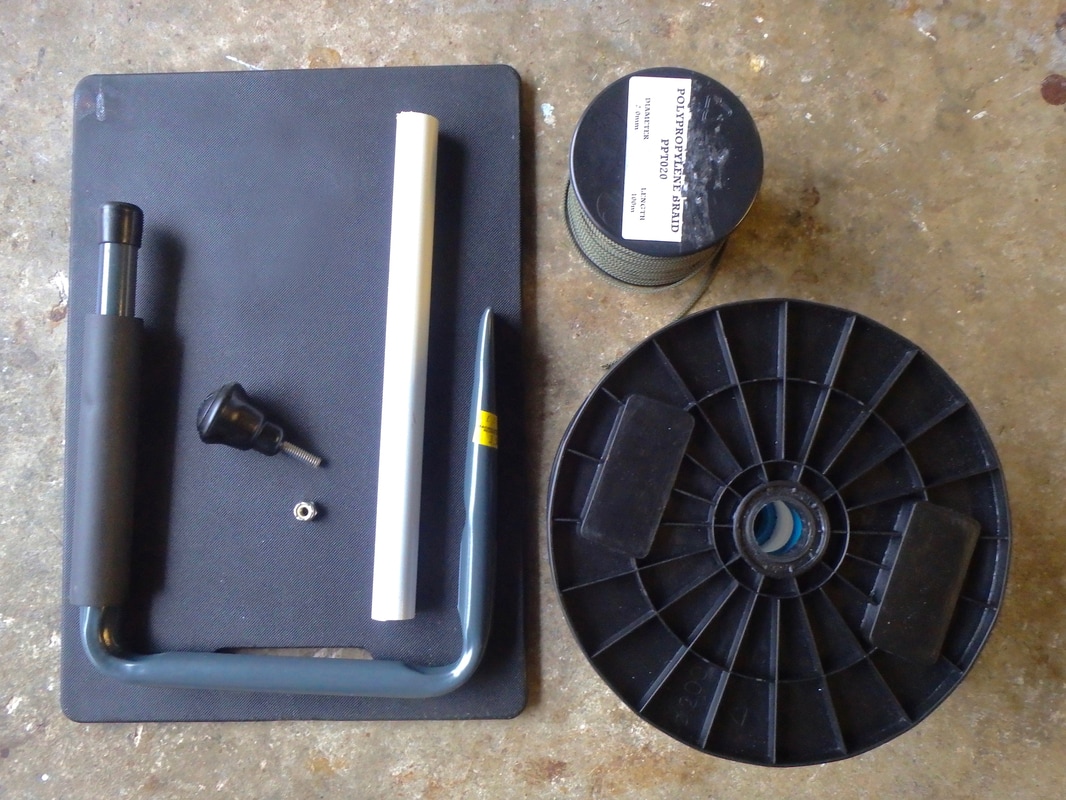 Building the SpoolThe first step was to build the spool. I spotted an empty spool on the cord/rope rack at my local hardware store and managed to get it for free which was great. It measured approx. 200mm diameter x 80mm wide and would hold plenty of 2mm polypropylene cord anchor line. I now needed a decent sized handle that i could get a good grip on to wind the spool. Richi had used a multiplier reel handle on the MK2 reel he made and this worked fairly well although a bigger handle was still needed. I searched around for a big game multiplier reel handle but this would have been too costly. A bit of searching and i found the Hobie Steering Knob Handle (bought at Cornwall Canoes). This is designed to screw into the steering handle on the Hobie kayak range, to allow for easier/smoother steering control. It came with a bolt ready to go so all i have to do was bolt it to the spool! At £13.95 this was the biggest cost on the build. The bolt was a 1/4"-20tpi and required a stainless nut, which was easy enough to source on eBay. 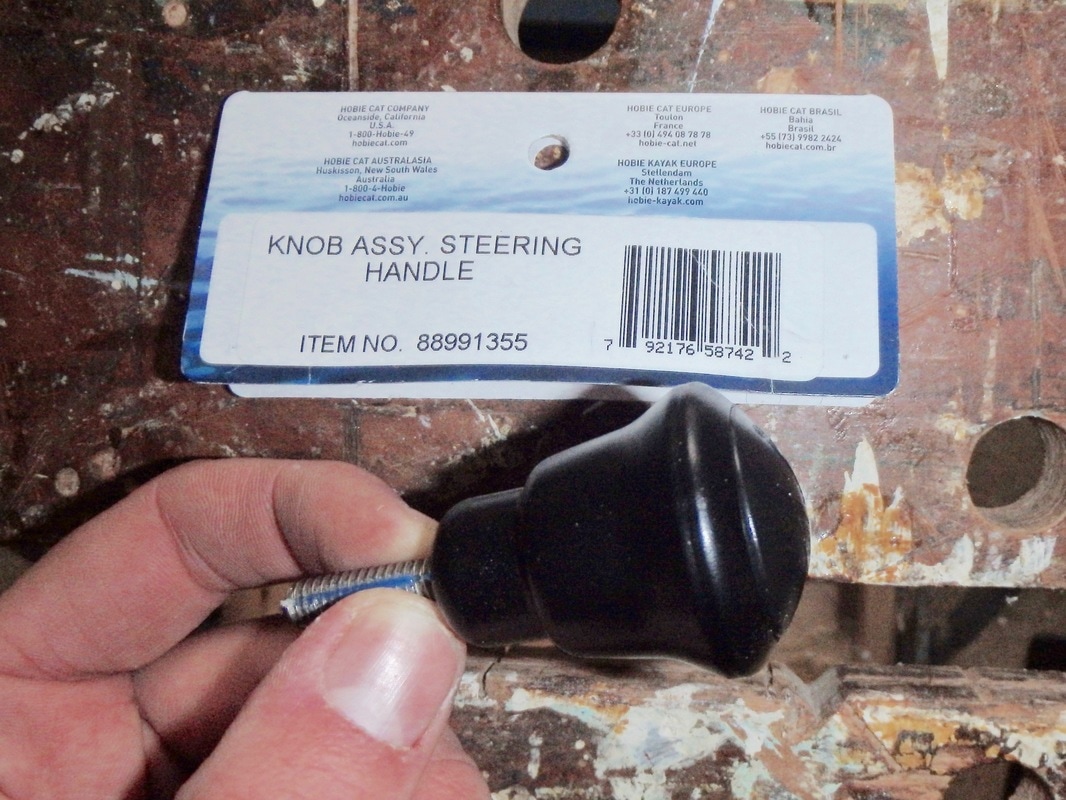 I needed this to be securely attached to the spool as it would potentially be subject to a fair load whilst winding anchor line onto the reel under tension. The spool had some rectangular recesses on the inner side. I used some thick chopping board to make a plug for this. This would provide a thicker plate to bolt the handle into for a stronger hold, and help to spread the load.
I wanted this to be attached to the spool so that no bolts/nuts protruded into the spool as these may catch on the anchor line during use. I used a technique whereby i countersunk the nuts into the chopping board by heating them up and melting them in place. Alternatively, a stainless steel metal plate could be used either side of the plastic spool to provide strength. The chopping board backing plates have never let me down before so i went with this option. To do this, first drill holes the same diameter as the bolt thread where you want the nuts to be located. I'm using M5 bolts so i drilled a 5mm hole. 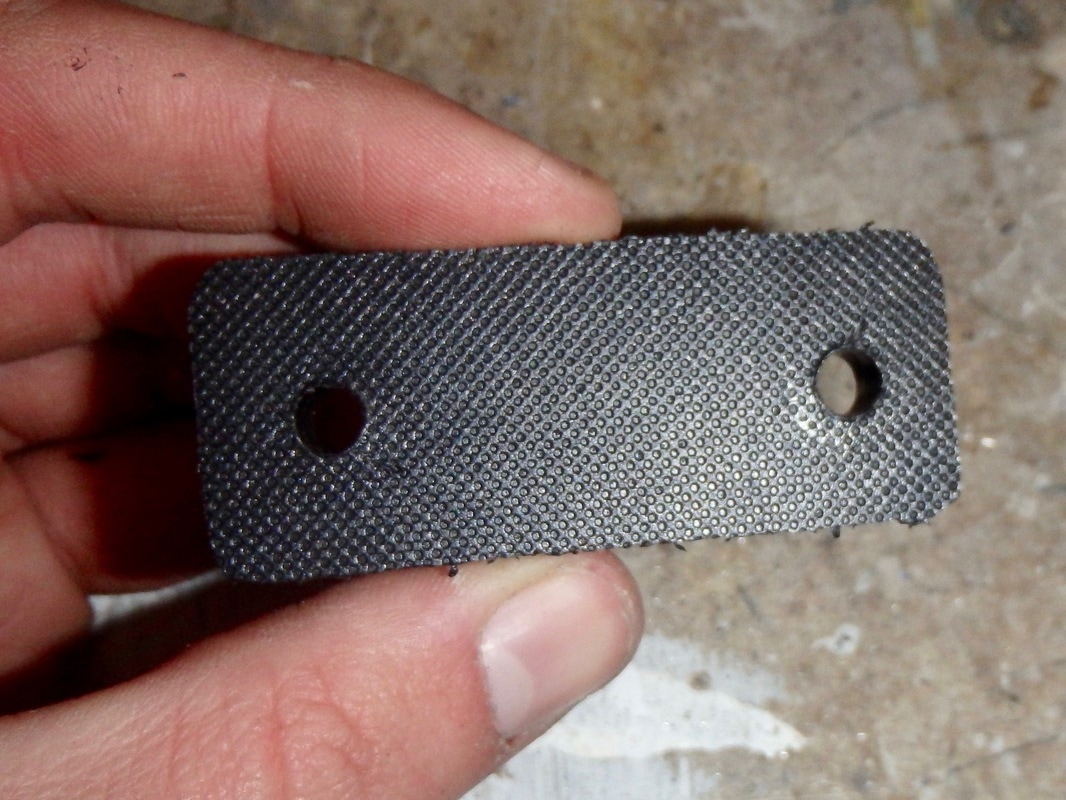 Then thread the nut onto a bolt so that there is enough bolt below the nut to clear the thickness of chopping board. Use a vice, or pliers, to hold the bolt and use a flame to heat it up for 30-60 seconds. Once very hot, use the pliers to push the bolt into the hole, and nut into the plastic until it sits level or just below the surface of the chopping board.
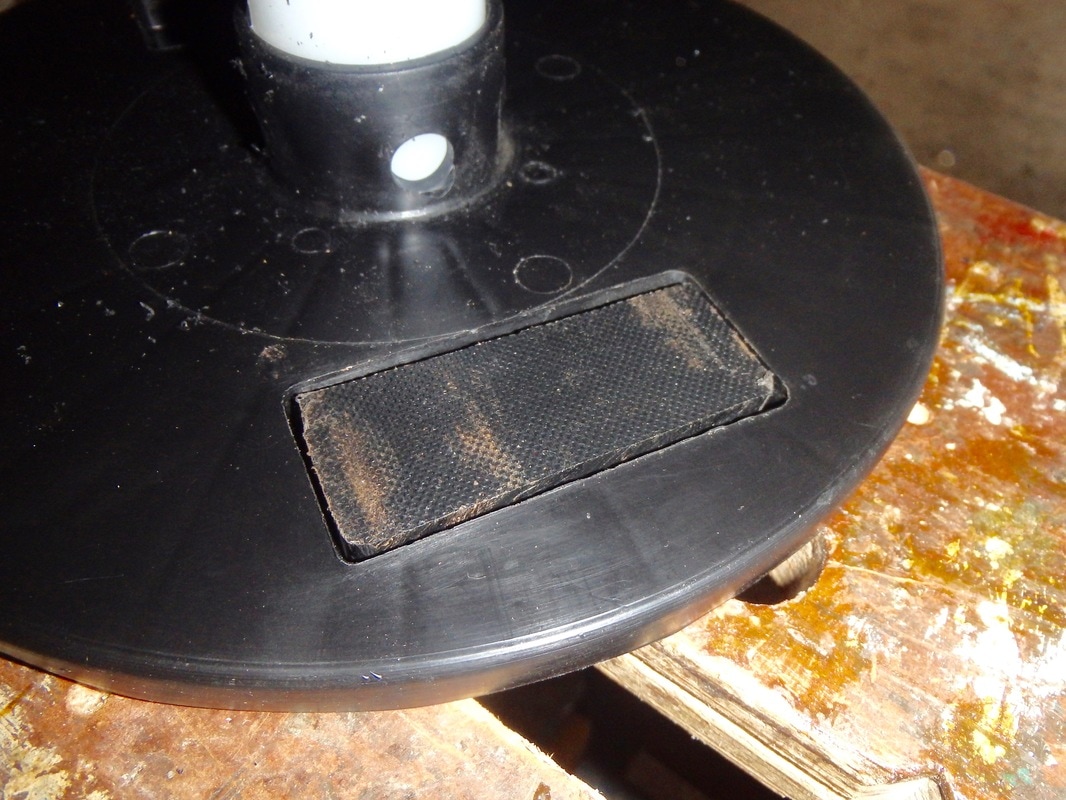
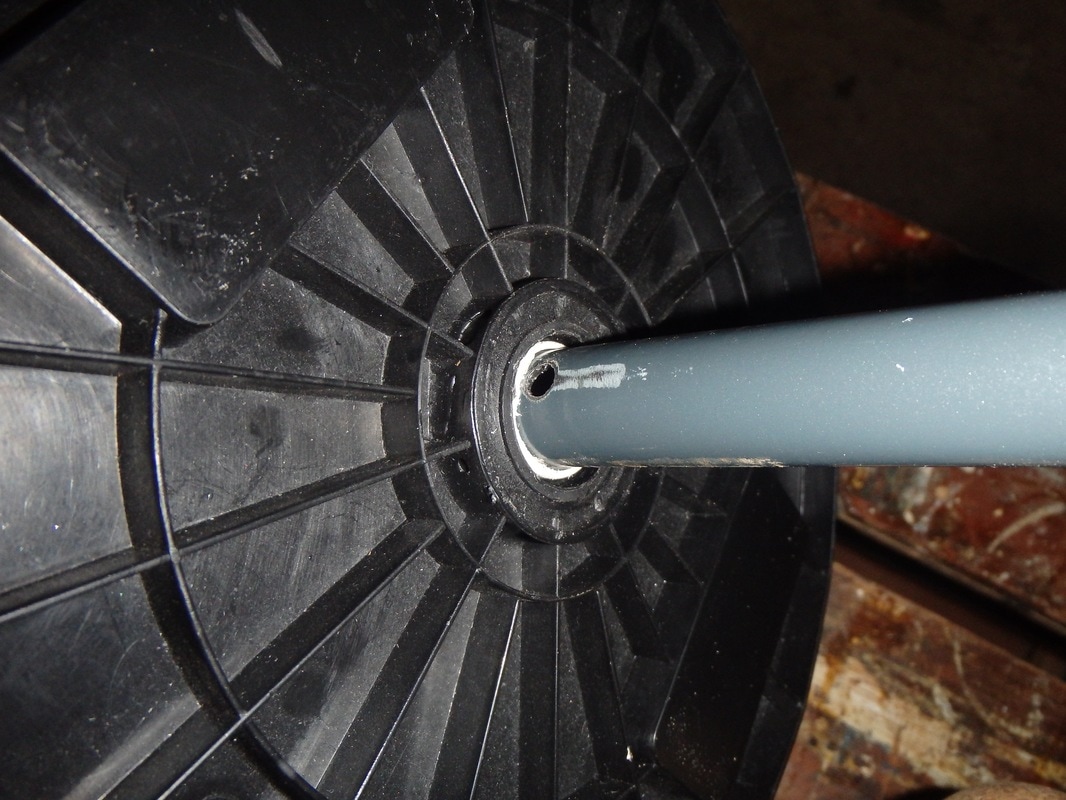
Ensure the bolt sits straight and then plunge into cold water to solidify the molten plastic surrounding the nut, thus fixing it in place. Leave for a minute and then you should be able to undo the bolt from the countersunk nut. There will probably be some excess plastic around the nut - this can be sanded or filed down for a neat finish. Repeat with the second bolt. These nuts will be used to hold the plate to the spool. 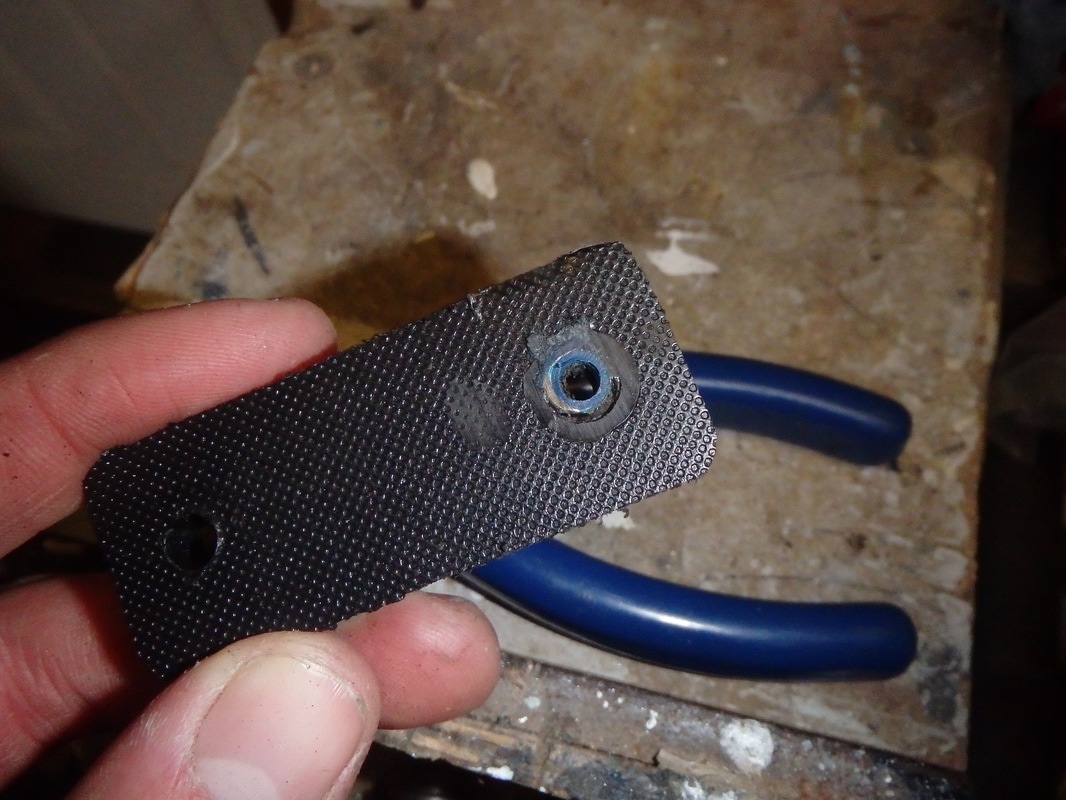 The same process is then used to countersink a 1/4"-20tpi stainless bolt in the middle of the plate - this is where the handle will bolt into. A 6mm hole was drilled in the centre and the bolt then countersunk. The cap comes off the handle to allow you to remove the bolt - don't heat up the bolt with the plastic knob still on it! 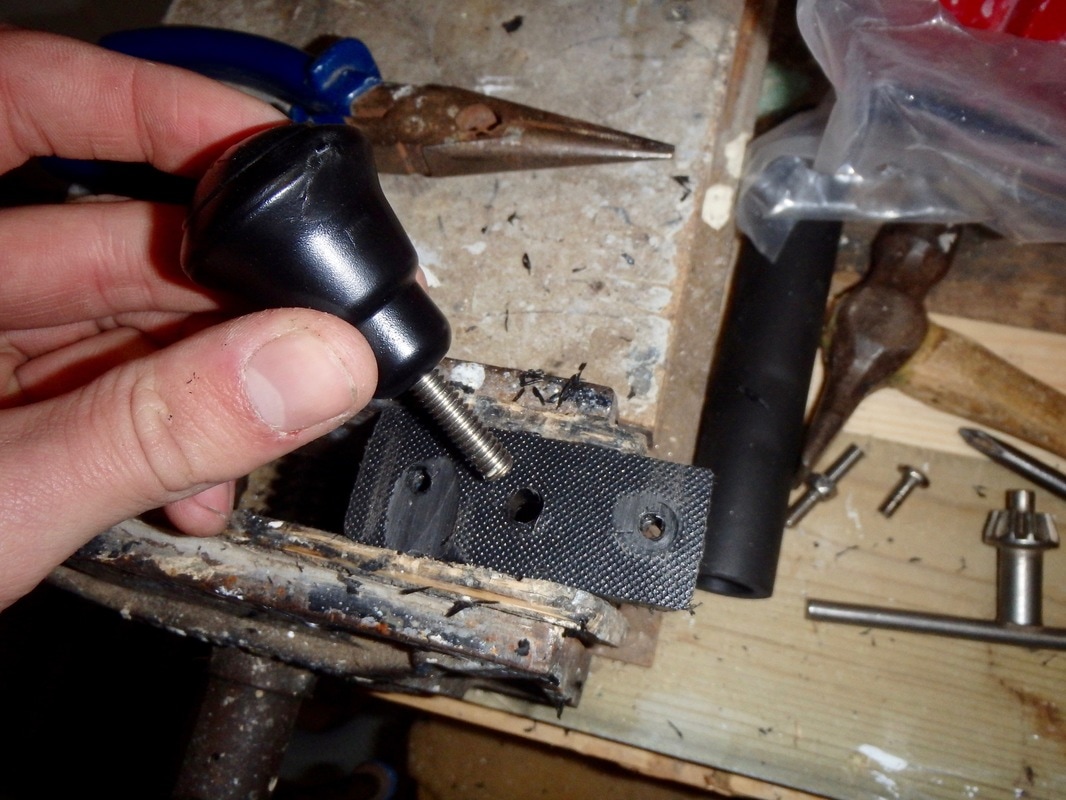 Once done, i was left with 3 countersunk nuts that the bolts could screw into. It was then a case of attaching this all to the spool. I drilled the 3 corresponding holes in the side of the spool recess.
I then bolted on the outer two M5 x 10mm to hold the plate to the spool using washers between the bolt head and the spool. The handle bolt then goes into the middle nut, using a washer between the handle and the outer spool. The handle bolt needed to be tightened just enough to allow free movement of the handle.
The M5 x 10mm bolts fitted perfectly but the handle bolt was too long and protruded past the plate into the spool. This was marked and cut down to size. The bolt was then given a dab of Loc-tite before being bolted back in place, this will reduce the chance of it coming undone during use.
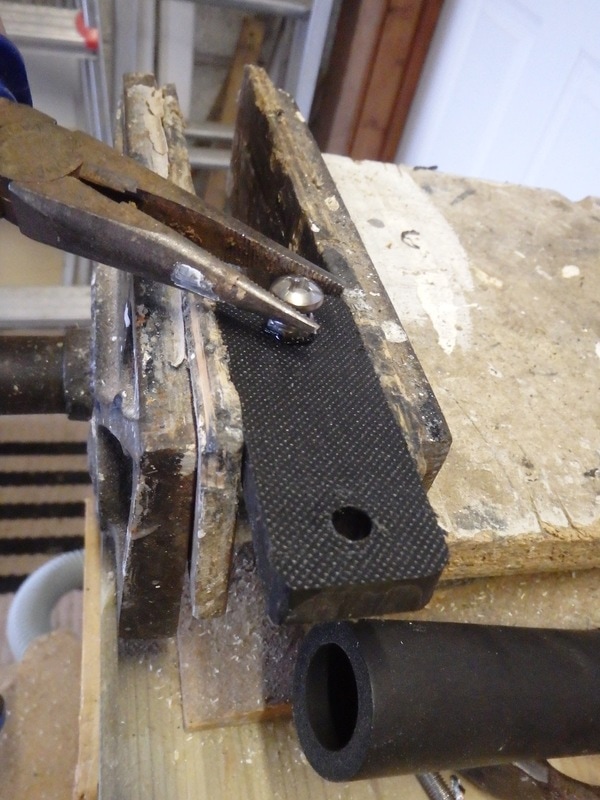
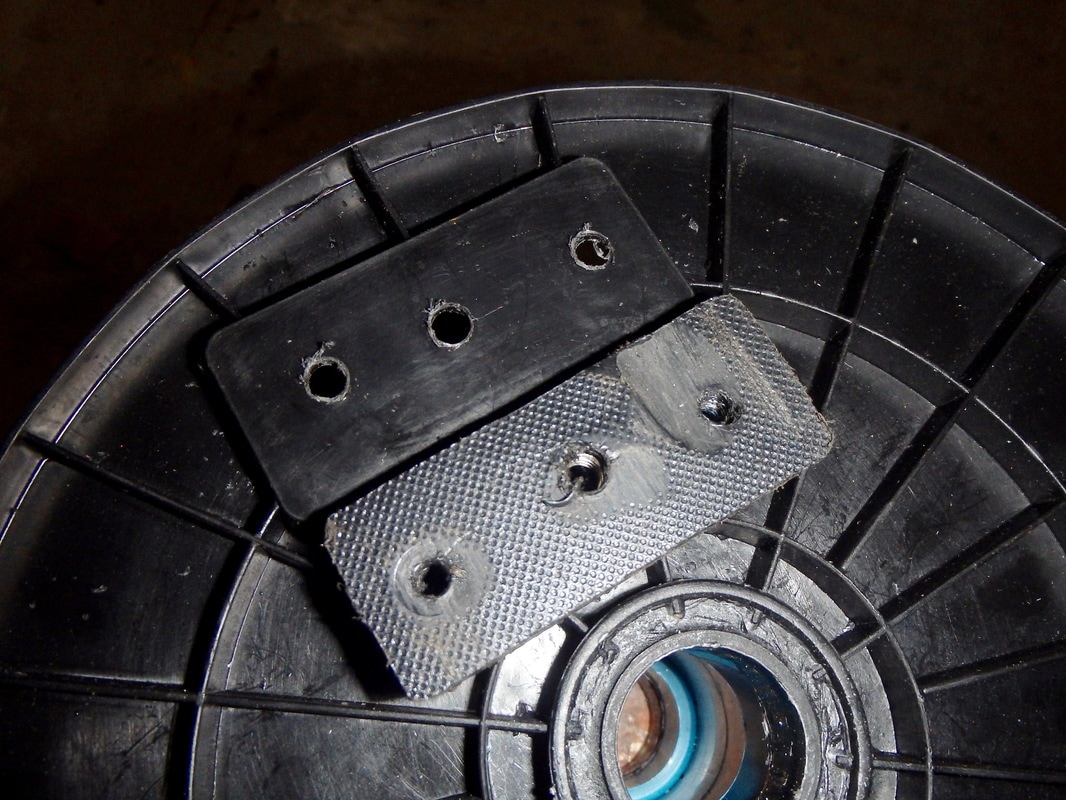
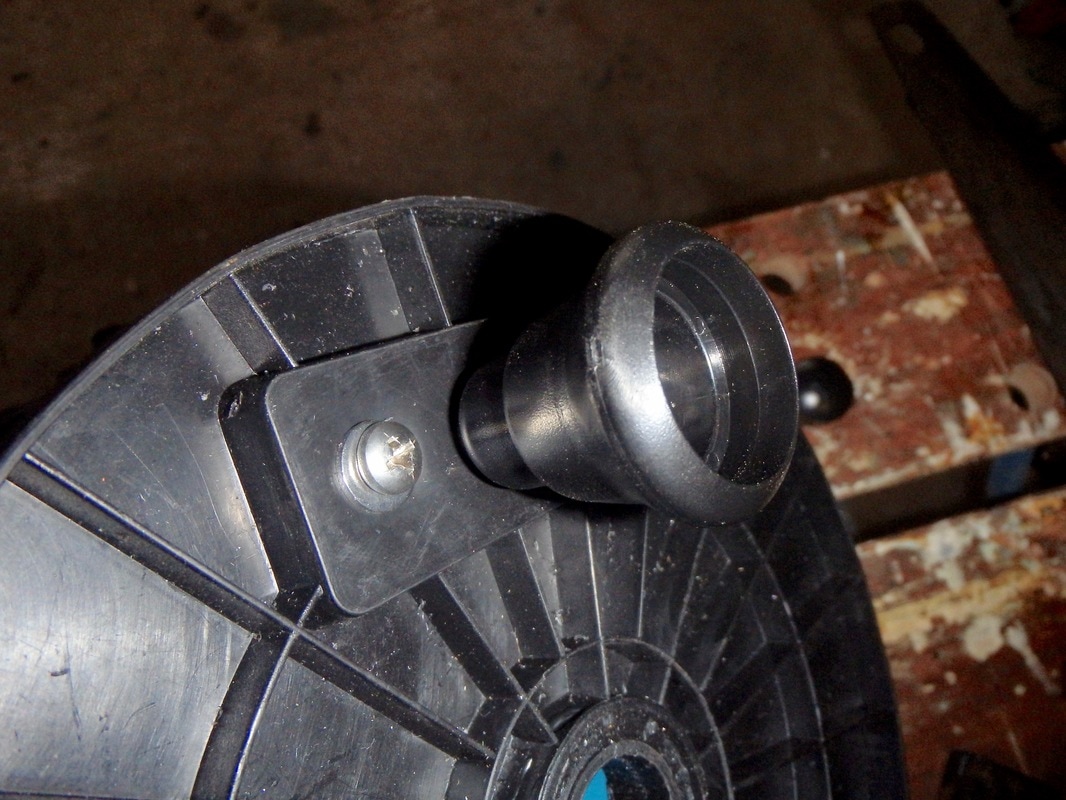
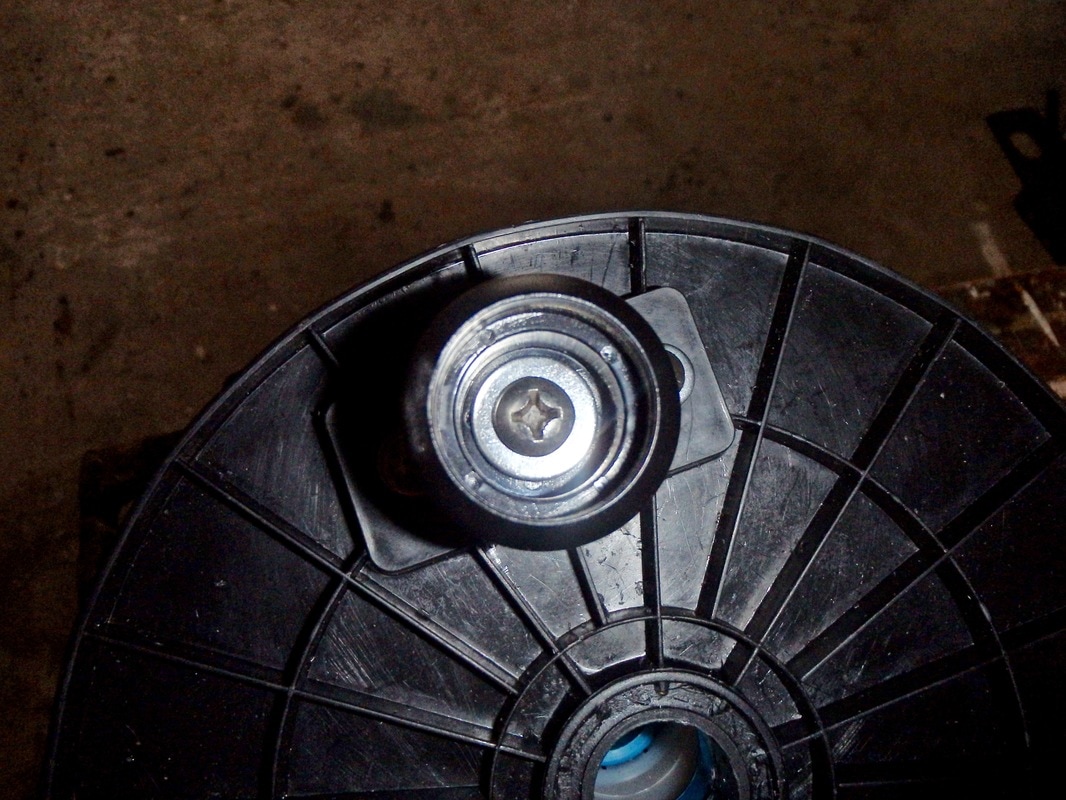
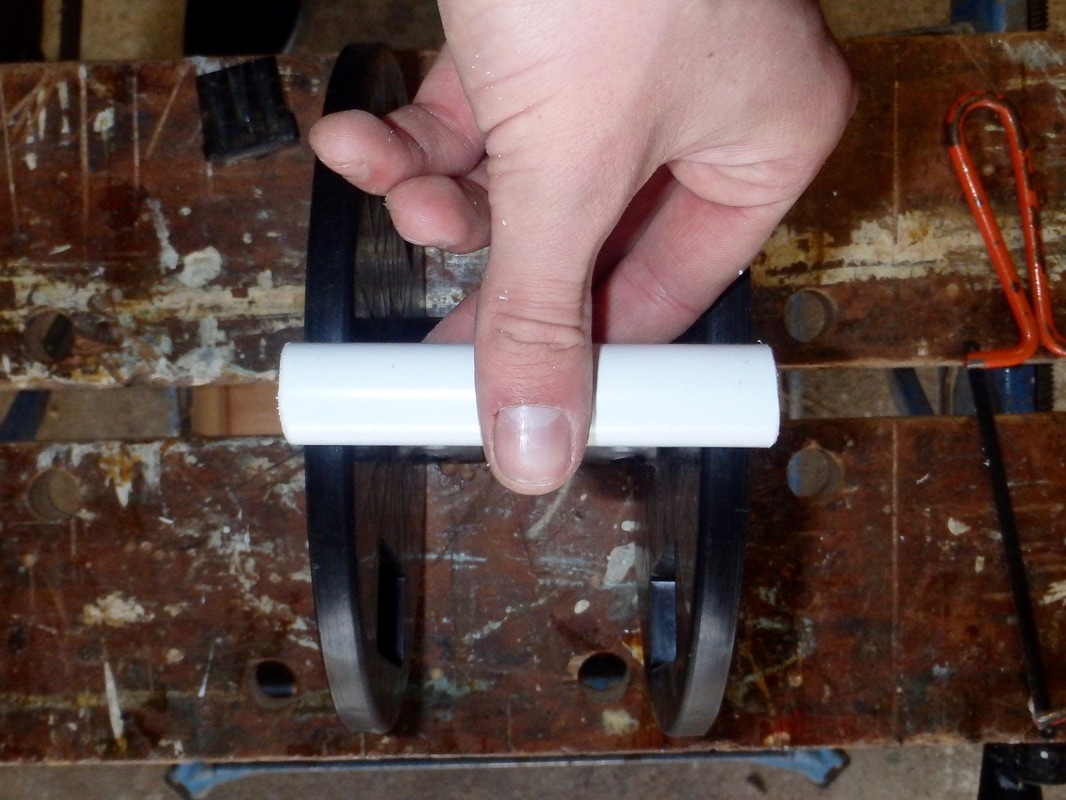
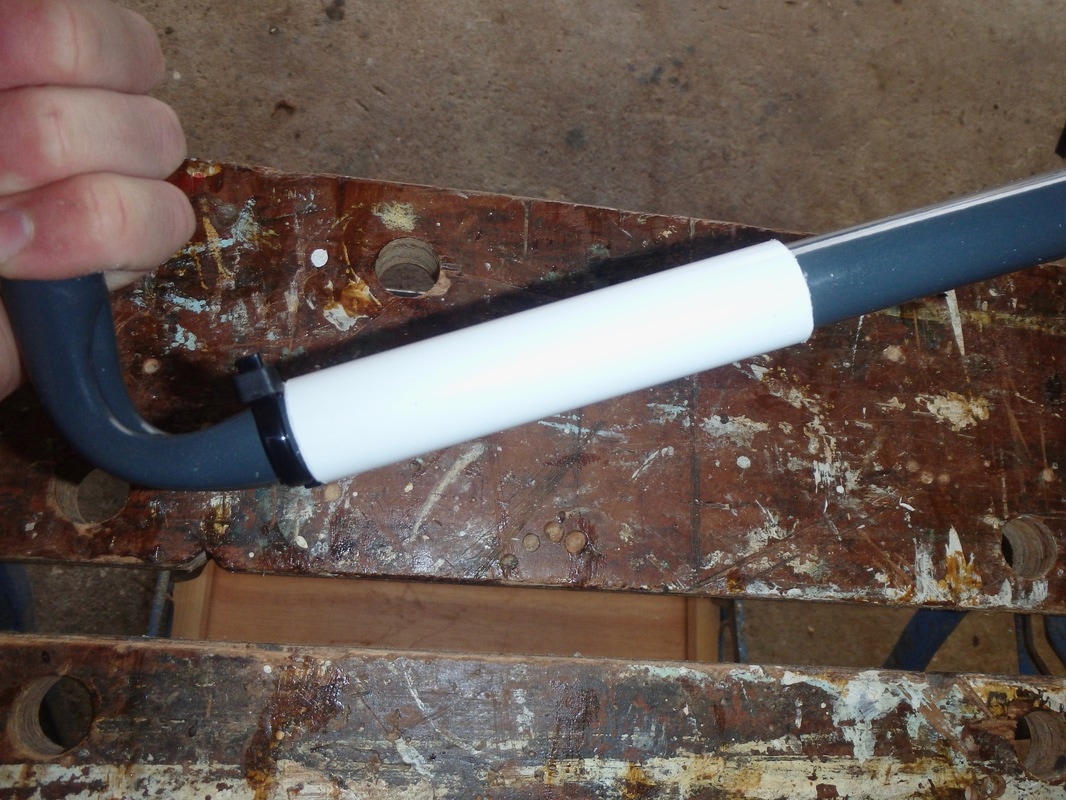
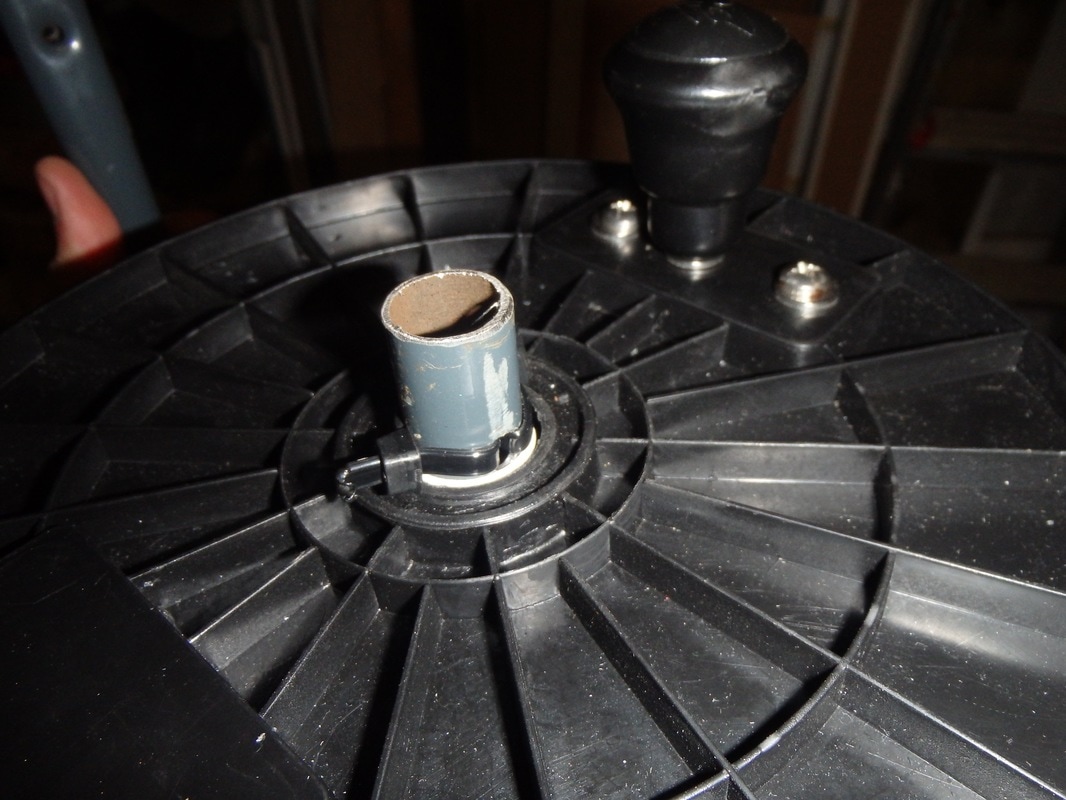
One spool with handle ready to go! 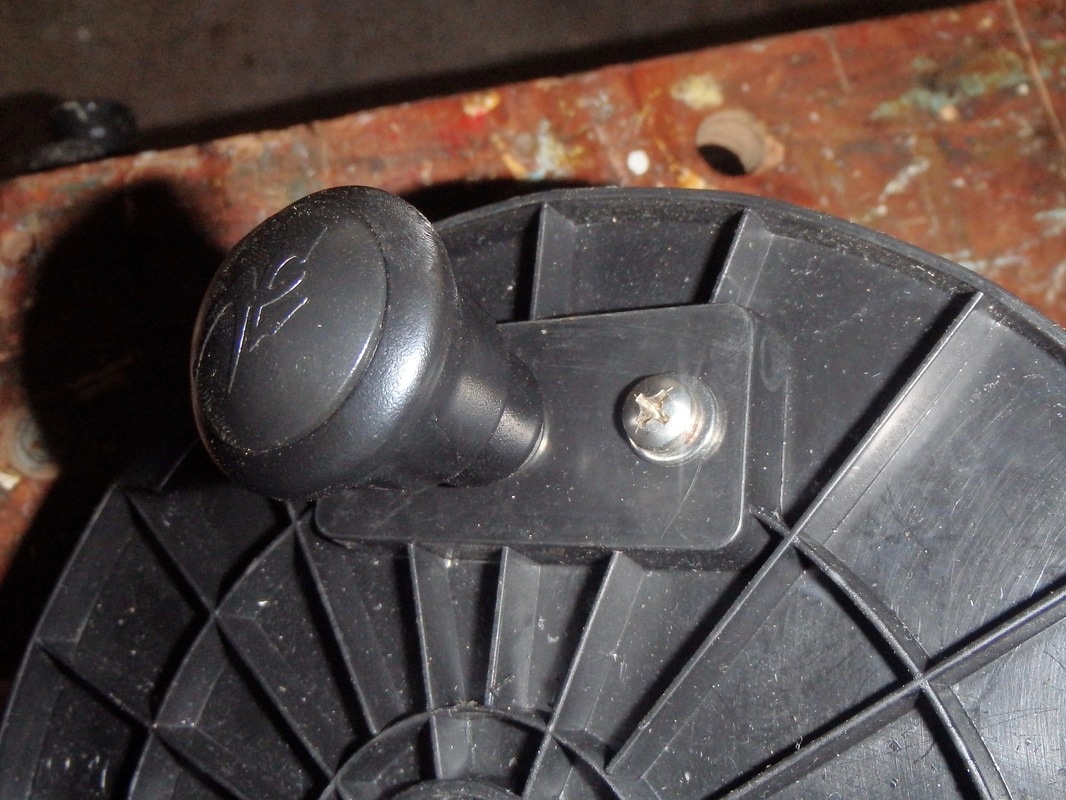 Building the FrameI came across the frame in a local hardware store. It is a bike rack storage hook made by SilverLine Tools. It is effectively a C-shape, where one side arm would hold the spool and one side arm would make the handle to hold during in use. At 210mm separation between the side arms, it would hold the spool with room to spare. It also features a soft rubber grip which would make a nice handle! It isn't made from stainless steel but it has been coated. It will succumb to the saltwater at some point but for £3.50 for a new frame, i am not too bothered! I choose this design as it would give me the option of holding it directly above the spool inline with the line tension, but also from the side if i wanted. It just needed a little bit of modifying. 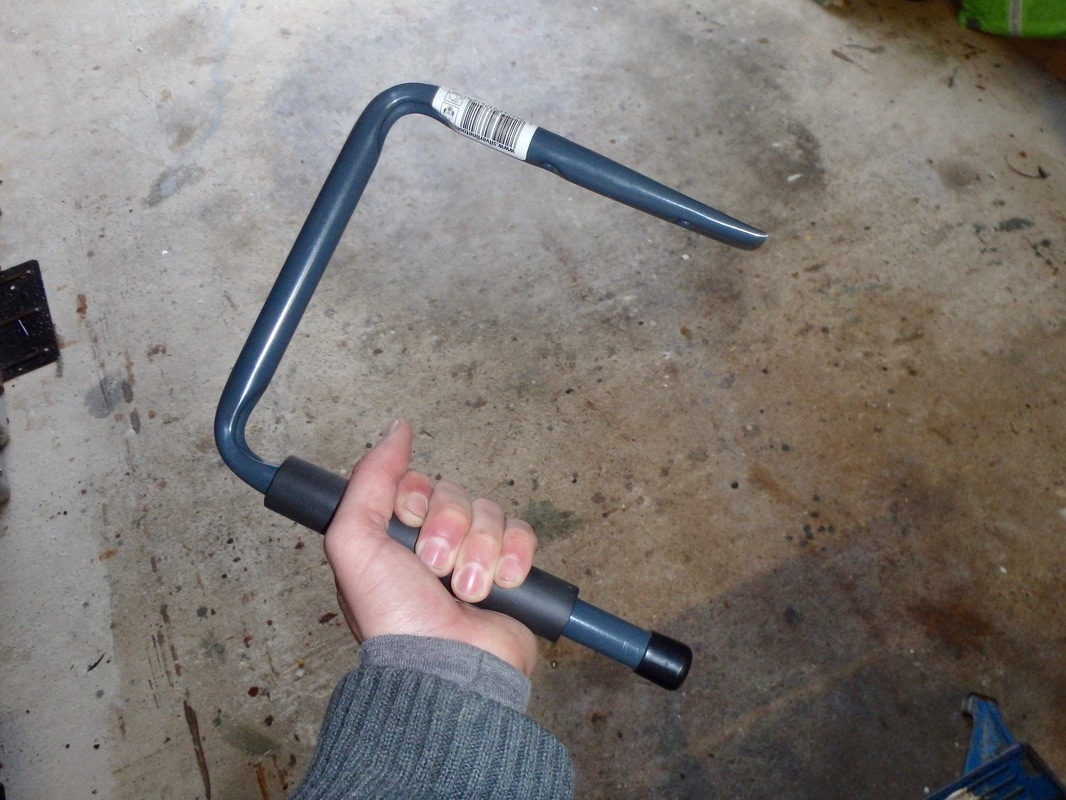 To hold the spool just away from the middle section, and keep it running straight and smooth, i would need to mount some spool keepers. I did this by drilling a 6mm hole through the frame just back from the bend. This was done on the part where the grip was located, as it was more tubular than the other section. The grip was easy enough to pull off the frame. 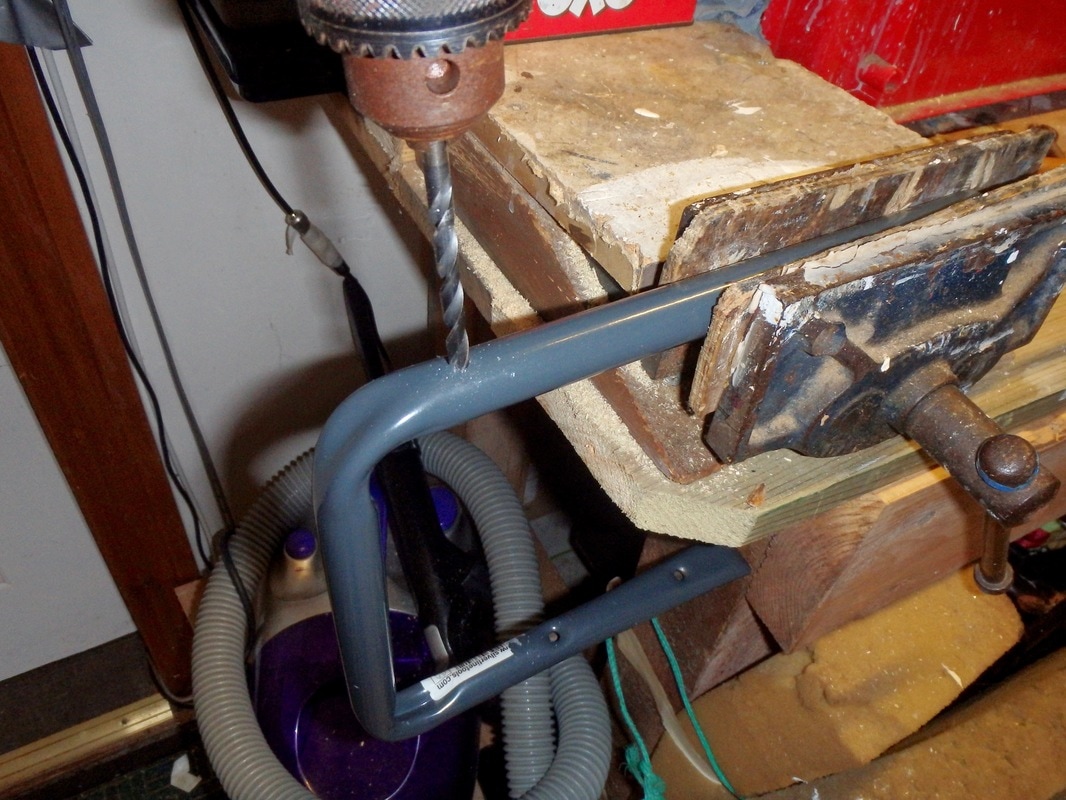 A spool keeper was then made by passing a couple of cable ties through the hole and fastening them down. A dab of superglue on each one will prevent the possibility of slippage. 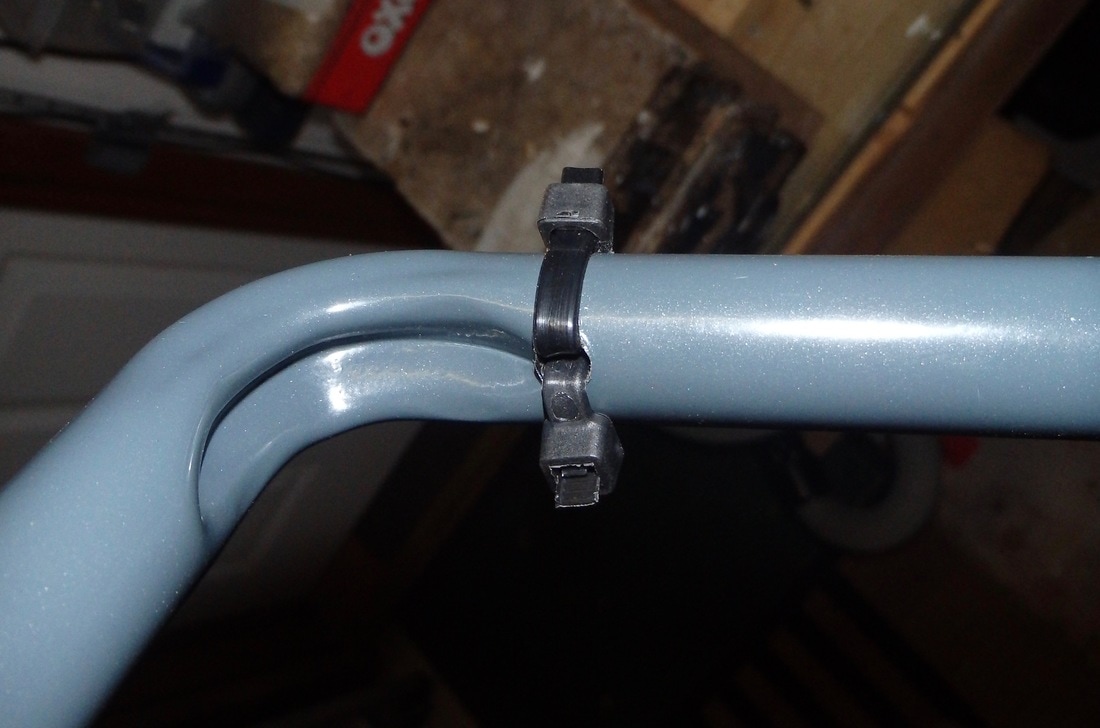 The diameter of the hole in the spool was about 5mm larger than the diameter of the frame. To reduce this difference for straighter and smoother winding, i used a short section of plastic piping (approx. 20mm diameter), cut to the width of the spool, to go between the spool and frame as a spacer.
The spool was then put in place and the positioned marked where the second spool keeper would be needed. The hole was drilled and cables put in place. The frame was also cut down to size before everything was put in place.
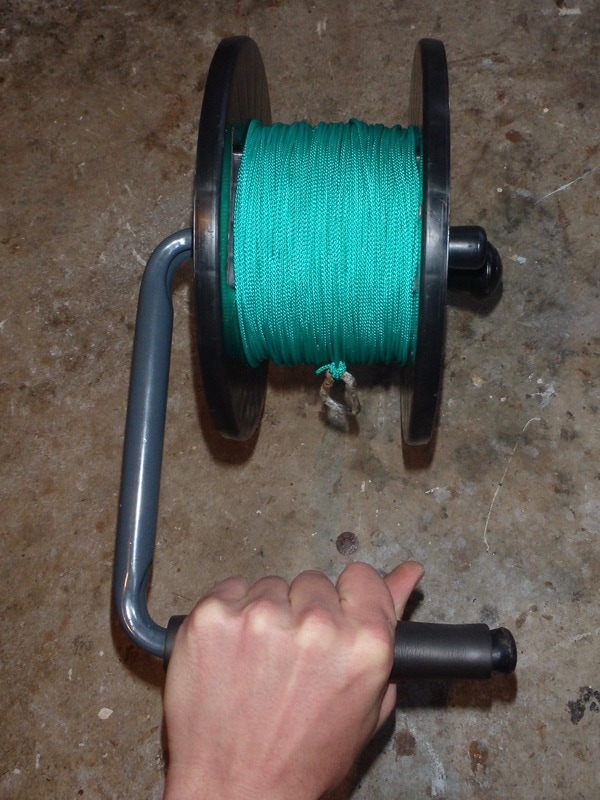
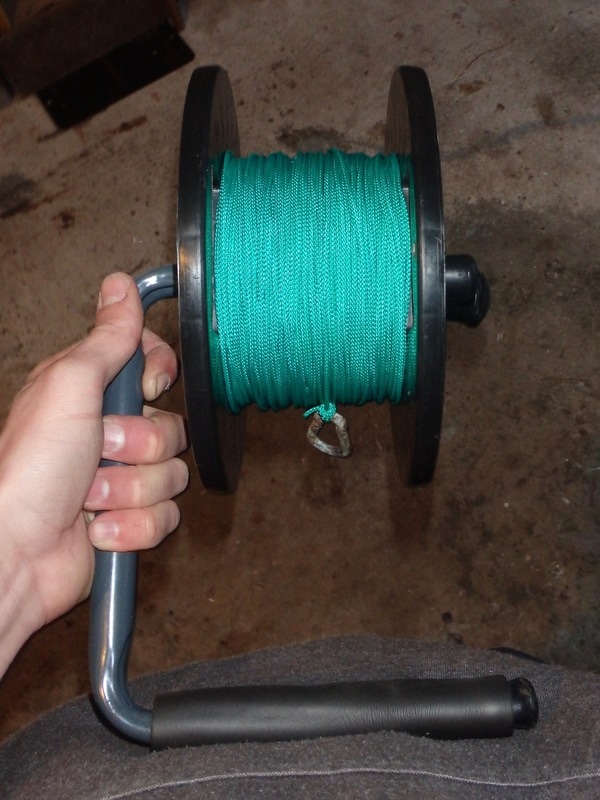
The frame came with a plastic end cap so this was placed on the end to neaten things up. I also smeared some Marine Goop over the holes where the cable ties are to help slow down any corrosion of the exposed metal. 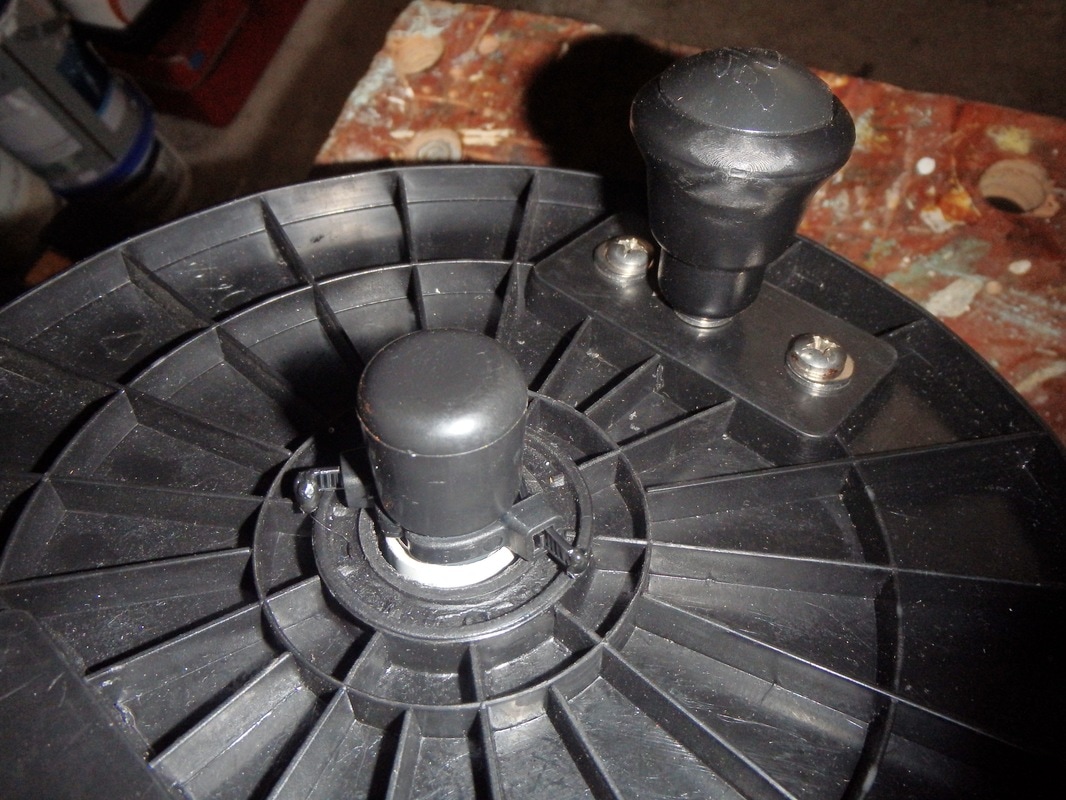 The other side arm was also cut to size, the grip put back on and another end cap fitted to the end. The anchor reel was now complete. The Finished Spool and Frame Assembly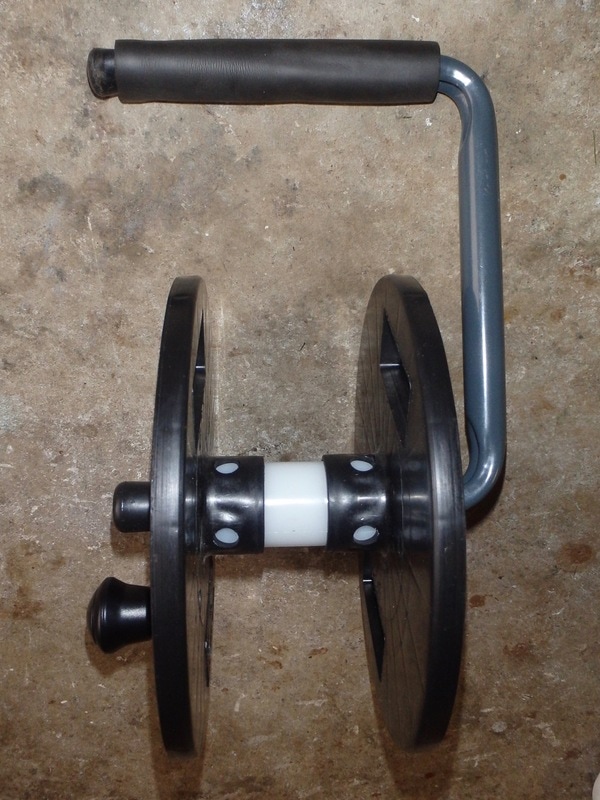 Finishing TouchesTime to put on the anchor line. For this i use 2mm polypropylene cord. I put on 100m and the spool could hold another 150-200m if needed, which may be required when i deep water anchor. A karabiner is then tied to the end to clip onto the anchor or anchor chain. This frame design should allow for easier retrieval of the anchor line when winding under tension directly down onto the anchor. It can be held above the spool inline with the line tension, or at the side. When held at the side the frame can be put against the body to provide support. This way is much easier to retrieve line when the line is under tension, the frame against the body allows you to crank the reel down without the frame wanting to twist or move.
As a finishing touch i have drilled a hole on the outer edge of the spool to clip the karabiner onto when the reel is not in use. 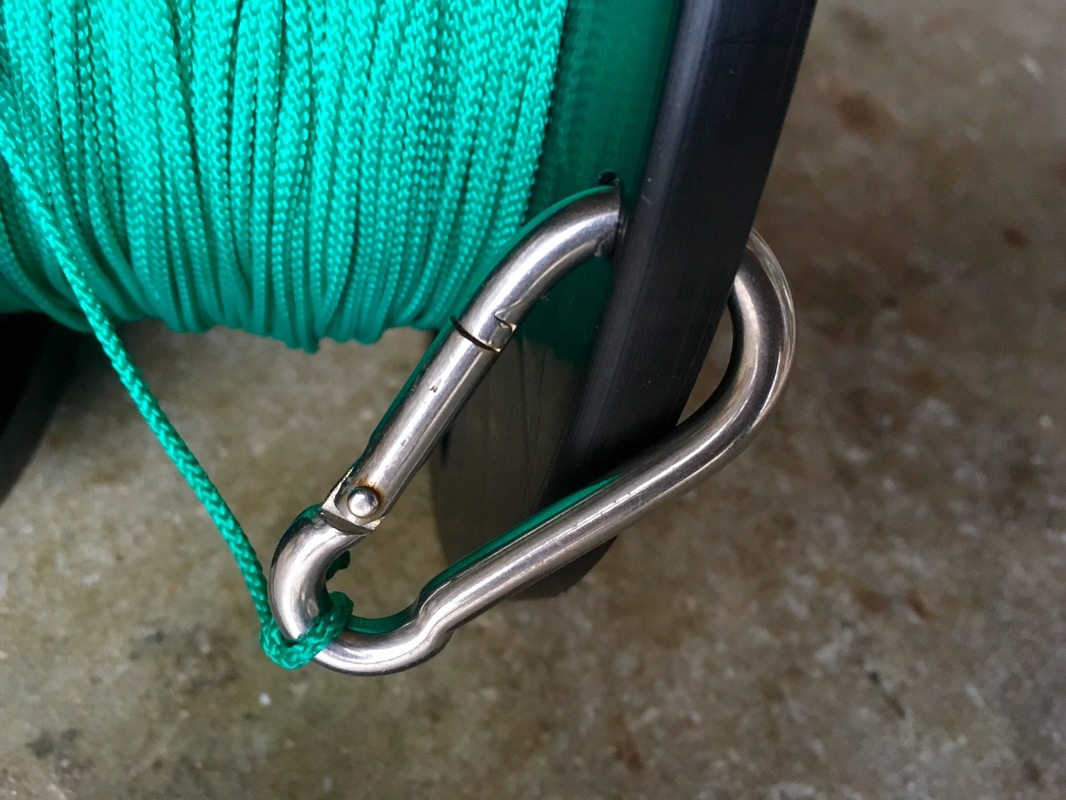 I also drilled a hole in the corner of the frame. This holds a karabiner which i can use to clip the reel to the kayak when in use, or to my tank well bungees or crate when paddling. 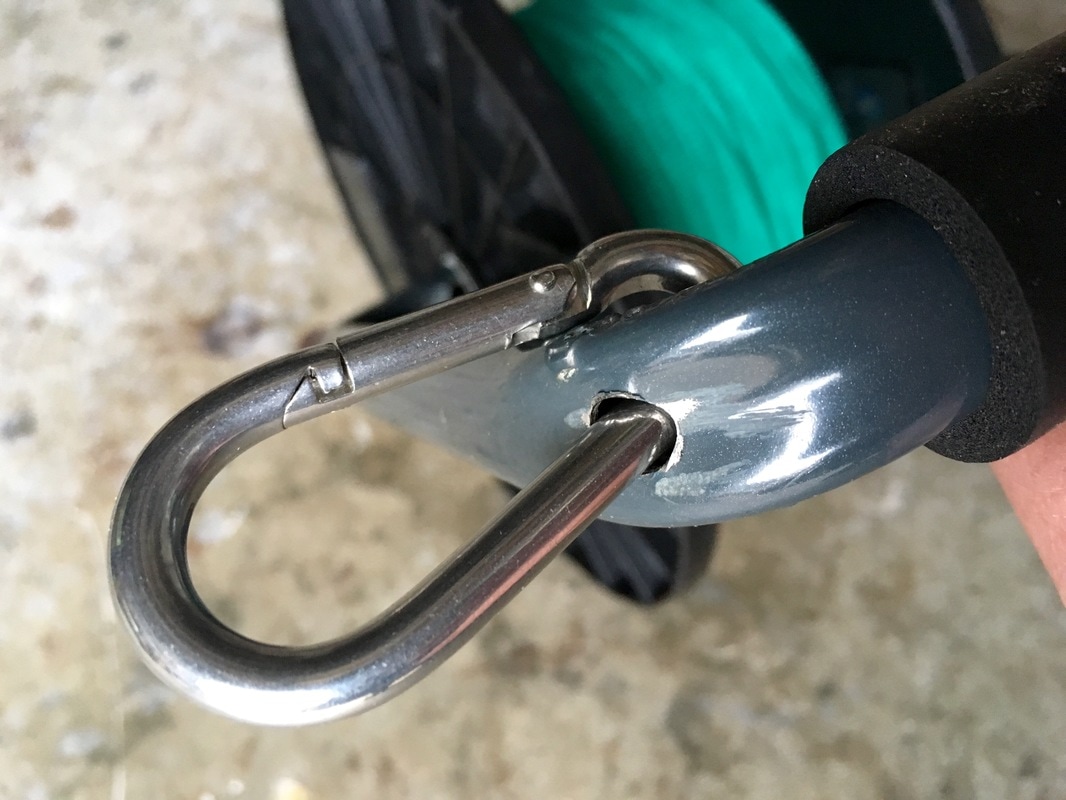 The Finished Anchor Reel Not bad for a couple of hours work on a rainy Sunday afternoon. Including the anchor line, the total cost of the components was around £30. In Use Testing....Coming Soon.... Just need the wild weather to calm down!
Gary Symons
2/2/2017 10:02:02
Liam.
Cornish Kayak Angler
2/2/2017 19:30:58
Thanks Gary, i'm glad the diagrams were of help! With the quick-release method, around 5m of 8mm floating polypropylene line is about right. That should allow for the buoy to sit up to approx. 3m off the stern of the kayak if needed. The quick-release method with the buoy is a great way to get to grips with anchoring a kayak, as it is very easy to just release if you feel uncomfortable at any point. More experienced kayak anglers tend to simplify the whole system once well practiced at anchoring. It all comes with experience and practice in a range of conditions but for those new to anchoring, stick with the buoy method.
Carl Witmer
7/3/2017 13:24:24
Hi , how do you keep more anchor line from coming off when in use?
Cornish Kayak Angler
7/3/2017 19:09:00
Hi Carl,
santiago laborde
8/9/2017 12:12:54
muy bueno
chris painter
3/10/2019 20:03:31
Hey Liam, with the quick release method, how do you stop line from just spooling off? The Beaver dive reel has an auto locking catch, but yours doesn't appear to have anything to stop it spooling off. Or do you only use your set up with non quick release?
Cornish Kayak Angler
3/10/2019 20:12:01
Hi Chris,
James
28/3/2021 23:23:27
Is there a way of having some kind of variable length anchor line that can be used in conjunction with a trolley to anchor at various depths and control your positioning?
ken mason
15/3/2022 23:59:25
I use an automatic retrieval washing line thingy which i just bolt to my crate.. Comments are closed.
|
AuthorLiam Faisey 
My Tackle Shop
SPONSORS
Proudly associated with

Cornwall's only specialist kayak fishing shop
Archives
March 2023
Categories
All
Add my blog to your feed reader by clicking the button below
Get blog updates via email
Kayak Fishing Videos
Custom feed reader powered by FeedWind
Useful Links
Anglers Afloat
Cornish Shore & Kayak Fisherman Cornwall Canoes Palm Equipment Penzance Kayak Fishing Meet Info Saltwater Kayak Fisherman Magic Seaweed XC Weather 
|


 RSS Feed


|
|
Website powered by pasties and the hope of good weather!
© 2023 Liam Faisey
© 2023 Liam Faisey