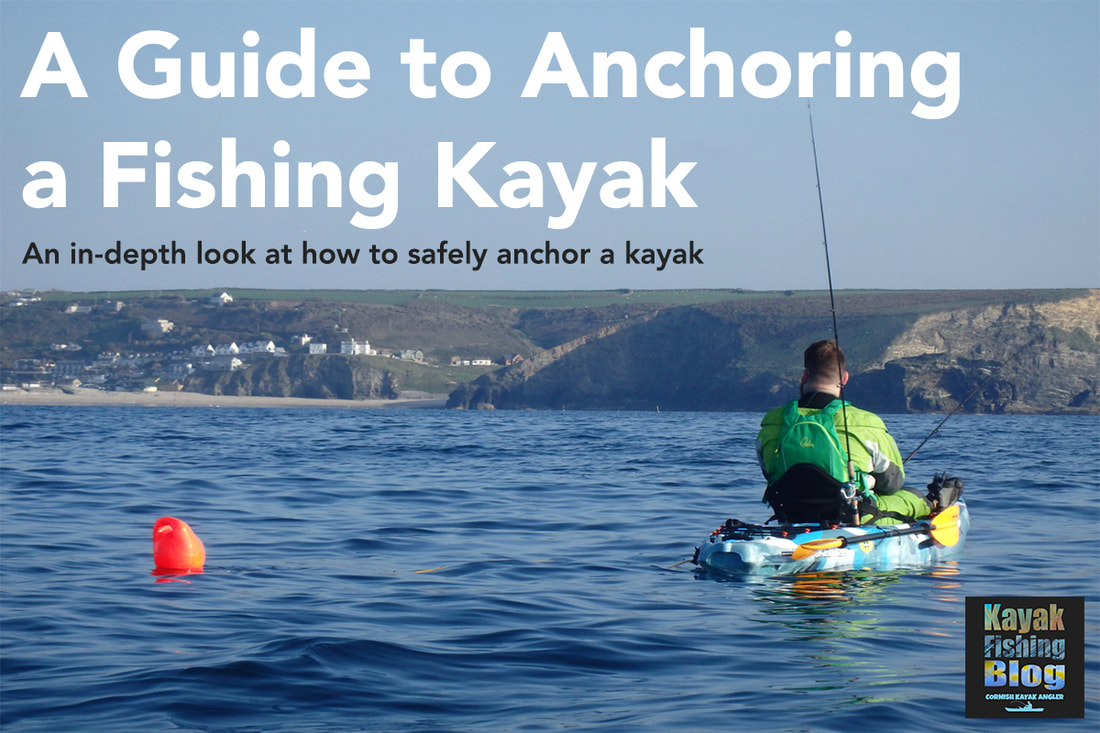
How to Anchor A Fishing KayakLet's jump straight to the point... anchoring a kayak is one of the most dangerous tasks to perform on a kayak. There is lots of potential for things to go wrong. Executed poorly and you could end up capsizing your kayak and this can lead to a whole other world of problems and possibly a rescue scenario, especially if you drift away from your anchored craft and cannot swim back to it. The risks involved when anchoring a kayak are very much related to the conditions at the time - anchoring in a big swell, or fast tide presents a higher risk than say dropping anchor on a flat calm lake. Nevertheless, the principles of safe kayak anchoring apply universally. Anchoring a kayak is not quite as simple as chucking an anchor down on a piece of rope and tying it off on your kayak. With a little thought and a few pieces of equipment you can greatly reduce the chance of a problem occurring and prevention is always better than cure! In many cases, the need to anchor arises from there being some form of current, tidal flow or wind (with associated choppy waves) that would otherwise cause you to drift. In order for a kayak to remain stable whilst at anchor, the hull will need to sit inline with the prevailing conditions. A kayak is by far more stable along its length rather than across it's beam - lean backwards and forwards violently on your kayak and you are unlikely to tip over... do the same side to side and you are much more likely to flip! With this in mind, you will need to cause your kayak to swing down-tide / down-wind / down-flow and this is best achieved by anchoring off the very bow, or more commonly, the very stern of your kayak.... easy! Well.... not quite. Tying off an anchor line to the bow or stern of your kayak is not an easy task when you are confined to the seat on your craft. Luckily there is a system that can be installed to your kayak to allow you to set your anchor line at the bow or stern of your kayak so that you can fish safely at anchor, all from the comfort of your seat - The Anchor Trolley. 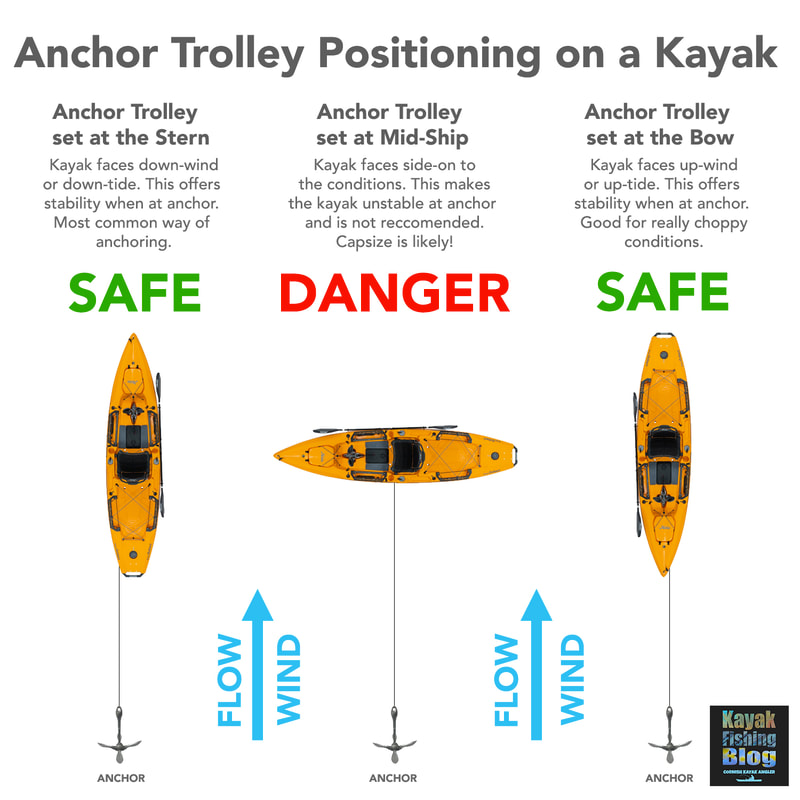 The Anchor Trolley SystemA Kayak Anchor Trolley, also known as a Running Rig, is pretty much essential for safe anchoring from a kayak. In basic terms, an anchor trolley is a loop of cord running between two pulleys situated at either end of the kayak. The loop is joined with a ring or karabiner through which you pass your anchor line. The trolley can then be shuttled from bow to stern easily from your seating position.
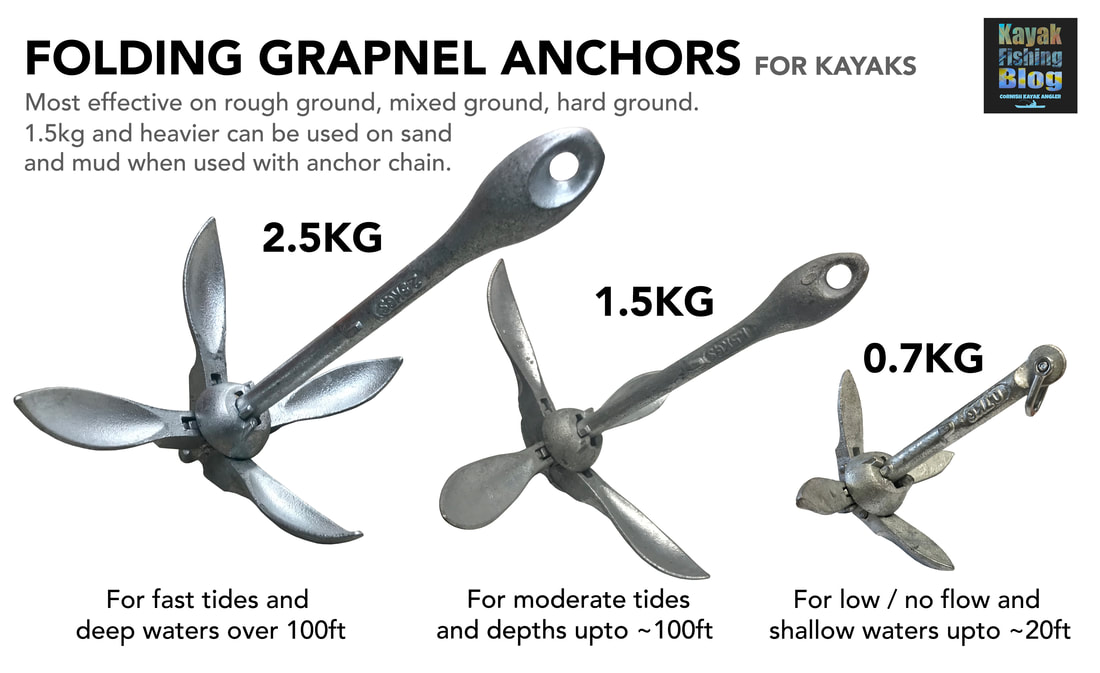
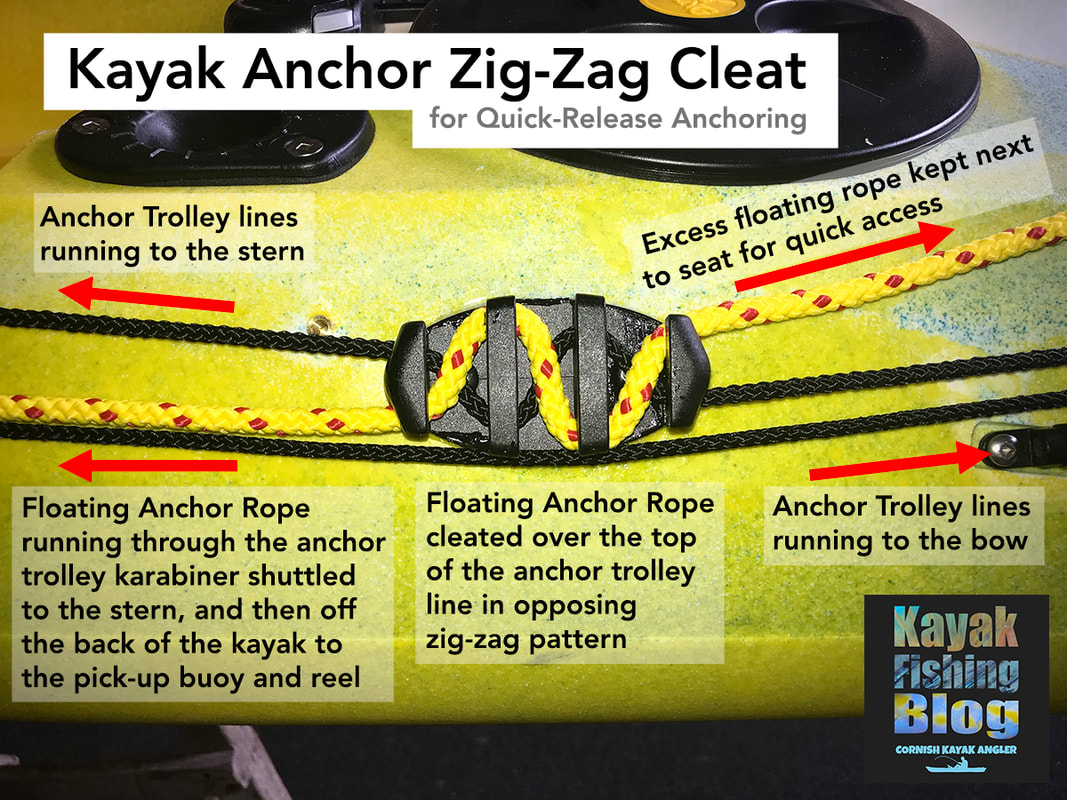
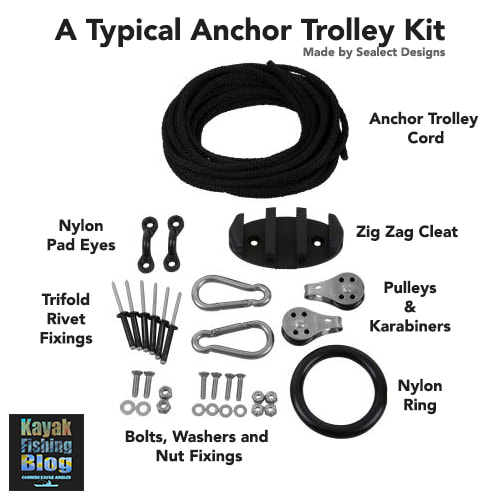
Anchor Trolley Components An anchor trolley kit will typically include: two pad eye fixtures to attach at either end of the kayak, two pulleys often with short lengths of bungee cord, or sometimes karabiners, to attach them to the pad eyes, a length of cord to run between the pulleys and a karabiner or ring to join the two ends of the cord. You then simply pass your anchoring line through the karabiner/ring at the seating position and shuttle it to the bow or stern between the pulleys. The bungee cord between the pad eyes and pulleys acts as a buffer against the kayak jolting the anchor line, and also helps keep the anchor trolley taut against the kayak. On my own anchor trolley I also use a couple of parrel buffer beads and have incorporated two stainless rings either side of the karabiner to allow me to break the trolley loop, forming a towing rope from the anchor trolley cord, adding versatility to the system. I clip the stern pulley directly to the pad eye using a karabiner to allow the point of anchoring to be as close to the back of the kayak as possible - this will help it sit better in a straight line in the tide. Click the following links to see full details of my anchor trolley on my Hobie Outback and Hobie Revolution 16. Anchor Trolley Cleat Some kits will also include a cleat to attach to the kayak near the seating position. This will allow you to ‘lock’ the anchor trolley cord into the desired position so that it doesn’t shift whilst at anchor. I recommend using a Sealect Zig-Zag cleat as the one cleat can be used to lock off both the anchor trolley and anchoring line. 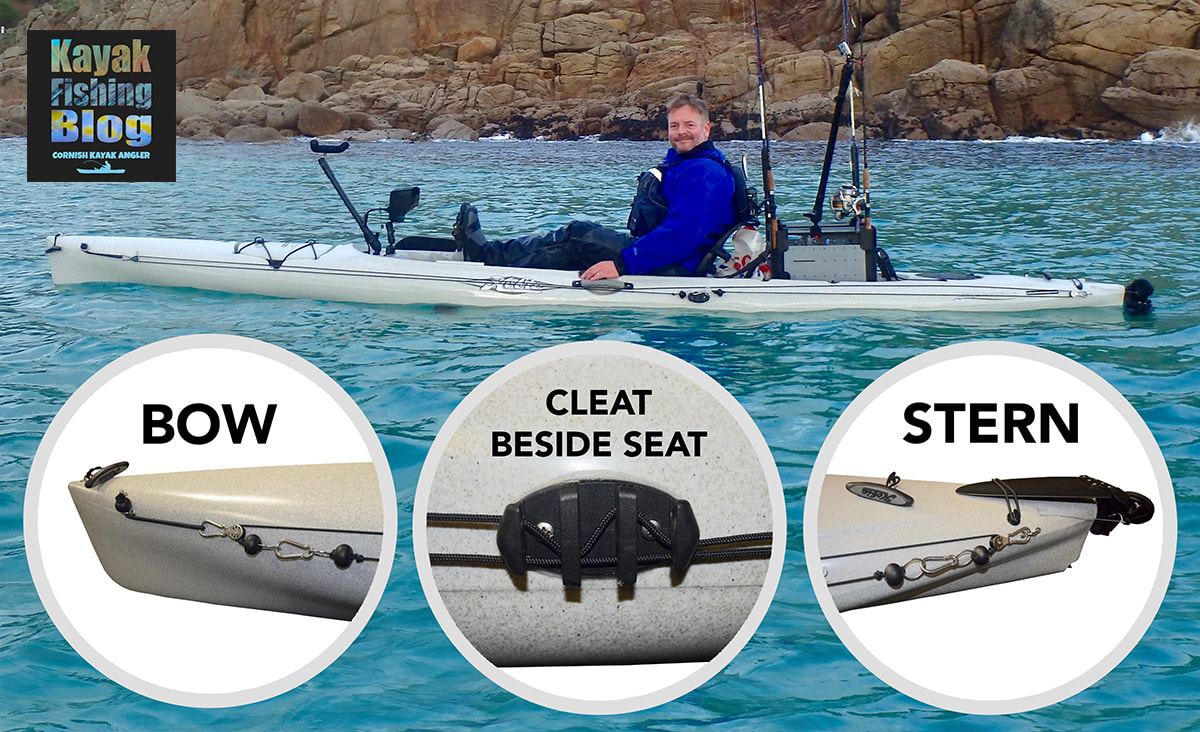 The anchor trolley system installed to my Hobie Revolution 16 fishing kayak Fixings and Fixtures for Anchor Trolley Systems Ideally use marine-grade 316/A4 stainless steel bolts, washers and nyloc nuts for attaching anchor trolley fittings. If you cannot gain access to the back of the area where the fixing will be, use Trifold Pop Rivets which offer a strong alternative and are excellent for use on plastic or composite kayaks for fitting load-bearing accessories. Use a dab of sealant when installing fixtures to your kayak, for a good waterproof fit. Well Nut fittings can also be used if installed correctly, but are not as strong as bolts or rivets. Avoid self tapping screws on an anchor trolley system as they can be ripped from the hull if subject to high loads. Types of Anchors For KayaksThere are a vast range of anchors types available. Some are a specific shape to hold well on a particular type of ground, others are more general and do an ok job on all types of ground. There are two types of anchor that will cover just about all saltwater kayak fishing scenarios - the Folding Grapnel Anchor and the Bruce Anchor. For freshwater fishing, most shallow-water scenarios can be covered with either a Mud Anchor or a Stake-Out Pole. Folding Grapnel Anchors The most common style of anchor for kayak fishing. This is your typical shape anchor with four folding flukes and a sliding collar to lock them in position either opened or closed. This type of anchor is great for most grounds and will grab very well to rough and hard ground. It will also work ok on sand and mud if used with a length of chain (covered further down in this article). Folding grapnels are compact once folded and easy to store on a kayak. You can get various weight grapnel anchors and 3 weights will cover almost all kayak fishing scenarios:
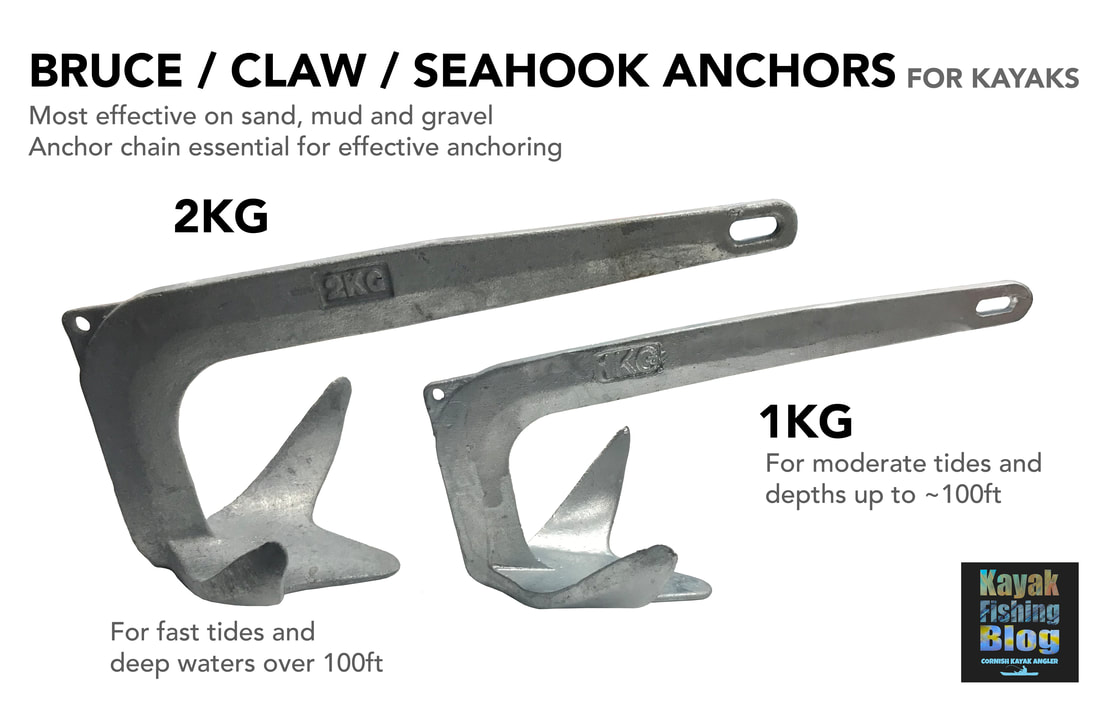
 Bruce / Claw / Seahook Anchors These anchors are designed for use on soft sediments such as sand, mud and gravel. They have fixed shovel style flukes, usually 3, that dig into soft ground particularly well. You can get various weight bruce anchors and 2 weights will cover almost all kayak fishing scenarios:
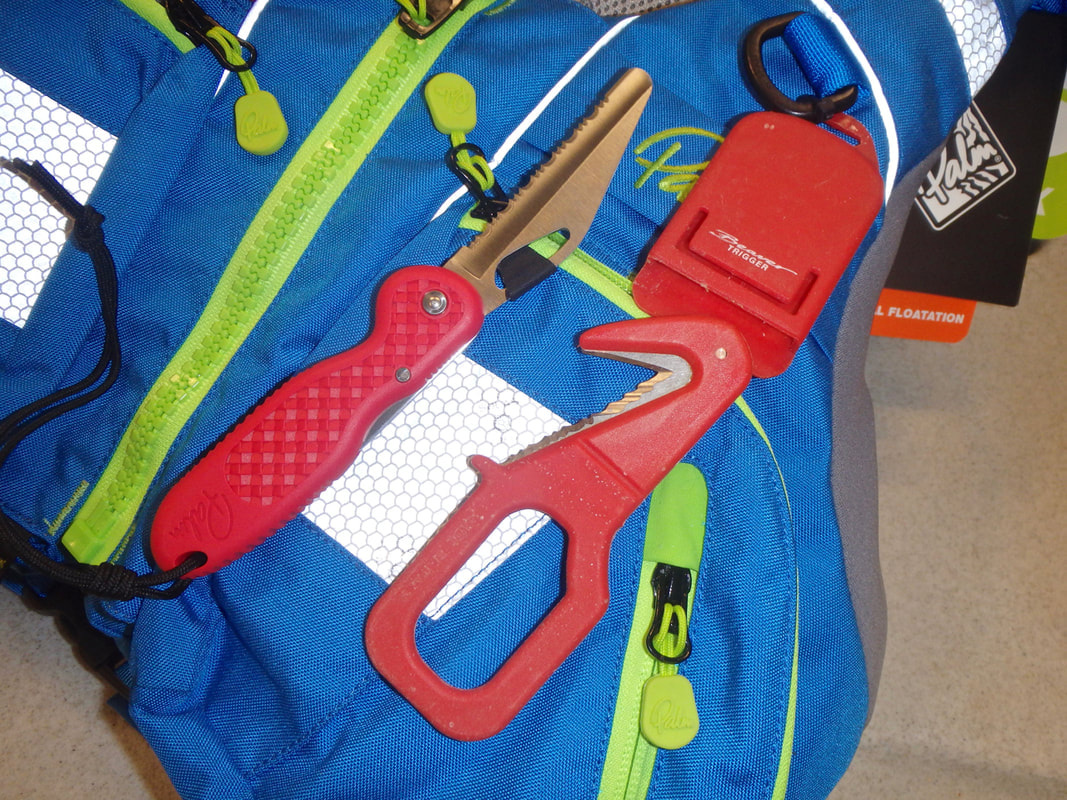
 Mud Anchors Popular with still-water and freshwater anglers, these are essentially heavy weights that are heavy enough sink into soft mud often found on lake beds, ponds, canals and reservoirs. In calm conditions, their weight alone is enough to hold a kayak steady on harder ground. They can also be used in shallow saltwater in areas of low flow and are particularly useful over very rough ground as they don't often snag. You can buy mud anchors and popular types are Mushroom Anchors (3.6kg / 8lb weight works well for kayaks) and Pyramid Anchors. Many people make their own mud anchors. A small house brick with a hole drilled through the middle to attach a loop of cord works fine - onto this you can attach your anchor cord. You can also fill a small flowerpot with concrete, and allowing it to set with a metal ring or shackle poking out the top to attach your anchor line too. 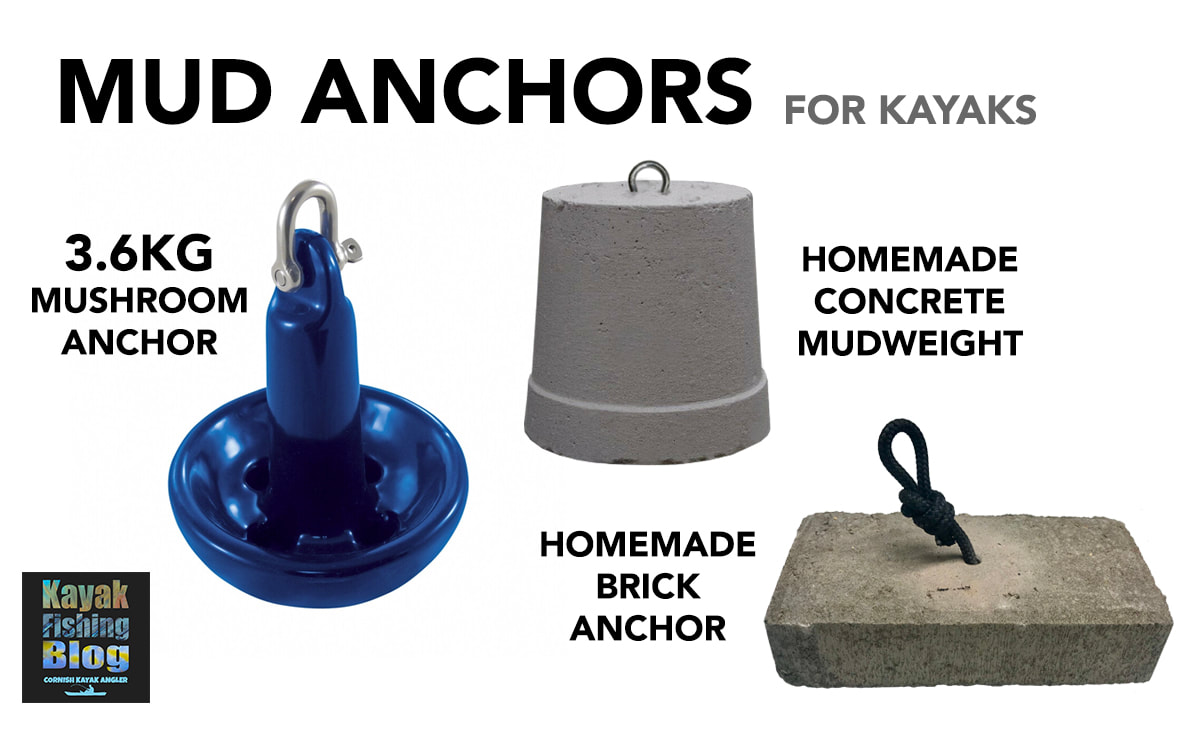 Stake-Out Poles On shallow flat-waters it is possible to use a stake-out pole to anchor a kayak. This is a long pole, made usually from fibreglass, that literally sticks into the bottom to hold the kayak still. This only works on calm waters with soft sediment bottoms that the pole can stick down into. Most stake-out poles are less than 12ft in length so you can only realistically use these in depths of up to 12ft. Stake-Out Poles are therefore useful for shallow lakes or lake margins, canals, back waters, skinny waters and other shallow areas. They are quick and easy to deploy - just push the pole down firmly into the bottom sediment and then tie off to the pole via your anchor trolley. You can also just stick the pole down through a scupper hole too. A popular Stake-Out Pole is the Yak Attack Park-N-Pole which is available in standard 6ft or 8ft options, or opt for the Park-N-Pole Link which allows you to add additional 4ft sections to extend the length of the pole. For those regularly fishing the shallows then the Power-Pole Micro Anchor offers the best anchoring option - this is a stake-out pole that features a motor to raise and lower the pole all at the push of a button! 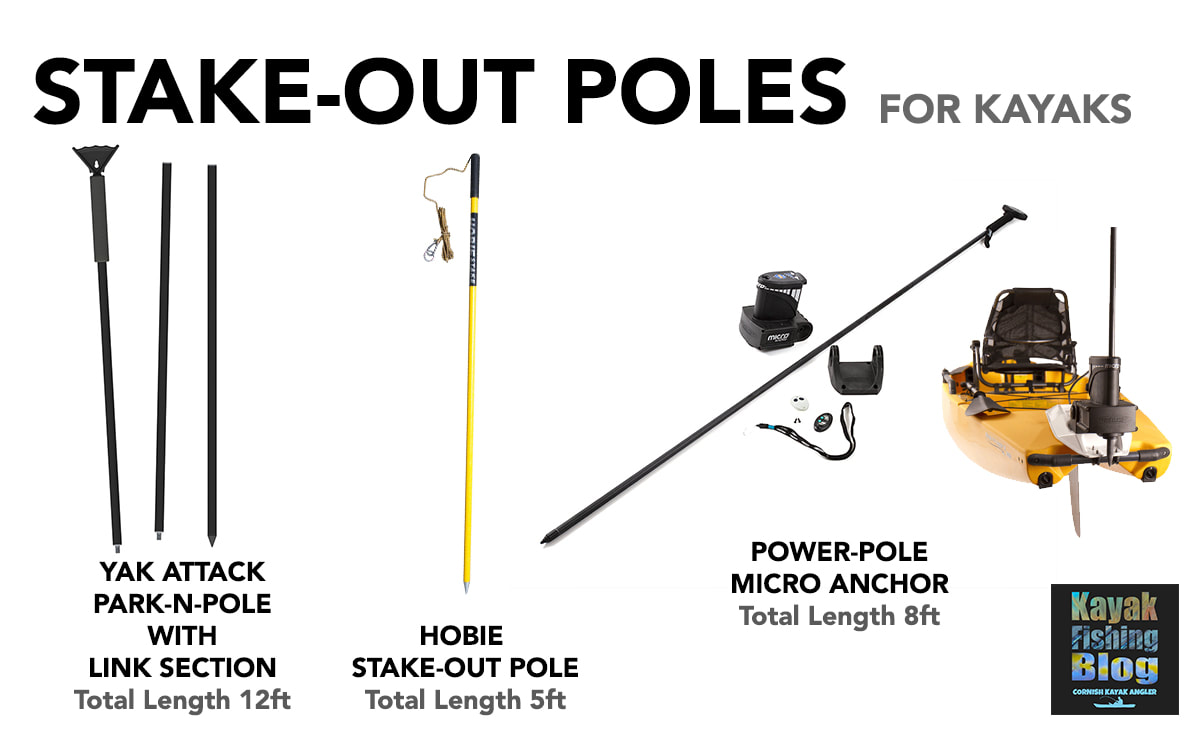 Anchor Chain For KayaksYou can greatly improve the holding power of your anchor by adding a length of chain above the anchor. The chain will not only add extra weight to the anchor to keep it pinned down to the bottom but it will also help buffer against the movement of the kayak against the anchor - this will reduce the chance of it slipping it's hold especially in choppy waters. Using chain is alsmot essential with folding grapnel anchors and bruce anchors, but are not needed with mud anchors for still-water fishing. Use 6mm short link galvanised chain for your anchor- this chain offers plenty of weight (around 0.7kg per meter) for it's length. 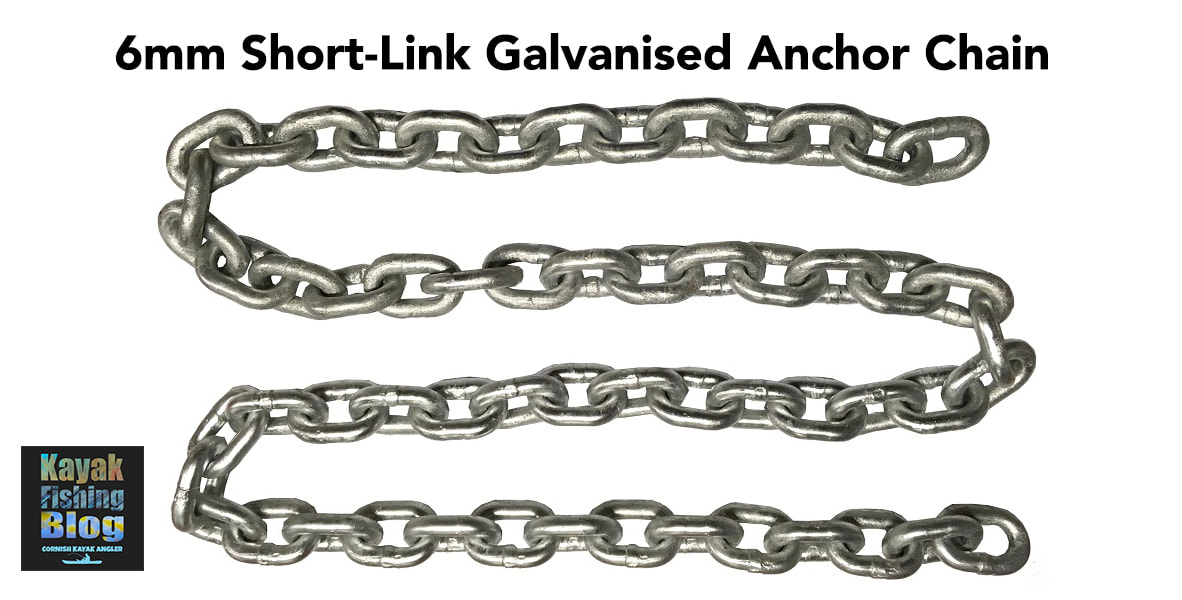 How Much Anchor Chain Do I Need? Add around 1 meter of chain for general conditions, depths up to 100ft and moderate tidal flows / currents up to around 1.0 knot. Add around 2 meters of chain for more challenging conditions, deeper waters >100ft and tides over 1.0 knot. You can simply attach the chain to the top eye on the anchor using a shackle or karabiner, however you may want to consider an anti-snag set up... Anti-Snag Anchor Set UpsGetting your anchor snagged on a kayak is no fun at all and makes the chance of capsize much more realistic. Pulling your anchor warp under lots of tension against a snagged anchor can make you unstable on your kayak, especially if it is choppy. If you are unable to free the anchor the only option would be to cut the anchor warp. Losing your anchor and chain setup can be costly! Luckily there are several methods to 'un-snag' a snagged anchor and they all work on the principle of pulling the anchor out of the snag backwards in attempt to free it. Anchor Weak-Link Method This is where the chain is held to the top eye of the anchor using a weak-link such as a small 2mm cable tie. When at anchor the force runs parallel with the anchor/chain and puts very little, if any, stress on the cable tie. If snagged, the idea is to paddle or pedal up-tide / up-flow of the snagged anchor. This changes the angle of the chain against the anchor and any force applied will be against the cable tie. With a few sharp tugs the cable tie will hopefully snap and allow the anchor to be pulled backwards from the snag. Simple, easy, cheap and the most popular method of setting up an anti-snag anchor for kayak fishing. Cable-Tie Weak Link on a Folding Grapnel Anchor - attach the chain to the bottom eye on the anchor using a shackle. Run the chain up the anchor to the top eye and attach the closest link to the eye with a small cable tie. 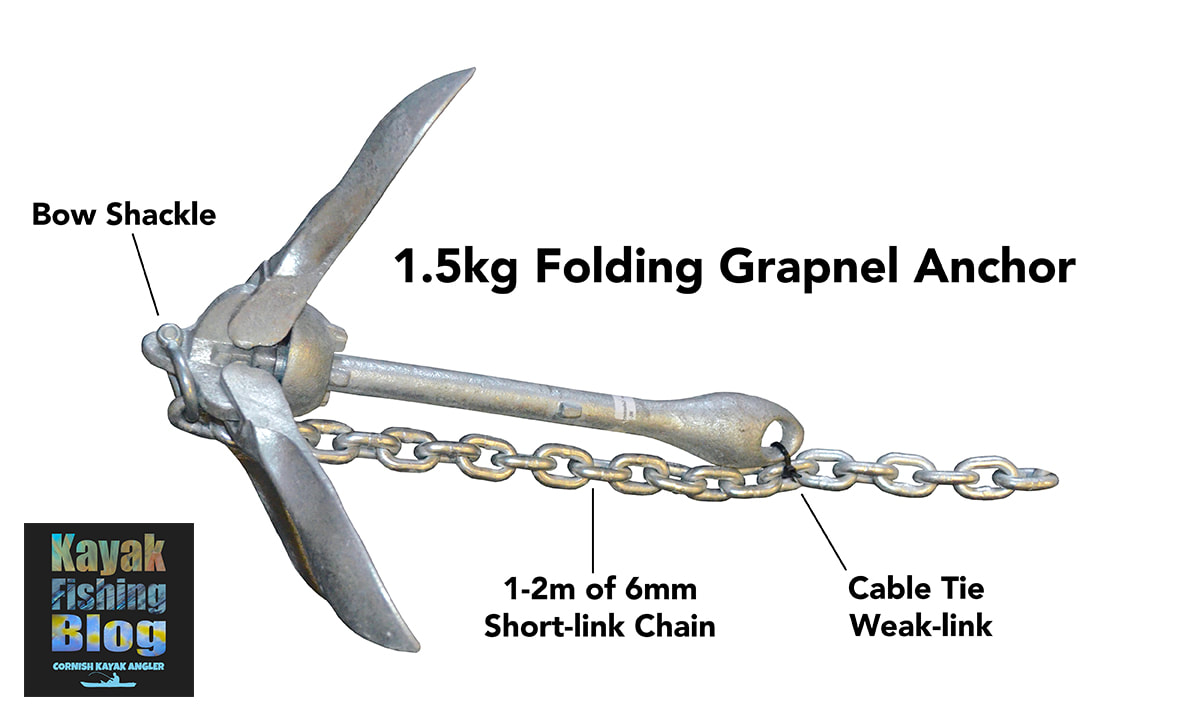 Cable-Tie Weak Link on a Bruce Anchor - I have found that the chain is best attached at the very top of the Bruce anchor, with a short length of cord used between the chain and the base of the anchor. I found the anchor to have a much better bite rate with bottom with the full weight of the chain above the anchor. A small cable tie can then be used between the cord and the top eye on the anchor. 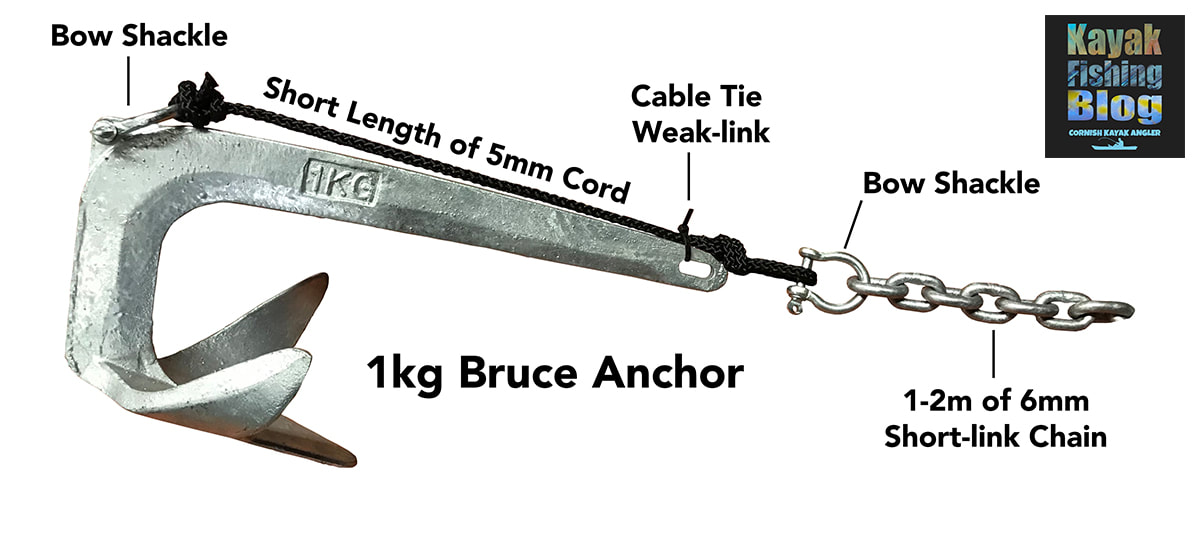 I have had a good success rate with the weak-link method and it works about 80-90% of the time. Some snags are just unforgiving and you have to suck up a loss... Poseidon’s Tax! 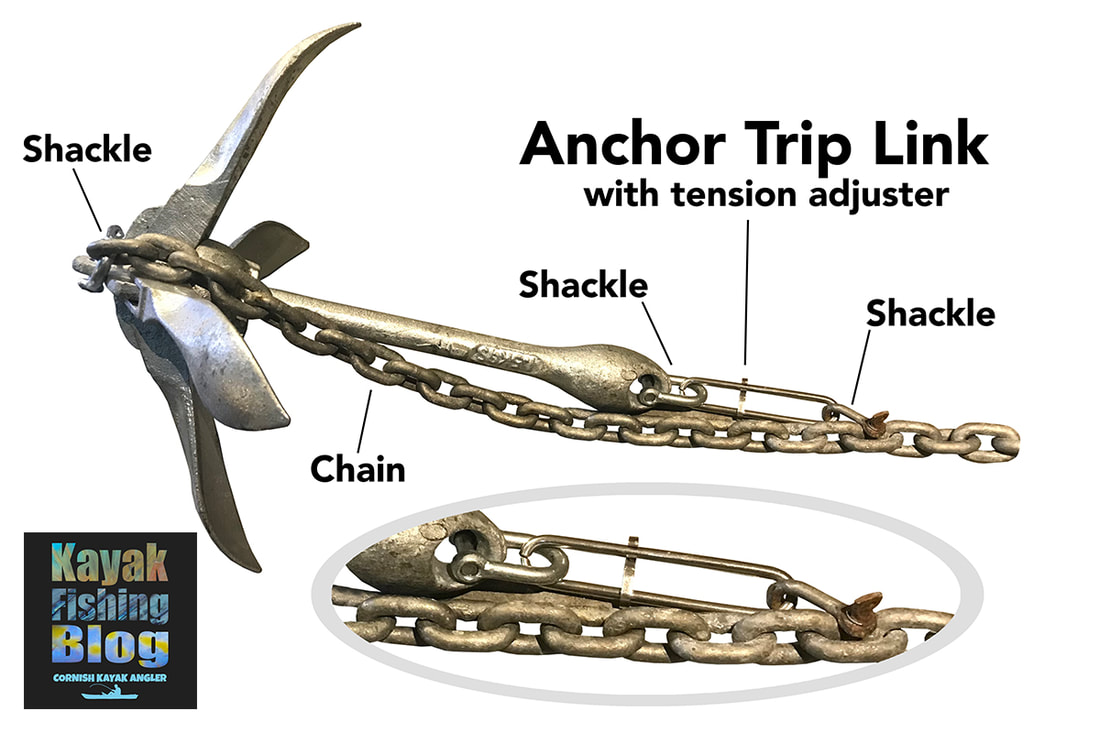 Anchor Trip-Link Method Specialist anchor trip links can be brought (via eBay search ‘kayak anchor trip link’), with adjustable tension settings to make the anchor ‘trip’ when a given force is applied. This is set up between a shackle on the top of the anchor and a shackle on the chain. It has to be set up in such a way that the force of anchoring is applied to the trip link itself. The sliding tensioner then needs to be set so that it won't trip when at anchor but will when you pull hard against a snagged anchor. This can take some experimenting but works really well when set correctly. Anchor Bridle Method Another method sometimes used is to tie a short length of slack cord between the top and bottom eyelets of the anchor, a so-called anchor bridle. You then simply attach your anchor chain to the bridle using a shackle. The chain is now free to slide the length of the anchor along the bridle. At anchor the chain will be positioned off the top, but paddling up-tide with plenty of anchor warp out will allow the chain to slide towards or to the base of the anchor, allowing for a chance to pull the anchor backwards from the snag. Care must be taken when lowering the anchor using this method so that it reaches the seabed the correct way up!  MEthods of Anchoring A KayakThere are two main methods of anchoring a kayak - the quick-release method and the simple / direct method. There are many variations on each method but the principal behind each method is explained below: Quick Release Kayak AnchoringA quick release anchoring setup allows you to almost instantly release from your anchor if needed. This can be very useful for safety - to get out of the way of boat traffic quickly, or to get out of the way of a rogue wave etc. It can also be useful when fishing in a group where you may need to help another angler land a fish or take a photo but don't want the hassle of hauling the anchor and having to reset it again afterwards. This is the best method for those new to anchoring a kayak as if you feel uneasy at anchor at any point you can quickly un-anchor. Quick-Release Kayak Anchoring Components The setup consists of an anchor reel, a pick-up buoy and a length of floating rope. The anchor reel is suspended below the pick up buoy with a length of floating rope running back to the kayak, through the anchor trolley ring / karabiner and tethered off to a cleat. If you need to un-anchor at any point you simply undo the floating rope from the cleat and let go. The rope feeds back through the anchor trolley ring / karabiner and you are completely free of the anchor. The anchor reel remains floating below the buoy for you to retrieve when safe to do so, or to re-attach to when needed. Note: The buoy must be knotted/fixed to the floating rope so that it does not slide under pressure. This method offers easy un-anchoring however it involves a little more hassle if you need to make adjustments to the amount of anchor line you have out. If you needed to let more line out you would have to pull in the buoy and reel and release more line. Kayak Anchor Reel An anchor reel is required to store your anchor line to prevent tangles and to keep things organised on your kayak. In very shallow water you can get away with simply winding your anchor line around a simple winder or empty rope spool, but in most cases you will be dealing with 10's of meters of cord which needs to be kept under control! Divers Reels make useful anchoring reels as they are compact and made for underwater use. The Beaver Osprey 80m Dive Reel is popular here in the UK and work the best for quick-release systems as the reel has a built-in anti-reverse ratchet mechanism to prevent line coming off the reel when anchored. I opted to make my own DIY Anchor Reel, using an empty rope spool, to hold lots of anchor line as i often anchor in deep waters. Kayak Anchor Line If you have brought a dive reel for use as an anchor reel then chances are it will be spooled up with cord ready to use. If not, choose some 1.5mm or 2mm polypropylene cord or mouse line. This is plenty strong enough to hold even the heaviest of kayaks in challenging conditions, and is thin enough to cut through the water with little resistance and be easy enough to handle when retrieving the anchor. This cord is available from most chandelery stores on 100m+ spools and is generally inexpensive. Tie a small karabiner onto the end of the anchor line - this makes it easy to clip on your anchor and chain when needed. Kayak Pick Up Buoy You will need a buoy large enough to stay afloat in a reasonable tide or in choppy waters. It will also need to be Hi-Viz so that you can easily locate it should you have to paddle away from it. Pick Up Buoys around the size of a standard football are about right. Cornwall Canoes sell the perfect sized one - click here for more info. Floating Rope Use around 4-5 meters of Hi-Viz 8mm floating rescue rope for a quick release anchor set up. This allows you to position the buoy a couple of meters off the stern of the kayak and reduces the chance of tangling fishing lines in your anchor line. It also gives you plenty of rope on the surface to aim for when picking up the anchor again after detaching from it. 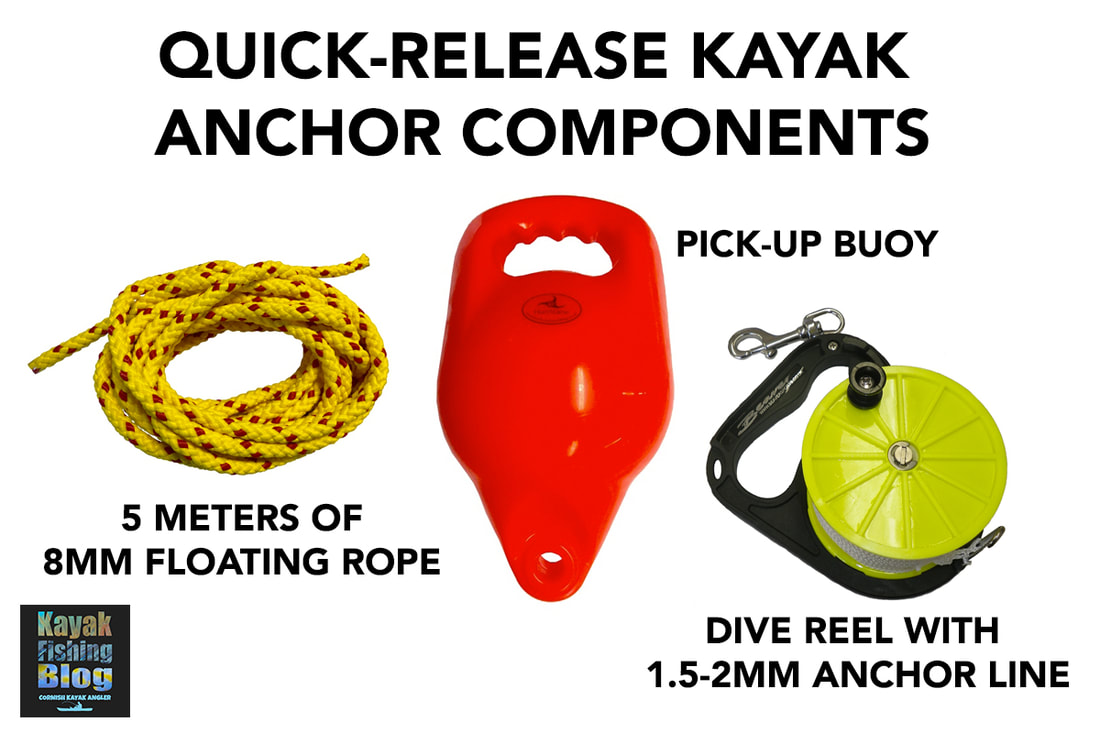 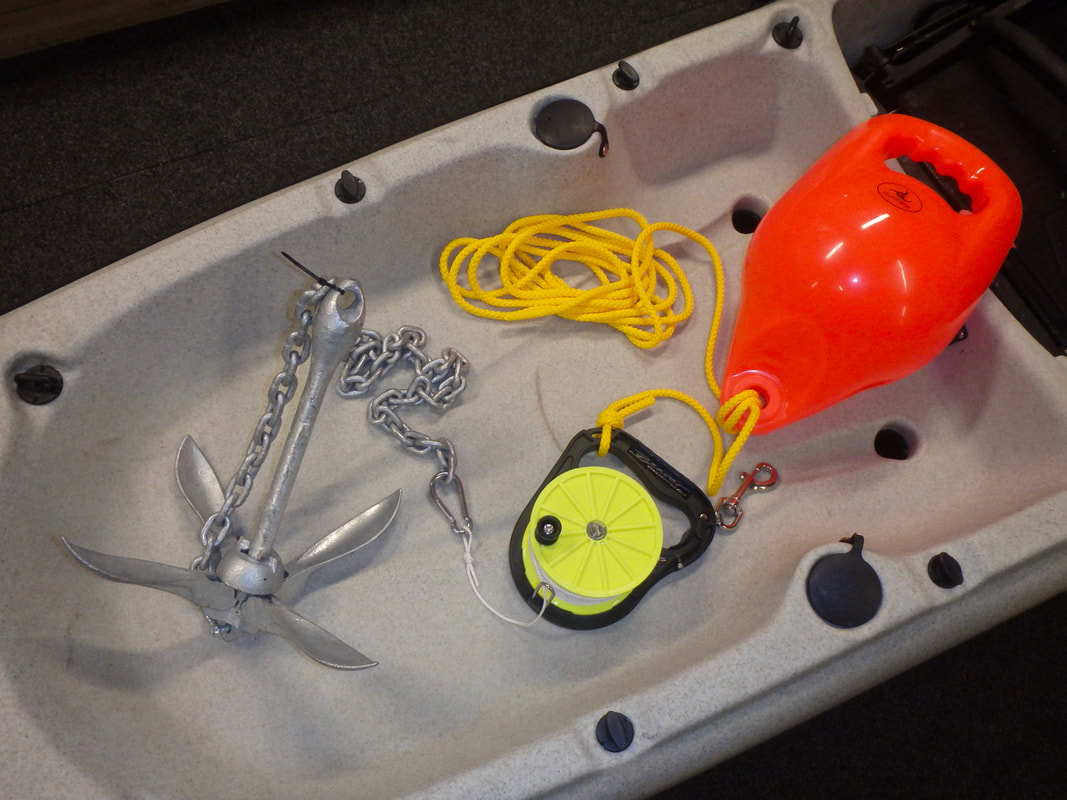 Quick Release Kayak Anchor System Assembled The general idea of how the quick release kayak anchor system looks once in use is shown in the diagram below: 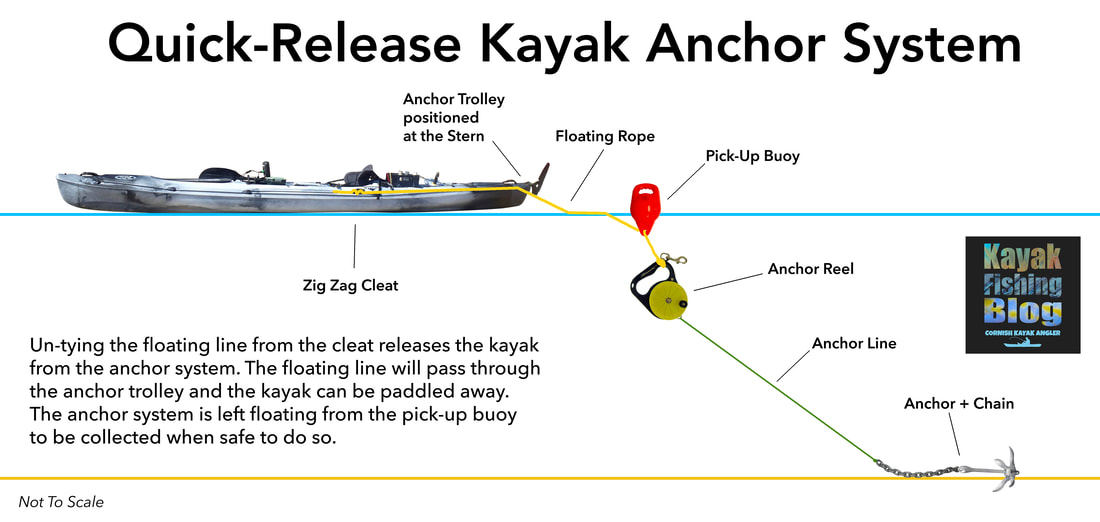 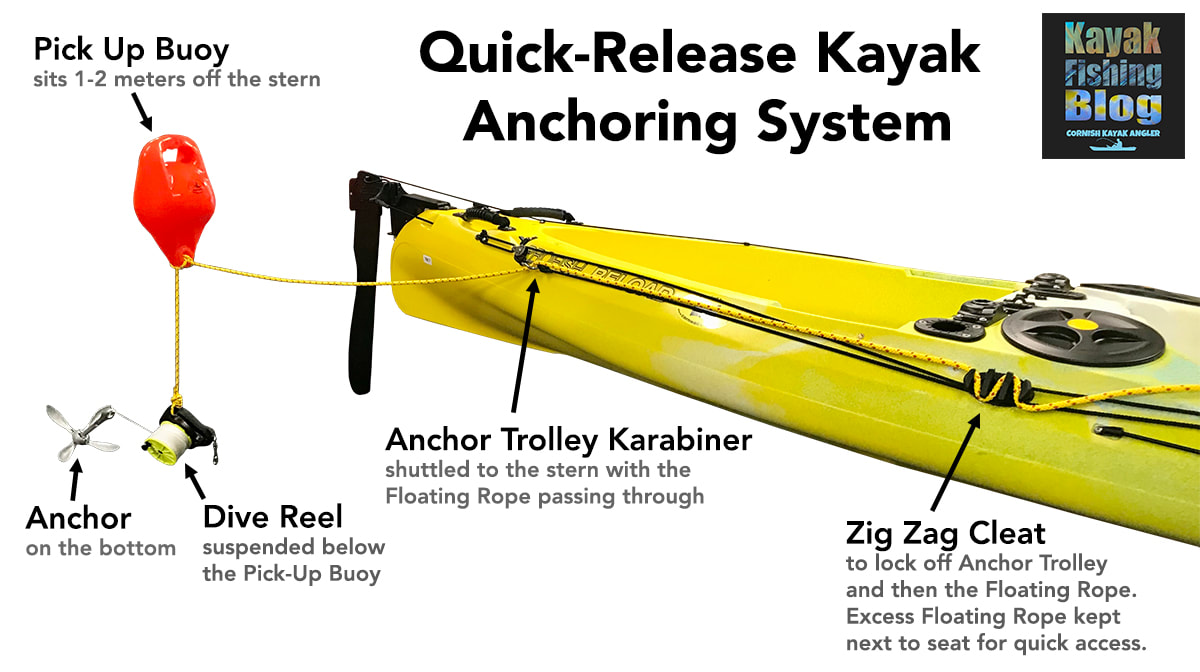 A Quick-Release Anchoring System assembled on a fishing kayak Simple & Direct Kayak AnchoringThis setup is much more basic and in many ways simple is often better. The anchor line runs directly from the cleat, through the anchor trolley ring / karabiner (shuttled to the stern of the kayak) and down to the anchor/chain assembly. There is no buoy and the anchor reel stays in the kayak - there is no tension on the anchor reel as the point of anchoring is from the cleat back down to the anchor. The anchor reel can be clipped to the side of the kayak or placed in the rear crate. This method is easier to make adjustments to the amount of anchor line you have out, because you can simply let more out by letting some extra line out from the cleat before locking it off again. This is not a quick-release method - the only way to quickly disconnect from the anchor is to cut the anchor line. I always carry a blunt-ended rescue knife or Beaver Trigger Line Cutter on my buoyancy aid for this reason. If i have to cut free then I lose the anchor but if i am in a position that i need to un-anchor at speed then that will be the least of my worries! 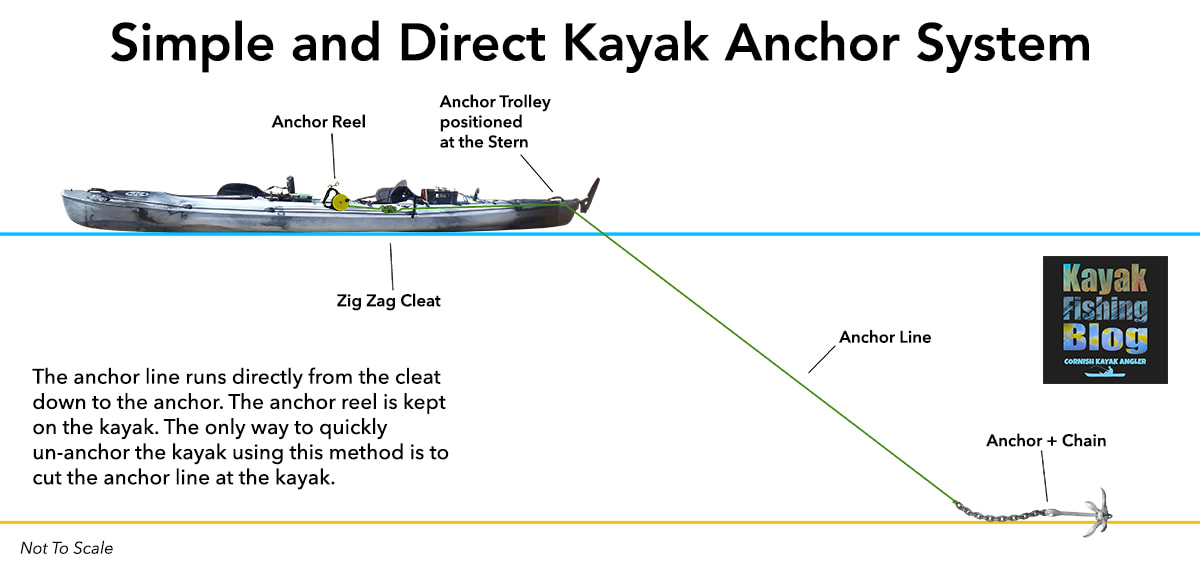 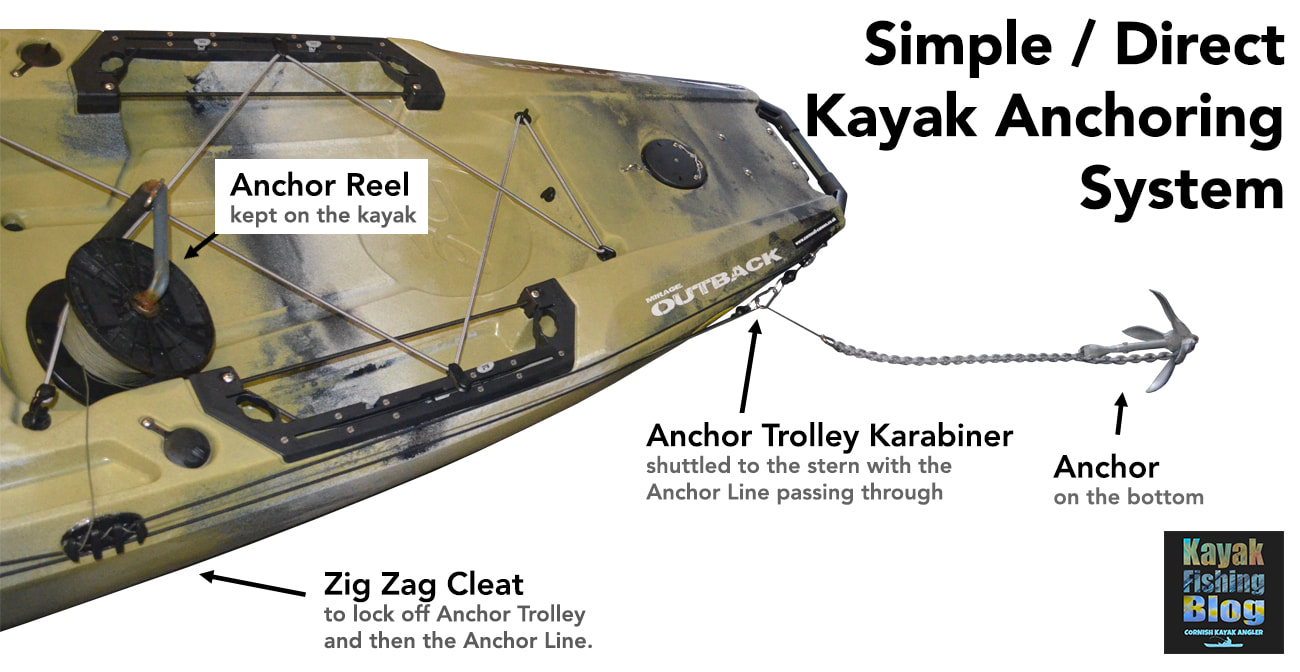 A Direct Anchoring setup shown on my Hobie Outback Kayak Anchor DeploymentOnce you have decided on a place to anchor you will need to take into account any wind, tide or currents which may cause you to move as you deploy the anchor. The process of anchor deployment can take anywhere from a few seconds in shallow calm water to a couple of minutes in deeper water or more challenging conditions. You will need to be ready to release the anchor up-tide or up-wind of where you want to end up anchored. By the time the anchor reaches the bottom and you have released some extra anchor line you will have moved from where you started the process. In shallow water and calm conditions you may not move at all. In windy or stronger tides you can move several hundred yards before you become stationary at anchor. Preparation is key. Deploying a Quick-Release Kayak Anchoring Setup:
 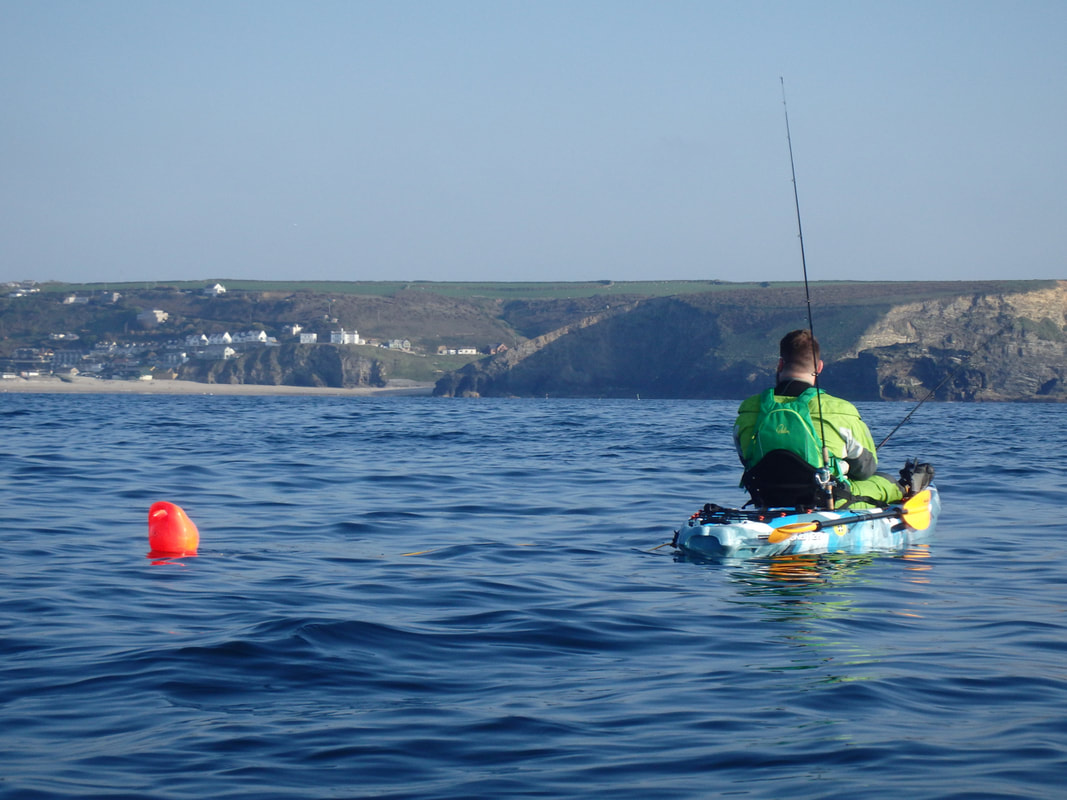 Kayak Fishing at Anchor using a Quick-Release System Deploying a Direct Kayak Anchoring Setup:
How much Anchor line should you let out?Grapnel and Bruce style anchors will bite into the bottom best when the anchor line is at a shallow angle to the bottom. By increasing the amount of anchor line let out, you decrease the angle between the anchor line and the anchor - this increases the holding power of the anchor and decreases the chance of anchor slip. The conditions will very much dictate how much anchor line you will need to let out. You will need to let out more anchor line the faster the tidal flow, the stronger the wind and the larger the swells. In shallow calm waters with little or no flow then you might get away with hardly any extra anchor line out as there will be little resistance against the anchor or mud weight. In calm-to-moderate tide/wind/swell conditions you should be able to get away with letting out somewhere between 1.5 to 4 times the depth of water. In faster tides, strong winds or large swell you may need to let out over 4 times the depth of water to achieve the shallow angle required for the anchor hold effectively. See the diagram below for how the amount of anchor line let out effects the angle between the anchor line and the anchor: 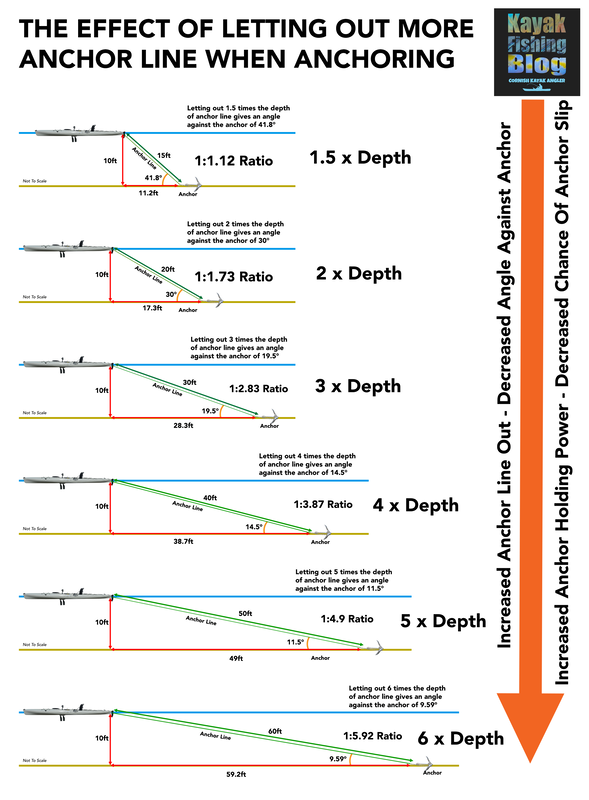 Hauling a Kayak ANchorOnce you are done fishing at anchor it is time to haul the anchor in. There are two main ways people retrieve an anchor from the bottom back to the kayak: Hand Hauling This is where you pull in the anchor line by hand, passing the loose line back into the water as you haul to prevent tangles on the kayak. It is best to let the kayak drift down-wind / down-tide and let the loose anchor warp drift up-tide away from the kayak to prevent it tangling into a mess. Once the anchor has reached the kayak, the loose line can then be wound back onto the anchor reel, being careful to avoid tangles on the reel. This puts little or no strain on the reel when winding in. This method is best done by leaving the anchor trolley set at the bow or stern whilst hauling. This ensures the kayak stays sitting in-line with the conditions for the most stability whilst you haul the anchor. DO NOT haul an anchor with the anchor trolley at mid-ship - if the anchor is snagged and there is choppy waves or tide then you risk turning the kayak over as everything comes under strain. Once you are confident the anchor has released from the bottom and you are drifting then you can move the anchor trolley if you find it easier to haul the line beside the kayak. This method is the easiest way to haul an anchor on a kayak, especially with anchors over 1kg in weight. Reel Hauling This is where the anchor line is wound directly back onto the anchor reel. To do this, shuttle your anchor trolley to the bow of your kayak and then wind in as much slack anchor line as possible to position your kayak roughly over the anchor. Once your kayak is over the anchor, hopefully it won't be snagged and you can continue winding in the anchor and anchor line directly onto the reel and back to the kayak. This can put a lot of strain on the reel when winding in but in some conditions (such as fast tides) this can be easier, safer and sometimes quicker than dealing with the slack line used by the other method. As soon as the anchor reaches the kayak you would be in a position to paddle or pedal off quickly. Sometimes it is too difficult to wind straight onto the reel so a 'pump and wind' approach is needed whereby you pull the anchor reel towards you then quickly wind on a few turns of line as you lean forwards with the reel - similar to how you would play a fish to the kayak just without a rod! A note on hauling Quick-Release systems... A quick-release anchoring system takes a little more work to haul than a simple/direct anchoring system. This is because the reel is held in the water and the line running from the reel needs to be clipped into the anchor trolley karabiner before you can safely haul the anchor line from the bow or stern. This involves pulling the floating rope, buoy and anchor back to the kayak first, quickly moving the anchor trolley to mid-ship, then clipping the anchor line into the anchor trolley karabiner and then ensuring this shuttles to the bow or stern before you go pulling the anchor in. In challenging conditions this can be a little tricky but providing you are prepared and let out some anchor line as you have the anchor trolley at mid-ship (when you clip the anchor line into it), before shuttling it to the bow or stern then it is safe to do. Practice is required to become competent with this but is relatively easy once you have done it a few times. Safe Kayak Anchoring TipsAnchoring can be potentially dangerous on a kayak but with a good understanding of the theory and principle behind anchoring a kayak in combination with plenty of practice then you can almost eliminate any problems arising whilst you anchor your kayak. Here are a few pointers from my experience in anchoring a fishing kayak over the years...
Enjoy Kayak Fishing at AnchorOnce you have an anchor trolley and anchoring system set up on your kayak and you are confident and competent in using it then you can open up many more options when fishing from your kayak. Target species that will only take a static bait, fish in windy conditions that would otherwise cause you to constantly drift, or just anchor when you need a rest and you want to sit back and relax! This article is designed to be a guide to anchoring a kayak with advice on safe anchoring methods and practices. It is not a definitive guide and many users tailor anchoring system to suit their kayak and anchoring requirements. Take advice from those who have experience in kayak anchoring and practice in calm safe conditions before anchoring in more challenging conditions. Stay safe and have fun fishing at anchor from your kayak! If you have any questions then feel free to ask in the comments - i will do my best to answer.
Where to buy Kayak Anchoring Equipment?If you are based in the UK then the best shop for everything kayak fishing is Cornwall Canoes.
If you are based in America then there are numerous paddle sport and marine chandlery retailers where you can source anchoring equipment including HOOK1 Outfitters, Austin Kayak (ACK), Appomattox River Company (PaddleVA), West Marine, Cabela's and Bass Pro Shops to name a few.
John Livingstone
17/5/2020 13:22:27
Great info on anchoring
Michael Mullally
26/9/2020 19:41:58
Ive been kayak fishing for over 10 years now, mostly in strong Thames tides. I agree with everything you have written.
subutay
18/12/2020 15:15:13
Perfect explaining and very usefull information ,congrats
JOHN S PETRAUSKAS
21/1/2021 09:58:45
Hi Liam. REALY LIKE YOUR ANCHORING SETUP. IN THE PROCESS OF BUYING ALL MY BITS AND PTECES. GOING TO SETUP THE QUICK RELEASE. THANKS FOR YOUR SAFETY TIPS THEY ARE FIRST CLASS. WILL BECOME A REGULAR FOLLOWER.
Felix
24/6/2021 08:49:49
This was a fantastic and informative read. A must for anyone starting out.
Hugo Doetsch
22/7/2021 02:08:20
Such a great read. I'm just getting into this and it was exactly the information I needed. Laid out clear and very concise.
Bob gallagher
27/12/2021 00:31:57
Hi Liam
Danny Kim
2/8/2022 12:26:52
Very well put together info. thank you. Danny from Athens, GA Comments are closed.
|
AuthorLiam Faisey 
My Tackle Shop
SPONSORS
Proudly associated with

Cornwall's only specialist kayak fishing shop
Archives
March 2023
Categories
All
Add my blog to your feed reader by clicking the button below
Get blog updates via email
Kayak Fishing Videos
Custom feed reader powered by FeedWind
Useful Links
Anglers Afloat
Cornish Shore & Kayak Fisherman Cornwall Canoes Palm Equipment Penzance Kayak Fishing Meet Info Saltwater Kayak Fisherman Magic Seaweed XC Weather 
|
 RSS Feed


|
|
Website powered by pasties and the hope of good weather!
© 2023 Liam Faisey
© 2023 Liam Faisey