KAYAK FISHING BLOG | CORNISH KAYAK ANGLER
  • Home
  • About
  • Blog
  • Information Guides
    • Choosing a Fishing Kayak
    • Choosing A Paddle
    • What to Wear
    • Essential Safety Equipment
    • Paddle or Pedal Kayak?
    • Installing A Fish Finder
    • How to Anchor A Kayak
  • Kayak Modifications
  • Videos
  • Reviews
  • Places to Fish
    • North Cornwall
    • West Cornwall
    • South Cornwall
  • UK Fish Identification
  • Photos
    • 2013 Photos
    • 2014 Photos
    • 2015 Photos
    • 2016 Photos
    • 2017 Photos
  • Marine Life Photography
    • Fish
    • Cnidaria
    • Echinodermata
    • Mollusca
    • Crustacea
  • Links

Kayak Fishing Blog

Installing the Raymarine Dragonfly 5-Pro

23/6/2015

 
Raymarine Dragonfly 5-Pro kayak installation
I won the Raymarine Dragonfly 5-Pro fishfinder/GPS and Navionics+ charts as 2nd prize in the Swanage Classic competition last month. I have spent the last few weeks thinking about how best to install the Dragonfly on my RTM Abaco and then sourcing all the components i would need. Here is a run through of how i installed it including: 

  • Making a waterproof battery box, 
  • Making a battery box holder, 
  • Mounting the head unit 
  • Installing the transducer in-hull

The process is applicable to virtually any kayak and fish finder unit where the transducer needs to be installed in the hull.
Components used in this installation:

  • Dragonfly 5-Pro Sonar/GPS
  • Navionics+ Charts
  • Scanstrut Deck Seal DS30-P for 30mm connectors and 9-14mm cables 
  • Scanstrut Deck Seal DS16-P for 16mm connectors and 2-8mm cables
  • 12v 7Ah Sealed Lead Acid Battery
  • Female Spade Crimp Connectors
  • 2-way Superseal Waterproof 12v Electrical Connector Plug 
  • Lock & Lock Watertight Rectangular Plastic Storage Container 1.9 Litre HPL818
  • Block of High-density Closed Cell Foam 
  • RAM 1" Ball Round Base with AMPS pattern
  • RAM Double Socket Arm for 1” ball
  • Chopping Board – 10mm thick
  • 1 m of 5mm bungee
  • 4 x Trifold Rivets or Stainless Steel Bolts, Nuts and Washers
  • Marine Goop 
Installing a Raymarine Dragonfly 5-Pro on a kayak

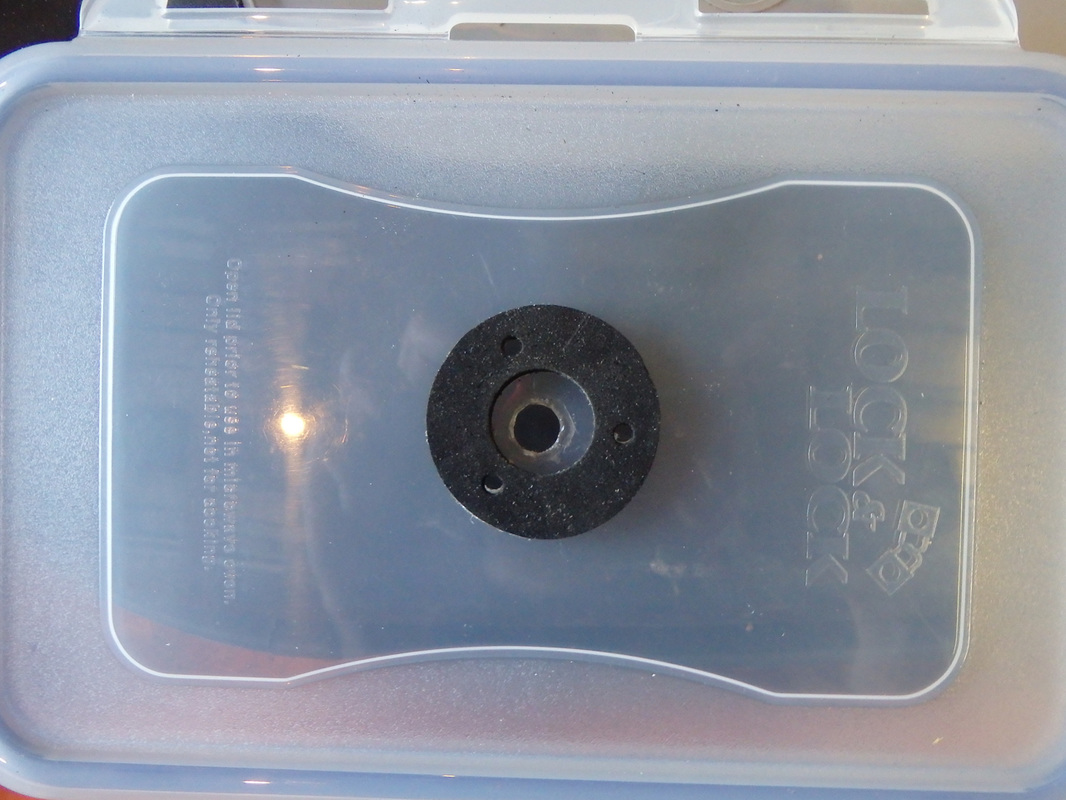
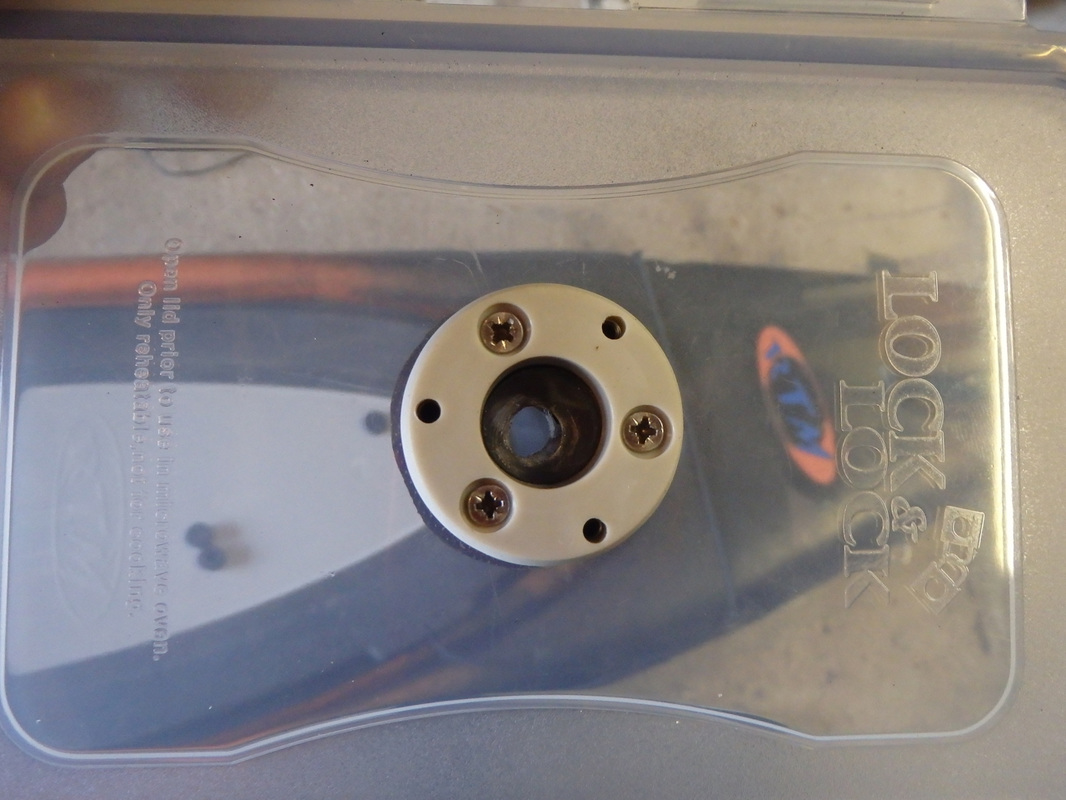
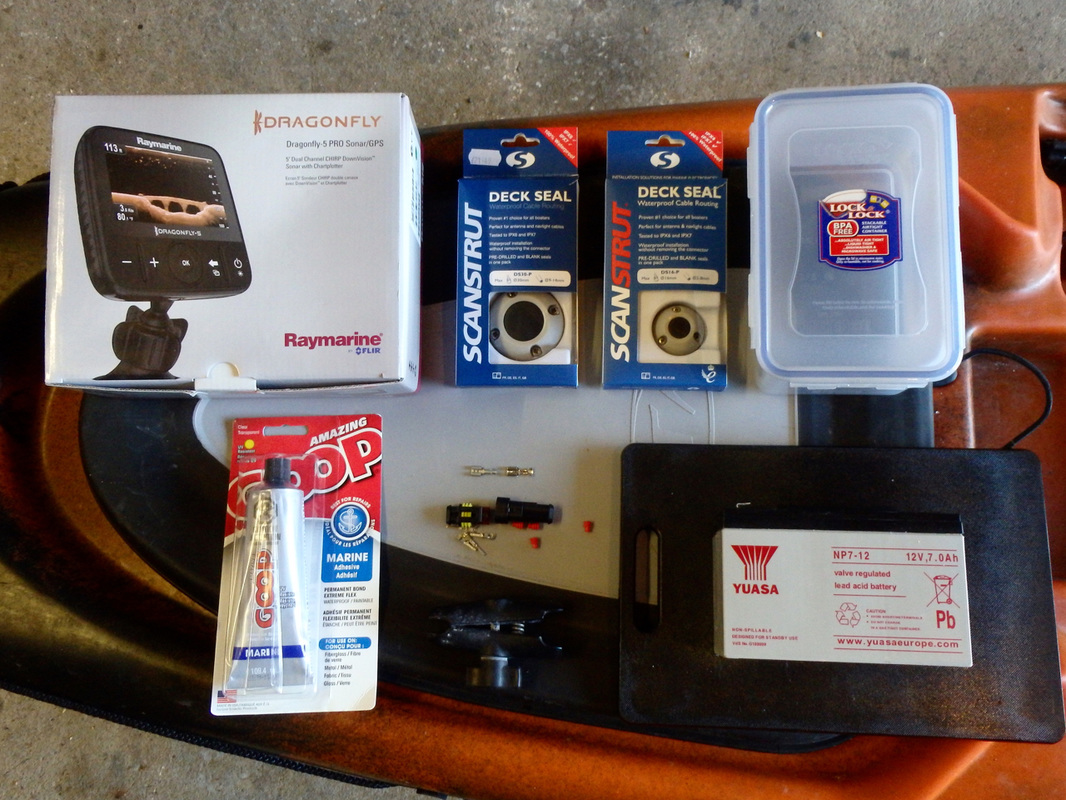
Step 1 - Making a Waterproof Battery Box

I am using a 12v 7Ah sealed lead acid battery to power the Dragonfly and i wanted this to be kept in a waterproof box that i could switch between kayaks and fish finders. 

Lock & Lock make a brilliant watertight rectangular plastic storage container (1.9 Litre HPL818) that houses a 12v 7Ah battery perfectly with a bit of foam packing. The power lead from the Dragonfly needs to pass into the container to the battery and for this i have used a Scanstrut waterproof Deck Seal (DS16-P for 16mm connectors and 2-8mm cables).
Making a Waterproof Battery Box for a kayak fish finder
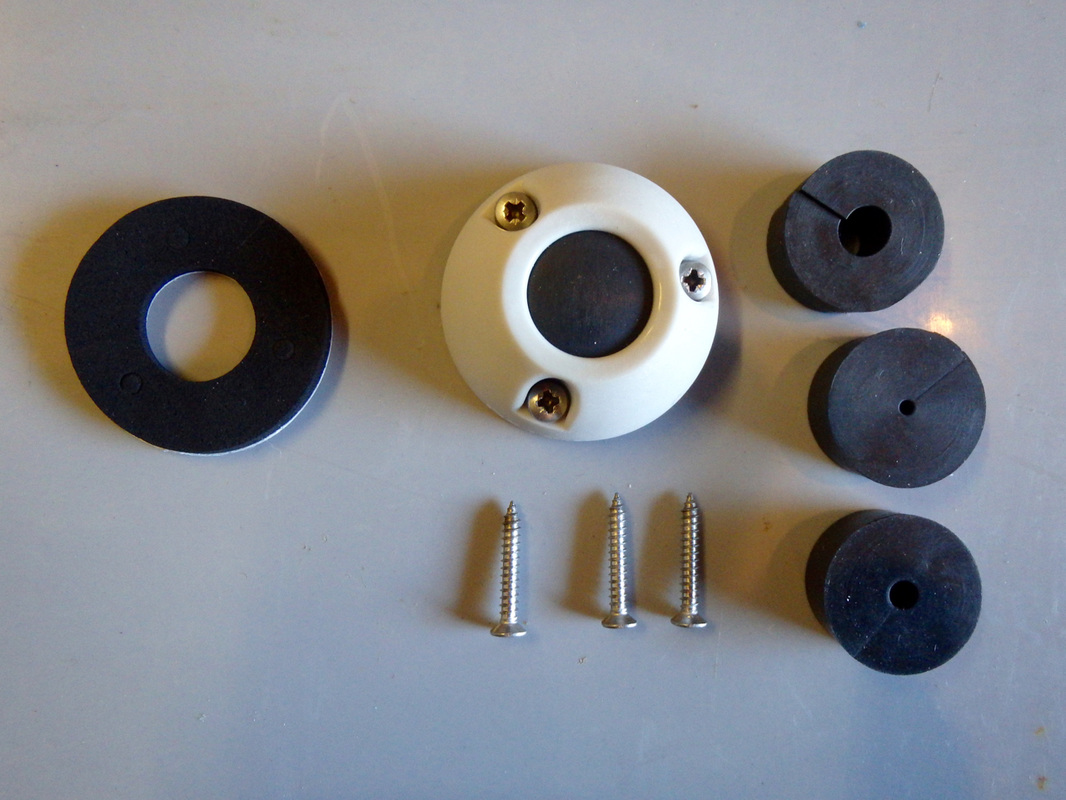
I start by drilling a hole in the lid, large enough to pass the spade end connectors through, 8-10mm should do. 
Making a Waterproof Battery Box for a kayak fish finder
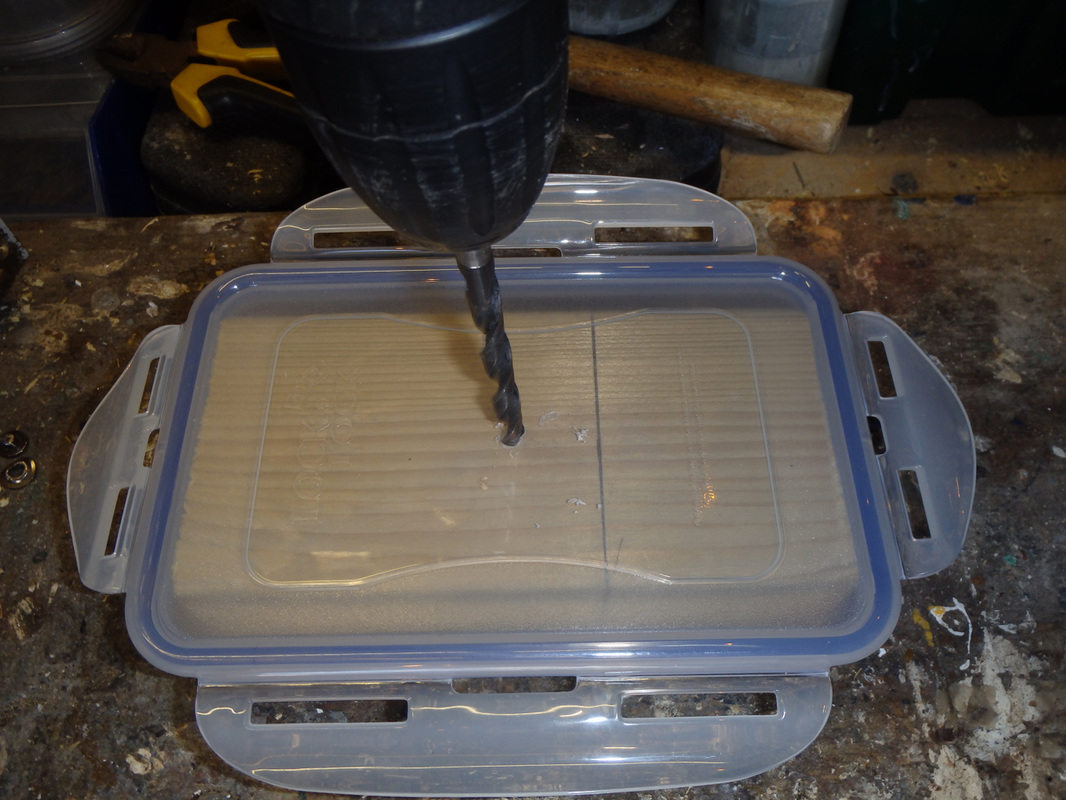
The deck seal fitting kit comes with self-tapping screws but the container lid doesn't give much thickness for a strong hold. I have used a small piece of black chopping board, with another 8-10mm hole drill in the centre, to make a backing plate to screw into. 
Making a Waterproof Battery Box for a kayak fish finder
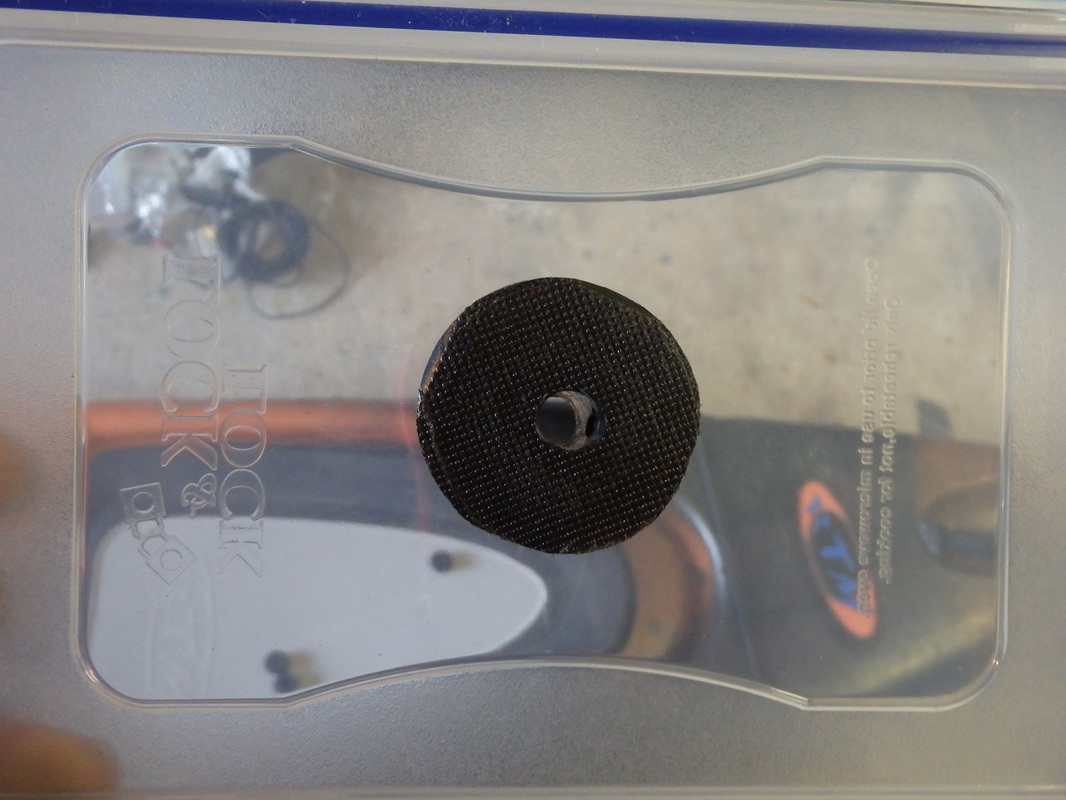
Then its a case of assembling the deck seal. Place the soft foam base over the hole, use the small guide holes in the ring to drill some pilot holes through the lid for the screws
Making a Waterproof Battery Box for a kayak fish finder
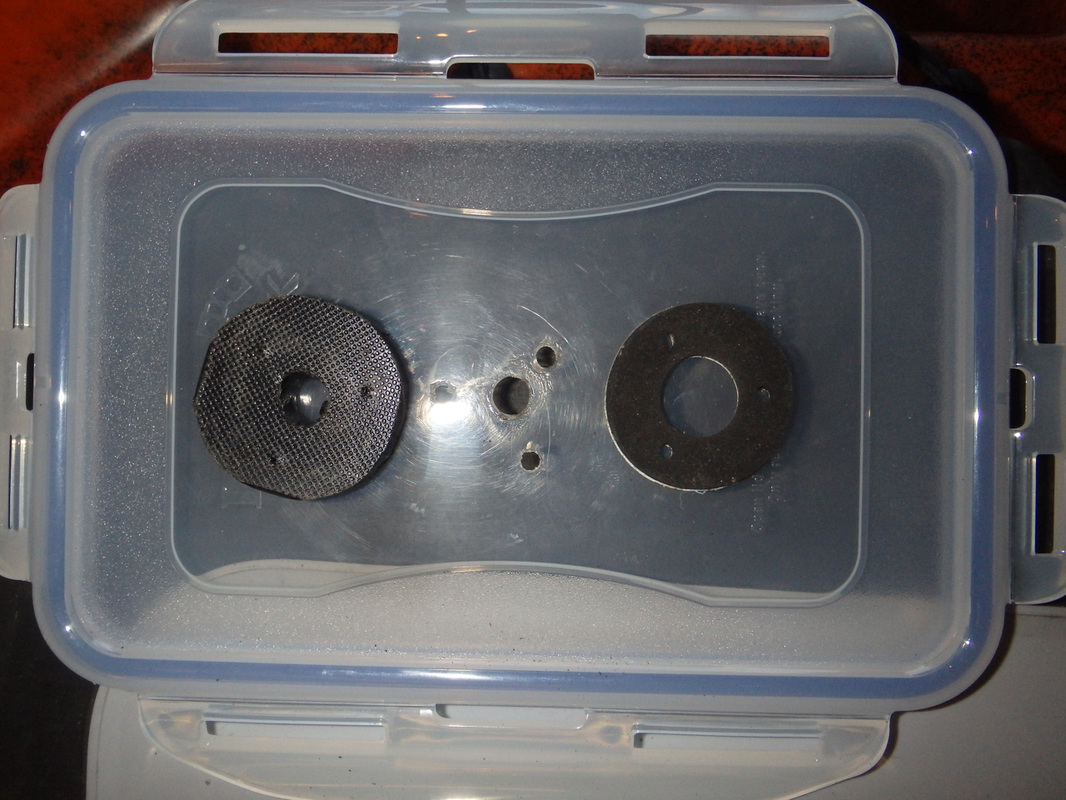
Stick the foam ring down over the hole, place the plastic base on top of the foam and then screw this down into the backing plate.
Making a Waterproof Battery Box for a kayak fish finder
Making a Waterproof Battery Box for a kayak fish finder - Scanstrut Deckseal
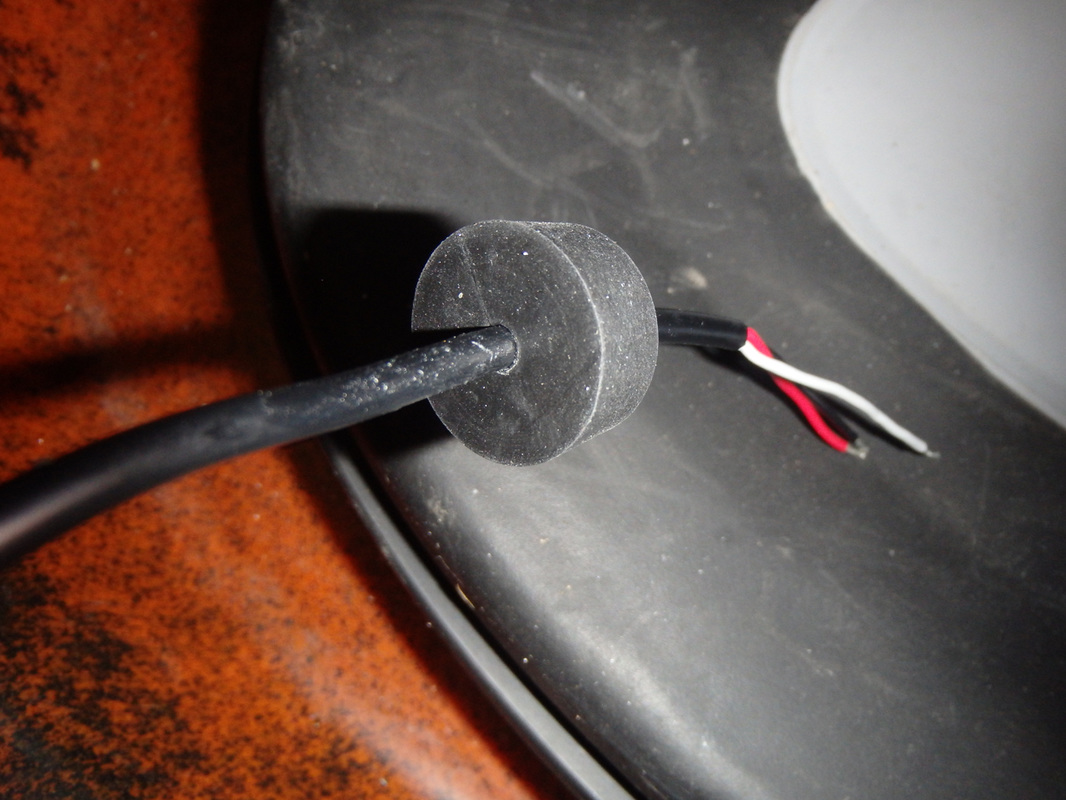
The DS16-P deck seal comes with a pre-drilled rubber block that is a perfect fit for the power lead but the deck seal comes with a blank rubber block that can be drilled for other sizes of lead. Before the power lead can be fitted into the deck seal a little bit of wiring is required to fit the super seal connector enabling the battery box to disconnected and moved between kayaks.

Note: This step isn't required if your battery box will always stay in one kayak.
Making a Waterproof Battery Box for a kayak fish finder - Super Seal Connector
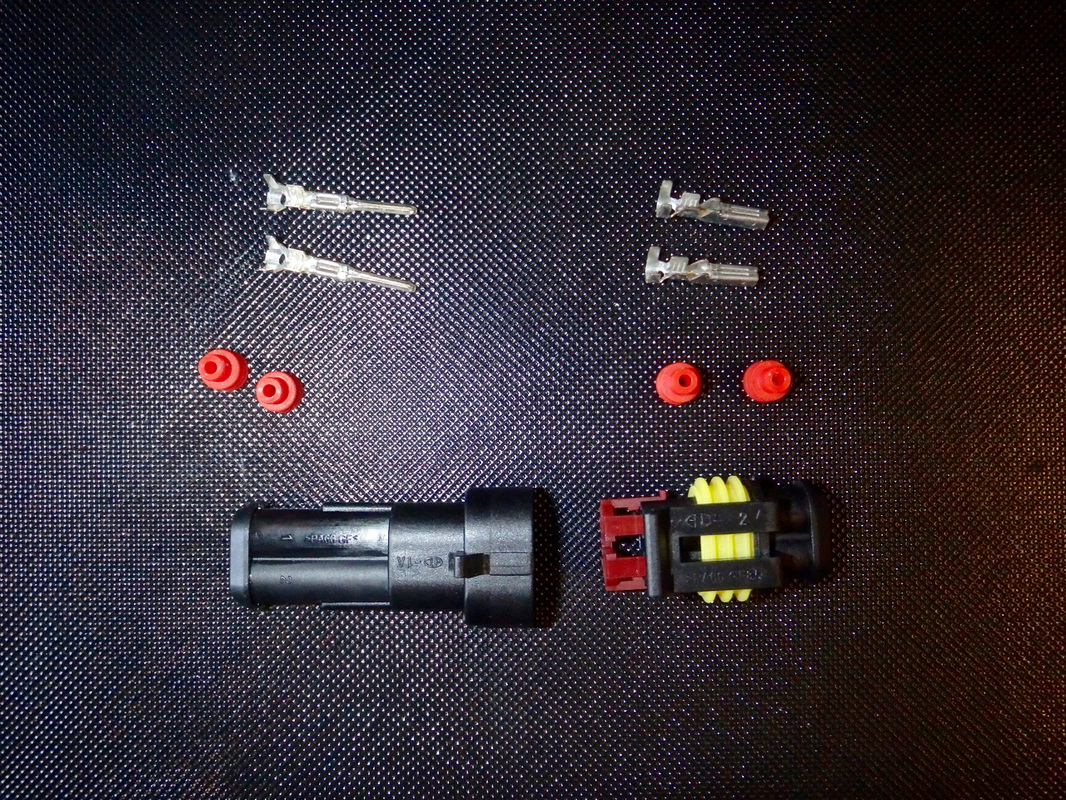
Cut off approximately 16" of the power cable and strip back around 2 inches of outer coating at one end and around 6 inches off the other, exposing the black and red wires. Strip approx. 1 inch of the coating off the red and black wires too. 

Note: There is also a grey wire incorporated into the power cable - this is a drain wire which works with the sheilding in the cable and serves to ground the wiring. I disregarded it during this installation and haven't experienced any problems to date. 
Making a Waterproof Battery Box for a kayak fish finder - Super Seal Connector
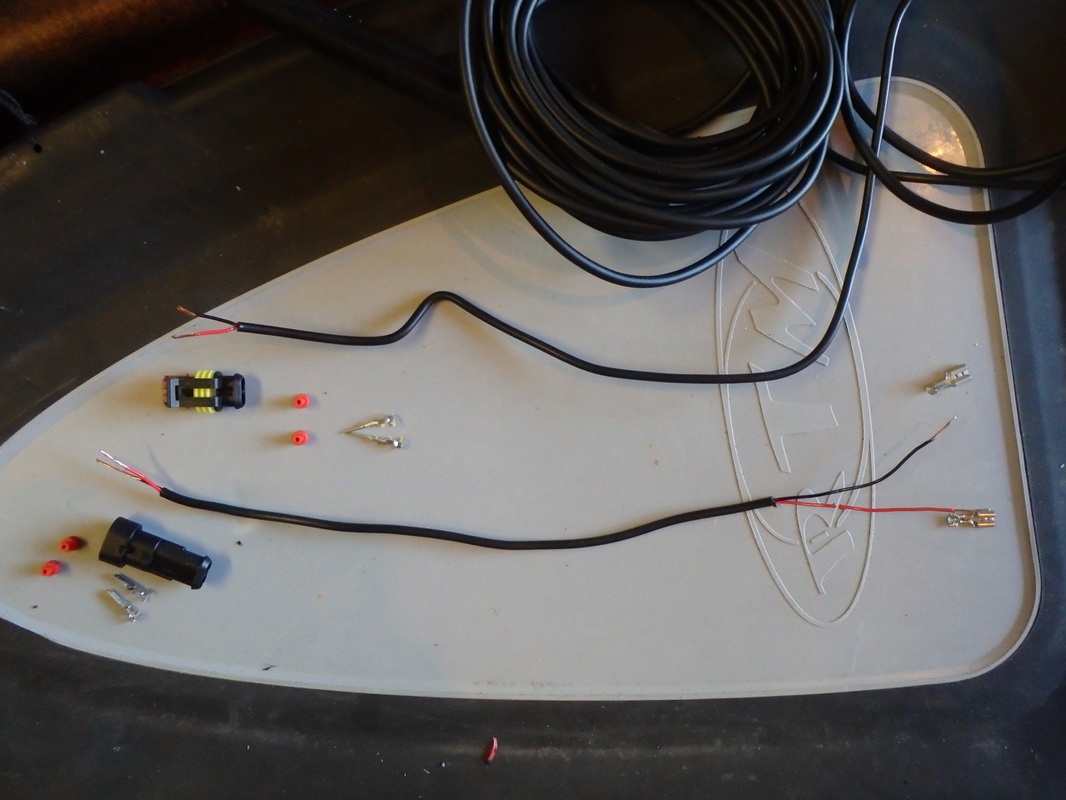
Crimp the female spade end connectors onto the wire ends with 6" of red and black wires exposed as above in the photo - these will clip over the battery terminals inside the battery box. At the other end, slide on the red rubber seals and then crimp on the female terminals of the super seal. Then its a case of slotting these into the back of the male connector.
Making a Waterproof Battery Box for a kayak fish finder - Super Seal Connector
Slide on the rubber seals and crimp the male terminals onto the end of the power lead coming from the fish finder. Slot these into the back of the female connector and the superseal is complete.
Making a Waterproof Battery Box for a kayak fish finder - Super Seal Connector
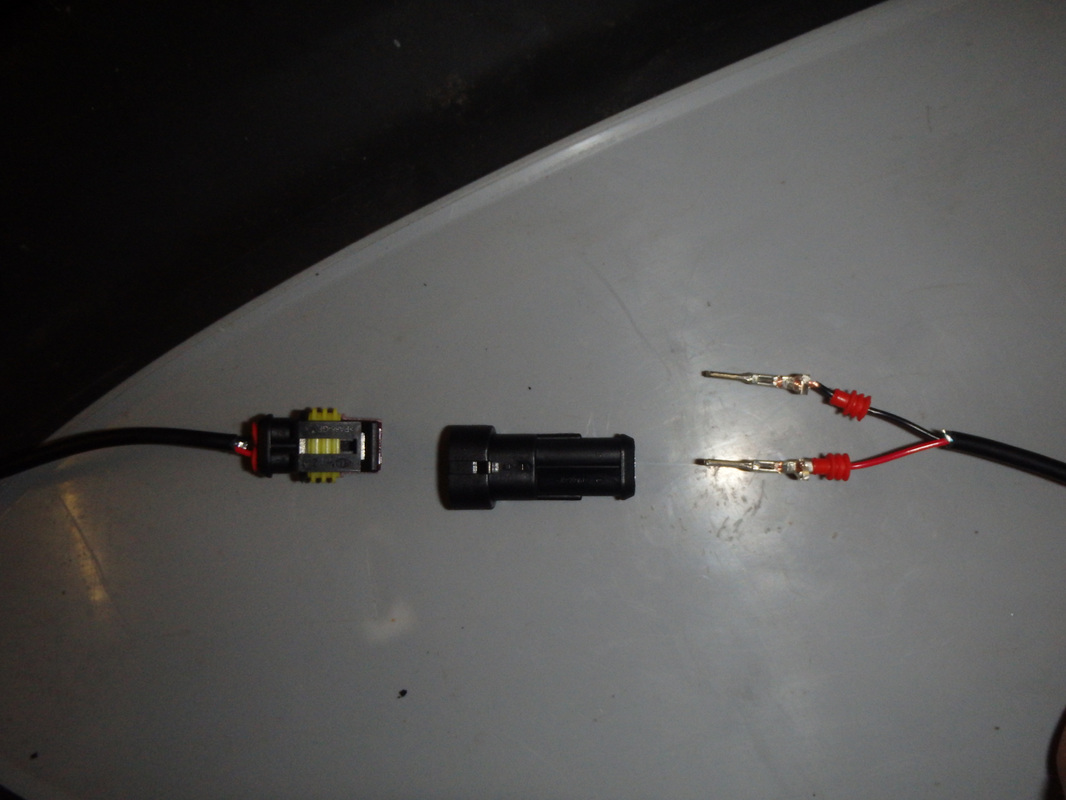
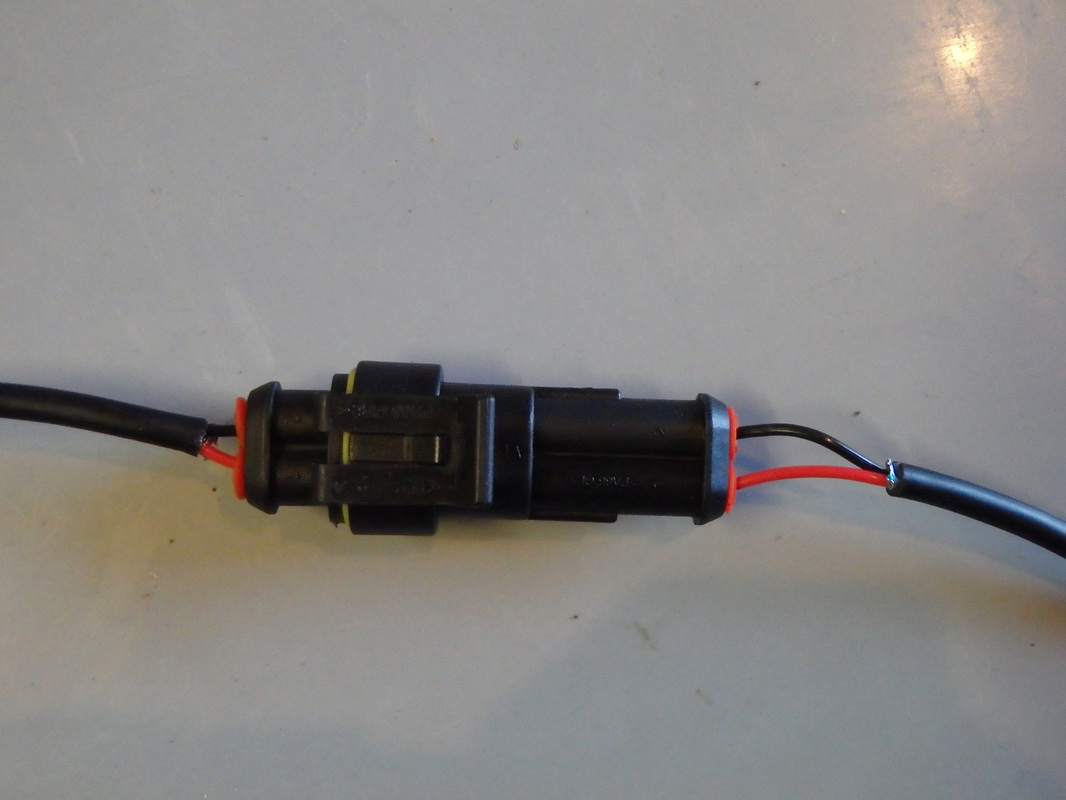
Pass the spade end connectors through the deck seal, place the rubber seal around the cable and screw down the top cover of the deck seal into the base using the bolts provided. I have used some insulation tape to tidy up any exposed wire. 
Making a Waterproof Battery Box for a kayak fish finder - Scanstrut Deckseal
Making a Waterproof Battery Box for a kayak fish finder
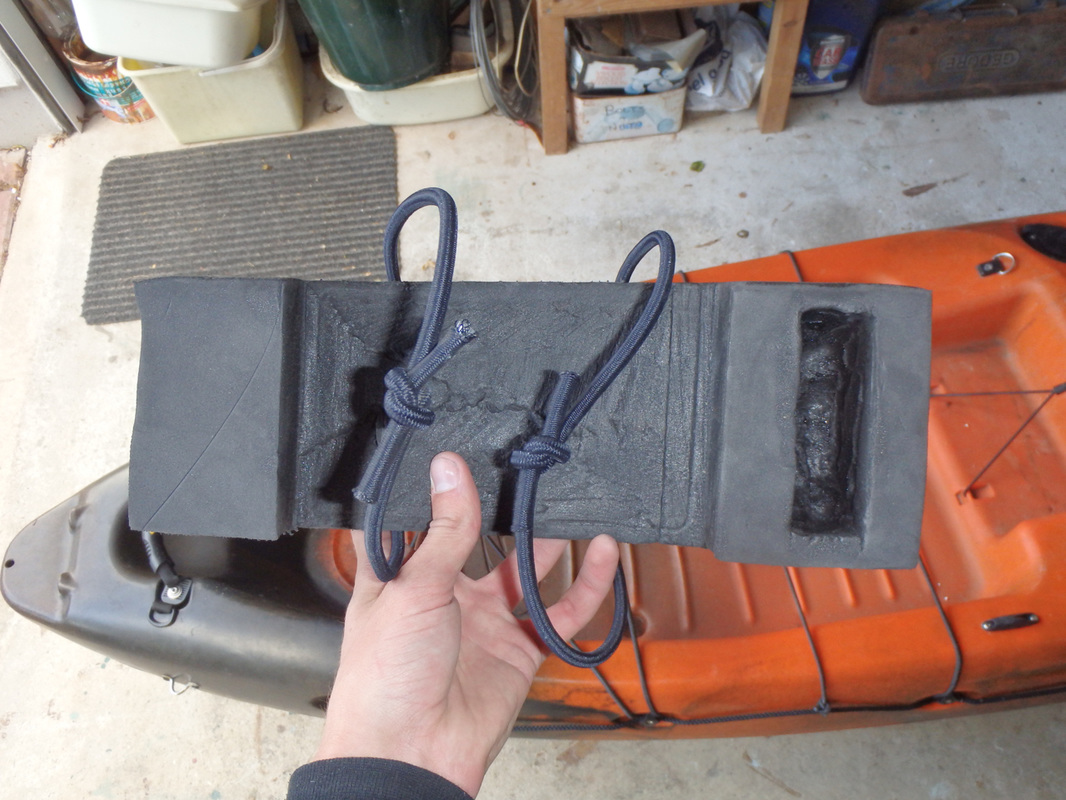
Place the battery in the box and connect the wires to the terminals. One waterproof removable/transferable battery box complete!
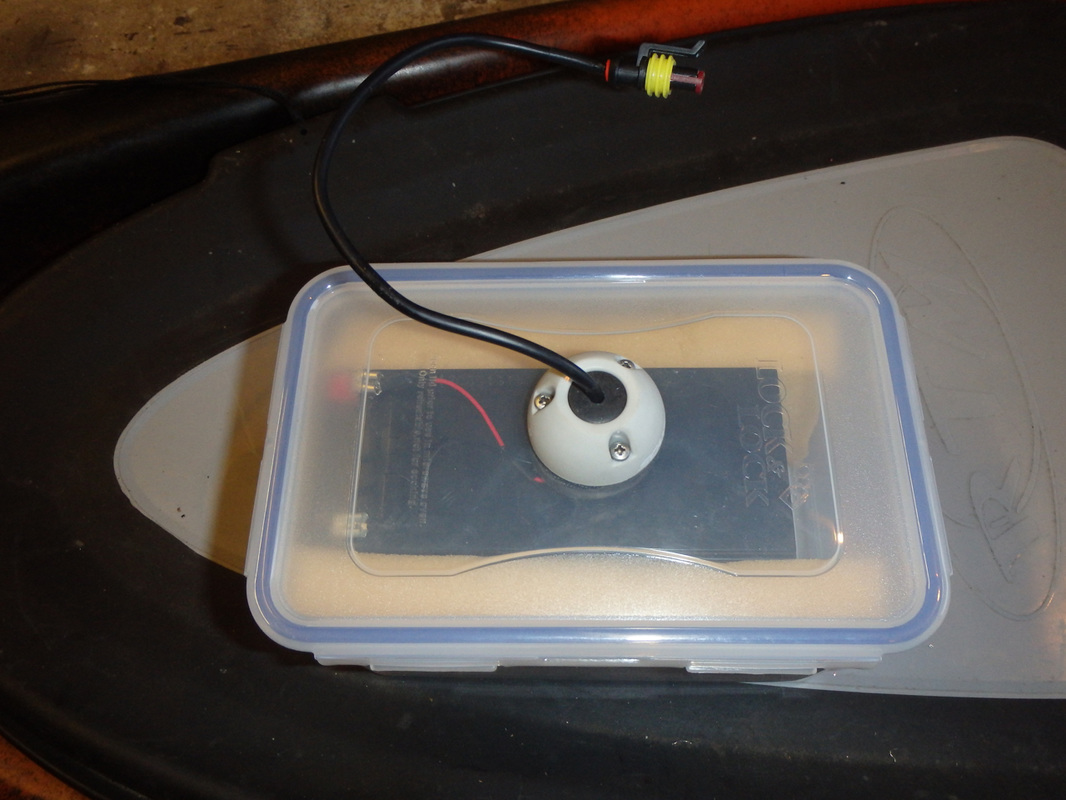
Waterproof Battery Box for a kayak fish finder

Step 2 - Making a Battery Box Holder

I didn't want the battery box to be sliding around inside the hull so decided to build a 'battery block' to hold the battery box in place. To do this i have used a block of high density closed cell foam
Making a Battery Box holder for kayak fish finder
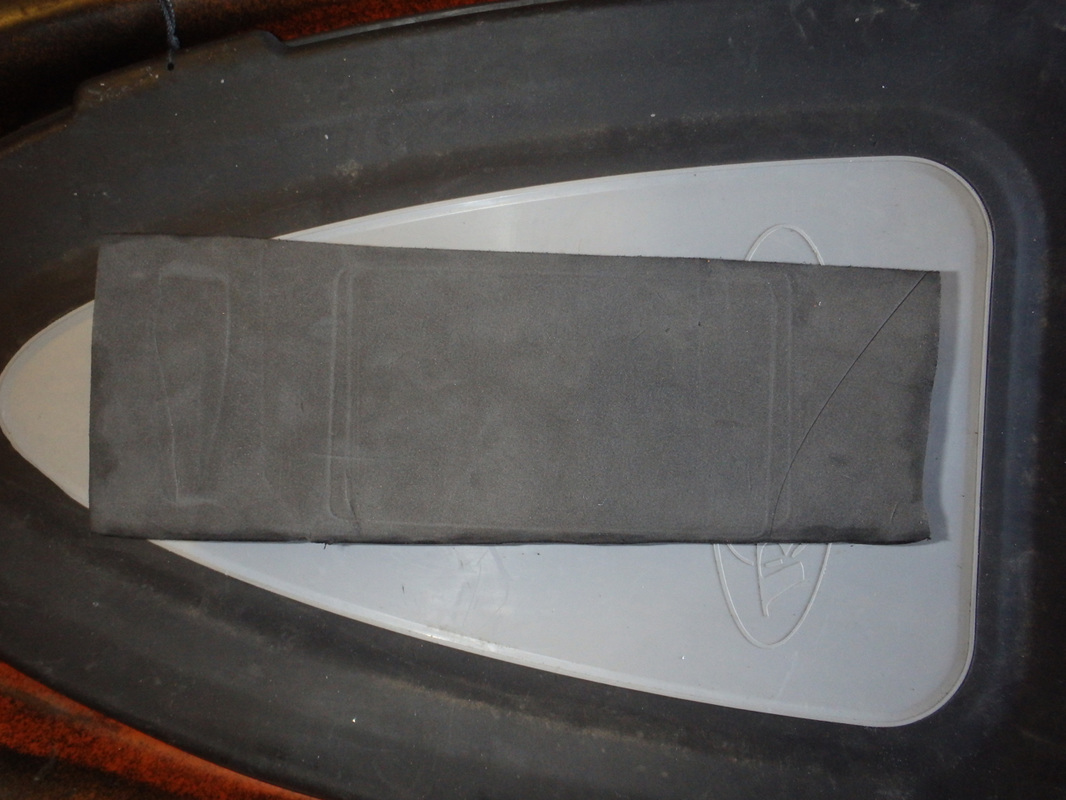
I shaped one side to the shape of the hull in the Abaco using a fine tooth saw and sand paper
Making a Battery Box holder for kayak fish finder
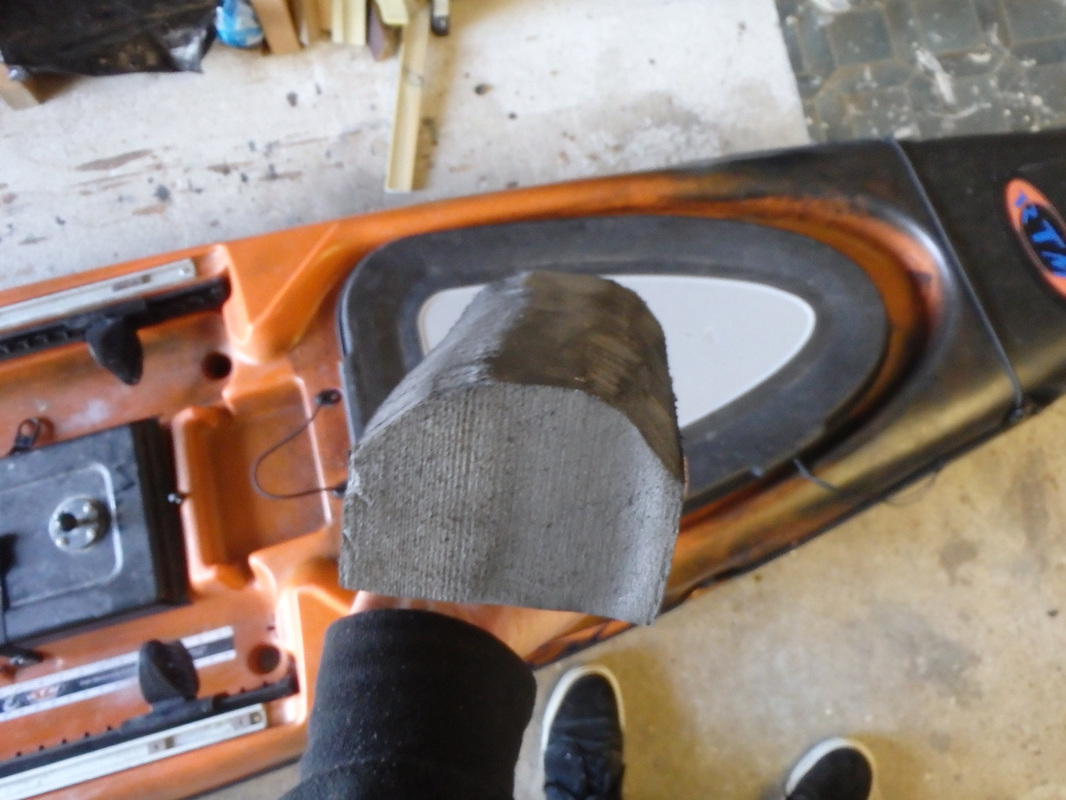
I then cut a slot just big enough to hold the battery box. Holes were drilled through the foam below the slot for bungee to hold the box in place. A recess was also chopped out of the block to form a hole to place excess cable. This will keep all the cabling tidy. After the transducer installation (Step 4) this block is glued to the hull to keep everything in one place. 
Battery Box holder for kayak fish finder
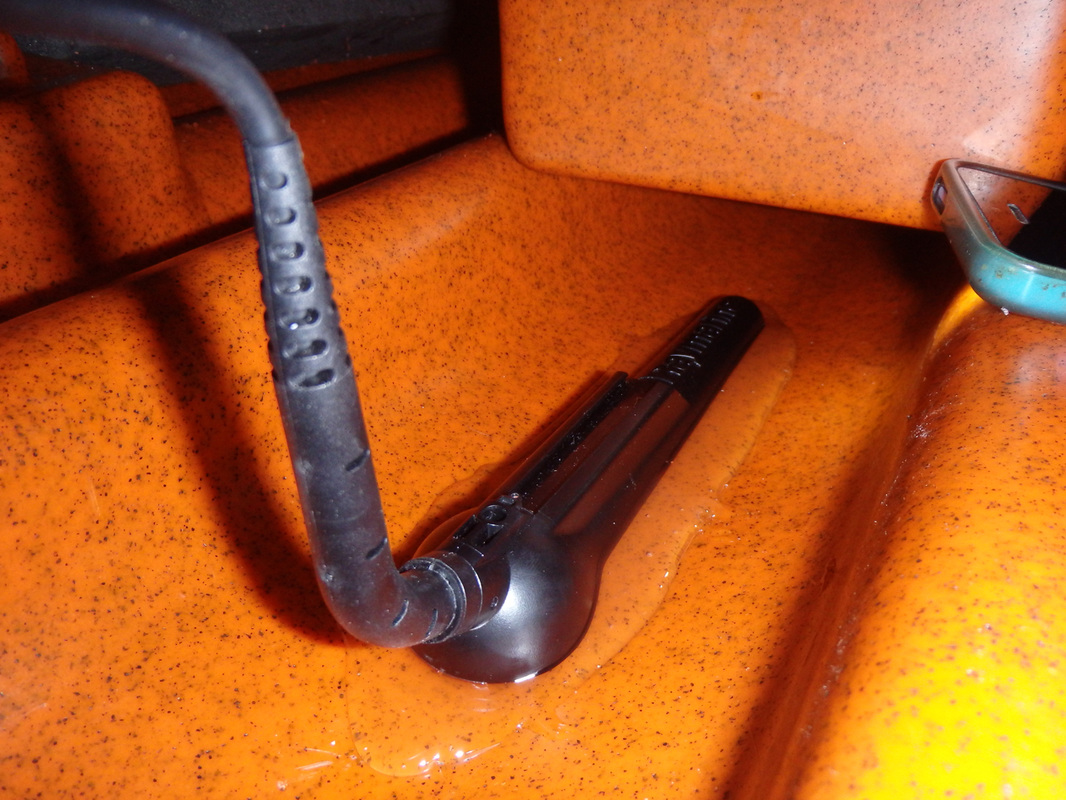
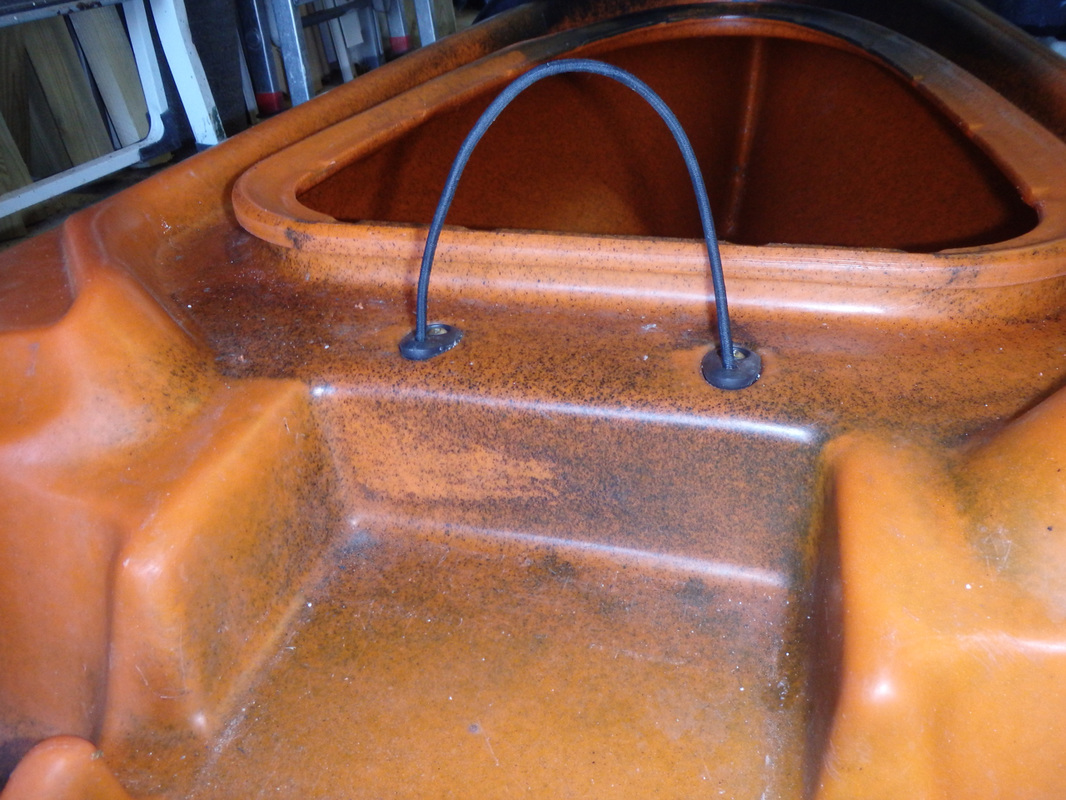
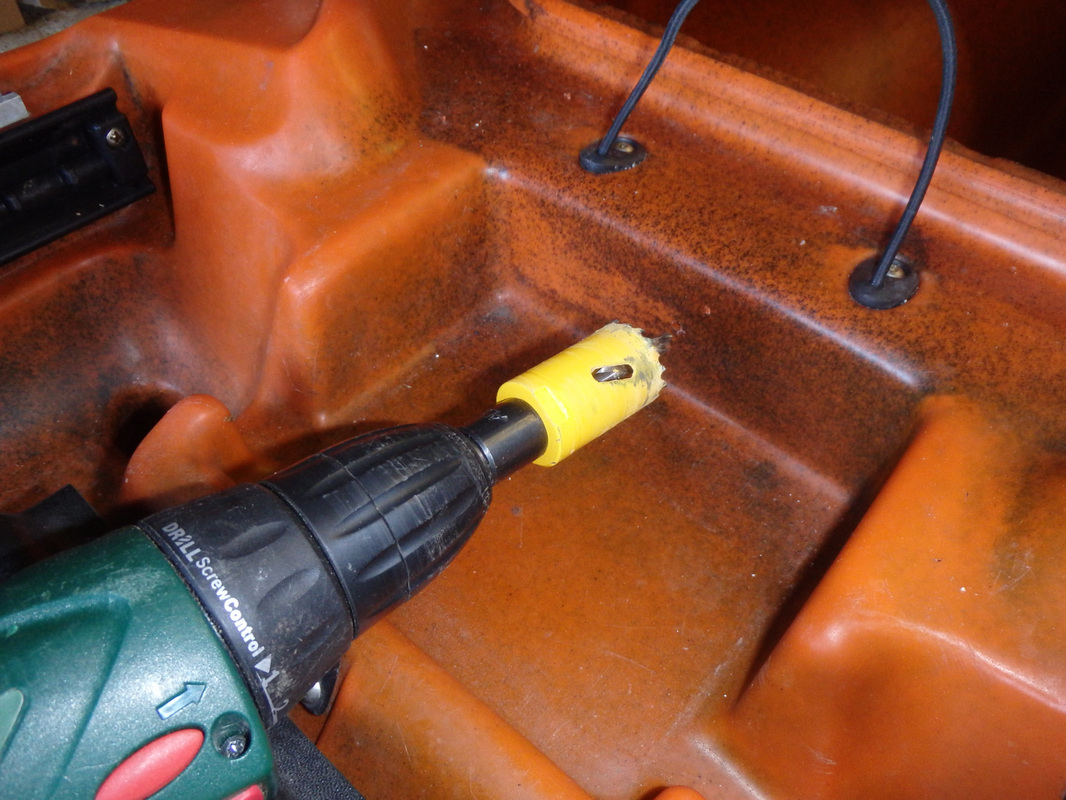
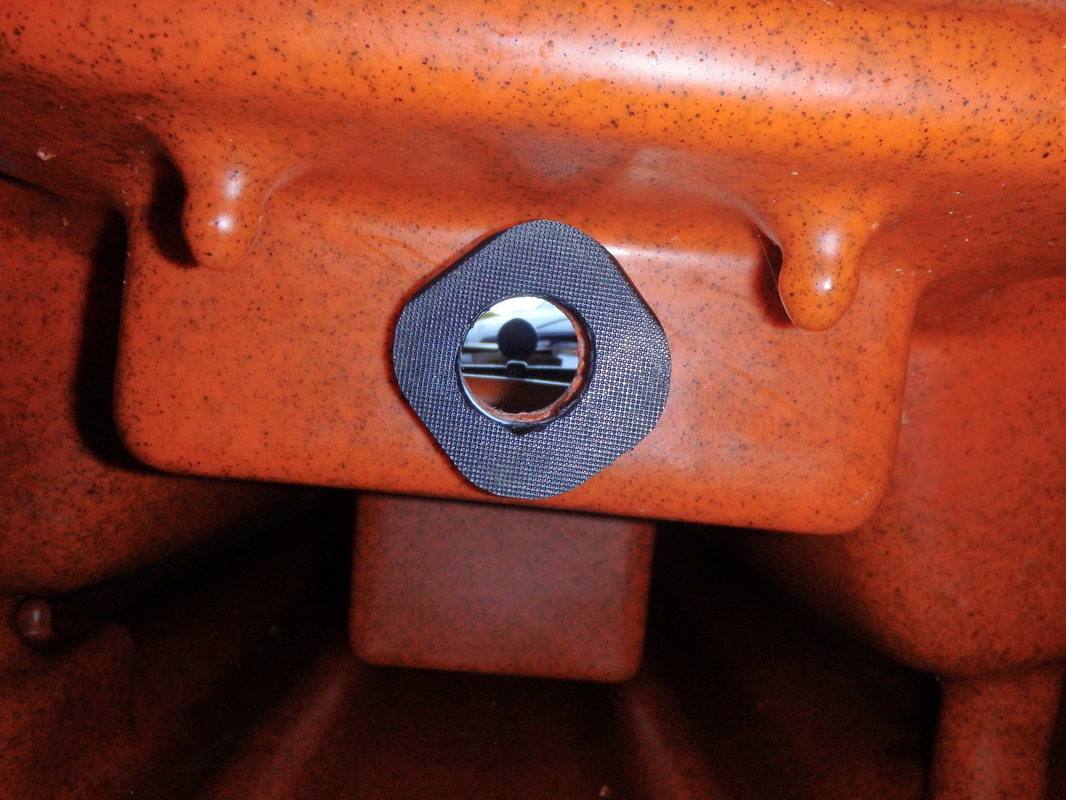
One finished battery box holder that keeps everything tidy and weighs virtually nothing!
Battery Box holder for kayak fish finder

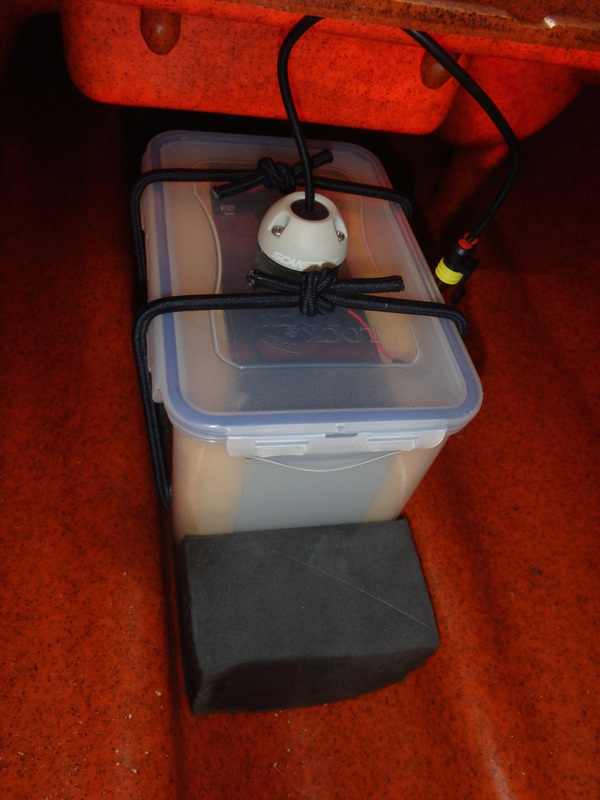
Step 3 - Mounting the Dragonfly head unit

The cables from the transducer and battery must pass through the hull of the kayak to plug into the back of the fish finder. For a waterproof seal i have routed my cables through a Scanstrut Deck Seal DS30-P for 30mm connectors and 9-14mm cables. I decided on placing this in front of my centre hatch in a small recess designed to hold a tackle box. Any small flat area towards the bow end of the footwell are popular places to position a deck seal. A hole is drilled that is large enough to pass the fish finder transducer/power cable connector through. 
Fitting a deck seal to a fishing kayak
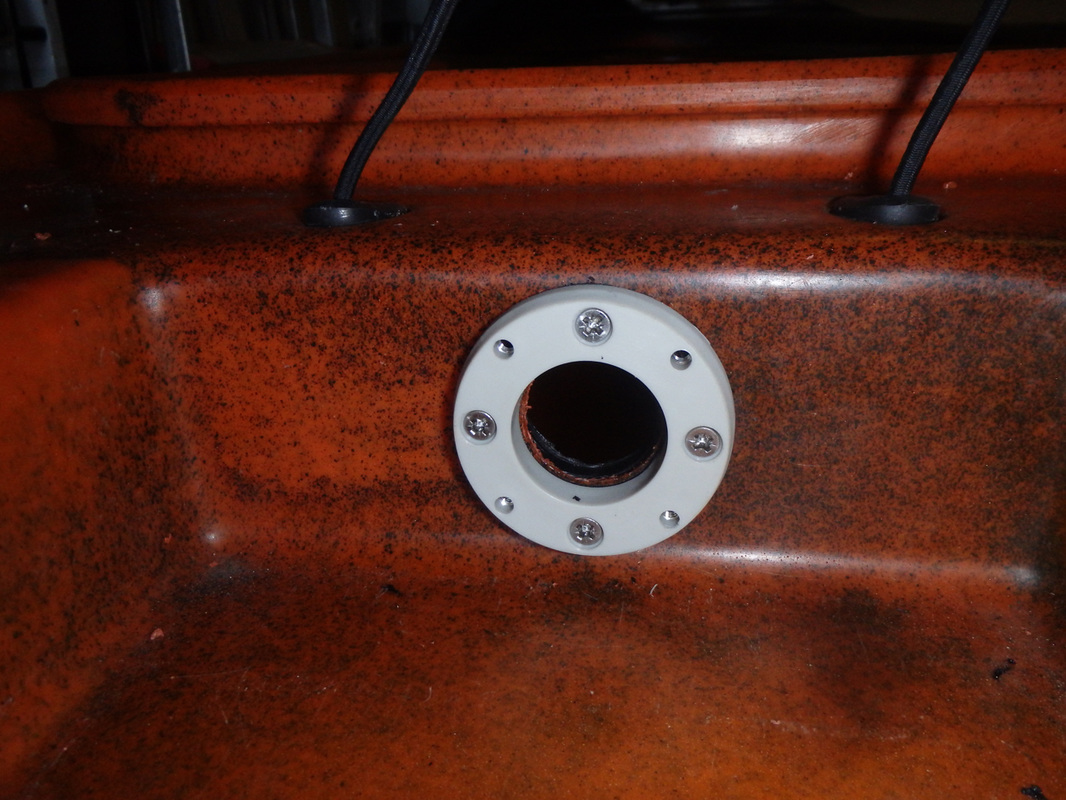
Next i assembled the base of the deck seal and made another chopping board backing plate for a strong hold against the kayak. 
Fitting a deck seal to a fishing kayak
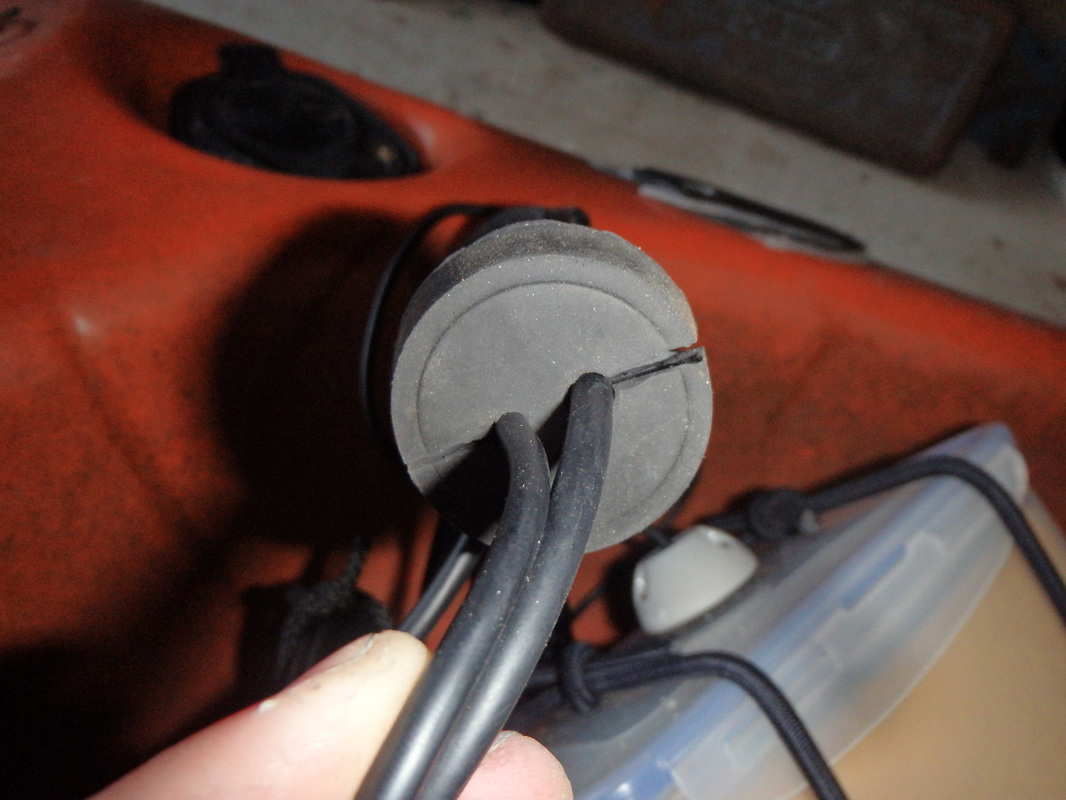
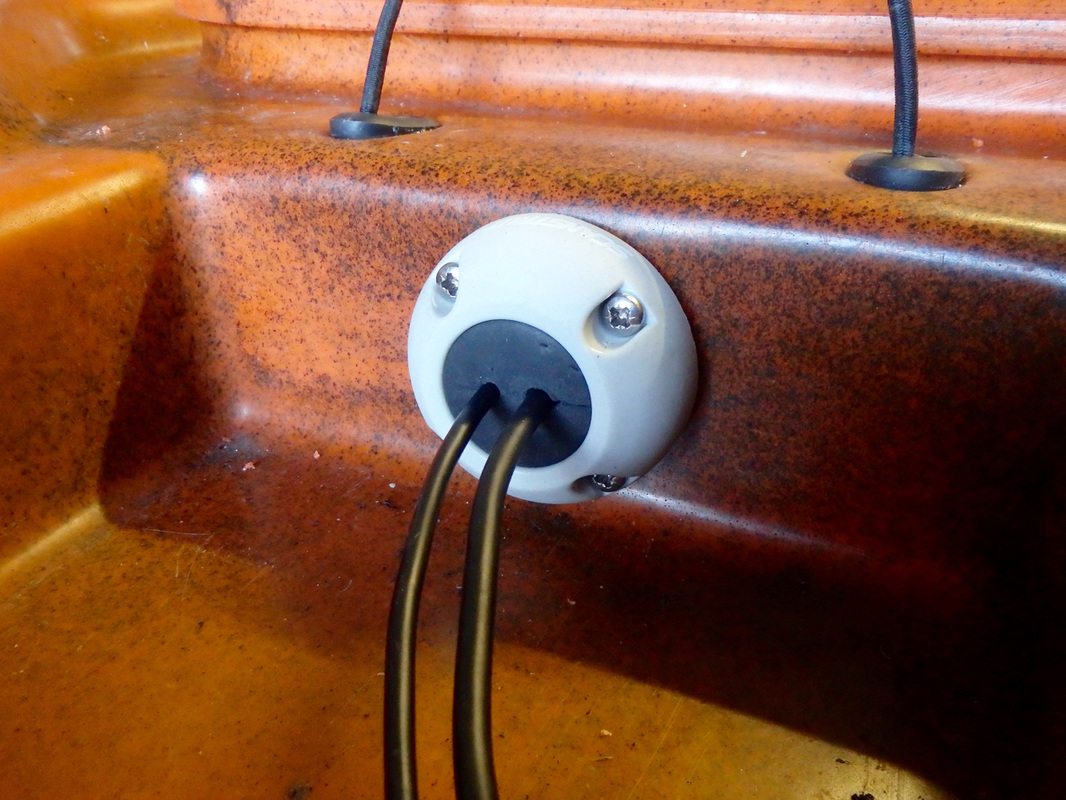
The pre-drilled holes in rubber blocks supplied with the DS30-P deck seal are too large for the power and transducer cables on the Dragonfly so i have drilled two holes in the blank block just slightly smaller than the cables. When this is clamped down under the deck seal cover it will wrap around the cables tightly forming a waterproof seal. A dab of marine goop or other sealant can be smeared around the cables and over the deck seal to fill any small gaps where water may ingress. Ensure there is enough cable outside the hull so that the connector plug can reach the back of the fish finder with some slack so that the connection isn't under stress and so that the fish finder can be moved on its mount. 
Fitting a deck seal to a fishing kayak
The Dragonfly 5-Pro head unit comes with it own adjustable mount based around a ball joint. The ball is compatible with 1" Ram Mount gear so i decided to utilise an existing Ram 1" Ball Round Base that i have bolted to my centre hatch lid and attach the head unit to this using a Ram 1" double socket arm. The Dragonfly mounting ball isn't as grippy as a ram ball but it holds well enough for now. If i find that it starts to not grip properly then i will invest in a Ram ball with an M6 male bolt to screw into the back of the unit. A Ram ball or the Dragonfly mounting base can be mounted onto any flat surface on a kayak using trifold rivets or stainless steel bolts, nuts and washers. Equally the fish finder could be mounted onto a slide track compatible 1" Ram ball if you want your unit mounted on your kayaks slide tracks. 
Installing a Raymarine Dragonfly 5-Pro on a kayak
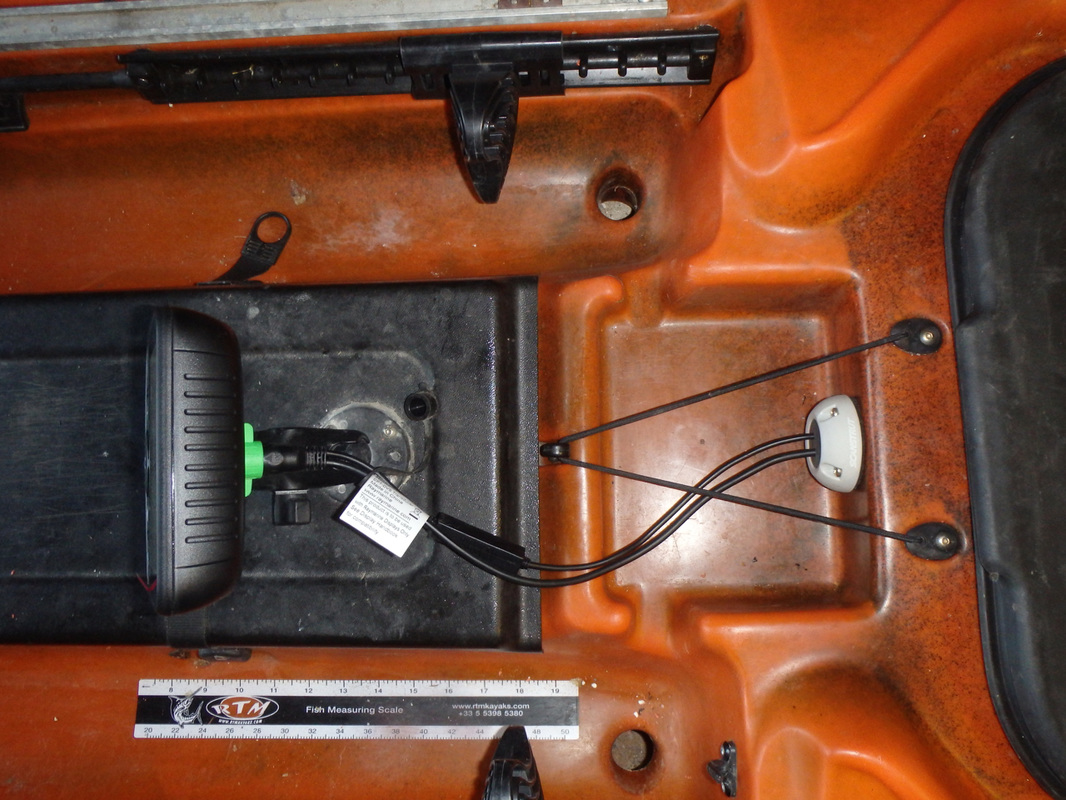
When I'm transporting the kayak the head unit can easily be removed and cables stowed under the  bungee. If you haven't got anything to retain the cables then a couple of pad eyes riveted to the kayak with some bungee tided between them would make a good cable keeper. 
Fitting a deck seal to a fishing kayak

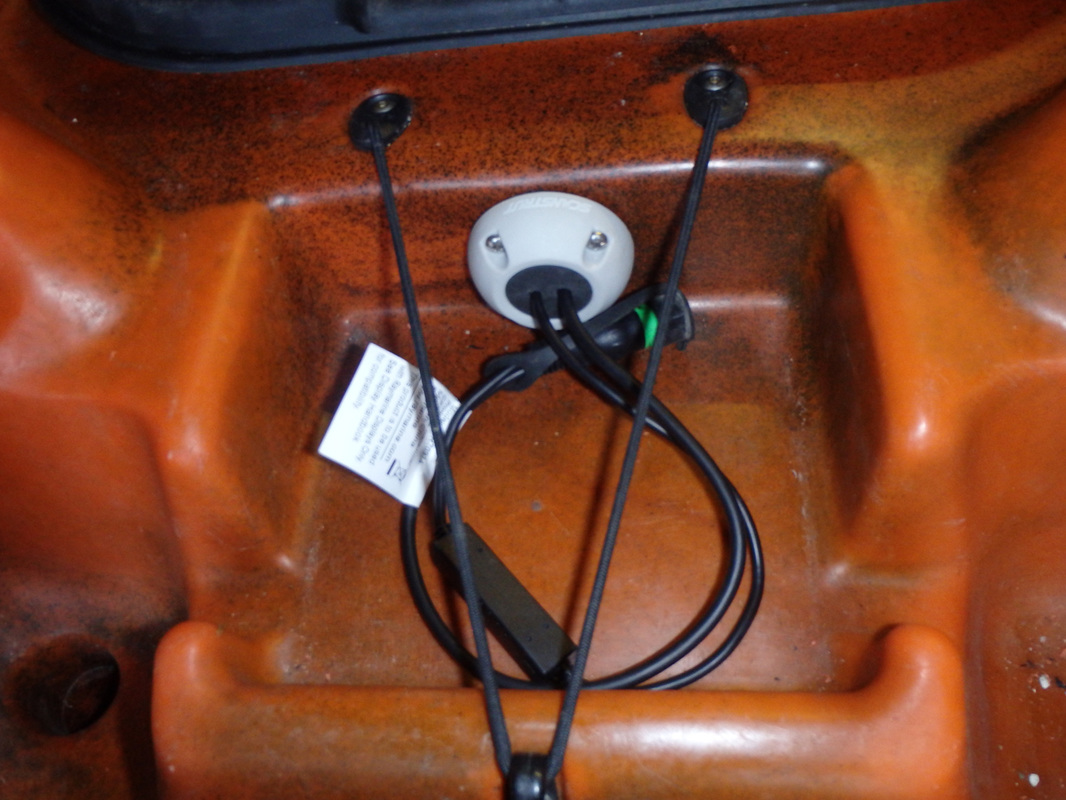
Step 4 - Installing the Transducer in-hull

There are 3 main methods to install a transducer on a kayak: 

  • Scupper Mounted -  where the transducer is fixed underneath the kayak either against the scupper hole or more commonly inside a purpose moulded transducer scupper with the transducer wire coming up to the head unit through the scupper hole.

  • Arm Mounted - where the transducer is mounted on the end of an arm which goes over the side of the kayak. Ram Mounts make a flexible transducer arm that can be attached to the kayak via a ram ball that is fixed to the kayak or on a ram ball that is attached to the kayaks slide rails, if present. The arm can easily be moved in and out of the water to prevent damage when paddling over shallow rocks or when launching/landing. 

  • In-hull Mounted - where the transducer is either glued inside the kayak against the hull as a 'dry-mount' or placed within a small well against the hull that is filled with water as a 'wet-mount'. The dry-mount in-hull option appears to be the most common form of transducer installation, if scupper mounting is not an option, with Marine Goop or Sikaflex used as the adhesive to bond the transducer to the hull.

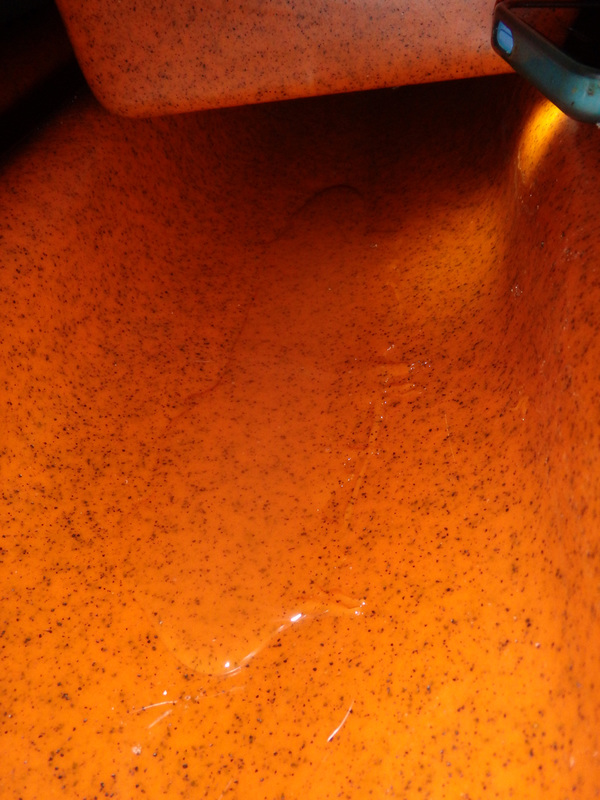
The Abaco does have a transducer scupper hole and i used this to scupper mount the transducer on my Lowrance Elite-4x DSI. The Dragonfly transducer is considerably longer than the Elite-4x DSI transducer and also longer than the transducer scupper on the Abaco! RTM will have to make a longer transducer scupper hole to accommodate for the larger transducers on the latest CHIRP fish finders.
Raymarine Dragonfly Transducer installation in the hull of a fishing kayak
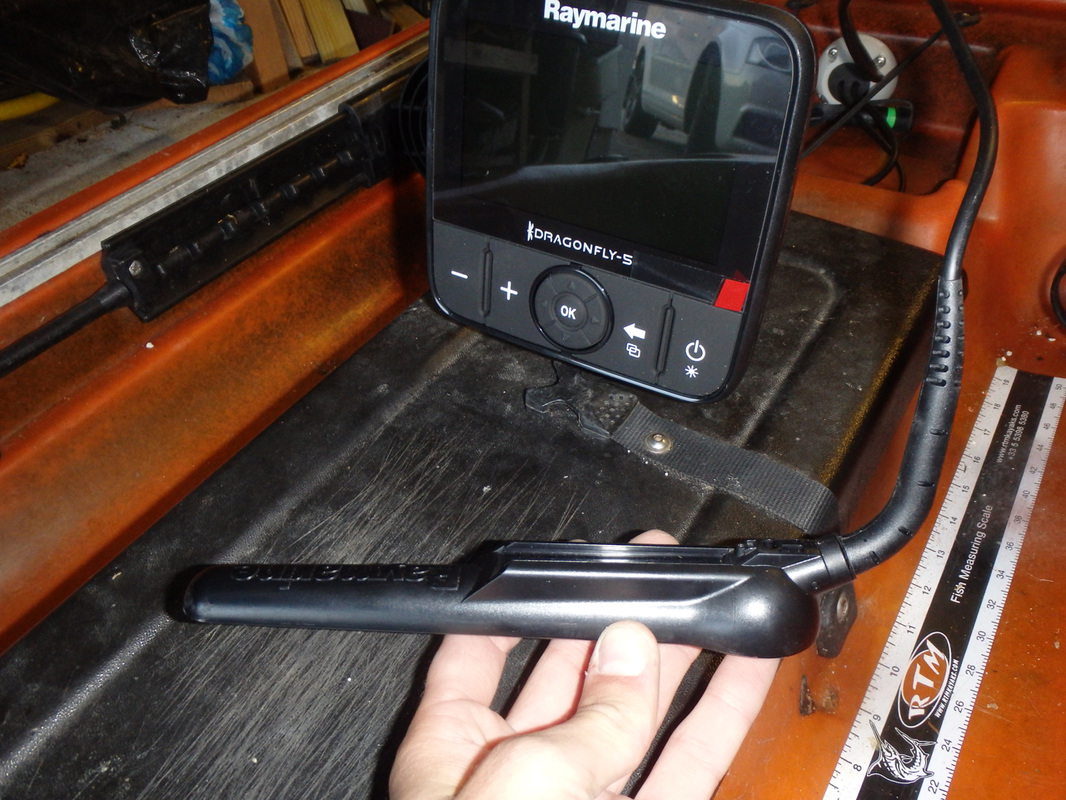
I decided upon the in-hull dry mount option so that all wiring is hidden inside the hull and the transducer is protected from damage. I opted for Marine Goop to bond the transducer to the hull. The transducer needs to be pushed down into a big blob of Marine Goop in the keel line of the hull but you MUST ensure no air bubbles are present in the glue before pushing down the transducer. Air bubbles causes interference with the sonar reading. Practice building up a blob of marine goop on some scrap cardboard or wood so that you know how best to apply it. I found even after practicing that a couple of small air bubbles were present in the glue so i used the sharp end of a cable tie to scrape the bubbles out of the blob. Use a small torch to illuminate the glue so that you can easily see any bubbles.
Raymarine Dragonfly Transducer installation in the hull of a fishing kayak
The Goop needs to be left for 24-48h to cure before use.  Once i was happy that the transducer had been glued in successfully i glued the battery block in place
Battery Box holder in a fishing kayak
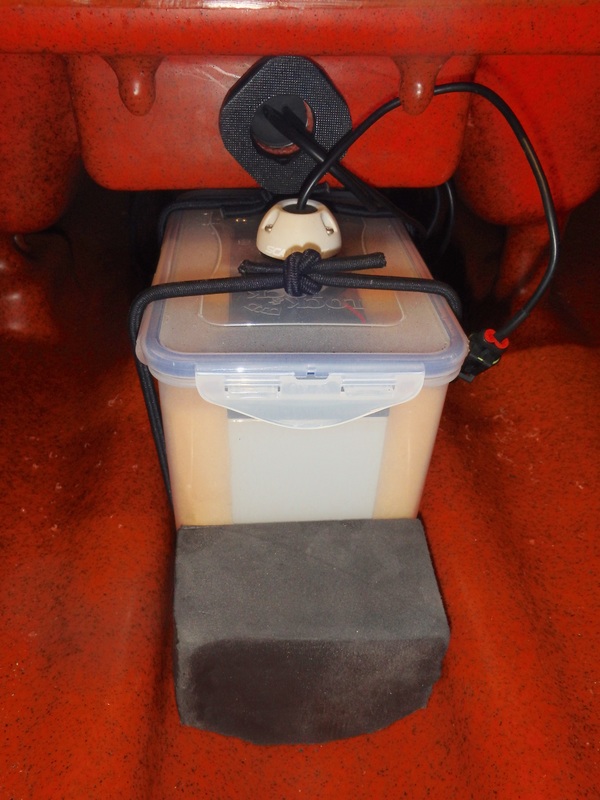
The wires are all tidy and the battery box can easily be disconnected and removed for when the kayak is being transported. The battery box can also be moved to another kayak for use with another fish finder. The bungee keeps it all in place so if the kayak was to flip the battery wouldn't be thrown around potentially damaging the wires. 

The Finished Product

Installing a Raymarine Dragonfly 5-Pro on a kayak
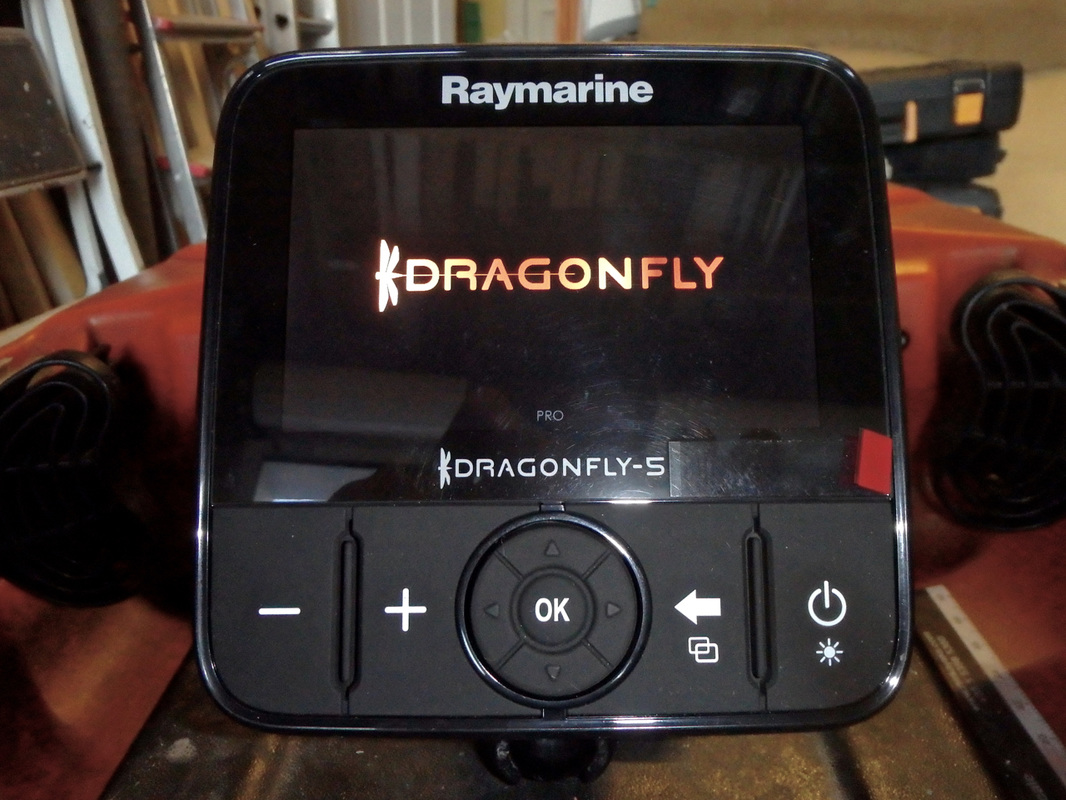
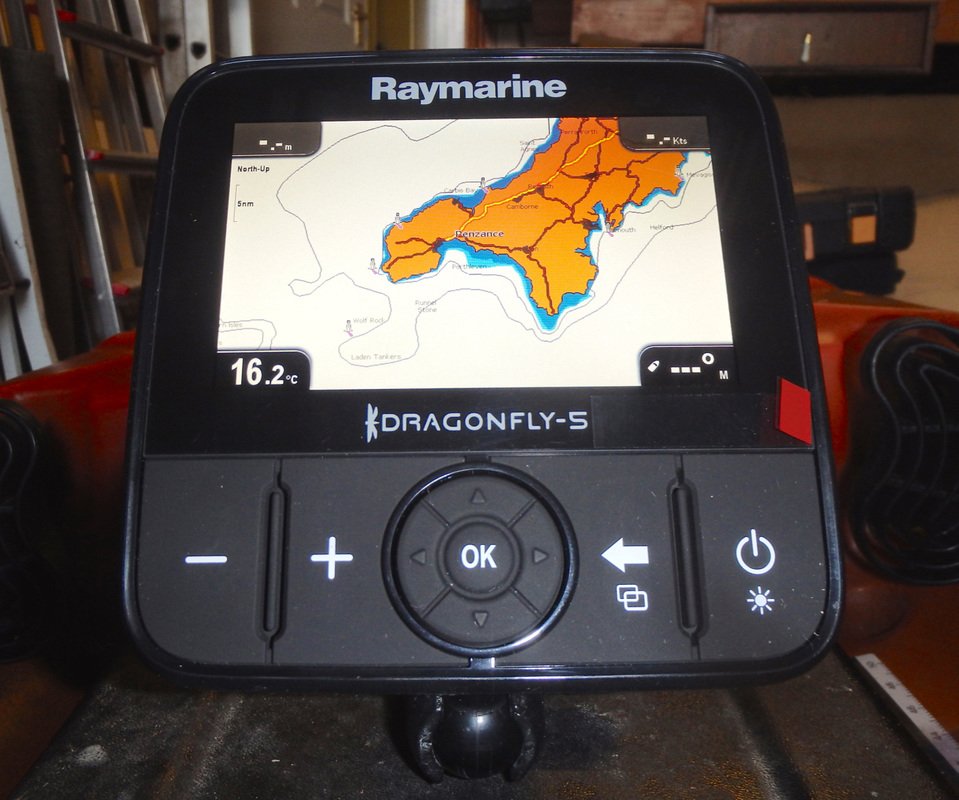
I downloaded the Navionics Nautical and Sonar Charts onto the micro SD supplied with the chart pack through the Navionics website following the very simple step-by-step instructions. The Micro SD then slots into a card holder located underneath a thick rubber plug in the back of the Dragonfly. Having looked at card slots on other manufacturers fish finder/GPS units, the Dragonflys looks to be far more likely to prevent water ingress under immersion. The downloaded nautical and sonar charts can easily be switched between on the menu. 

I used the Dragonfly over the weekend of the Ocean Kayak Classic competition at Plymouth and it seemed to work flawlessly. The display is bright and clear. Raymarine ensure the Dragonfly screen will not fog and i saw no signs of fogging over the weekend. The down-vision returns were high resolution, clear and sharp with no signs of any issues from the in-hull installation apart from a small band of interference within the first few cm's of return - this was to be expected and is hardly noticeable on the screen at all which is good. Bottom features were clearly identifiable with rocks, boulders and seaweed seen is good detail in shallow water less than 10m. Without having used it in deeper water i cannot yet comment on its ability to identify structure below this depth. The GPS worked well and waypoints easily entered and stored. The chart was easy to navigate and zoom into and out from. The temperature reading starts quite a way above the water temperature just after launching (seen below in the photo) but once the hull cools down to the water temperature after 10 minutes or so the reading is approx. 1° above that of the water.

So far I'm impressed and I'm sure it will be put to good use finding fish and various structures, with the GPS and bathymetry charts being used to navigate to fishing grounds and store those all important places where the fish are caught!

If your interested in purchasing the Raymarine Dragonfly 5-PRO they are available at Cornwall Canoes, along with all the main accessories needed for fish finder installation. Give them a call or check out their website for more information.
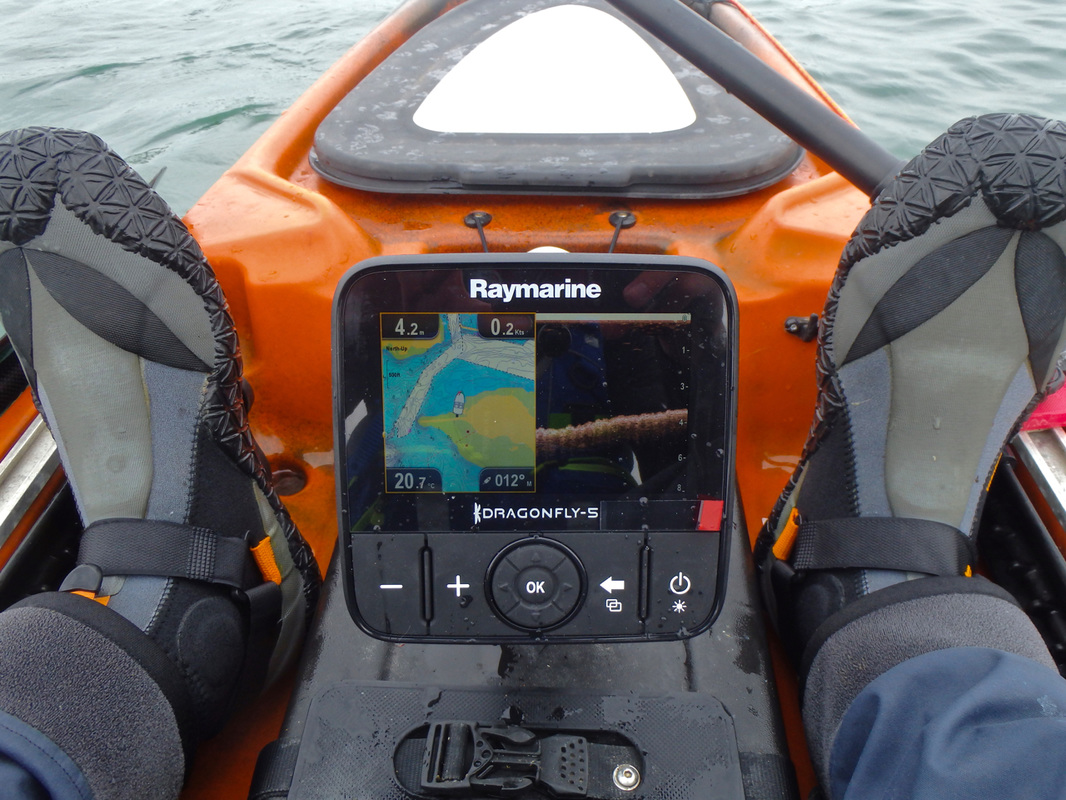
Installing a Raymarine Dragonfly 5-Pro on a kayak

2016 Update

I am no longer paddling the RTM Abaco used in the install above so the Dragonfly has been transferred to my RTM Tempo using the same method used in this post, and more recently transferred to a RTM Rytmo and installed using a through-scupper method. More info on the RTM Rytmo Installation can be found on the following link: Rigging the RTM Rytmo for Kayak Fishing. 
Dave Hogan
24/6/2015 14:04:20

Great job.. I've just bought the same unit and been fitting mine out on my sib. From reading the instruction they say a 5amp inline fuse must be used. Do you intend fitting one or did you just miss it out?
Keep up the good work.
Cheers
Dave

Liam Faisey
24/6/2015 14:10:46

Hi David,

Must have missed that in the instructions! Not sure if I will bother but it would be easy enough to incorporate a waterproof fuse holder into into the battery box wiring.

Cheers,

Liam

nathan
23/7/2015 06:33:17

great report, I could not see where you attached the drain wire.
I thought that it had to be connected to the negative side.

Liam Faisey
23/7/2015 06:36:22

Hi Nathan,

I didn't know it had a drain wire. If so mines not connected to anything and seems to be working fine!

Cheers,

Liam

thanks liam, yes the drain wire is the grey one
23/7/2015 06:45:47

thanks liam, yes the drain wire is the grey one.
you can see it on your twelfth picture down from the top.
in the instructions it says it has to be connected to the negative terminal.

Liam Faisey
23/7/2015 06:52:37

As far as I can remember what's shown in the photo is just the reflective insulating sheath. I'm positive there wasn't a third wire but then again I wasn't looking for one so probably missed it. I will have a closer look at it when I get a chance!

Cheers for pointing it out,

Liam

Dean
19/10/2015 23:12:15

Hi how did you find this in deeper water with the in hull install? I have been told that down imaging won't work through the hull?

Liam
20/10/2015 15:56:50

Hi Dean,

The down imaging has worked fine for me. I have only used it in depths up to around 25-30m so far so can't comment on how it performs in deeper water. I know others have had problems getting the DI to shoot through-hull though. Would like to have scupper mounted mine but it was not really an option with the dragonfly transducer size

Cheers,

Liam

James
15/3/2016 14:39:40

How long does the 7Ah battery last for? I am just trying to fit a 5 Pro to a kayak and am looking at batteries.

Cornish Kayak Angler
16/3/2016 20:15:33

Hi James, A 7aH battery will last around 2 day sessions on the water. I tend to charge mine between trips though to be sure it'll power the fish finder all day.

Cornish Kayak Angler
17/3/2016 20:48:16

The 7aH will last a good two day sessions on the water. I usually charge mine up between trips though just to be sure

Kelvin
1/4/2016 19:01:38

Thanks for a great write up I've got the dragonfly 5 pro fitted on a trident 13. Ive tried the transducer arm over the side and didn't like it at all so after reading this I'm going to try the same and marine goop the transducer in the hull

Cornish Kayak Angler
2/4/2016 23:30:25

Hi Kelvin,

Thanks for the comment. The in-hull install is fairly easy, just take your time applying the Goop to ensure there are no bubbles! The in-hull method keeps all the cables tucked away inside the kayak too so it looks neater and tidier. Let me know how you get on with it,

Cheers,
Liam

Kelvin
17/4/2016 22:09:59

Hi Liam I tried the transducer out today and it worked great no problem at all the water temp was a degree or to higher but not really bothered about that

Matt
9/4/2016 12:47:46

I guess I have air bubbles in my goop. Unit will randomly not read in under 2' of water. I'll try again...

Cornish Kayak Angler
10/4/2016 22:01:19

Hi Matt,

I often find that a fish finder will not show a clear reading in very shallow water such as within 2 foot of water. I assume there is so much reflection of sonar signal the unit struggles to generate a clear image of what is beneath the kayak. Usually it just fills the screen with colour as if you were touching the bottom. The Dragonfly does it and so does my Lowrance Elite. Once you get beyond say 3 foot of depth the unit begins to read correctly.

Did you try the unit in deeper water? Did it show a clear image?

Air bubbles in the Goop will usually show as gaps in the sonar reading, usually shown as vertical black lines (or white depending on colour settings). This is where the sonar is instantly being reflected back onto the transducer by the air bubbles between the transducer and the kayak hull. Were vertical lines or gaps present in the sonar reading?

Hopefully you get to the bottom of the issue!

Cheers,
Liam

ChrisB
14/5/2016 09:58:36

Hi Liam, just completed the install and all went well - except on powering up there were dreaded black lines on the sonar. Any advice in how to avoid these? I made a well for the transducer and thought I had all the bubbles out but discovered micro bubbles when I removed the transducer. Maybe I should use less Goop?

Matt
13/7/2016 21:38:50

Chris, did you ever get a reply here? I have the same issue as well as having the unit kinda freeze up in less than 2ft of water. I'm going to try again this weekend, didn't know if you had any tips.

Cornish Kayak Angler
13/7/2016 22:40:49

Sorry guys, I've only just seen you comments.

Chris - looks like you have solved your issue going on the comment below.

Matt - most fish finders will not produce a clear reading in very shallow water. I assume that this is because of the amount of sonar reflection between the bottom and the kayak causing lots of interference and mucking up the return signal. Mine does not show any clear reading in less than 2ft as well. Move into 3-4ft and it should start producing a better reading.

Let me know how you get on.

Cheers,
Liam

Bob
3/8/2017 16:27:42

Hitting Goop with a hairdryer will help remove micro bubbles. Use a bright flashlight and check for bubbles in Goop before setting transducer into it.

mike
14/6/2016 21:26:42

Amazing post, thanks

ChrisB
13/7/2016 22:33:15

Hi Matt, no I didn't get a reply but my unit works fine now.
I think I solved the problem by removing and cleaning the transducer and not using a "well" for the Goop when I reset it in the hull. I also set it closer to the hatch than at first was so that I could see any bubbles no matter how small they were. Those bubbles I found, and they were very small, I tried to tease out with a cocktail stick. I also used much less Goop. After that all was well, although the weather in the Solent hasn't been great for kayaks and it hasn't had much use! Good luck with your installation.

Nuno Ribeiro
17/9/2016 19:12:54

Helo From Portugal

Im about to make the same mount on my transducer (Dragonfly 5 Pro)

Heard rumours about "burnt" transducers because they were designed to work under water....or in constant contact with water.

Any comments about this "rumour" ???

Thanks and great post.

Best Regards
Nuno

Cornish Kayak Angler
17/9/2016 19:43:27

Hi Nuno,

I have too heard rumours about the Dragonfly transducer overheating when installed in the hull. I haven't experienced this myself when i had this transducer installed this way. I installed the transducer this way in an RTM Tempo too without any problems.

Hope the install goes well!

Cheers,
Liam

Nuno Ribeiro
17/9/2016 23:49:27

Thanks a Lot for de feedback.

Im going to install "dry" as You. Im using sikaflex 11c...in Portugal is more common to use this product.

Boas Proas (Good Bow....portuguese expression ;)

Best
Nuno

Nuno Ribeiro
20/9/2016 19:02:18

Update

Tested today. All OK
Some fine tuning needed on shallow and muddy warters. Too much signal and "noise" and "gain" needed to adjust manualy.

Great Sounder.
https://goo.gl/photos/77i37axB3gDqtmFk8

Thank You again for the tips

Best
Nuno

Matt
1/10/2016 05:35:10

Hi Liam,
Great write up and lots of good tips too. im about to upgrade my hummingbird to a dragonfly pro, everything in my head knows what to do and where to place things, and already to start. The closed cell foam is s great idea, I've started to form mine up across the hull as my blocks are 50mm thick and need to bond together. My question is, after forming up the battery holding block, I'm thinking of cutting out the shape of the transducer, so I can install the transducer in gloop, then gloop in the battery block on top of it. For two reasons really, tidy up the hull space and thinking the battery block would prevent the transducer being knocked out gloop of something was placed in the hull. Do you know of any reason why the battery can not be placed directly over the transducer, would it affect its readings, there should be at least the thickness of 30mm of close cell foam separating them.

Cornish Kayak Angler
3/10/2016 20:21:24

Hi Matt,

The battery itself shouldn't interfere with the transducer but I would recommended keeping it away from it rather than over it. CHIRP transducers can get warm so it's probably best to not be covered up and open to the air inside the hull to prevent potential overheating. Gooping the transducer in as I have above leaves the top half of the transducer exposed the air and the bottom half bonded to the hull. I haven't experienced any problems with mine overheating.

I hope your install goes well!

Cheers,
Liam

Norberto
16/3/2017 10:40:48

Hi, nice post. How the FF have performed after installation? Have you had the opportunity to get it to deeper waters? Any overheating of the transducer? How far to the side does the unit can see underneath the kayak? I am evaluating the same FF model for my 2015 OK Trident 13 kayak using your post as a guide to install the unit. Thank you.

ChrisB
16/3/2017 15:15:23

I had an email from "Weebley" about the installation and results from its use on the water. Firstly Weebley I didn't post the blog (I think it was Liam) and don't want to take credit for a great instructional guide. It really made things easier to install the unit. But in response to your questions, I have used it extensively and it works v. well. However, I fish mainly in the Solent and haven't recorded depths of more than 30ft (or I would be in the shipping channel!) I have had no trouble with overheating and looking forward to using it again in the v near future - hopes this helps.

Norberto
16/3/2017 21:40:41

Thank you very much,

Raymond
10/4/2017 21:08:54

Hello, excellent post, it is very helpfull
Can you tell me if the Scanstrut Deck Seal
always has a blank rubber block included?

And would the connector of the wire fit through a 21mm (4-9mm) version?

Thank you

Cornish Kayak Angler
13/4/2017 22:27:02

Hi Raymond,

Thanks for your comment. Yes the Scanstrut deck seals come with a blank rubber block for custom drilling/wire install. I'm not 100% sure on the 21mm deck seal - I have a feeling it may just squeeze through but haven't tried one myself to know.

Cheers,
Liam

Jai Fitchett link
17/4/2018 06:44:09

hi i am impressive too ,, when i read your post, it is good instruction
god job , and i will follow your providing info hope this usable me and other and try to updates my all ideas
thanks a lot

john bass link
21/5/2018 16:27:22

It was a great article. you told the installation very well. thanks Liam

John Bass link
30/8/2018 18:29:18

Raymarine dragonfly 5 pro is a really great fish finder. You have described the installation in great detail and it has been a great article. very thankfull Liam

Lawrence B link
3/1/2021 19:32:41

Verry nice blog you have here

john thomson
28/5/2021 09:17:45

the specs for this fishfinder show IPX6 and IPX7, IPX6 isn't really for immersion. Any problems with waterproofness of this model?


Comments are closed.

    Author

    Liam Faisey

    Liam Faisey Cornish Kayak Angler

    SPONSORS

    palm-equipment-logo
    Picture
    Picture
    Picture
    Navionics Logo

    Proudly associated with
    Cornwall Canoes
    Cornwall's only specialist kayak fishing shop

    Archives

    March 2023
    January 2023
    November 2022
    February 2022
    September 2021
    June 2021
    May 2021
    April 2021
    March 2021
    January 2021
    June 2020
    May 2020
    April 2020
    November 2019
    October 2019
    September 2019
    July 2019
    June 2019
    May 2019
    February 2019
    January 2019
    August 2018
    July 2018
    June 2018
    May 2018
    April 2018
    February 2018
    January 2018
    December 2017
    November 2017
    October 2017
    September 2017
    August 2017
    July 2017
    June 2017
    May 2017
    April 2017
    March 2017
    January 2017
    December 2016
    October 2016
    September 2016
    August 2016
    July 2016
    June 2016
    May 2016
    April 2016
    March 2016
    February 2016
    January 2016
    December 2015
    November 2015
    October 2015
    September 2015
    August 2015
    July 2015
    June 2015
    May 2015
    April 2015
    March 2015
    December 2014
    November 2014
    October 2014
    September 2014
    August 2014
    July 2014
    June 2014
    May 2014
    April 2014
    March 2014
    February 2014
    December 2013
    November 2013

    Categories

    All
    Anchor
    Anchor Chain
    Anchoring
    Anchor Reel
    Anchor Trolley
    Atom Bib
    Baillons Wrasse
    Ballan Wrasse
    Basking Shark
    Bass
    Battery
    Bixpy Motor
    Black Bream
    Blonde Ray
    Blue Shark
    Boat Fishing
    Bull Huss
    Buyers Guide
    Camera
    Clothing
    Cod
    Common Skate
    Competition
    Conger Eel
    Corkwing Wrasse
    Cornwall
    Couch's Bream
    Crate
    Cuckoo Wrasse
    Dab
    Diy
    Dolphins
    Drift Fishing
    Drysuit
    Equipment
    Extendable Pole
    Fishfinder
    Fish Finder
    Fishing Kayaks
    Flounder
    Footwear
    Gilthead Bream
    Goby
    Goldsinney-wrasse
    Go Pro
    Gps
    Greater Weever
    Grey-gurnard
    Grey-gurnard
    Haddock
    Herring
    Hobie
    Hobie Eclipse
    Hobie Outback
    Hobie Outtfitter
    Jellyfish
    Kayak Fishing Guide
    Kayak Review
    Kayak Surfing
    Kayak-wars
    Launce
    Launch Venues
    Leashes
    Lesser Spotted Dogfish
    Ling
    Lithium Battery
    Live Bait
    Lowrance Elite 4x Dsi
    Lure Fishing
    Lures
    Mackerel
    Marine Biological Association
    Measuring-fish
    Megrim Sole
    Mirage Drive
    Modifications
    Mother Shipping
    Mounting-board
    Oceanic Pufferfish
    Ocean-sunfish
    Octopus
    Paddle
    Paddling
    Palm
    Palm-kaikoura
    Pedal Drive Kayaks
    Penzance Kayak Fishing Meet
    Pfd
    Pilchards
    Pilot Whales
    Places-to-fish
    Plaice
    PLB
    Pollack
    Porbeagle Shark
    Pouting
    Railblaza
    Ram Mounts
    Ram Tubes
    Ray
    Raymarine Dragonfly
    Red Band Fish
    Red Gurnard
    Red Mullet
    Reef Fishing
    Review
    Revolution 16
    Rigging
    Rock Cook Wrasse
    Rod Holders
    Rod Rest
    ROKK Mounts
    RPF Master
    RTM
    RTM Abaco 420
    RTM Abaco 420
    RTM Luxe Seat
    RTM Ocean Duo
    RTM Rytmo Angler
    RTM Tempo
    Safety
    Scad
    Scorpionfish
    Scotty Mount
    Selfrescue
    Shark
    Shore Fishing
    Skate
    Slide Track
    Small Eyed Ray
    Smoothound
    Spotted Ray
    Starting Out
    Storage
    Storm
    Streaked Gurnard
    Tandem Kayak
    Team RTM UK
    Teksport Xplore 330
    Thermals
    Thornback Ray
    Tompot Blenny
    Tope
    Triggerfish
    Tub Gurnard
    Turbot
    Ugly Stik Elite Spin Rod
    Ugly Stik Kayak Rod
    Undulate Ray
    VHF Radio
    Vibe Sea Ghost
    Video
    Viking Kayaks
    West Cornwall Kayakers
    Yak Attack

    Add my blog to your feed reader by clicking the button below 

    RSS Feed


    Cornish Kayak Angler - Kayak Fishing Blog

    Get blog updates via email

    Enter your email address:

    Delivered by FeedBurner


    blog web counter
    Web Counter

    Picture
    Picture
    Picture

    Kayak Fishing Videos

    Picture
    Picture
    Picture
    Kayak Bass Fishing Video
    Picture
    Picture
    Picture

    RSS Feed Widget
    Custom feed reader powered by FeedWind

    Useful Links

    Anglers Afloat
    Cornish Shore & Kayak Fisherman
    Cornwall Canoes
    ​Palm Equipment
    ​Penzance Kayak Fishing Meet Info
    Saltwater Kayak Fisherman
    Magic Seaweed
    XC Weather

    Picture

    Choosing a Paddle for Kayaking

    Kayak Fishing Clothing

    Pedal and Paddle Fishing Kayak Pros and Cons

Cornish Kayak Angler - Kayak Fishing Blog

Popular Pages

  • Home
  • Blog
  • Videos
  • Reviews
  • Kayak Modifications
  • UK Fish Identification
  • Places To Kayak Fish

Sponsors

Picture
Picture
Picture
Picture
Navionics UK

YouTube

Facebook

Website powered by pasties and the hope of good weather!
© 2023 Liam Faisey
  • Home
  • About
  • Blog
  • Information Guides
    • Choosing a Fishing Kayak
    • Choosing A Paddle
    • What to Wear
    • Essential Safety Equipment
    • Paddle or Pedal Kayak?
    • Installing A Fish Finder
    • How to Anchor A Kayak
  • Kayak Modifications
  • Videos
  • Reviews
  • Places to Fish
    • North Cornwall
    • West Cornwall
    • South Cornwall
  • UK Fish Identification
  • Photos
    • 2013 Photos
    • 2014 Photos
    • 2015 Photos
    • 2016 Photos
    • 2017 Photos
  • Marine Life Photography
    • Fish
    • Cnidaria
    • Echinodermata
    • Mollusca
    • Crustacea
  • Links