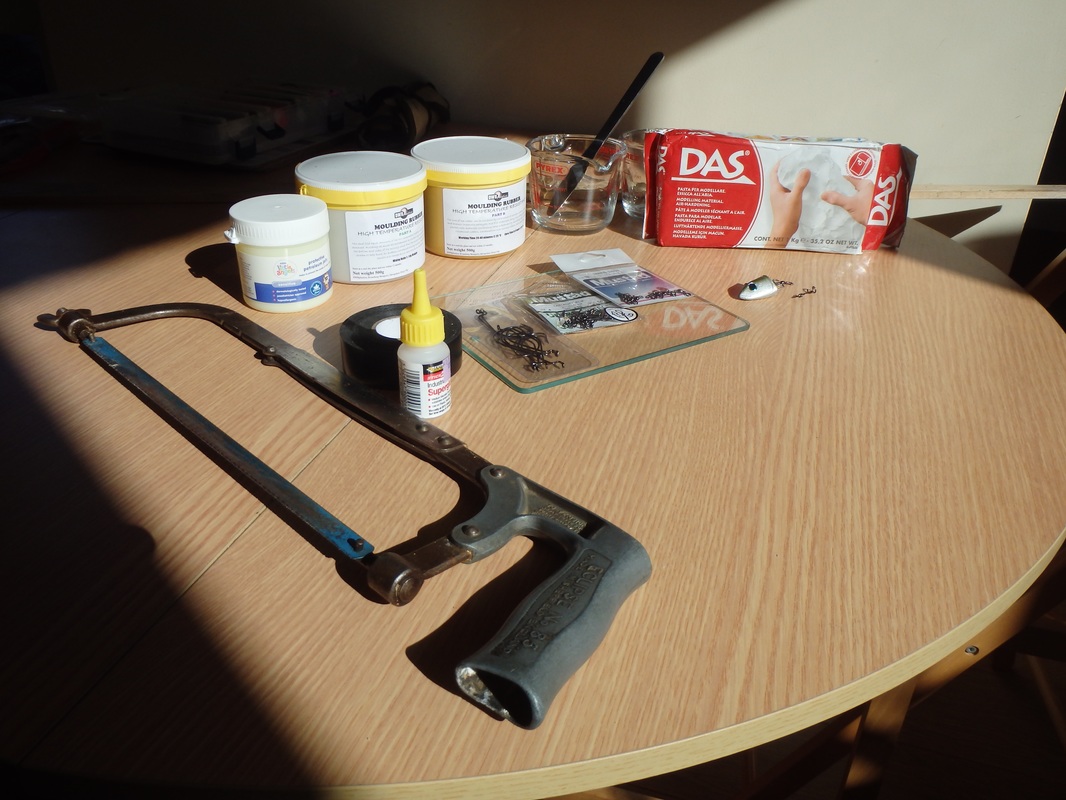
EquipmentAll the equipment to make a 2-piece RTV silicon mould for the homemade lead heads shown in this blog post can be purchased online and from any good hardware store. To make the lead heads shown in this tutorial you will need:
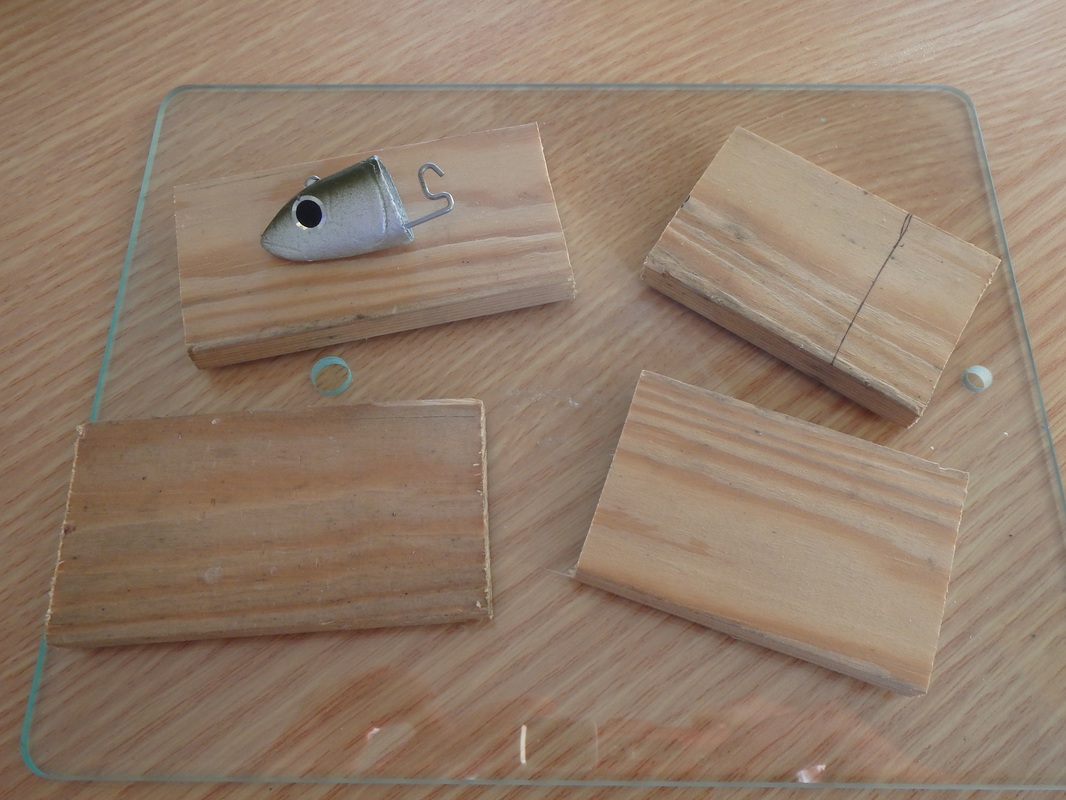
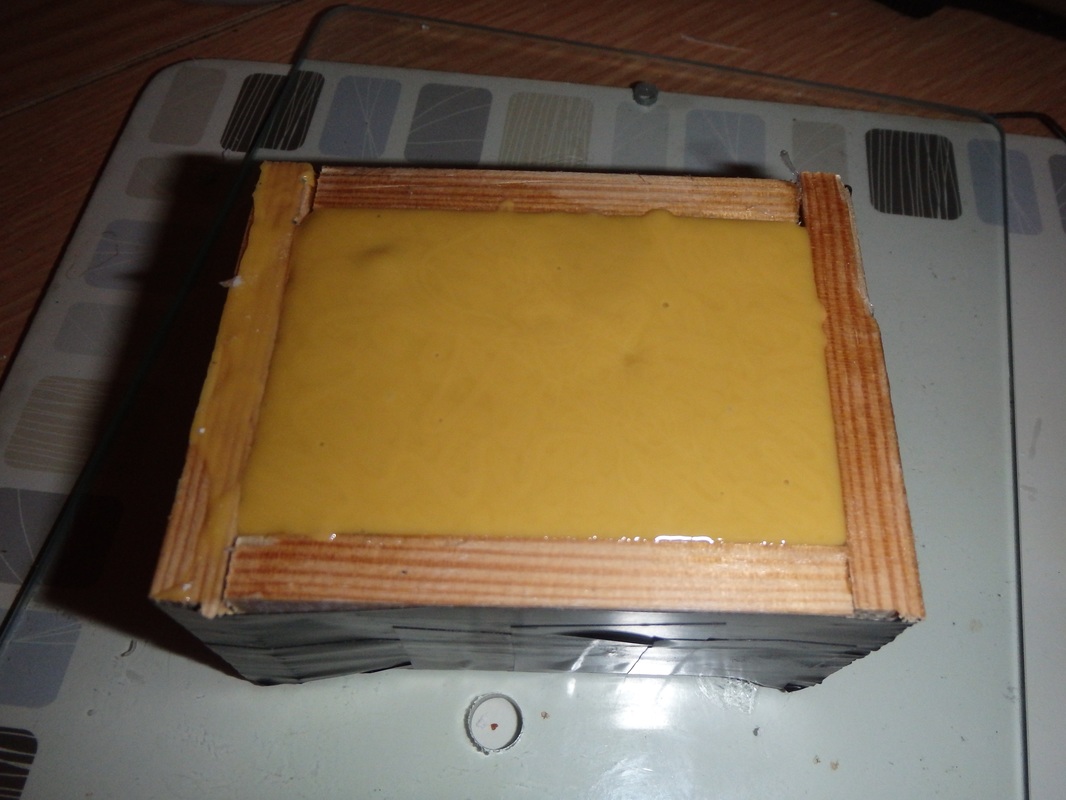
 Making a 2-part RTV Silicon Lead MouldYou will need to choose a jig head that you wish to replicate the shape of, or alternatively create a solid clay blank of a custom designed head. I have chosen to base the design of this lead head on the popular Minnow lure made by Fiiish, however this is not an exact copy. In fact the reason for creating a homemade version is that i wanted to improve the hook clip. I have had a few instances where a fish has managed to twist and unclip the hook from the head. I have found a more secure clip to be used and this is explained later on. Making lead heads yourself also gives you control over colour choice and head decoration. Once you have chosen the basic shape/design you wish to create a mould for you will need to create a mould box using the wood strips and a smooth flat tile - the tile forming the base. You want to create a box big enough to allow for a few centimetres of space all around the lead head if the lead head is located in the centre. Cut the wood to size, then glue the strips together and secure with sticky tape.
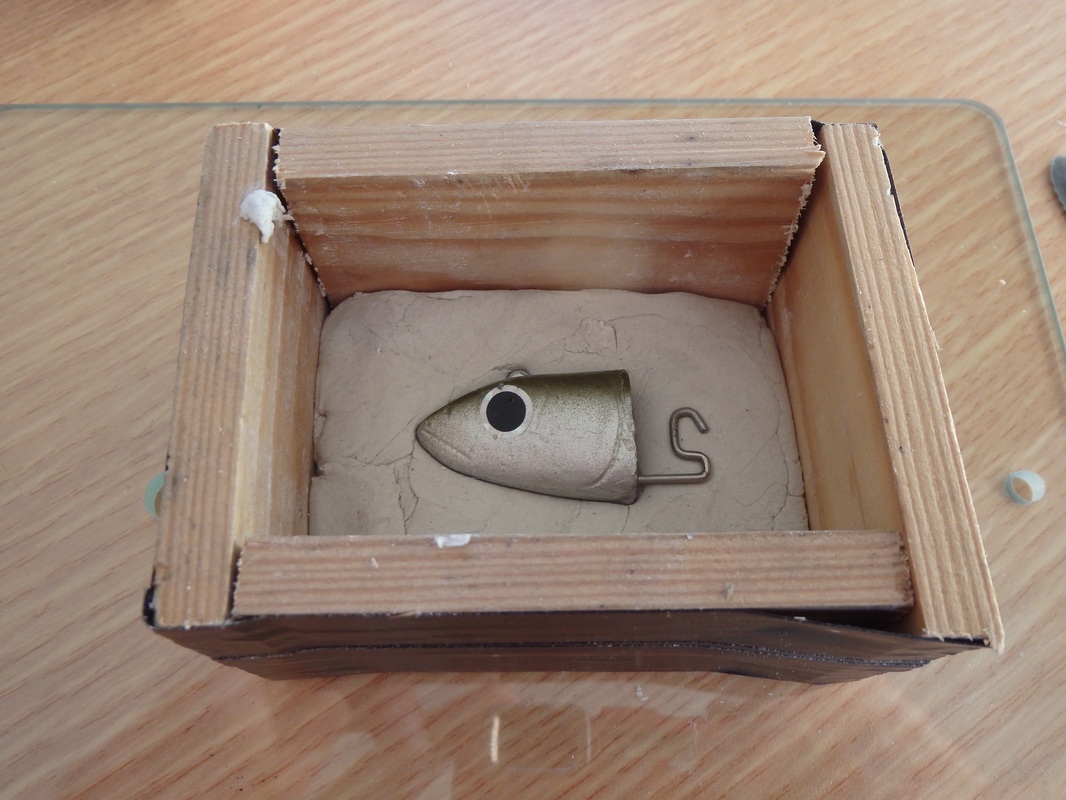
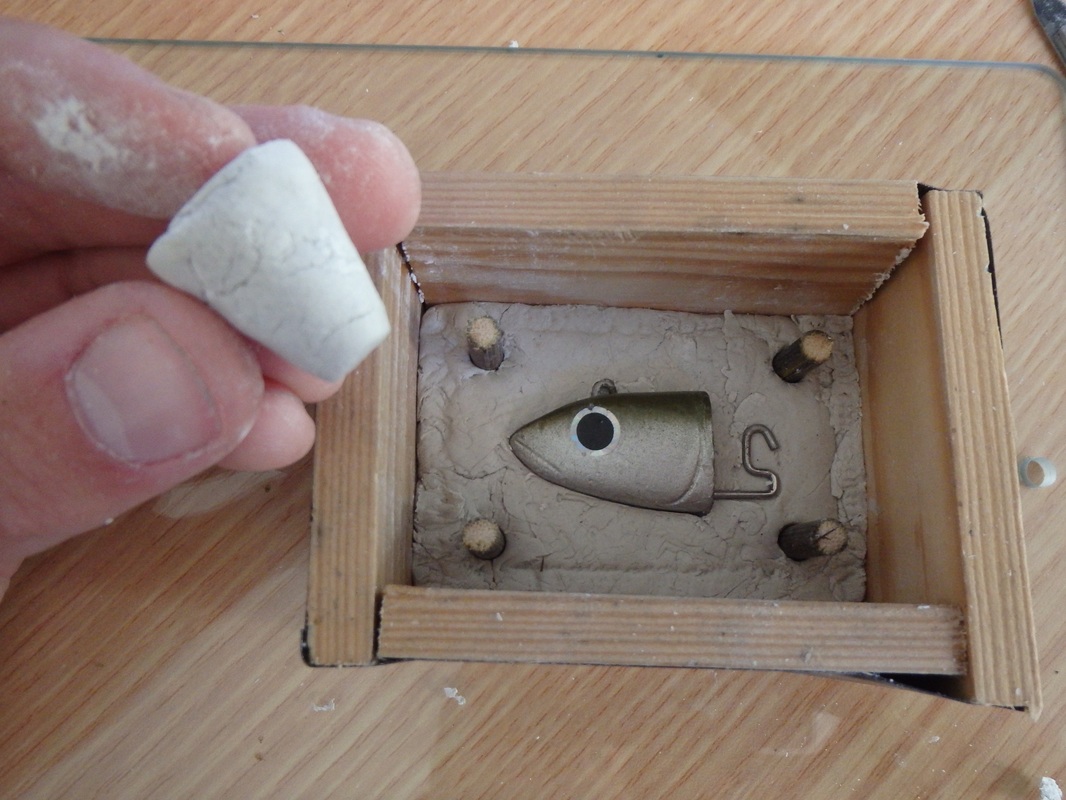
The next step is to create the top half of the 2-part mould. Place the mould box on the smooth flat tile (glass used here) and fill it halfway with white modelling clay. Push the lead head into the centre of the clay. Carefully remove the mould box and take your time with a scalpel to go around the seam line between the lead head and the clay to create a neat and smooth join. This will ensure that both halves of the mould have a clean meeting point. Level off the area around the lead head the best you can. I haven't worried too much about the lure clip as i trim this area out at a later stage to make space for a new clip.
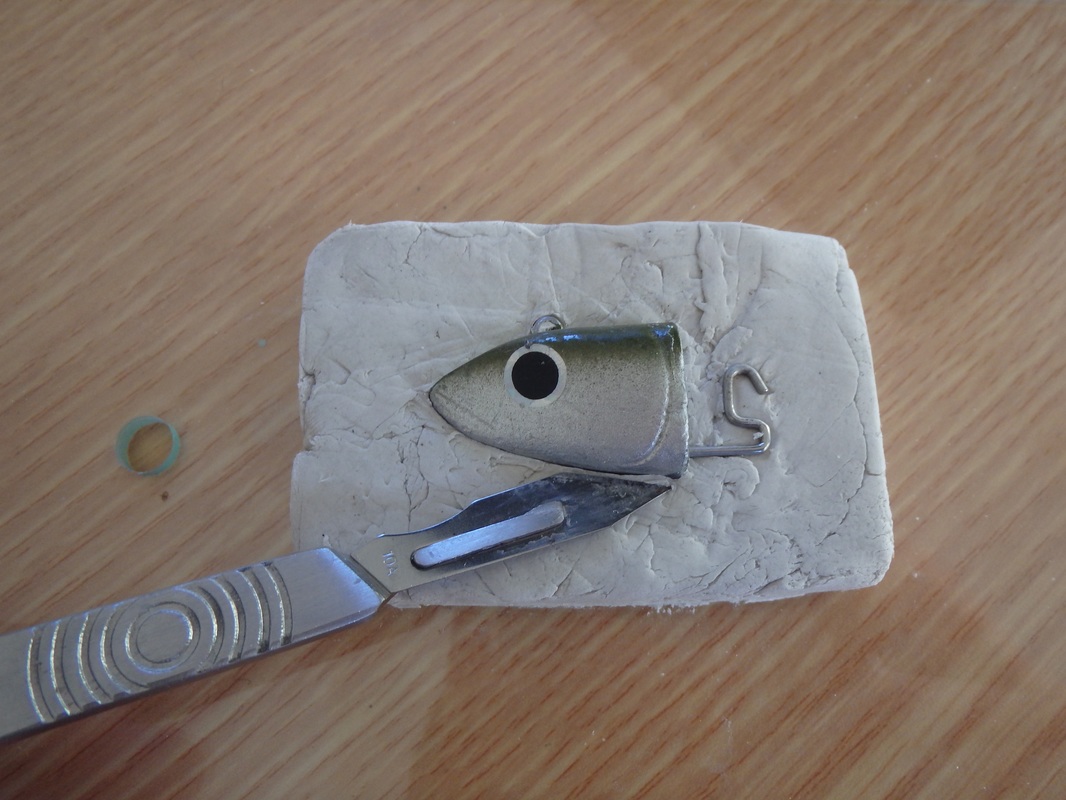
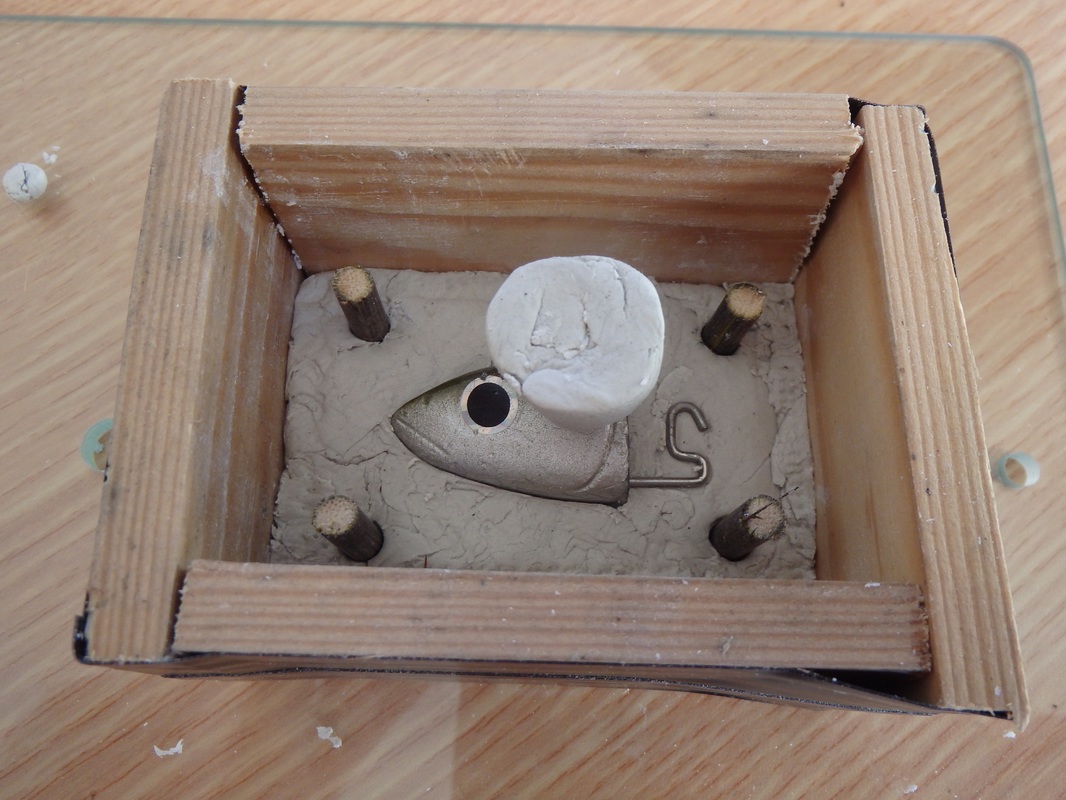
Put the mould box back over the clay block - you may find that you need to trim the edges of the clay block so that it will go back over. Once in place, take some wooden dowelling and push this into the clay to create a key for the two halves of the mould to line up together in the correct position. You will also need a very shallow sloped funnel out of the clay to place onto of the lead head - this creates the pouring funnel for the lead in the top half of the mould. Make sure it is either a shallow sloped funnel or even just a straight sided cylinder as solid lead will have to be pushed out through this once the lead has solidified when it comes to pouring the lead heads.
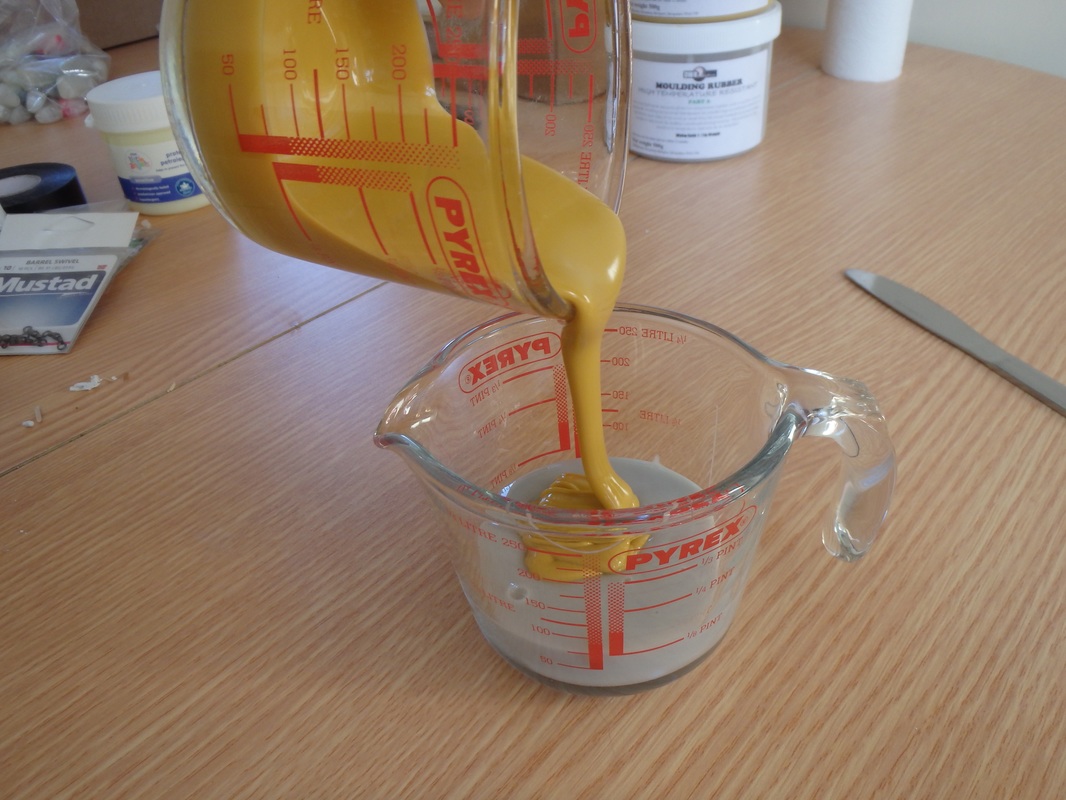
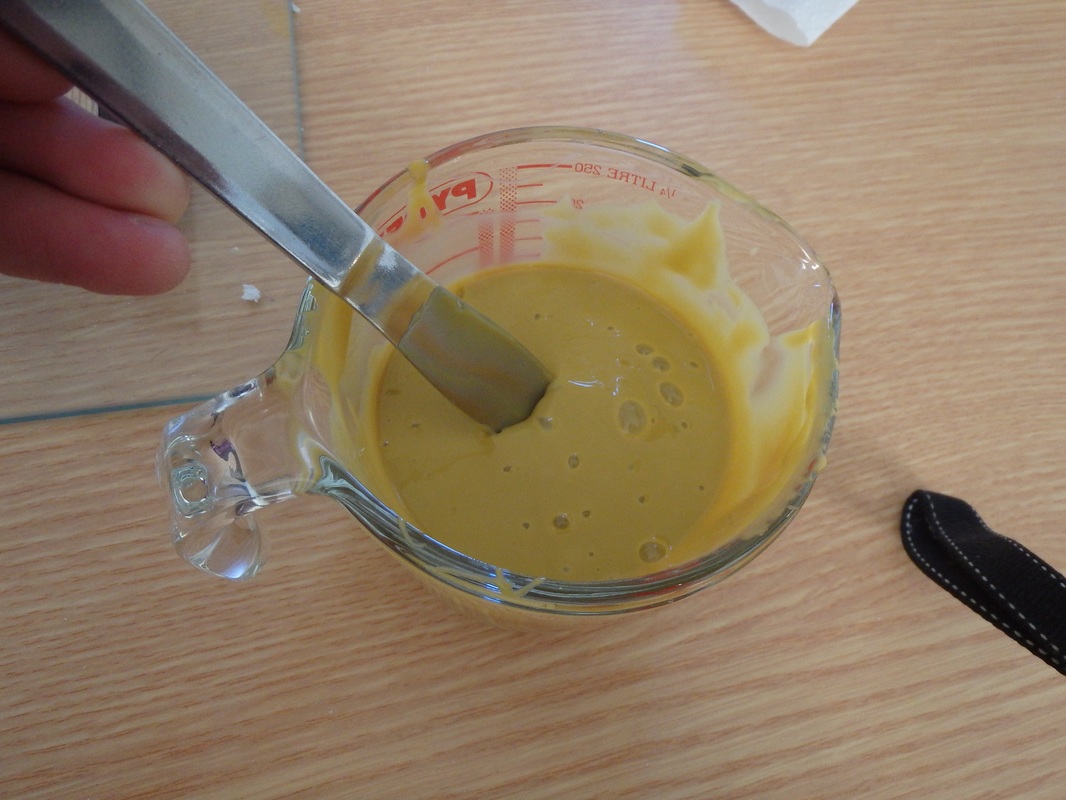
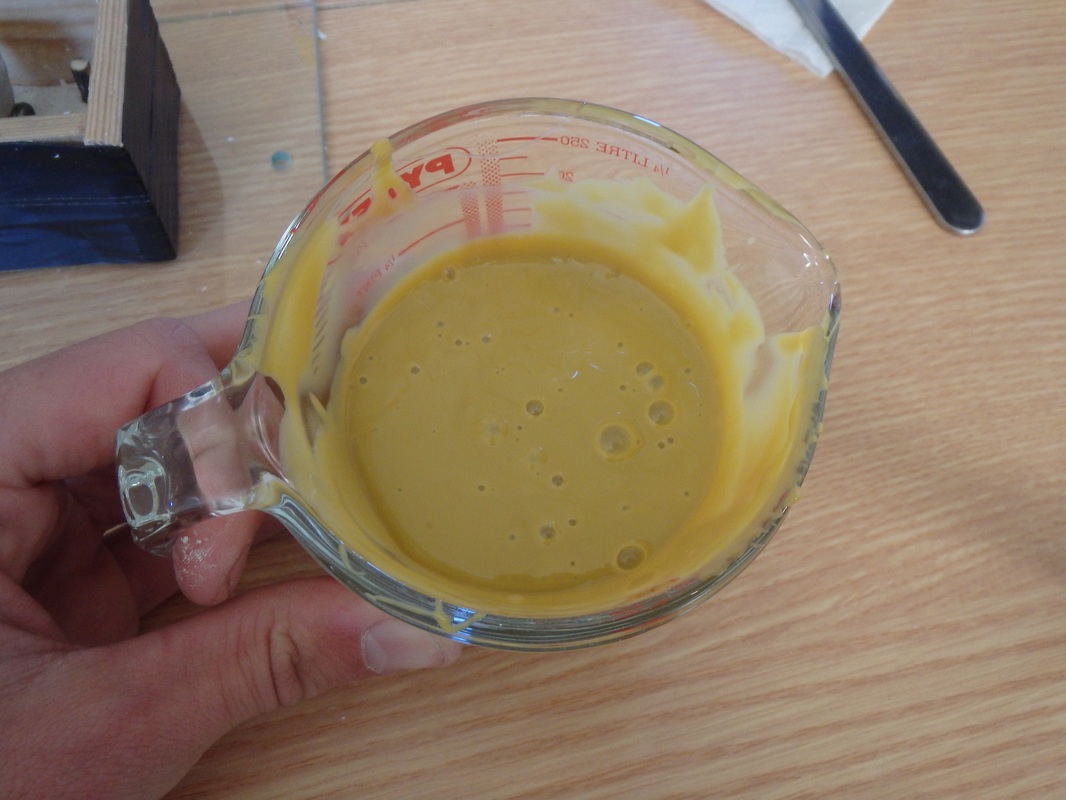
Its time to create the first half of the mould using high temperature Room Temperature Vulcanisation (RTV) silicon. PLEASE NOTE: you must use high temperate resistant RTV as this is the only silicon that has a working temperature greater than the melting point of lead. The high temperature resistant RTV has a working temperature resistance up to 330℃ with lead having a melting point of 327.5℃ - using a non-high temp resistant RTV would cause the mould to melt and fracture, potentially causing burns to the lead pourer. 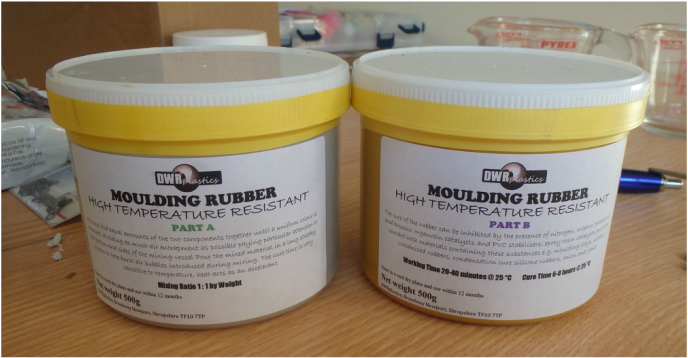 The silicon is non toxic comes in 2 parts - A & B. One part contains a Platinum compound that initiates curing when in contact with the other part. This particular RTV must be mixed in equal quantities (1:1 ratio) and the mixed material has a usable life of 30-40 mins with a cure time of 4-5 hours at 15°C. Increase the temperature and the useable time quickly decreases. The average household temperature is probably somewhere between 18°C and 25°C. The mixed material has a useable life of 8-12 mins with a cure time of 1-2 hours at 25°C so you have to work quickly if your in a warm room. There are various chemical compounds that can inhibit the curing process - just make sure you have clean hands, mixing vessels and stirrers and you should be fine. You wont need a lot of silicon and you can estimate the amount needed by measuring the dimensions of the mould box, calculating the volume (L x W x H), dividing this by two and then converting this into the equivalent quantity of liquid needed to fill that space. I would then multiply this amount by half again as you will get some stuck to the sides of the pouring vessel....... or just guess the amount but make sure you overestimate as there wont be time to mix more if you find you don't have enough once pouring. 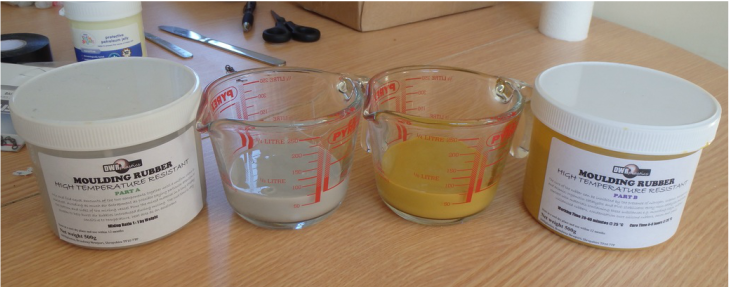 The yellow part seems less viscous so it is easier to pour this into the grey part than the other way around. Mix throughly for 3 or 4 minutes to ensure it is fully mixed.
Time to start pouring into the mould box! Hold the jug well above the box to create a fine and steady stream of silicon - take your time to carefully cover the lead head trying to not introduce any air bubbles - this will ensure a smooth layer of silicon against the head for a clean replication of the surface. Air voids against the head will create a misrepresentation of the jig head surface. Continue filling to the top of the mould box. This stage may take 5 minutes or so, you may notice that the silicon gets more viscous towards the end as it begins to cure. Providing that the lead head has been carefully covered without air bubbles you could speed up the pouring of final centimetre of silicon if the silicon starts to cure and thicken. 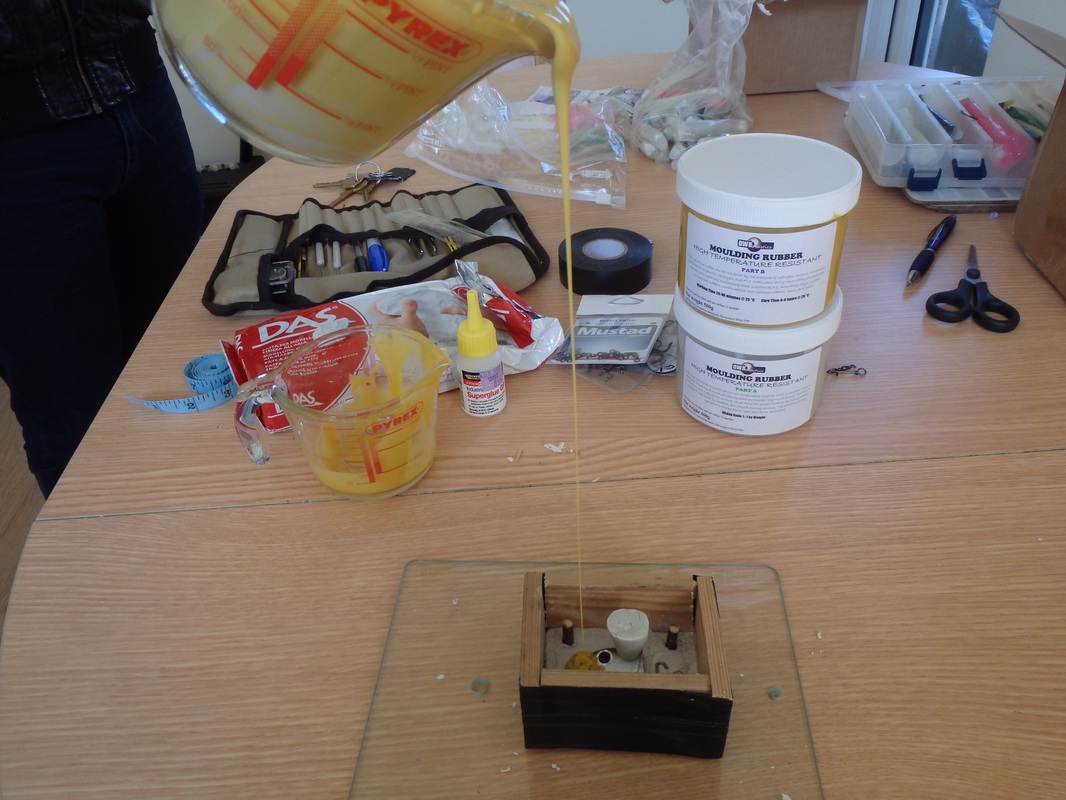 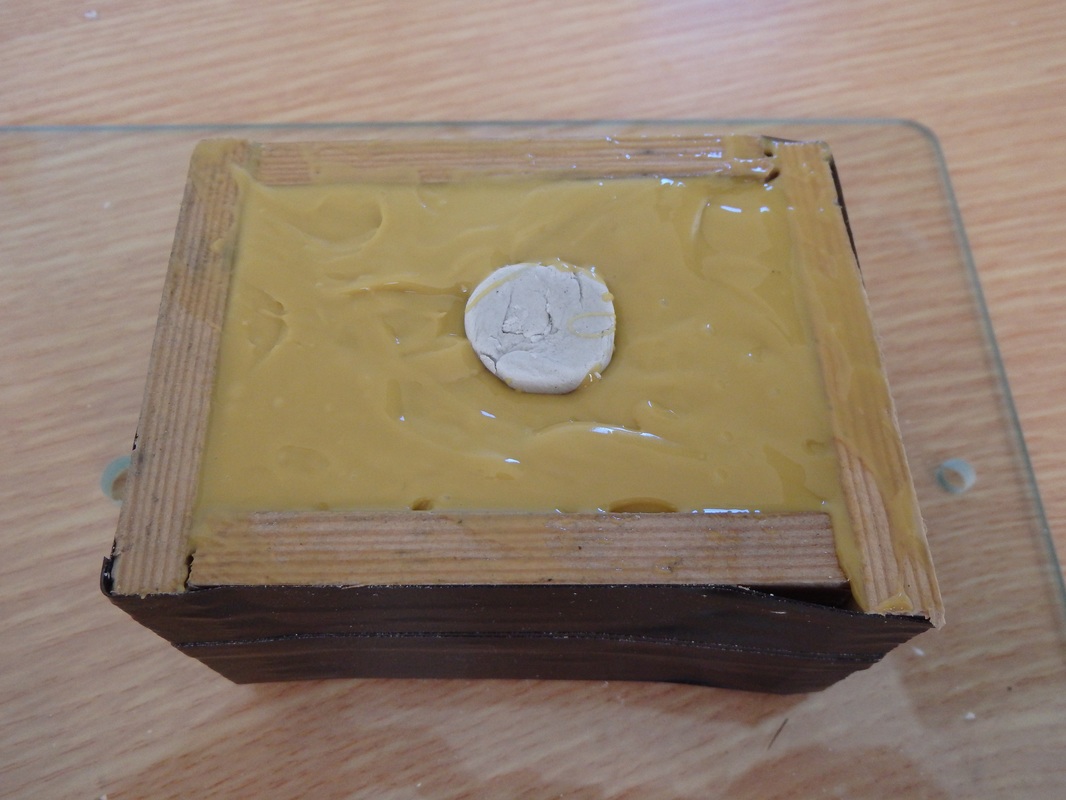 Now wait 4-5 hours to ensure the silicon has fully vulcanised/cured and become solid. Then you will need to remove the mould box.
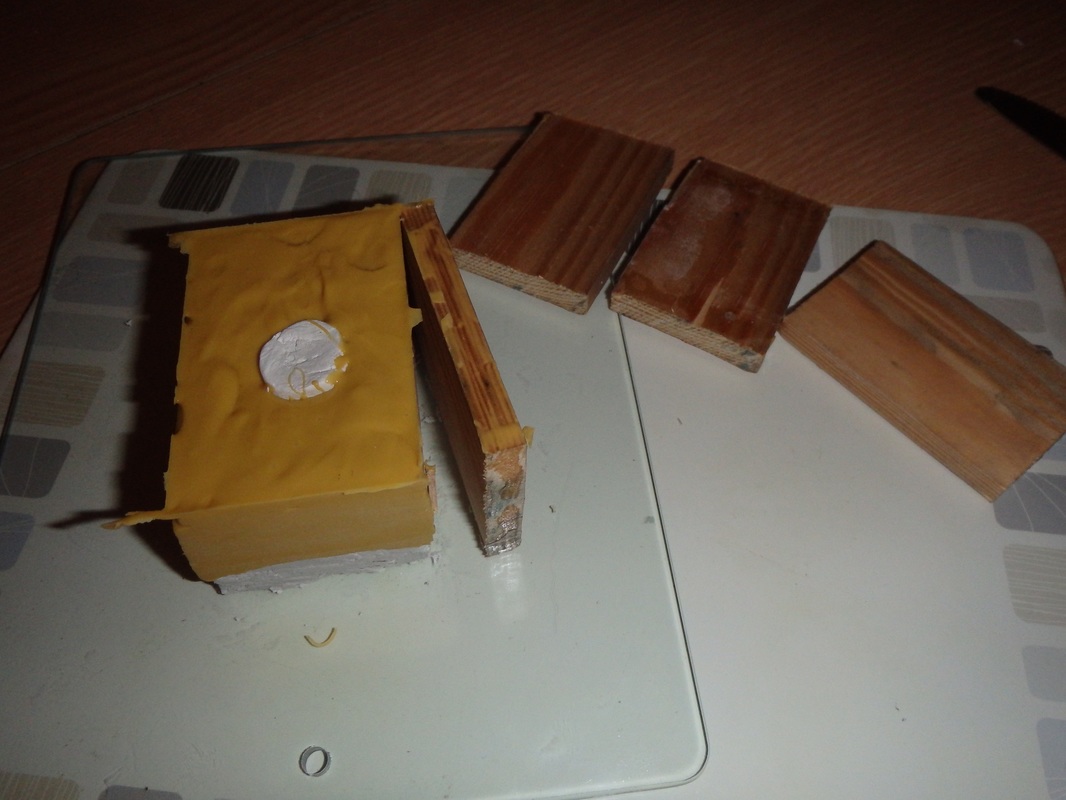
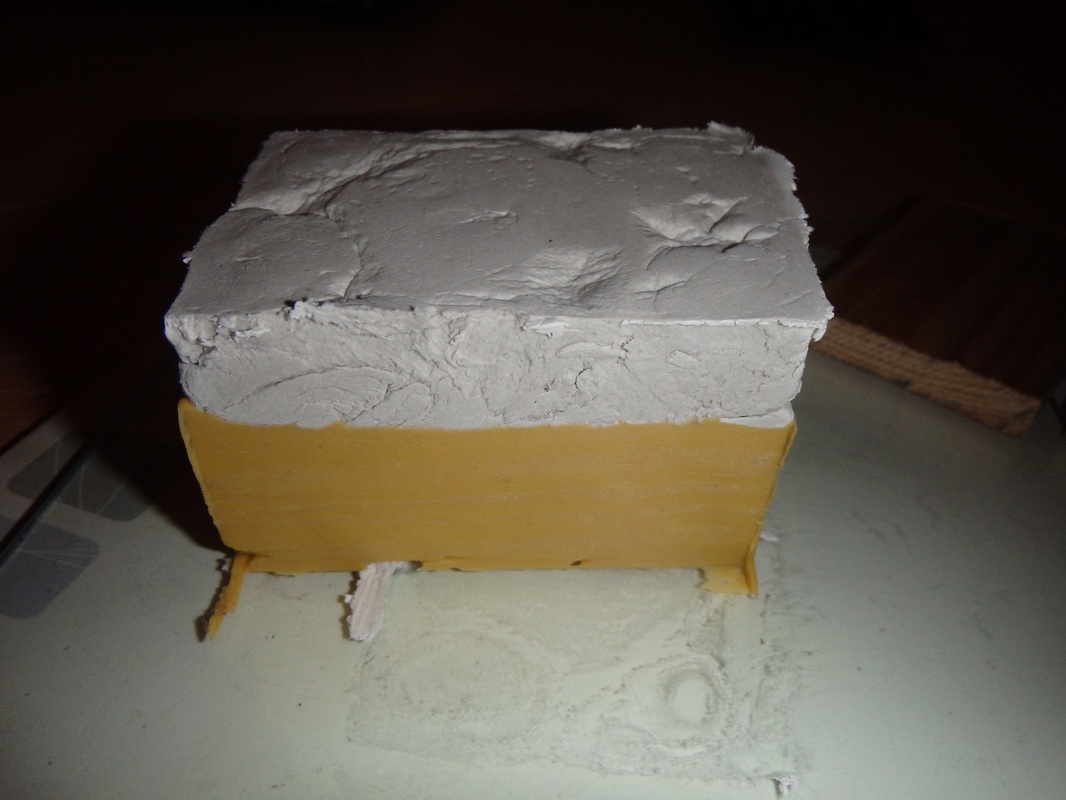
Gently peel away the clay to reveal the first half of the mould! 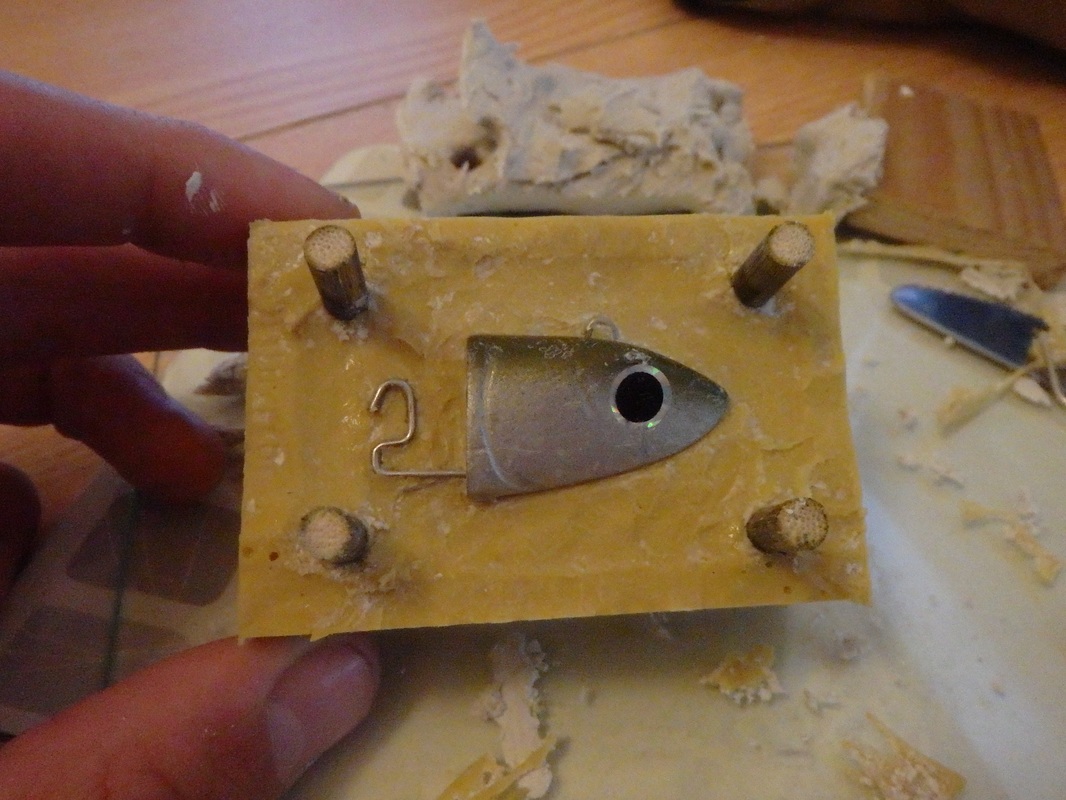 Time to create the second half. This is easier and less complex than creating the first half. The first step is to re-build the mould box around the top half of the mould. If the wooden dowels are easy to remove you can superglue these in place. 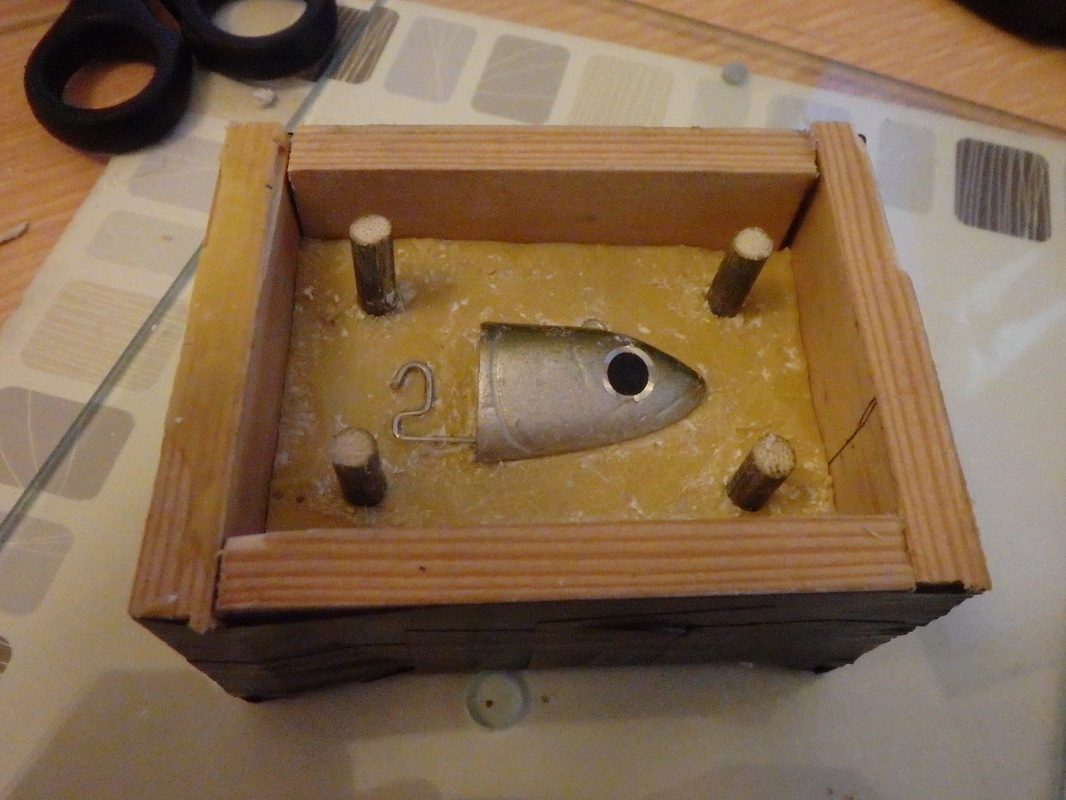
Then its a case of mixing up a new batch of high temperature resistant RTV silicon and filling the mould box using the same approach as last time to ensure you don't introduce any air bubbles. Fill to the brim and wait 4-5 hours for this to cure.
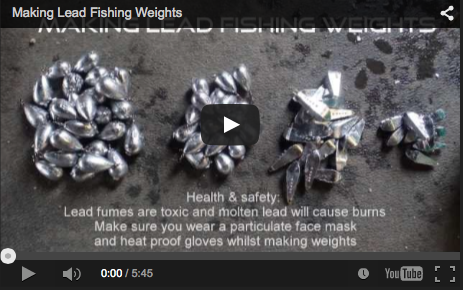
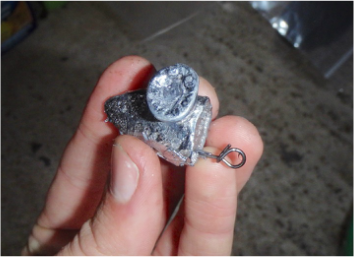
Once cured, remove the mould box and you will have your two-part mould! 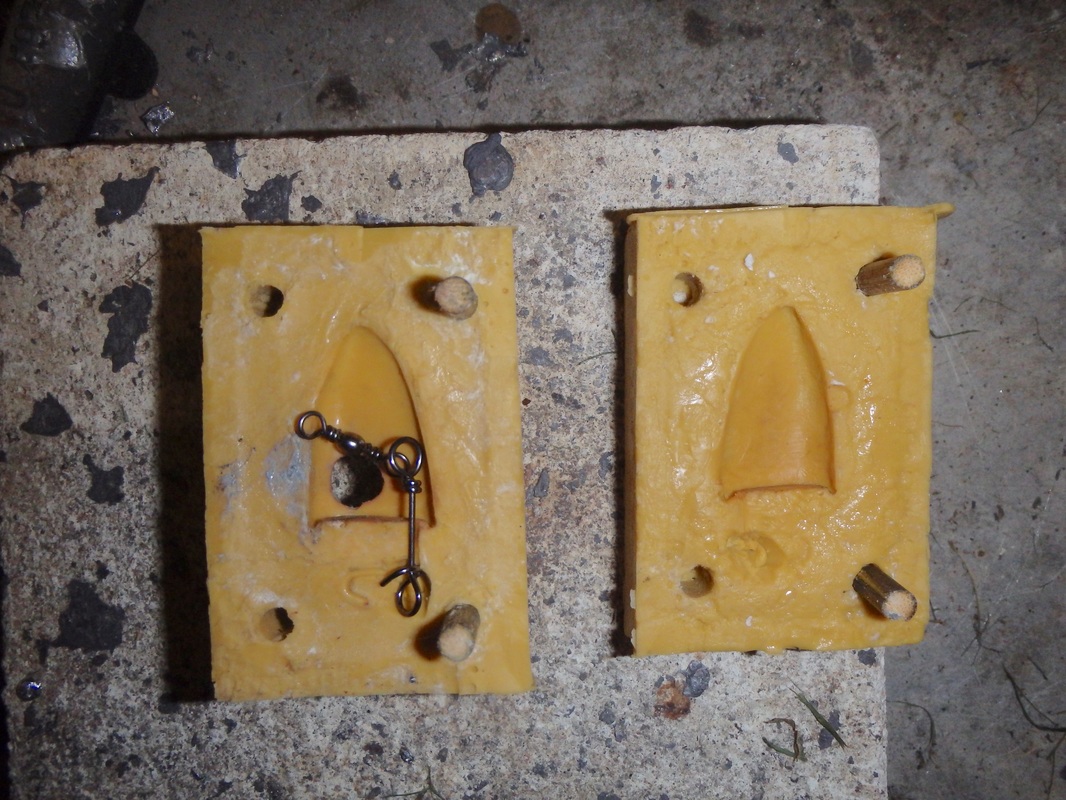 Adding a Hook ClipThis mould has closely replicated the popular Fiiish Minnow head, but i wanted to improve the design of this lure for my homemade version. I was happy with the hook attachment point on the Fiiish Minnows and indeed have lost several fish where fish have managed to twist off the hook from its clip. Don't get me wrong, the original clip is great for ease of changing a hook so i wanted to keep this ability in an improved version. It would be simple enough to use a link swivel set into the head to have a fixed hook on the lead (the clip would be set too far into the lead to be able to open it again) but i wanted a clip that i could still change the hook if needed. After a bit of searching i came across the ideal solution - a Mustad Fastach clip. These have an eye at one end and a twisted section of wire at the other that forms an eye that you can clip a hook or weight onto. The eye sits inside the head and the attachment point outside - it is simple enough to cut a small depression in the silicon to allow for the clip to sit in place when the two halves of the mould are placed together. I have also used a small Mustad barrel swivel (size 10) as a point of attachment for the line. Again, if needed, a sharp knife can be used to form a depression for this to sit in but i found the groove left by the original clip was just the right size to hold the swivel in place. 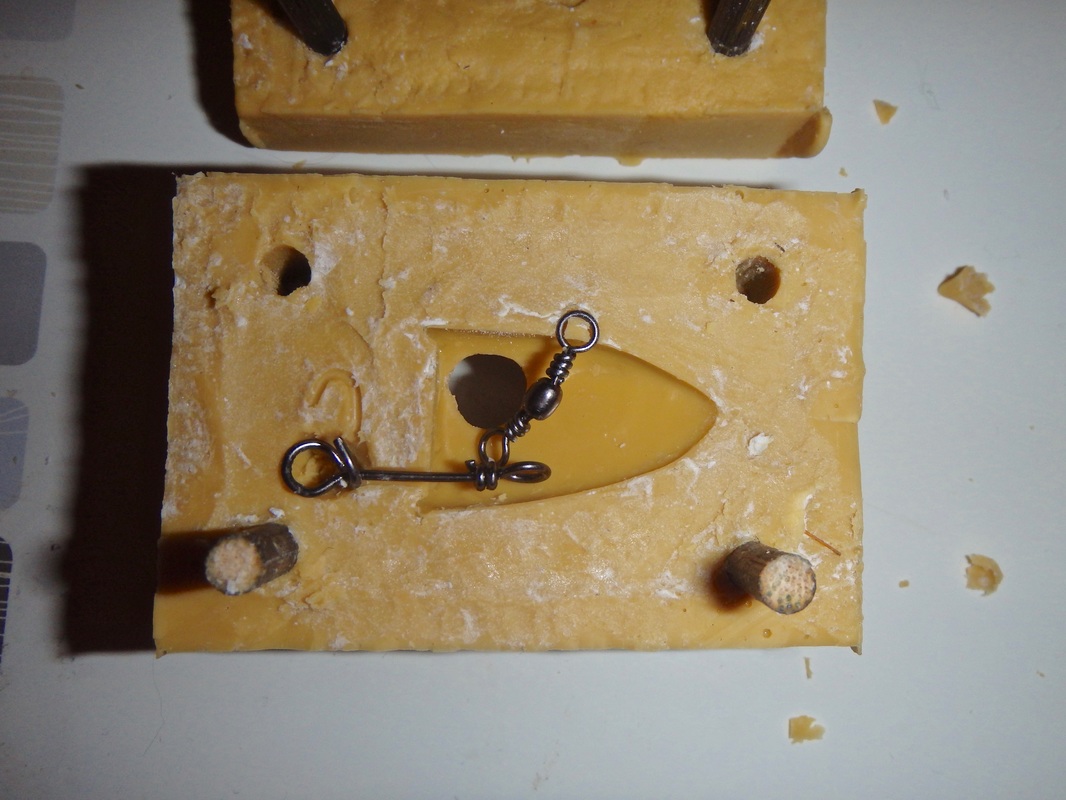 Making the Lead HeadsIts time to make the first batch. For this you will require all the equipment required for pouring your own homemade lead weights - the equipment needed and the process involved is covered in detail in a previous blog post: Making Lead Fishing Weights. Please pay particular attention to the health and safety points. In short - make sure your wearing a particulate respirator and heatproof gloves, ensure lead is dry and work in a well ventilated area. A silicon lead mould acts differently to an aluminium lead mould. An aluminium mould requires pre-heating to ensure that the lead fills the mould fully before solidifying whereas this is not really possible with a silicon mould. The silicon does not seem to hold as much heat as an aluminium mould but can still get very very hot after a few pours. I have also noticed that it takes much longer for the lead to solidify within a silicon mould than in an aluminium mould - I'm assuming that the silicon resists the conduction of heat away from the molten lead thus taking longer to cool, so leave it a couple of minutes before opening the mould. Once the lead has melted in the pouring pan, place the Fastach clip and Swivel in place, put the two halves of the mould together, using the dowel to lock the two halves in the correct position. Ensure that they are fully pushed together with no gap at the seam. Slowly pour the lead into the mould until it is full. Try to stop as soon as lead appears to rise in the pouring funnel. 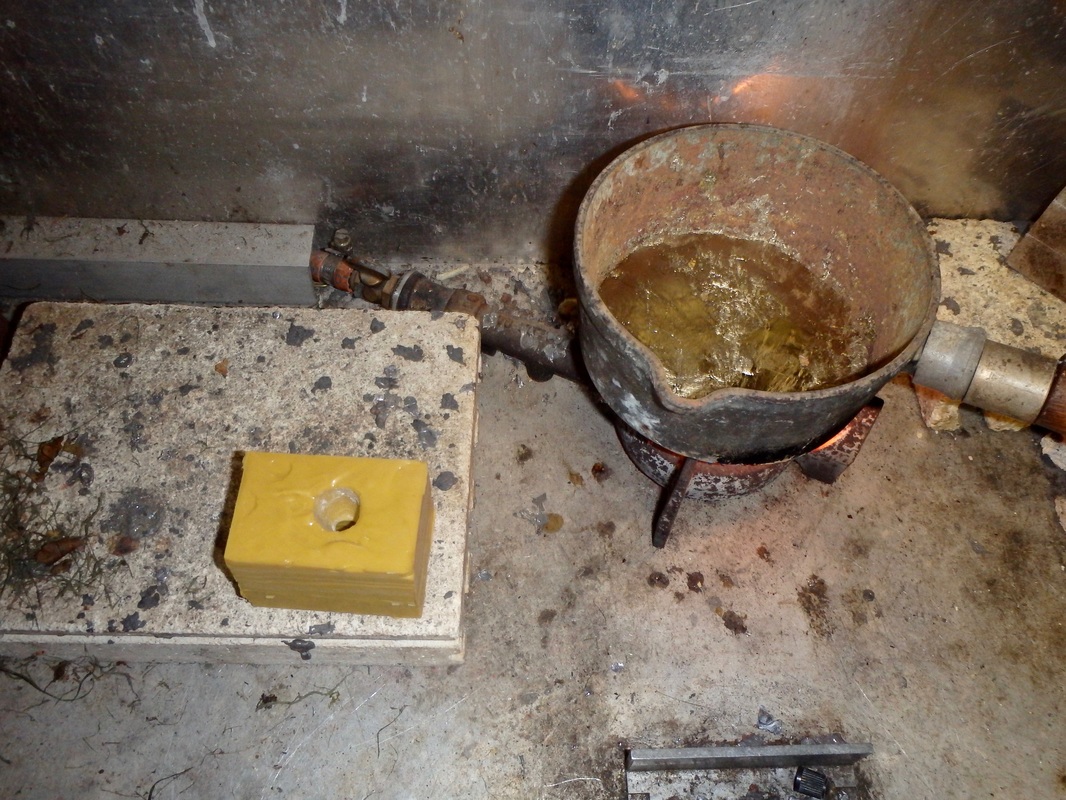 Once full, allow several minutes for the lead to cool and solidify. Open the mould and you should have a shiny lead head and a big smile on your face! Take your time removing the head from he mould - you may have to force the pouring funnel section back through its hole using a screwdriver or similar to push. The silicon is reasonably flexible so doing this shouldn't cause damage to the mould. Creating a vertical sided pouring hole when creating the mould would remove the need to force the lead too much at this stage. Leave several minutes for the mould to cool slightly before the next pour. 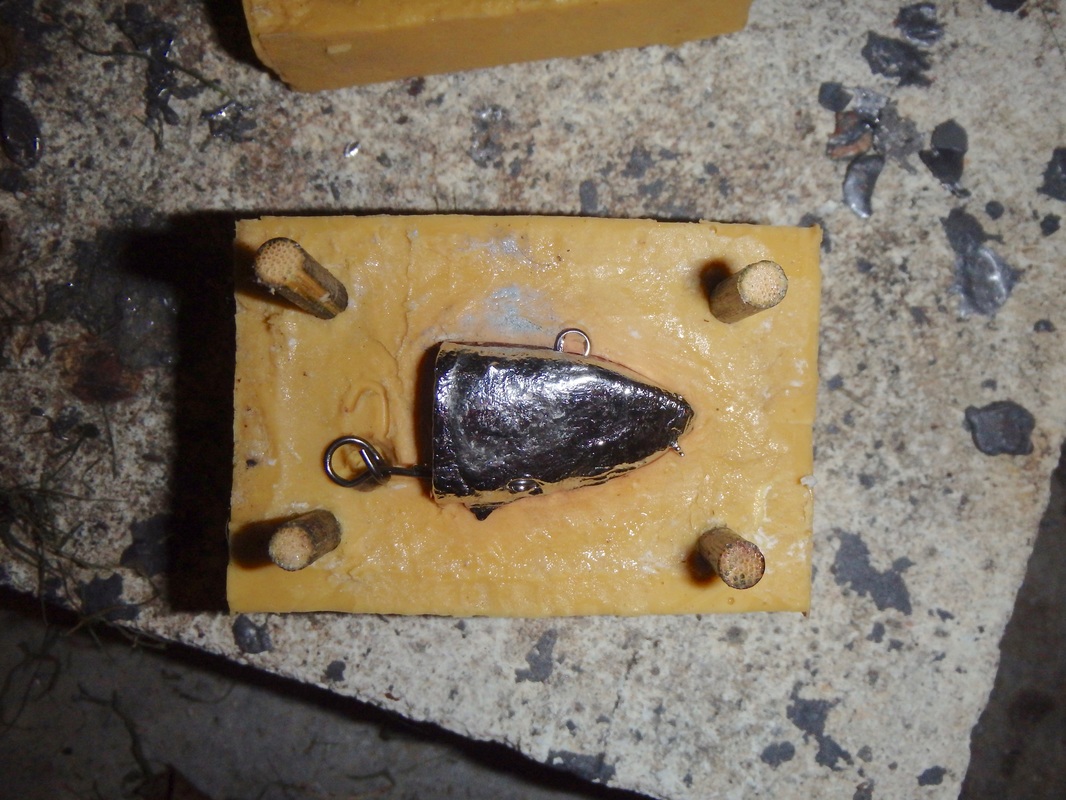 I made 20 heads in the first session and the mould seems to have handled this well. It has discoloured slightly but i would say it will still be useable for another 20-40 pours before it will start to show signs of disintegrating. I think the key to prolonging the mould life will be to make small batches (10-20 heads) and to leave several minutes between pours to avoid overheating the mould. 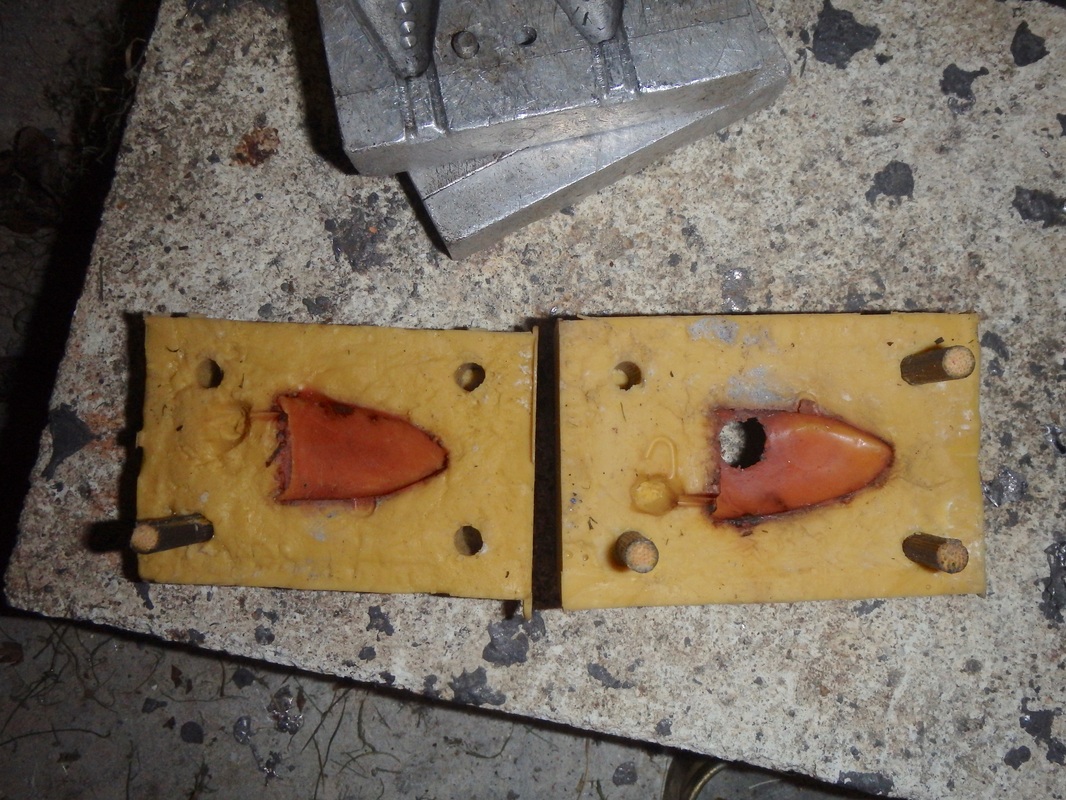 Once the lead head has been removed from the mould it is just a case of trimming off the pouring funnel section using some metal snips, and tidying it up with some sandpaper.
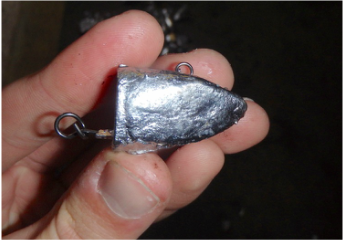
Finishing TouchesTime to decorate the lead head. I could have gone to town on this and created some realistic fish head designs, with gill cover detailing and shiny bits etc. or used powder coating for a smooth even finish, but i wanted to keep it simple, easy and quick. I used some gold coloured nail paint/varnish to paint the lead head, then i superglued some craft eyes to the head to bring it too life! 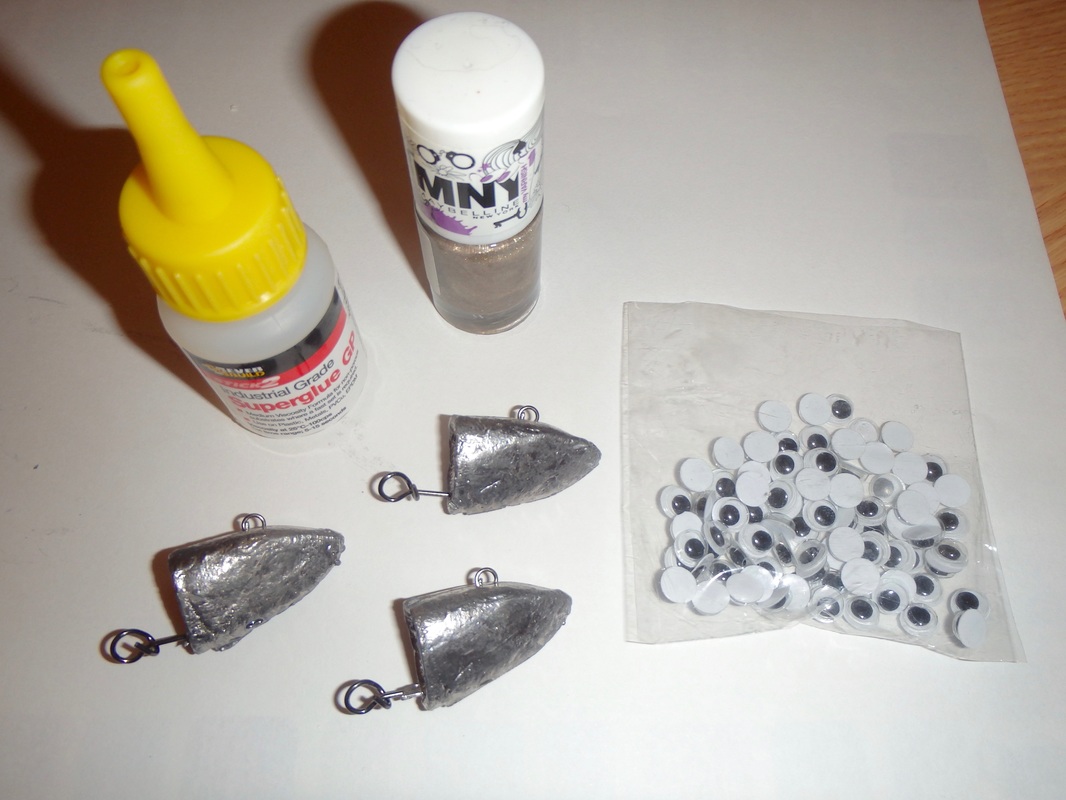 I am yet to find a hook that matches the strength and quality of the Krog Premium Hooks that come as standard with a Fiiish Minnow lure. These aren't cheap at around £3.60 for 4 but seeing as this is the point of connection with a fish then i don't mind spending more for a reliable hook with a strong point that is resistant to blunting. I did however come across a cheaper alternative to trial - Mustad Mega Bite Weedless hooks at around £2.50 for 5. 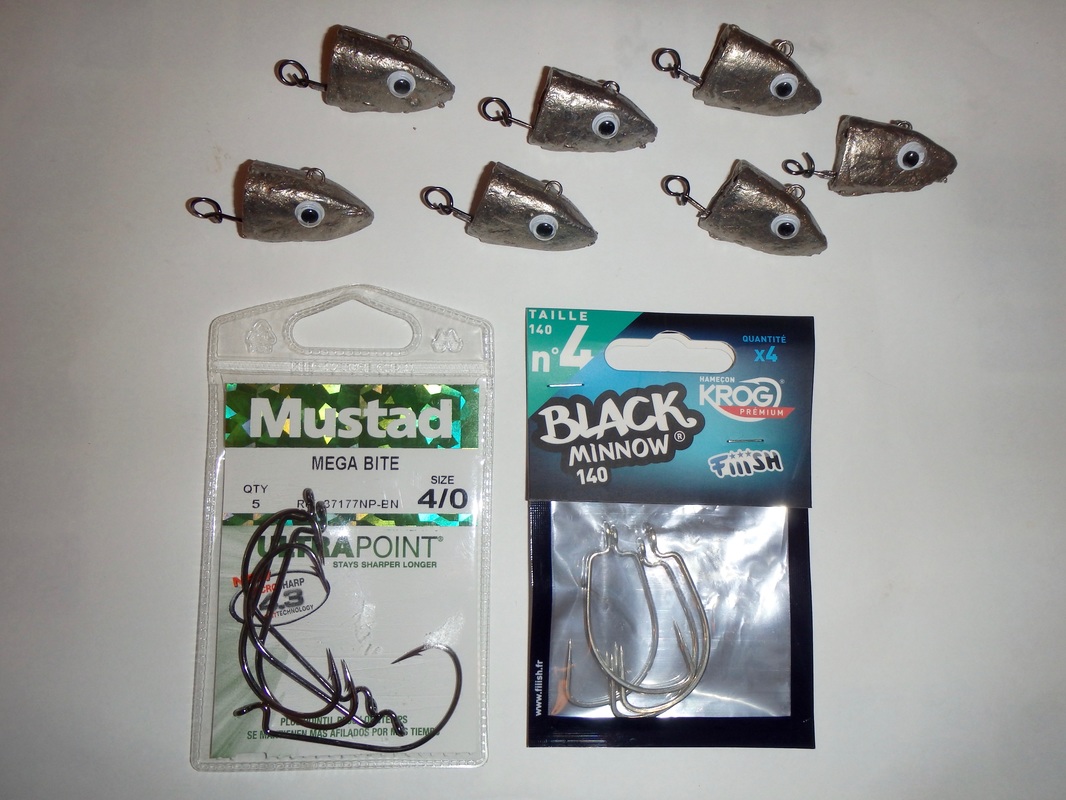 The Mustad Mega Bite is manufactured in slightly finer wire than the Krog Premium Hook and as a result will bend easier - not necesserily a problem for the size of fish i am targeting with these lures. The point is also angled more towards the shank than on the Krog hook. Once in a lure this sits at an angle to the body - on one hand this may provide better anti-snagging properties but on the other hand it may cause the point to foul within the plastic more often. The Mega Bite also has a longer shank - this puts the hook point further down the lure which may help with hook ups when the fish are just grabbing the tail of the lure. I caught fish on both once on the water but Im still favouring the Krog hook for use on my homemade lures as they just seem the right size for this lure. 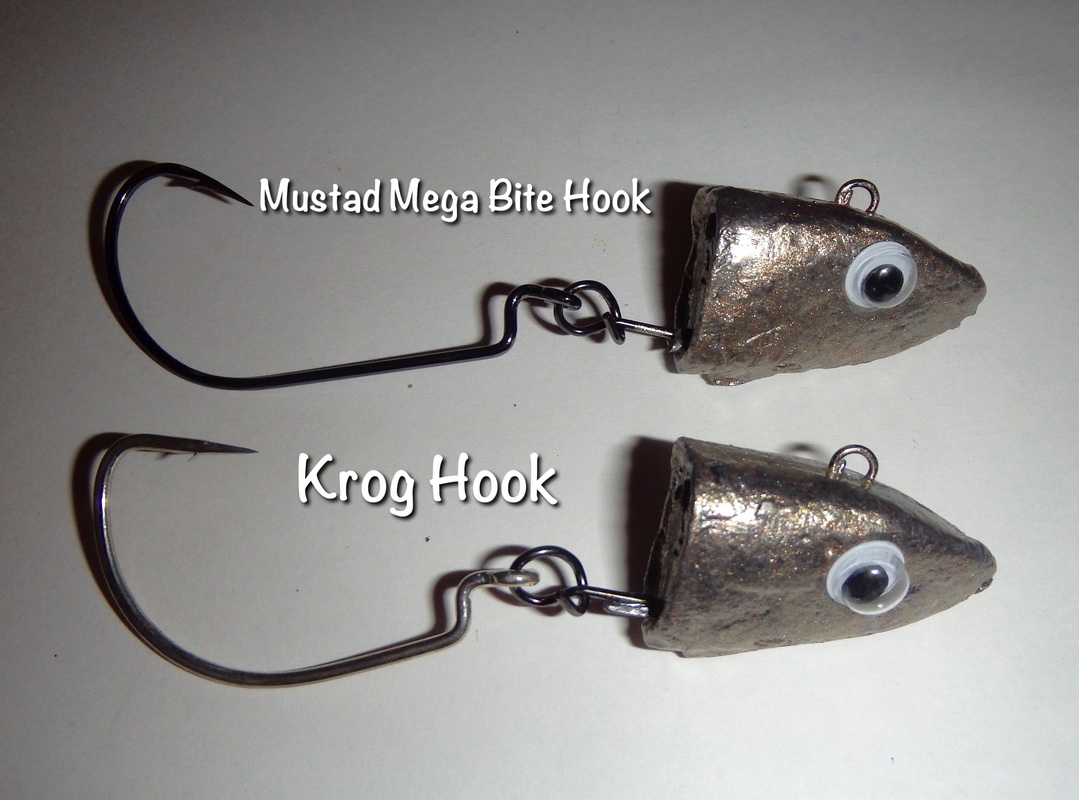 It is fairly tough to clip and more importantly unclip a hook from the Fastach clip. This is exactly what i wanted from the lead head so that fish couldn't work the hook off during a fight. The one disadvantage to the clip is that it isn't so easy to pass this through the plastic lure body when rigging up the lure. You end up forcing the plastic body over the clip and cutting a path for the clip to go through the lure. This isn't too much of a problem because once its all in place i superglue the body to the head so that fish can't rip it off with ease. I have found this to be the most durable way to rig a split belly shad type lure. The Finished Homemade Split Belly Shad LureIt has taken a fair bit of research and sourcing of products but i am very happy with the final product. I now have the equipment needed to create homemade lures by either modifying existing patterns or by creating patterns from scratch. It has been reasonably costly for the initial cost layout but in the long-term this will save money. Making lures is also a great way to pass an afternoon when you can't get on the water and it is very satisfying to catch on your own home pours! 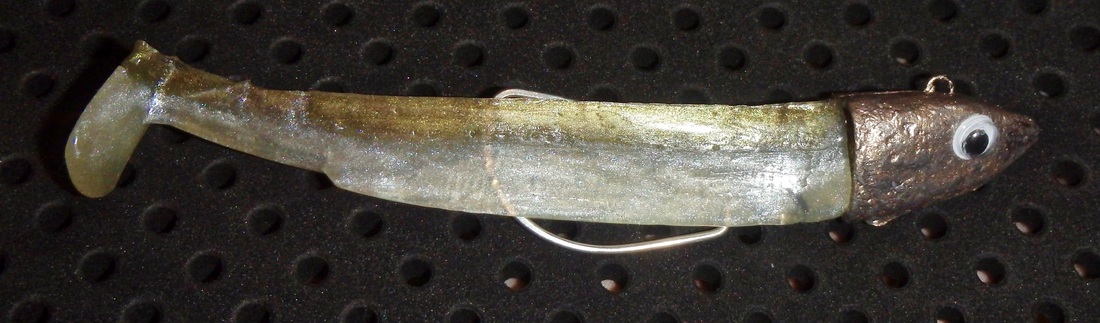 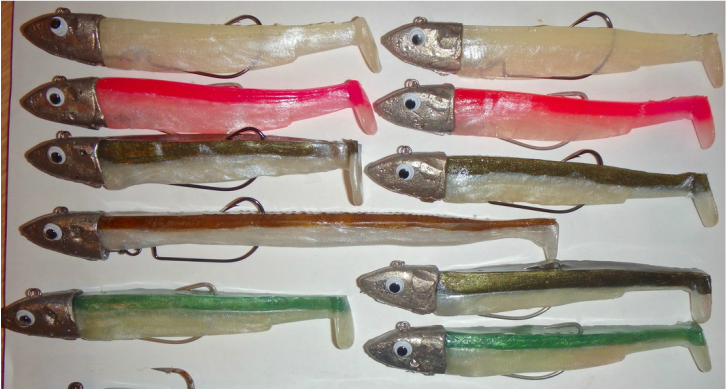 This particular size split belly shad weighs in at 60g - this is the perfect size for me to fish deepwater reefs up to a depth of around 120ft in a moderate tide using braid on a fixed spool reel/heavy lure rod set up. 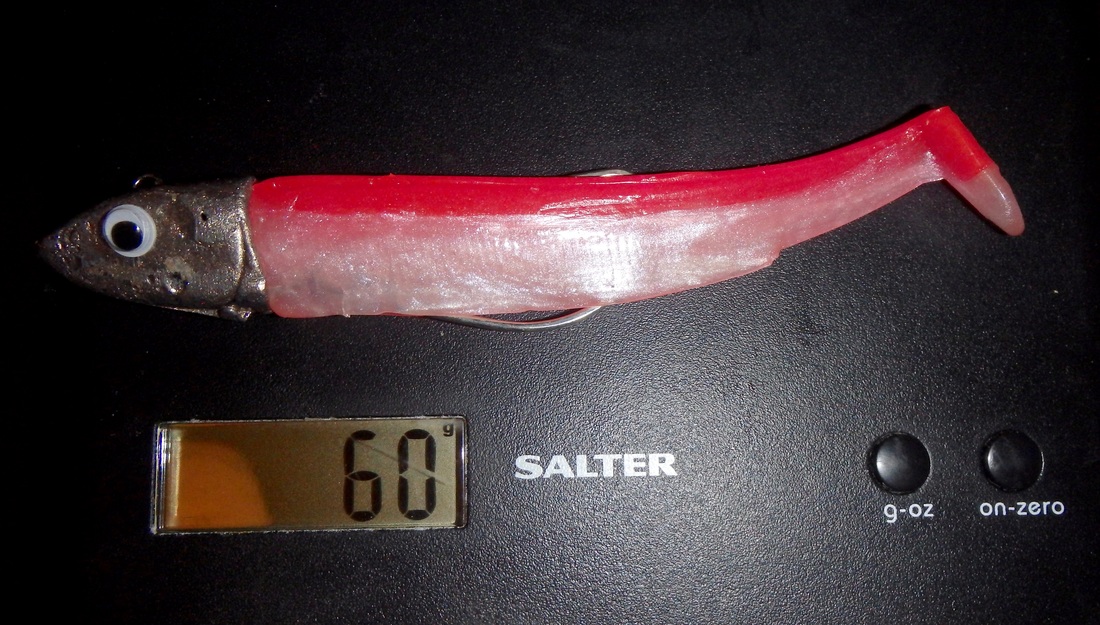 Do they work.....Yes! 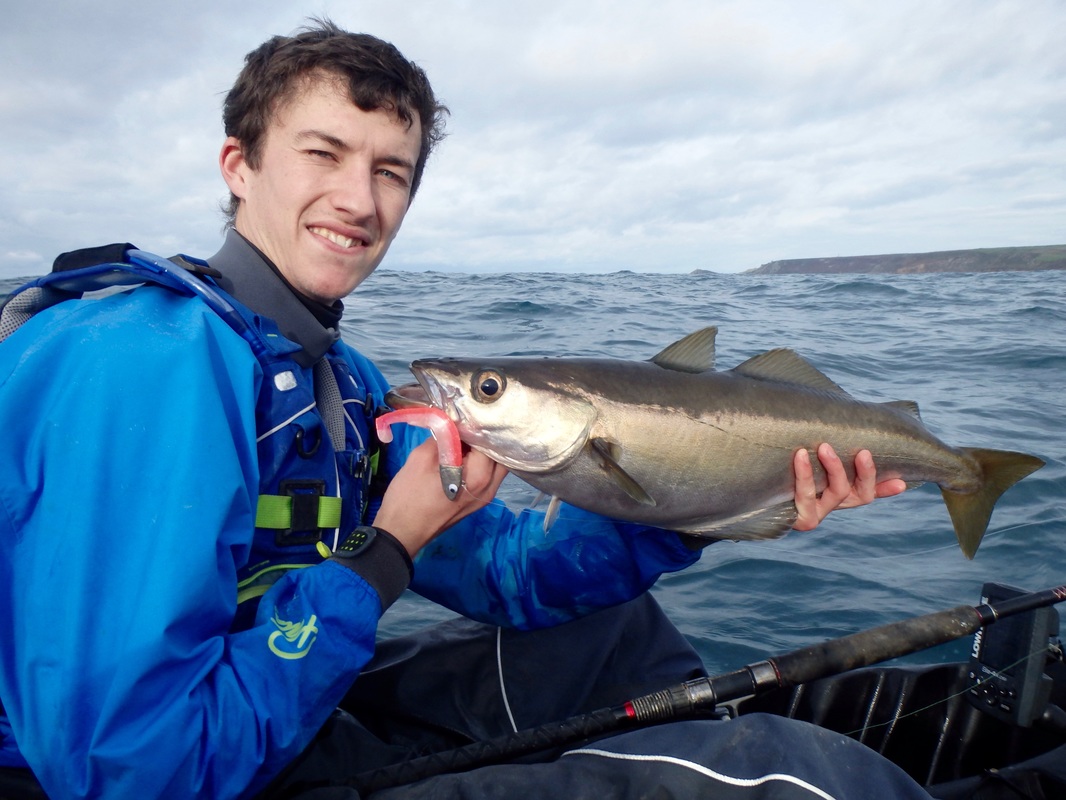 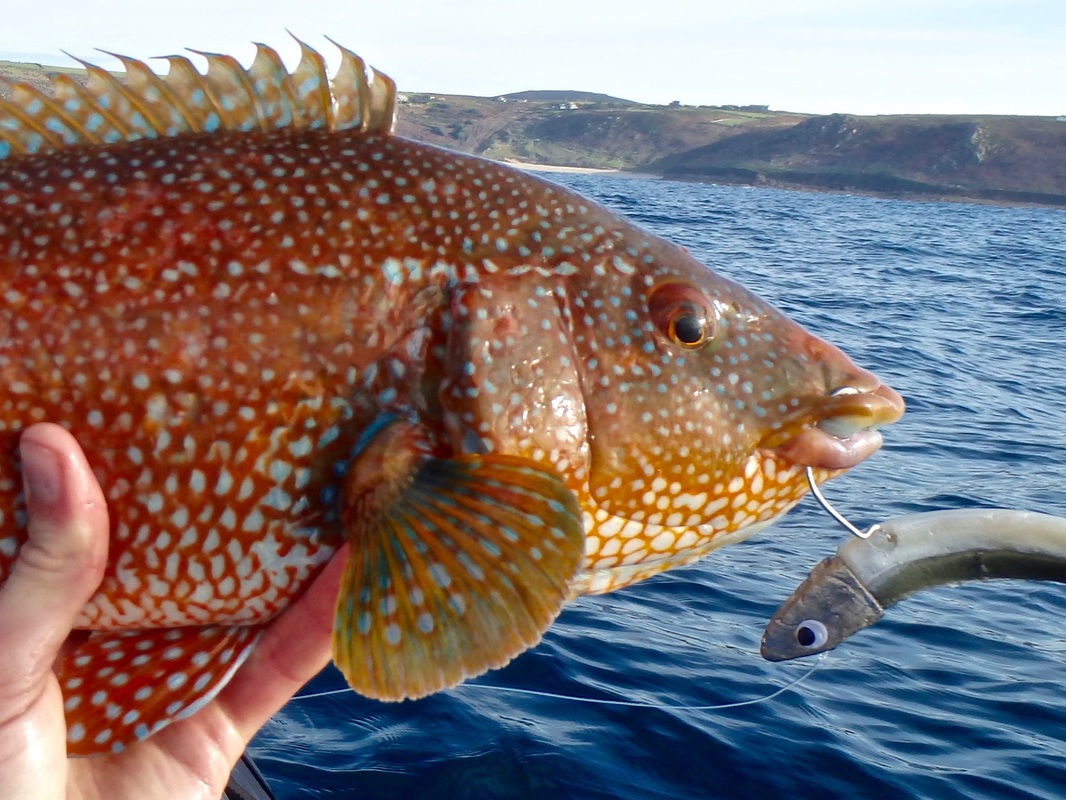  The next step is to make a completely custom lure, both the head and body, from scratch. I have already done this but will get around to writing this up on a new blog post at some point in the future.
If you have any questions, feel free to leave a comment and i will get back to you.
Barry
28/2/2016 21:25:11
Having spent this afternoon making heads (copy of Delande) I find this very helpfull, thankyou.
Cornish Kayak Angler
28/2/2016 21:38:09
I'm glad you found the post helpful Barry. I'm experimenting with creating my own design lead heads and bodies now which should be fun!
roberto
16/5/2016 16:32:48
hello,
Kernow
29/2/2016 18:06:27
Time well spent Liam filling the gaps between the weather.Lures are looking great and are proven in the water.
Cornish Kayak Angler
29/2/2016 18:11:27
Cheers Kernow, already made and trialled a few custom designs on the last session of last year. Bit more tinkering to do with the design to get a better action in the water, just need a few trips out to test them again. Might have to go next weekend come rain or shine! 18/3/2016 09:28:48
Cornish Kayak Angler
19/3/2016 21:13:08
Hi Jeff, Thanks for your comment. Im glad you will find the blog post useful. Yes Lego is great for building mould boxes, i only had wood strips to hand on the day so that is what i used!
Joel
12/5/2016 15:44:23
Great tutorial, been scouring the web for months, trying my hand at cod jigs with your technique
Cornish Kayak Angler
13/5/2016 22:23:47
Hi Joel,
Philip
18/9/2018 18:10:42
Did the mould deform after some cast? I want to give this a try but worry the silicone will burn and wont hold the shape in time. It would be great to hear your feed back! Again great info, I am currently casting a few splite belly shad mould to try as well 😄
Jan
4/5/2019 07:30:21
How do you remove the head from the mold ? because in my opinion the lead in the funnel prevents removal from the mold because it is sloped :-) 4/5/2019 08:49:31
Hi Jan, Comments are closed.
|
AuthorLiam Faisey 
My Tackle Shop
SPONSORS
Proudly associated with

Cornwall's only specialist kayak fishing shop
Archives
March 2023
Categories
All
Add my blog to your feed reader by clicking the button below
Get blog updates via email
Kayak Fishing Videos


Custom feed reader powered by FeedWind
Useful Links
Anglers Afloat
Cornish Shore & Kayak Fisherman Cornwall Canoes Palm Equipment Penzance Kayak Fishing Meet Info Saltwater Kayak Fisherman Magic Seaweed XC Weather 

|


 RSS Feed


|
|
Website powered by pasties and the hope of good weather!
© 2023 Liam Faisey
© 2023 Liam Faisey