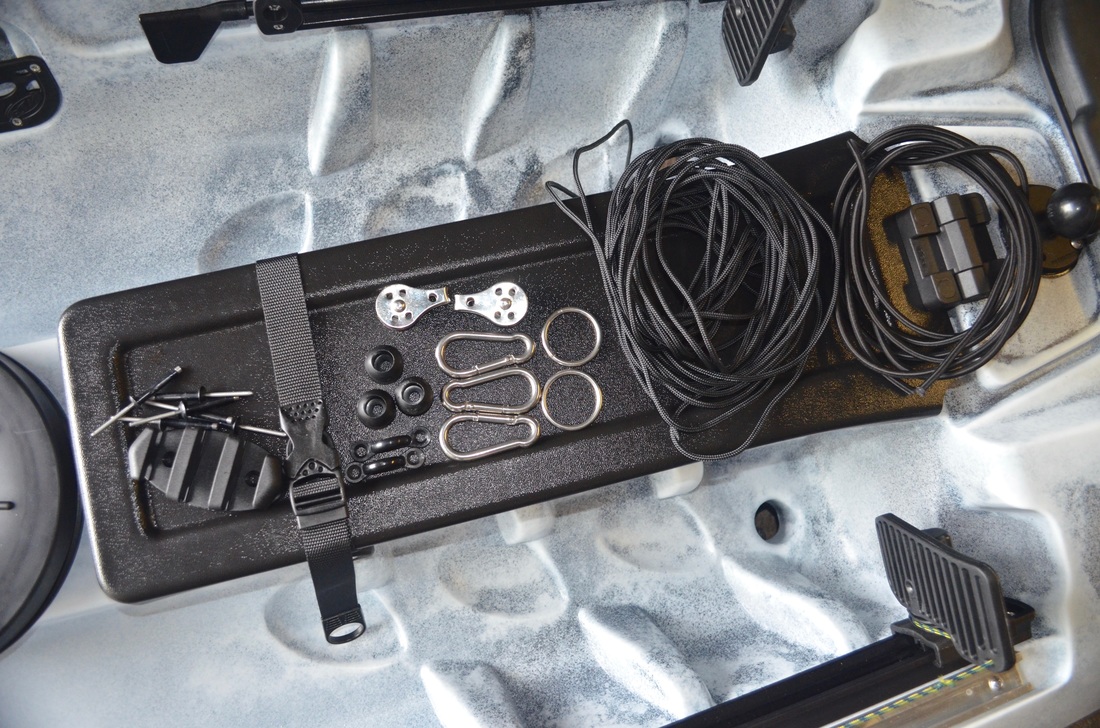
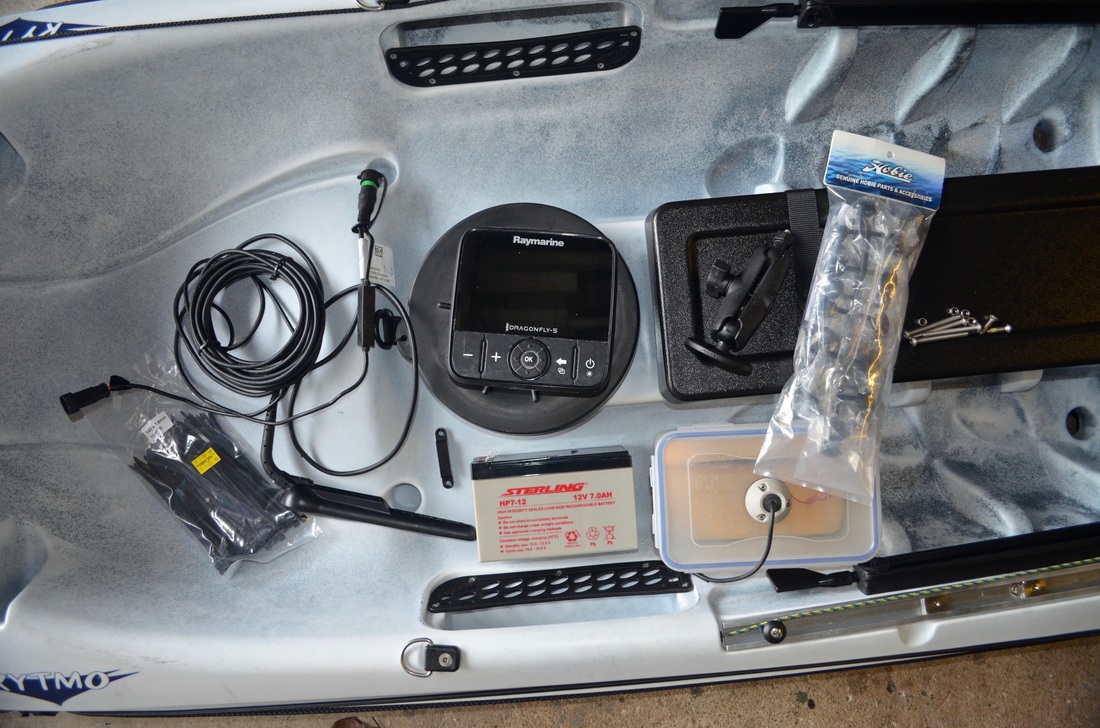
It has become commonplace for kayak anglers to add various pieces of equipment and make modifications to their kayaks, to make them a more comfortable and more effective vessel to fish from. Everyone has different requirements in terms of equipment needed and therefore no two fishing kayaks will be the same! This is how i rigged the RTM Rytmo Angler for my fishing needs.... Anchor TrolleyAn Anchor Trolley is essential for safe anchoring. It allows for the point of anchoring to be set at either the bow, or more commonly the stern of the kayak so that the length of the kayak lays inline with the prevailing wind, tide, waves and current. A kayak is designed to ride the water along its length hence the kayak being in this position at anchor being the safest way to anchor. Tying an anchor line off to the side of the kayak will probably see you going for a swim and potentially getting into a dangerous situation if you become separated from the anchored kayak. An anchor trolley is essentially a loop of cord that runs from bow to stern. The loop incorporates a carabiner or ring that the anchor line can pass through and be shuttled to either end of the kayak. Full length anchor trolleys seem to be most common although some people opt for half trolleys that run from midship to bow or midship to stern. A midship to bow trolley works well for using a drogue. I have always used a full length anchor trolley on the starboard side of the kayak. I am right handed and find that having the anchor trolley on my strongest side seems most natural in use. Here is how i installed an anchor trolley on the Rytmo... Equipment Used:
Tools required:
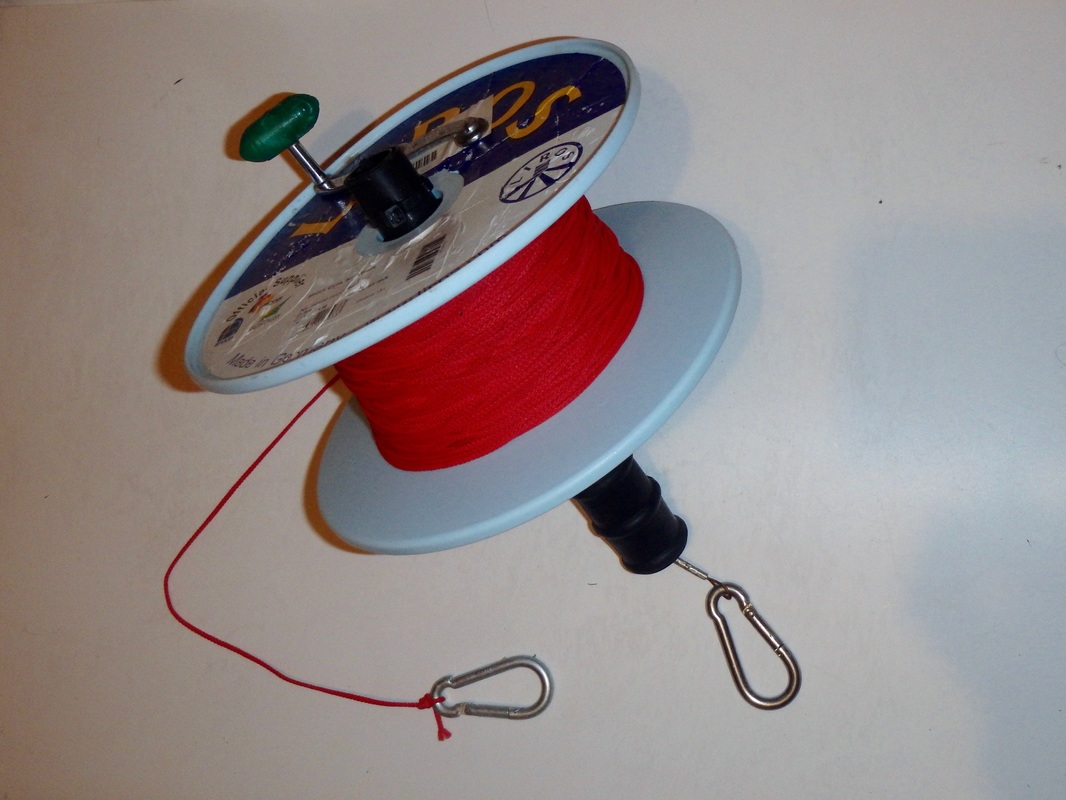
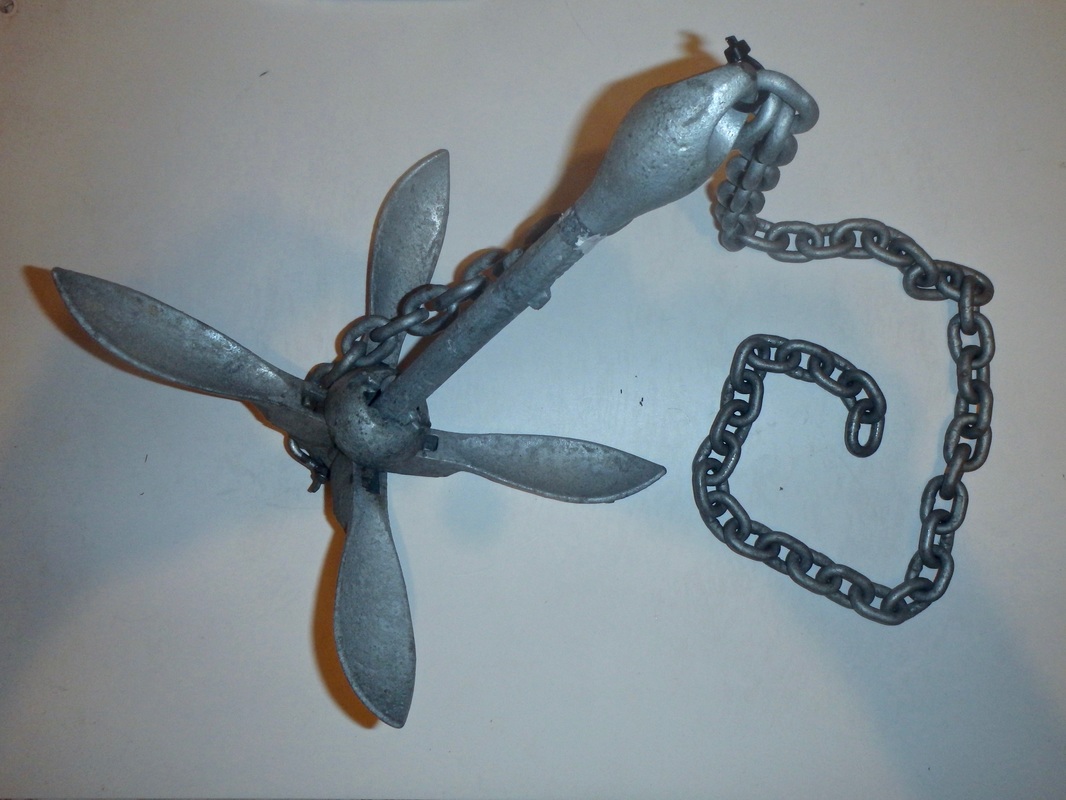
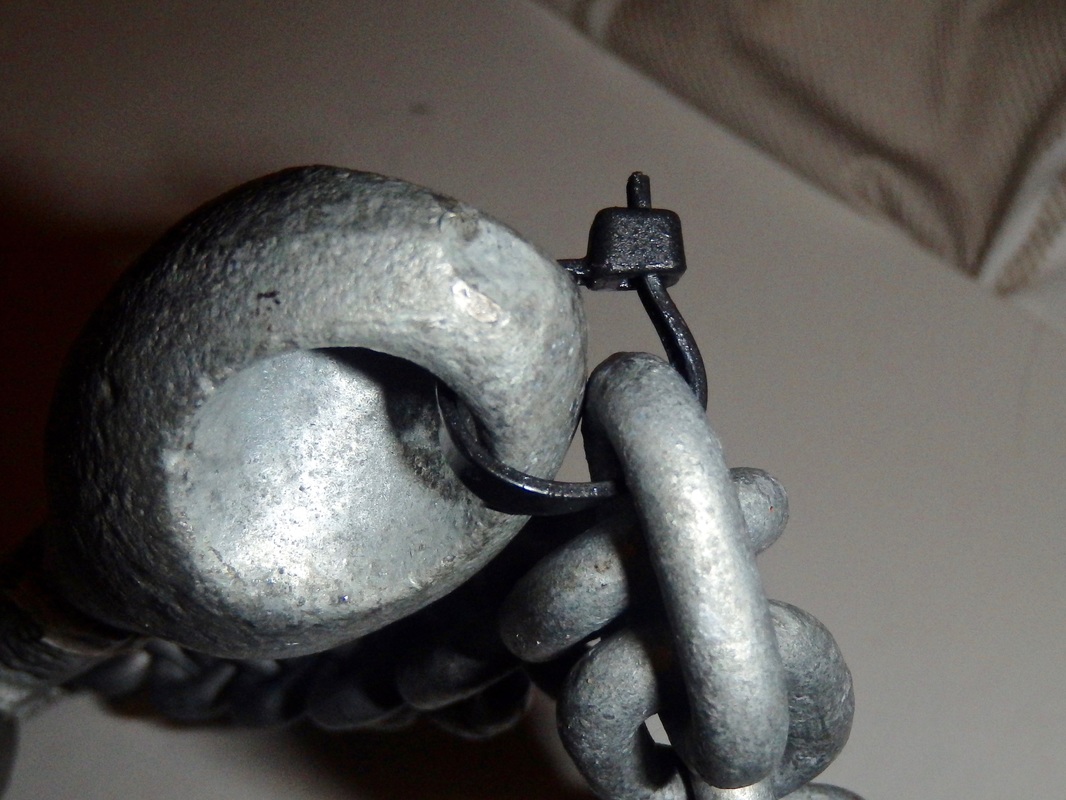
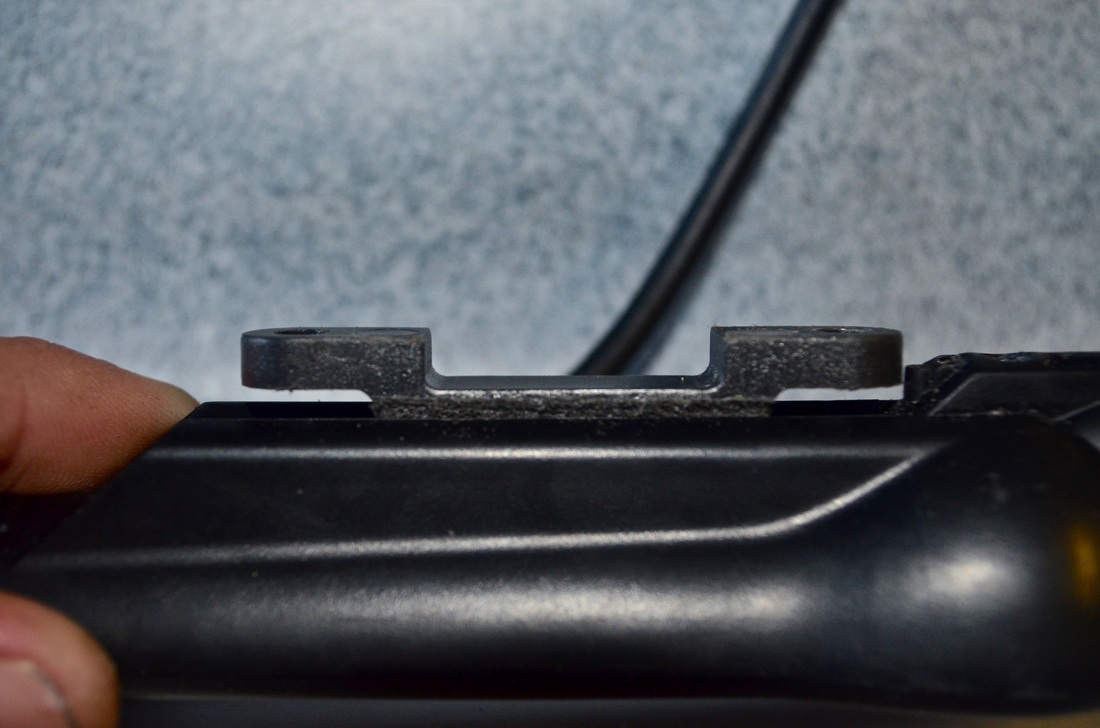
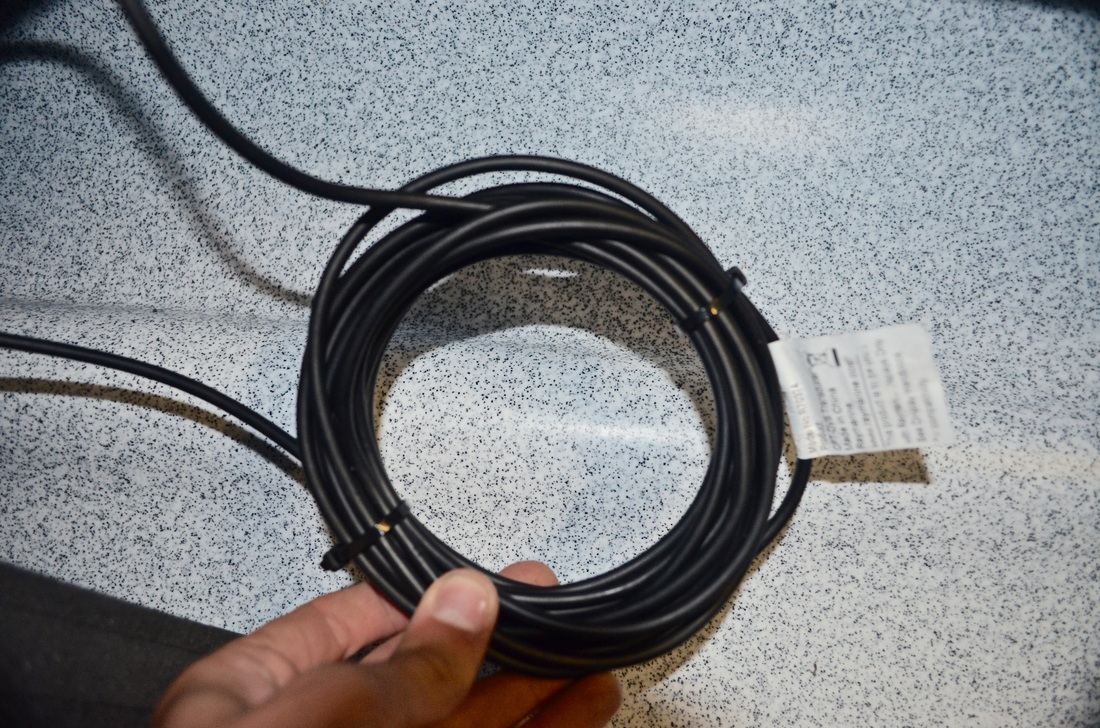
 The first step is to fit the pulley at the bow end. The pulley will be attached to a pad eye, placed a few inches back from the bow, via a short length of bungee. The bungee has two purposes - one to keep the anchor trolley taut to the hull, and two to act as a shock absorber when anchored in lively conditions. Use a marker pen to mark where the holes need to be drilled to fit the pad eye. I use a 5mm drill bit, or a 4mm with a bit of wiggling. Apply some sealant to the holes and rivets - i recommend Marine Goop as this is both an adhesive and sealant but clear silicon will also work as just a sealant - see recommended Sealants and Adhesives here. Pop the rivets using a pop rivet gun - if the shaft snaps short of the rivet head you may need to use a hacksaw to cut down the shaft. One of the black parrel beads is used to make an elastic toggle loop approx. 4 inches long. Use a lighter to melt the ends of the elastic to stop them fraying. The bungee loop then passes through the pad eye and is stopped by the bead as shown below. The pulley then clips to the bungee via a 60mm stainless steel carabiner. 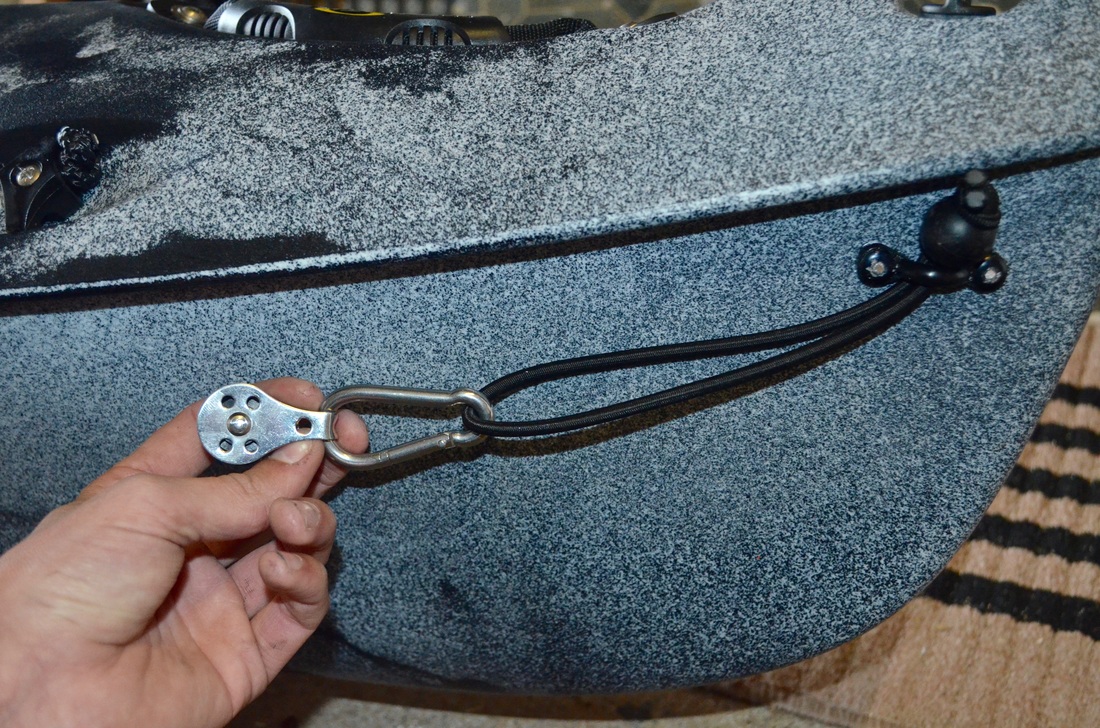 A similar set up is installed at the stern, although without the bungee. I will be anchoring from the stern 95% of the time so i want to point of anchoring to be as close to the stern as possible so that the kayak will sit as straight as possible at anchor. The absence of the bungee allows the trolley carabiner to sit closer to the stern. The use of a carabiner at either end of the trolley allows for the whole set up to be removed of needed. 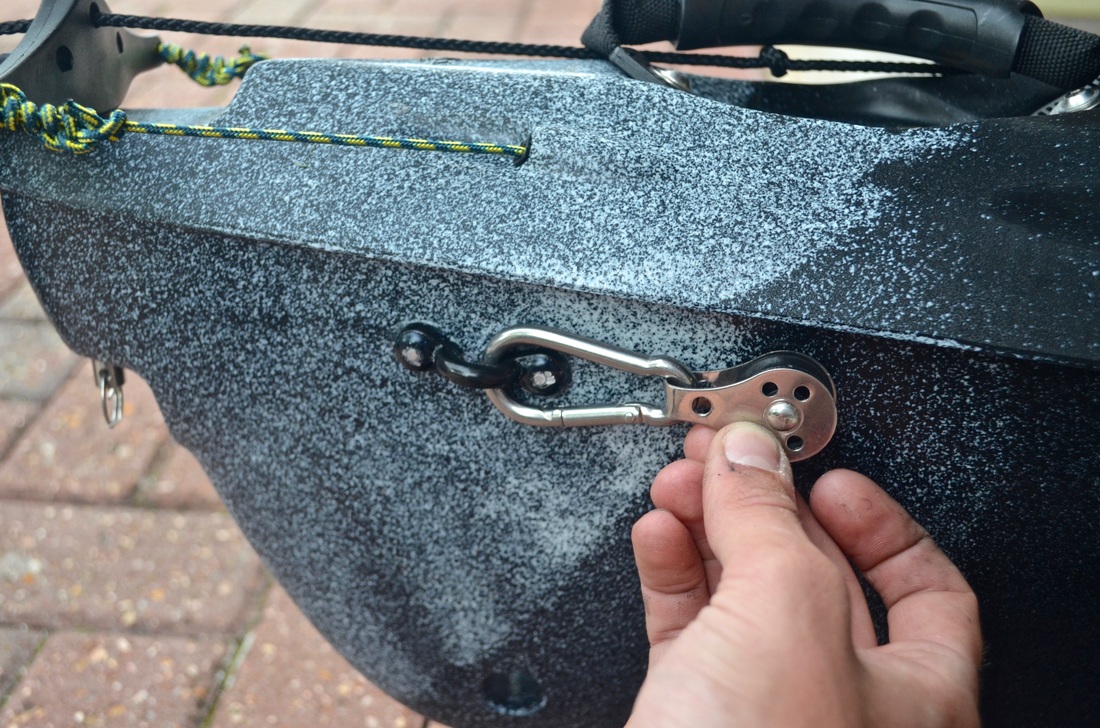 I'm using 4mm braid-on-braid for the anchor trolley line. Simply pass the braid through both pulleys and bring together on the bottom side of the pulleys to create the loop. Thread a parrel bead onto each end as these will act as buffer beads against the knot, which could rub against the pulleys when anchored and weaken the braid over time. I then tie a 30mm stainless steel ring to each end of the braid and connect these a 60mm carabiner. A bit of tinkering will be needed to get the trolley taut and the knots tight at the same time! Again use a lighter to melt the ends of the braid to stop it from fraying. The use of the rings comes from Mark Crame who uses this set up as a towline as well as an anchor trolley. Simply unclip the carabiner from one of the rings and you have either a bow or stern tow line to clip onto another kayak! Im sure that will come in handy at some point.  The anchor line can now pass through, or be clipped into, the carabiner and shuttled from bow to stern but a cleat is required to lock the trolley in position. I use a zig zag cleat as the one cleat can be used to lock off the anchor trolley and cleat off the anchor line. I have positioned the zig zag cleat beside the Rytmo graphics, just below the flush mount rod holder. In this position it does not interfere with paddling (no catching your knuckles!) and it is still within easy reach as it is right beside the seat. A zig zag cleat is a load bearing fitting and i recommend installing using either bolts/washers/nuts if you can access the rear of the area where you are fitting, if not then trifold rivets work well and have never failed me. I do not recommend the use of well nuts having seen several fail on load bearing fittings, such as cleats and rod holders. Seeing as i cannot access the rear of the area i want to install the cleat i will be using trifold rivets. Many pop rivet guns do not have a nozzle small enough to fit between the sections of the cleat to sit flush against the rivet head, which is needed to pop them. All is not lost as there are a couple of ways to get around this. If the rivet nozzle is close to fitting in the gap, then apply some force (often quite a lot!) to wedge the nozzle into the cleat until the nozzle head touches the rivet head - then you can start popping! Alternatively, use some small washers to place over the alloy rivet rod and against the rivet head and build up to a height where the rivet gun nozzle can rest against the washers - you will then be able to pop the rivet! 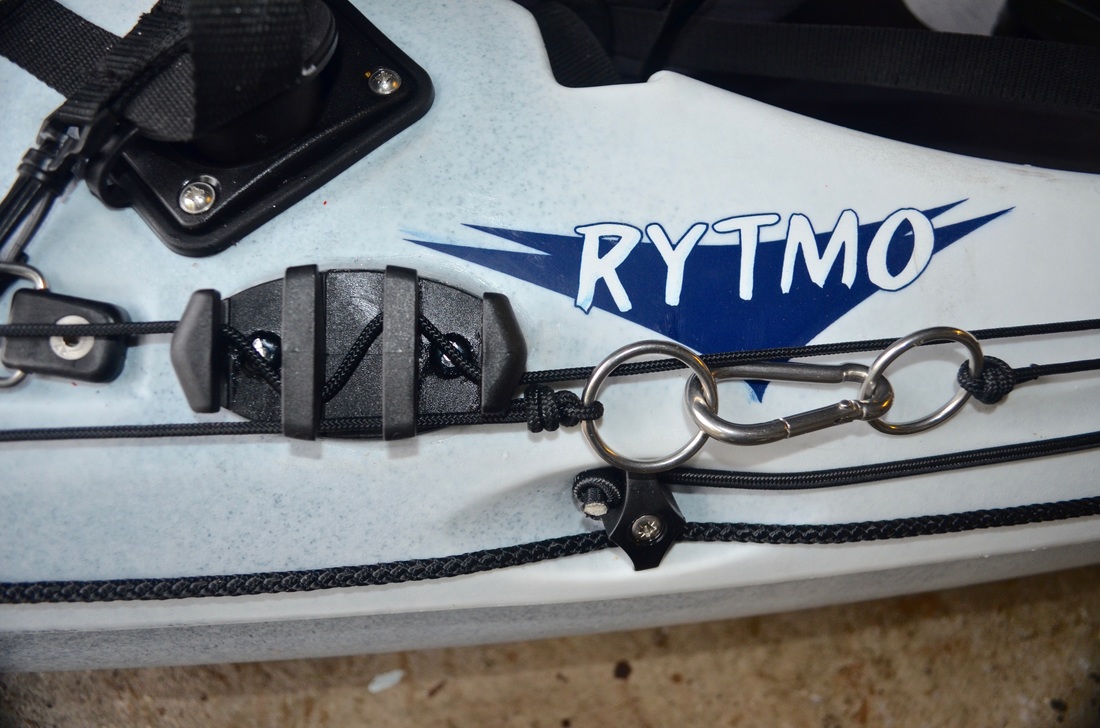 A homemade anchor reel (made by Richi) loaded with 2mm polypropylene cord/braid and 1.5kg Grapnel Anchor with 1.5m of 6mm chain and cable tie weak link complete my current anchoring set up. The chain attaches to the base of the anchor using a D-shackle. The cable tie is tied to a chain loop in a position that puts little or no strain on the cable tie when the chain is being pulled in line with the anchor shaft. If the anchor becomes snagged i paddle up tide, if possible, in order to put pressure against the cable tie. A sharp pull will then hopefully break the cable tie and allow the anchor to be pulled out of the snag from it's base.
A carabiner is tied to the anchor line, this passes through the carabiner on the anchor trolley. I then clip on my anchor chain/anchor and lower this to the sea bed. Whilst it is falling to the bottom i shuttle the anchor trolley to the stern and lock this off using the zig zag cleat. Once the anchor has hit the bottom i feed out enough extra line ensure the anchor grips the bottom well, the amount of line depends on the conditions. In shallow (less than 10m) water and calm conditions with little tide or current you can get away with letting hardly any extra line out. In rougher conditions you will need to let more out. In deeper water (over 10m) i can let anywhere between half the depth of water worth of extra line out and 2 or 3 times the depth of water worth of line out. It depends on how much tide, swell, chop and wind you are anchored in. The harsher the conditions, the more line you need to let out. There are no hard and fast rules so experiment and find out what works for you and your kayak. The Anchor trolley can also be used to position a Drogue/Drift Chute off the bow to help slow a drift in windy conditions. The Rytmo is now rigged for anchoring, which will allow me to fish for many bottom species, such as Ray, Conger and Wrasse, that i would not be able to target as effectively on the drift. The anchor can also be an important safety device should you need to stop your kayak drifting if you have gotten into difficulty and need to wait for help. Fish Finder and GPS Chart Plotter - Raymarine Dragonfly 5 ProFish Finders and GPS Chart Plotters, either as combo units or seperate devices, are common accessories to be fitted to a fishing kayak. Are they worth the money.... in my opinion....Yes! A fish finder is great for locating bait fish in the water column and finding structures such as reefs and sandbanks to fish over. These structures can easily be found using nautical charts and high definition sonar charts, such as those available on chart plotters running a Navionics card, but often these charts will not reveal small-scale fish holding structures such as specific pinnacles on a reef or a newly formed sandbank or recently revealed boulder field. I find a fish finder particularly useful when vertical jigging over reefs - you can keep an eye on the bottom contours and drop the lure over drop offs and into holes, of lift the lure over pinnacles and rises to prevent snagging. A fish finder really does open your eyes as to the world beneath your kayak and allows you to make informed choices as to where to cast your lure or place your bait. GPS Chart Plotters can either come integrated within a fish finder unit or as a separate handheld or fixed device. A chart plotter is effectively sophisticated sat nav for boats! You can see your geopgrahical location (lat/long), your speed and your heading. Location information can be important for safety reasons, in case you need to relay you position and heading to other water users or the coastguard. The heading vector is useful to track and calculate the direction of a drift. The speed information is useful to see how much headway your making against the conditions or how fast you are drifting when not paddling. Your position is shown on a basemap so that you can visually see your position and heading relative to the coastline - this is particularly useful if you get stuck out in low visibility conditions and need to navigate back to shore. Chart plotters allow you to mark waypoints onto a base map so that you can return to these positions at a later time or date. These could be fishy looking marks, a place where you caught a big fish, a previously unmarked wreck or reef etc. etc. For this a chart plotter is invaluable and being able to navigate yourself back to a desired mark is fantastic and time saving! Decent chart plotters will also allow you to mark tracks so that you can see exactly where you have paddled or drifted. This is great for tracking drifts so that you are not covering the same ground if the fish aren't biting, or for drifting the same ground if the fish are biting! Most chart plotters can be upgraded to display high definition nautical and sonar charts, such as Navionics+. This effectively gives you a really detailed map of the sea bed. You will be able to see exactly where reefs and drop offs are located so that you can paddle straight to them saving you time on the water. You can then use your fish finder to check out the fine scale structure of these areas. I have been using a Raymarine Dragonfly 5Pro, a fish finder/chart plotter combo, on my Abaco and then Tempo over the last year or so. It was now time to install it on the Rytmo! Equipment Used:
Tools required:
 Installing a fish finder at first seems complicated but in reality is fairly straight forward once you get your head around what needs to go where. It will still take a couple of hours to install one without rushing. The most difficult part is choosing where best to mount the transducer. There are 3 main methods to install a transducer on a kayak:
Many models of fishing kayaks have transducer scuppers but hardly any will fit the long transducer of a Raymarine Dragonfly very well. The Rytmo has a moulded scupper hole for a transducer and the CPT-DVS transducer that comes with the Dragonfly DVS and Pro series fits the space perfectly without protruding out front the hull!! The larger Lowrance CHIRP transducers also fit - see here.
The transducer scupper has two moulded in brass inserts for attaching a transducer. After a little bit of thinking and searching i found a way to attach the transducer using these fittings. I used a Footmans Loop - this is designed to retain 1" webbing - and i attached this to the last fixing using a short M5 bolt. 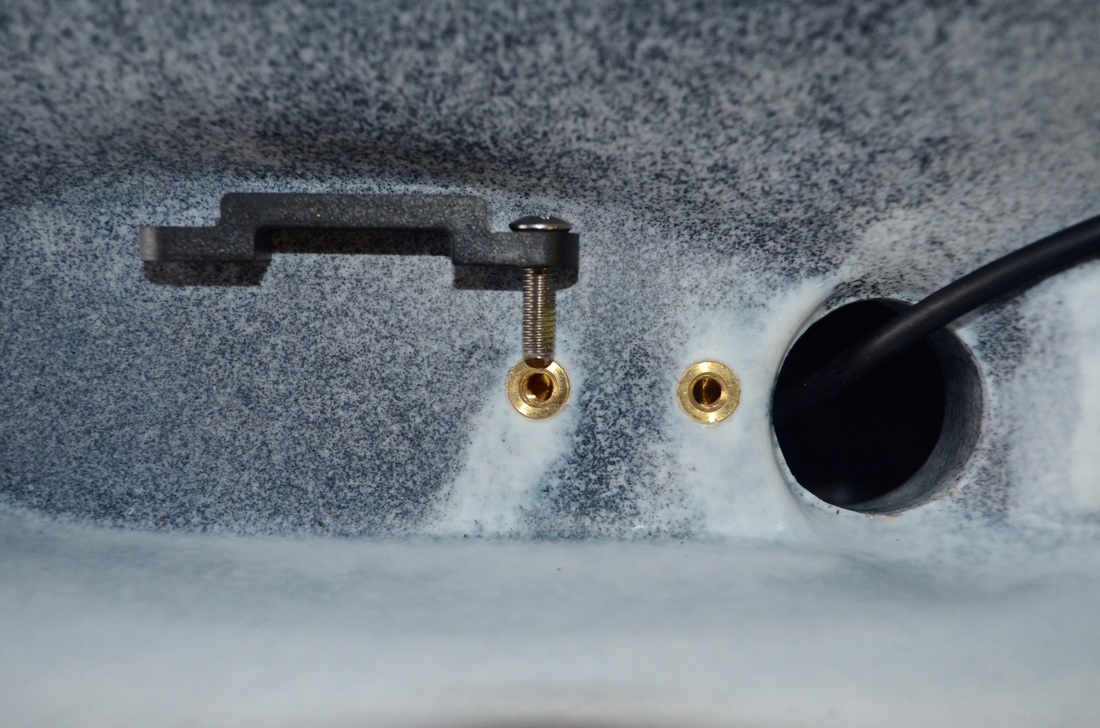 The plan was to use this as fixing to cable tie the transducer onto. To make the transducer sit straight and flat on top of the Footmans Loop it needed a little modification by means of trimming the width of the top section to sit within the groove in the top of the Dragonfly transducer. This was achieved by using a fine tooth saw and whittling the plastic away either side until it was a perfect fit for the groove.
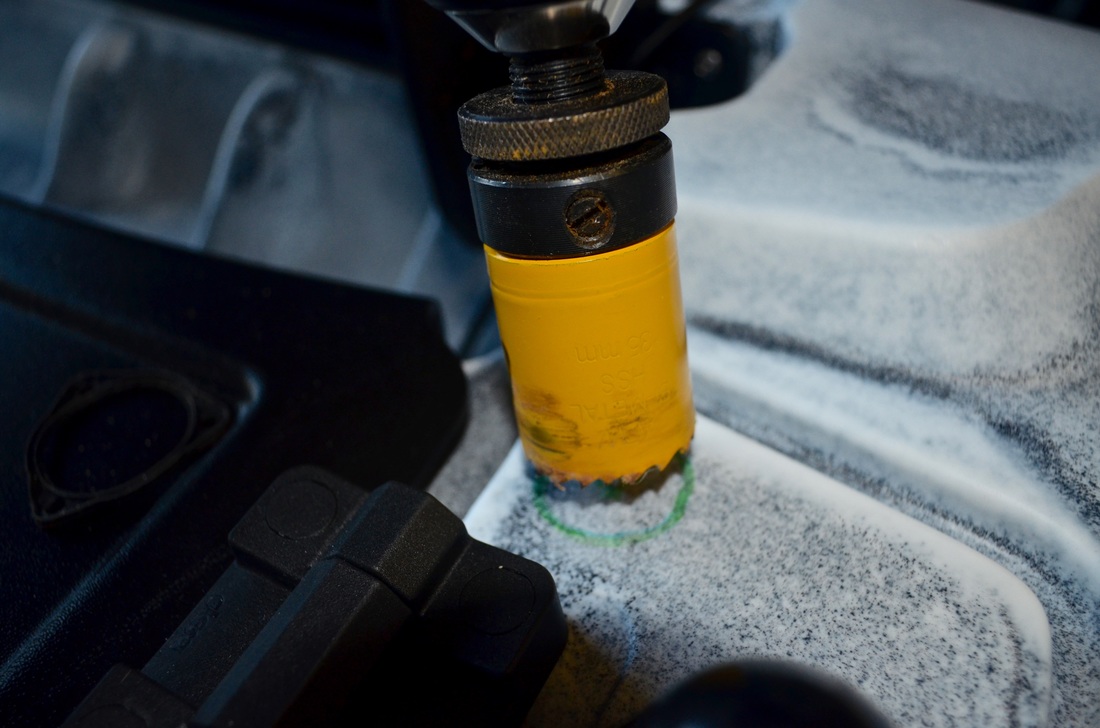
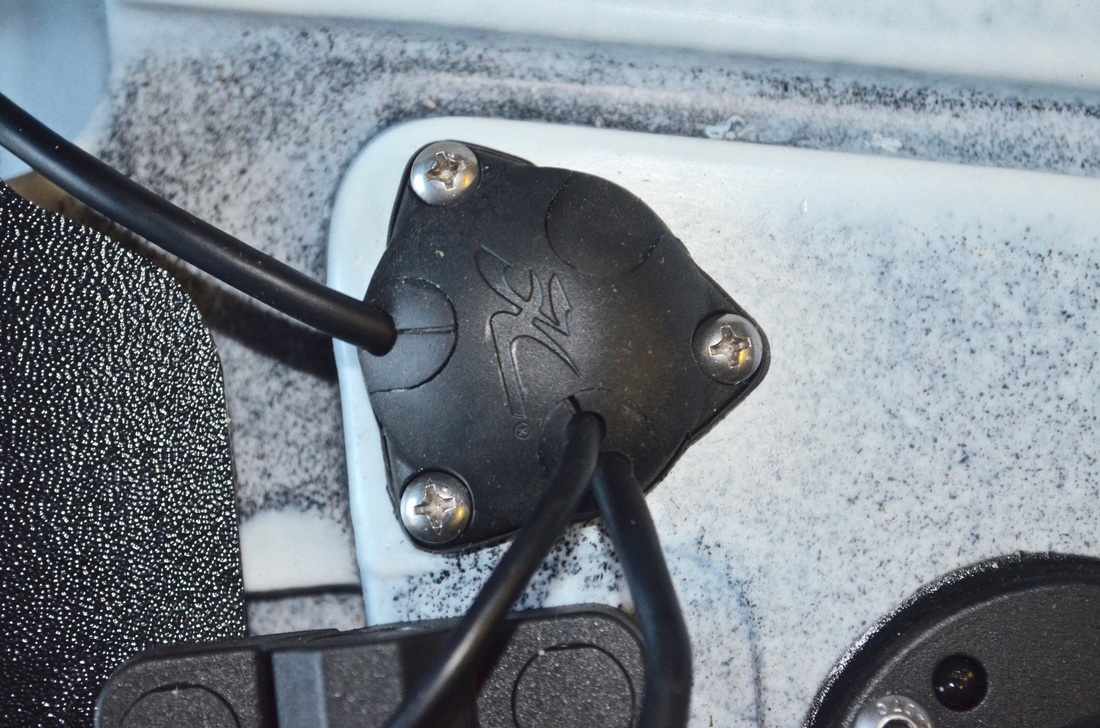
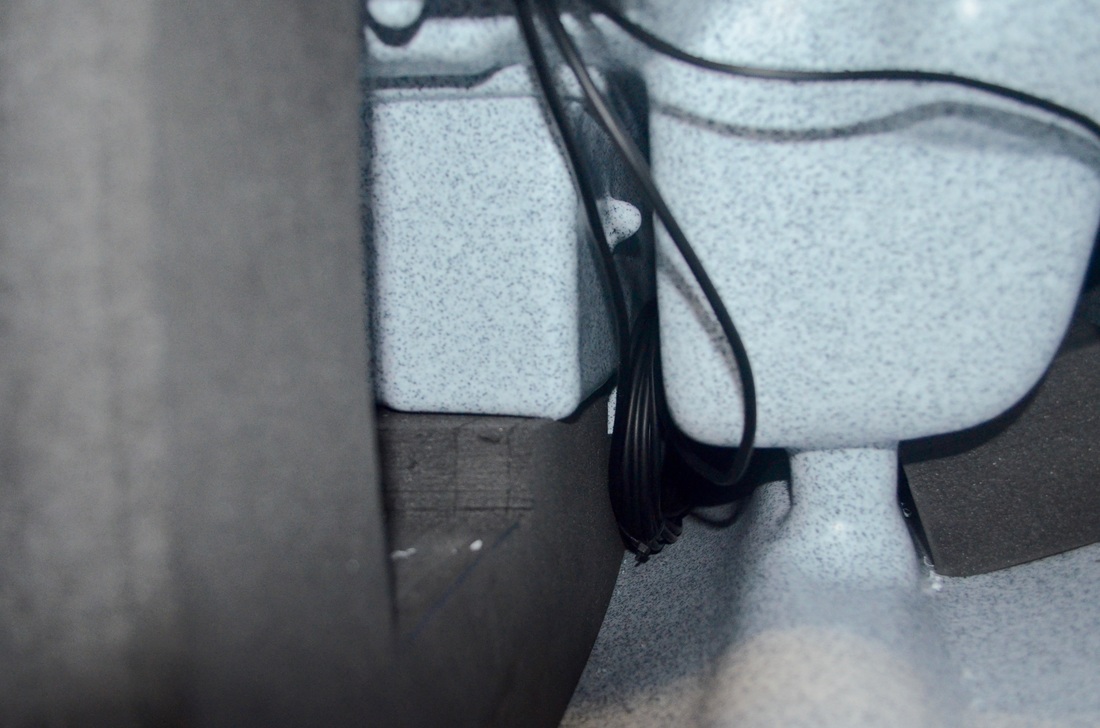
The modified Footmans Loop was then screwed into the furthest insert from the Scupper and a couple of cable ties used to attach the transducer to the Loop. It sits really well even with just one screw holding the loop in place. The cable ties have no noticeable effect on the transducer reading from what i can tell after the first few sessions. Transducer Installation done....easy! 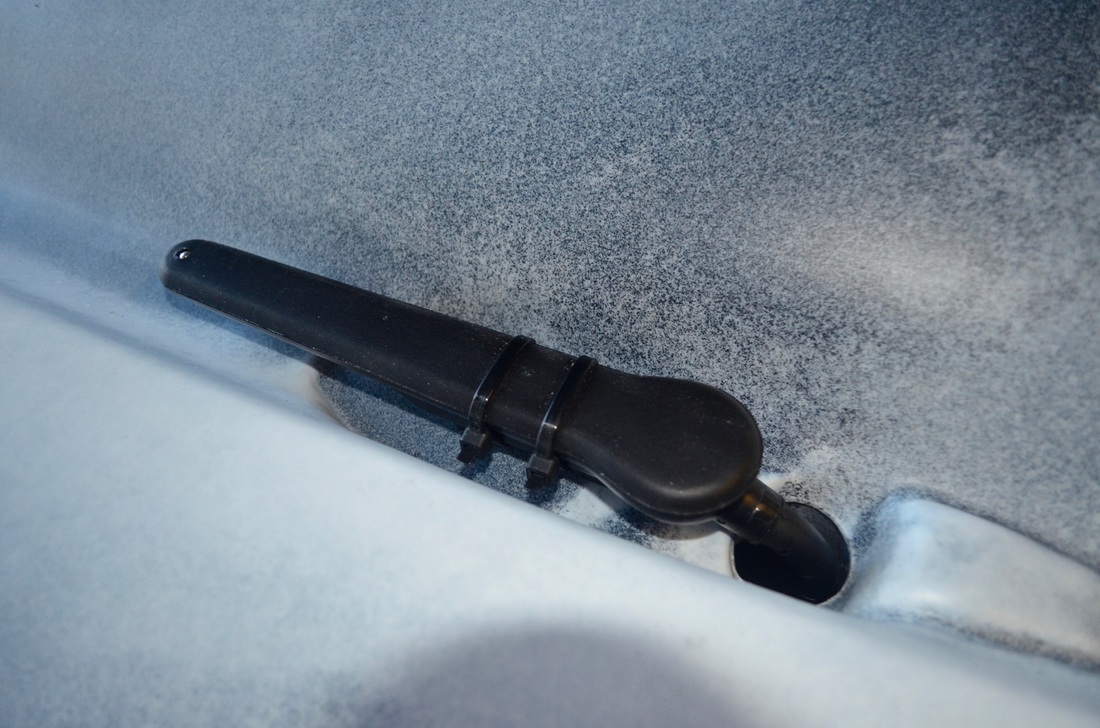 The cable runs up through the scupper hole so the next step is to sort out where the battery, excess cabling and main head unit will be located. To keep things tidy on the deck i opted to put the battery and excess cabling inside the hull. In order to do this the transducer cable would need to pass into the hull and then both the transducer cable and power cable connected to the same connector need to pass back out of the hull so that it can connect to the head unit. To ensure waterproof cable routing a deck seal is needed. On both the Abaco and Tempo i used a Scanstrut deck seal, but after fitting a Garmin unit to a 2016 Hobie Outback i was very impressed with the Hobie deck seals that come as standard on the Hobie Kayaks that are 'Lowrance Fish Finder Ready'. The deck seals are called a Hobie Thru Hull 3 Way Plug Kit. They are low profile and could allow for up to 6 cables to pass through it with connectors up to 35mm in diameter. They come supplied with lots of pre-drilled rubber inserts for various diameter cables, with inserts that take one or two cables. Blank inserts are also supplied to blank off sections not needed on the deck seal. It really is a neat bit of kit. They can be purchased at Cornwall Canoes. 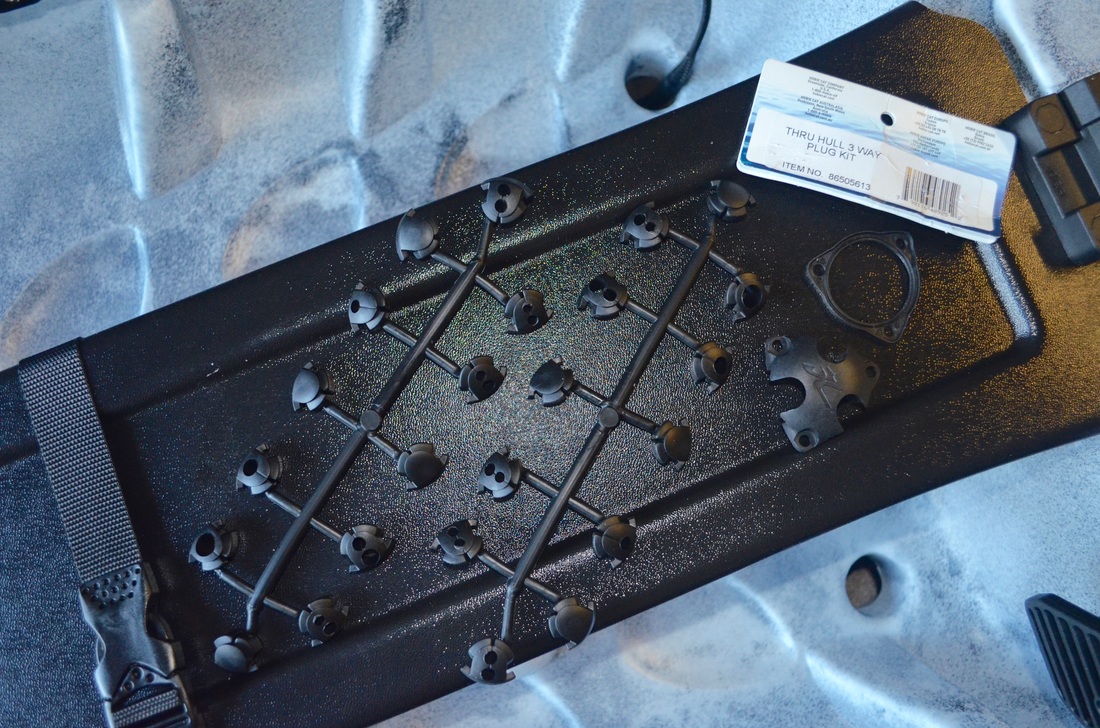 I would be installing it on the flat space just in front of the centre hatch hinge. 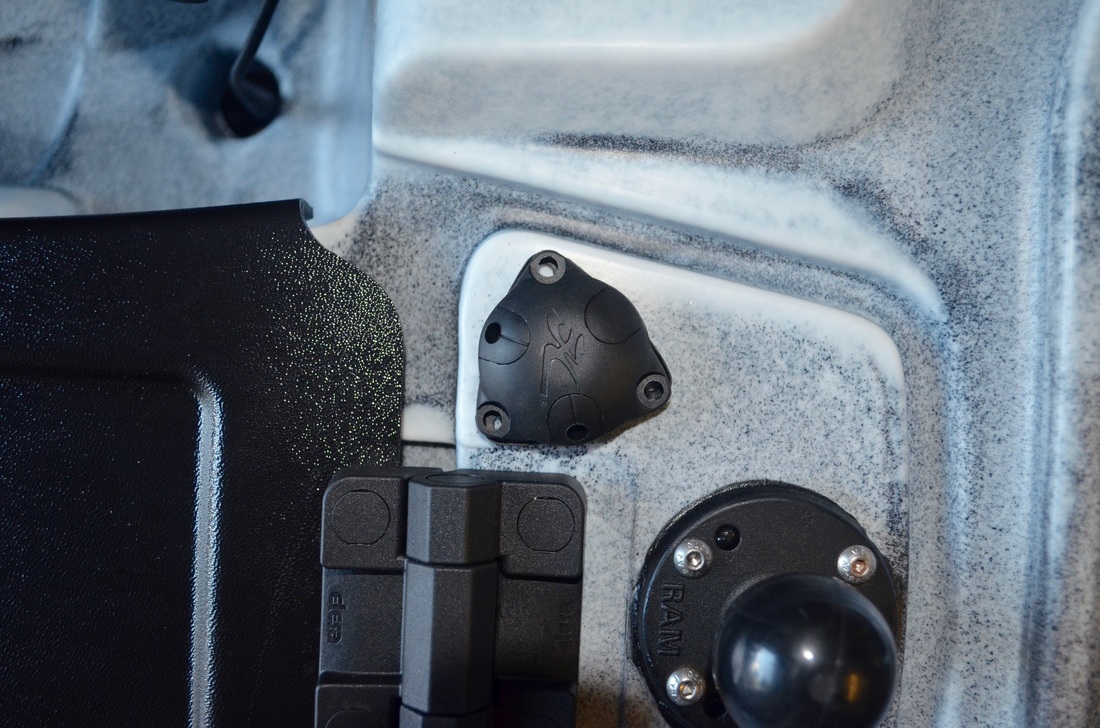 A 35mm Hole Saw is used to cut out a hole in the hull for the deck seal to be installed over. A rubber gasket is supplied and this sits perfectly over the hole - it can also be used to mark out the area before drilling.
It is then a case of putting the cabling into the hull and bringing the connector back out. You can then select which rubber inserts you need to use. I had the transducer cable going into the hull through one insert and then both the transducer and power cable coming back out of another. A blank insert then completes the deck seal. A dab of sealant where the cables meet the seals ensures further waterproofness.
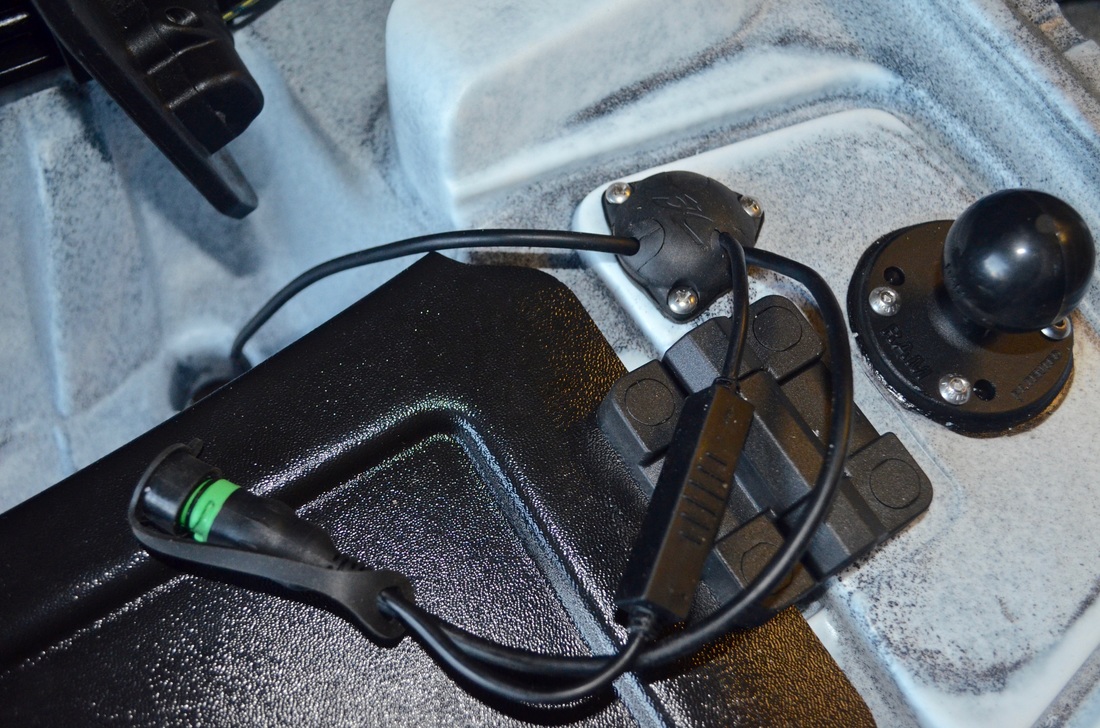
The cabling is coiled up and held together with a couple of cables ties to keep things tidy. This is then stowed in a gap between the scupper hole and the centre hatch inside the hull.
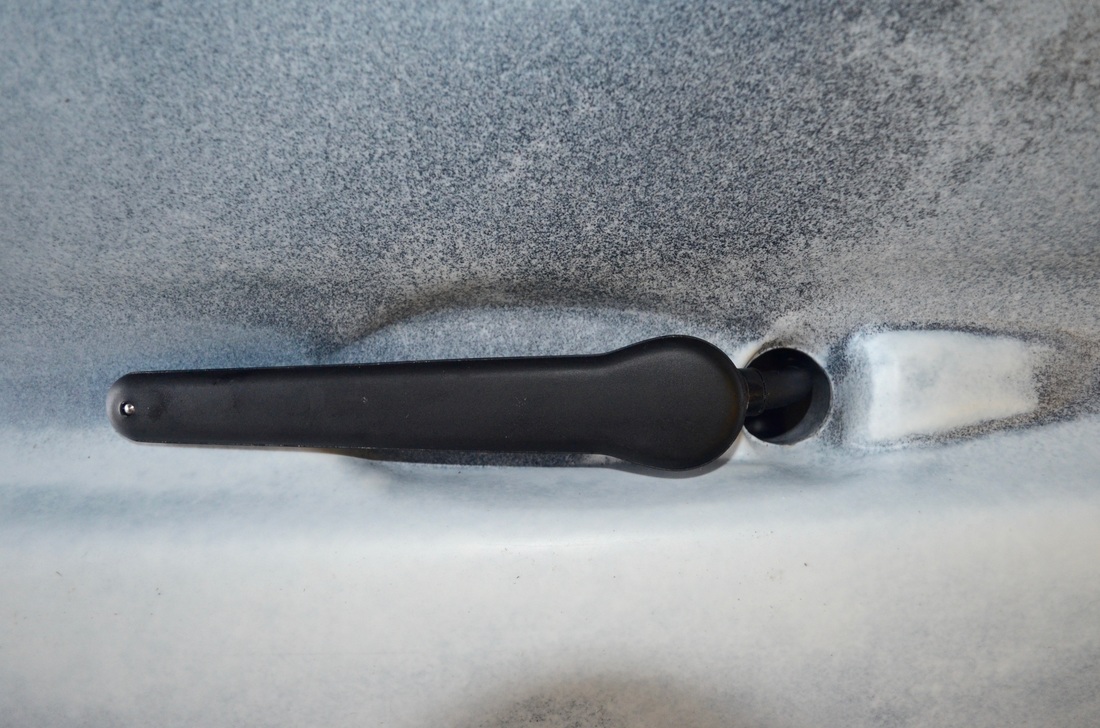
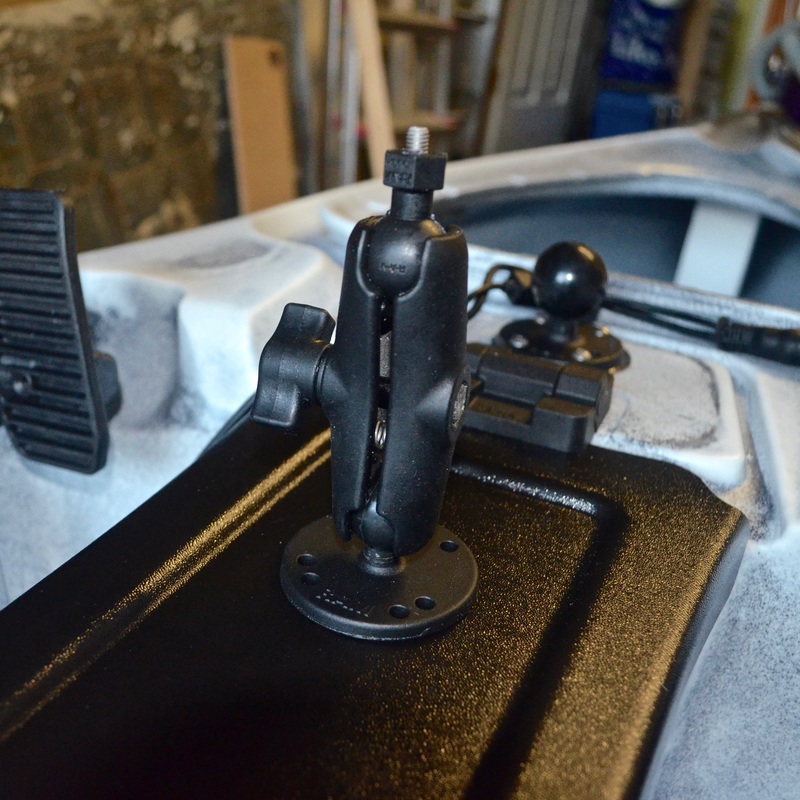
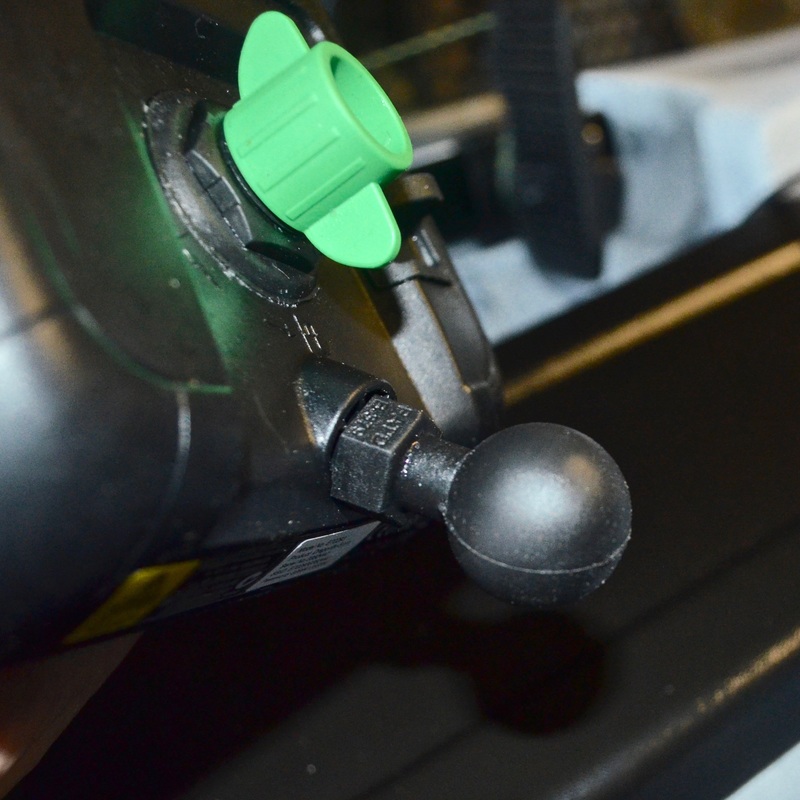
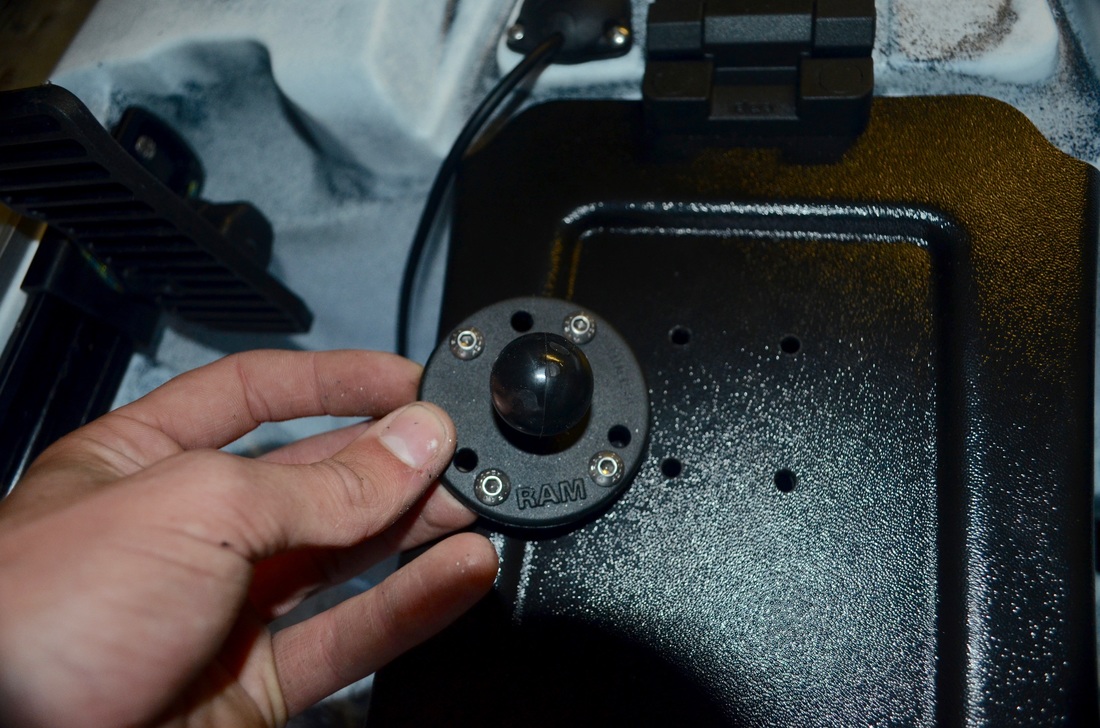
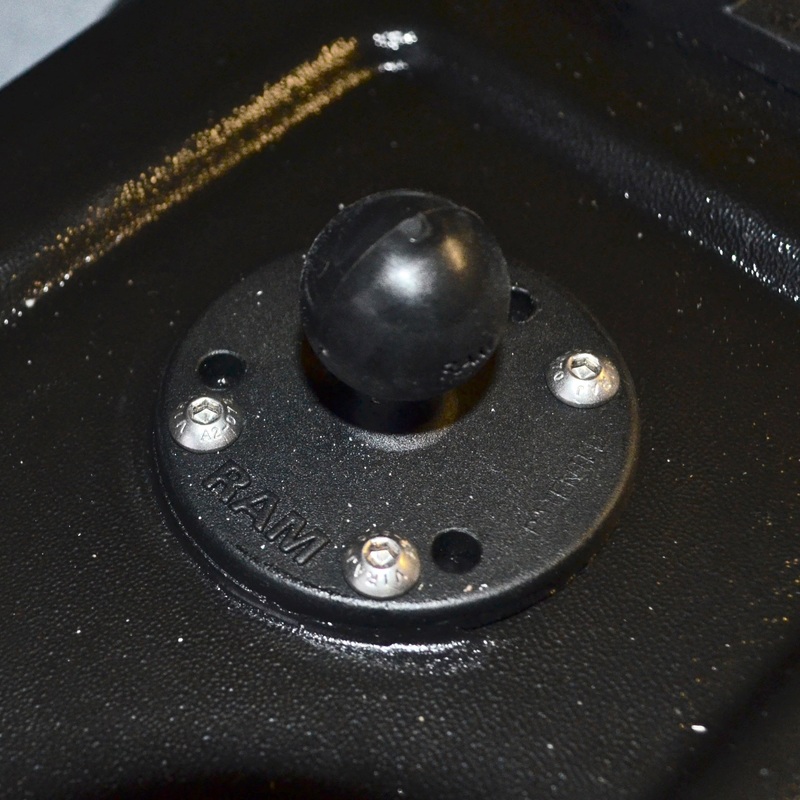
I keep my battery in a homemade waterproof battery box. In the Abaco and Tempo i made a battery box holder from a block of high density foam and some bungee. The Rytmo comes supplied with some foam in the front hatch that appears to be ready made to take a battery or battery box! I simply added a loop of bungee running beneath the block to use to hold the box in place.....easy! 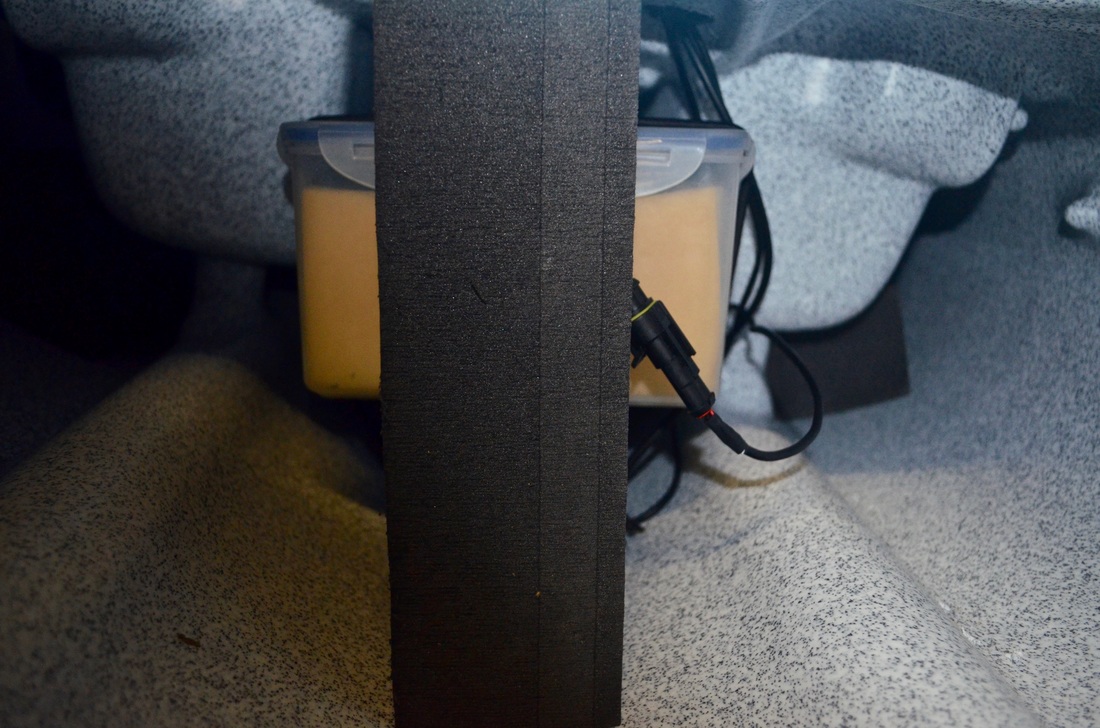 Transducer, battery and cabling sorted, this leaves only the head unit to mount. I have always used Ram Mounts for mounting fish finders as they allow for infinite angle adjustments so you can position the screen exactly where you want it. Ram Mounts make a mount specifically for the Dragonfly series - Part no: RAM-B-202-379-M616, This comprises of a 1" ball on a round flat base, a double socket arm and a 1" ball with a thread screw that will bolt straight into the back of a Dragonfly.
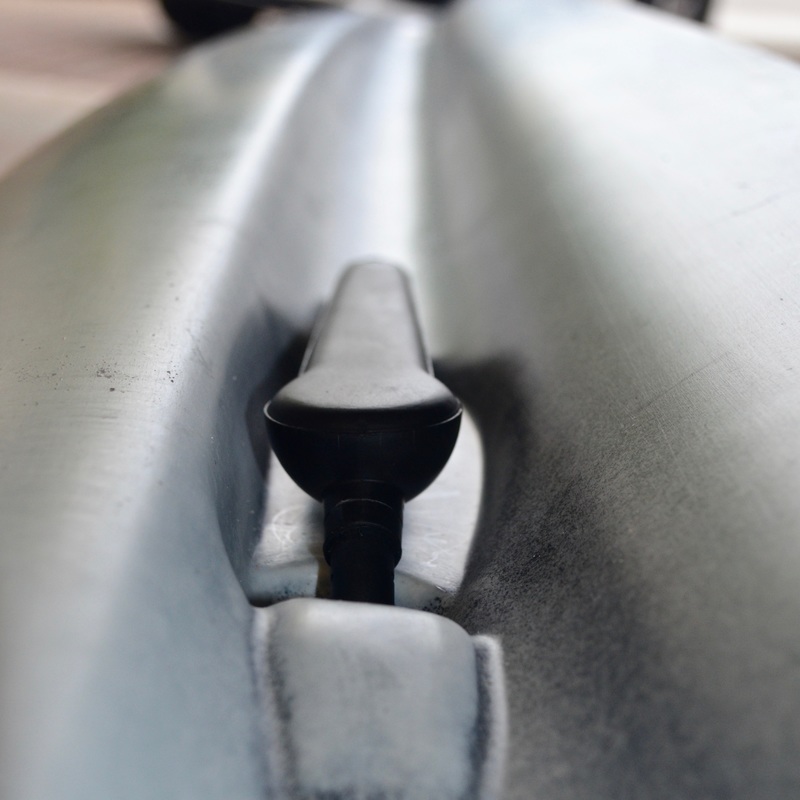
I decided on mounting the fish finder at the front of the centre hatch. I fitted the Ram Ball to the hatch lid using 4 x M5 Stainless Steel bolts with washers and nuts. Again a dab of decent sealant ensures a waterproof fitting - here i used Black Sikaflex-291i as it looks great on black surfaces!
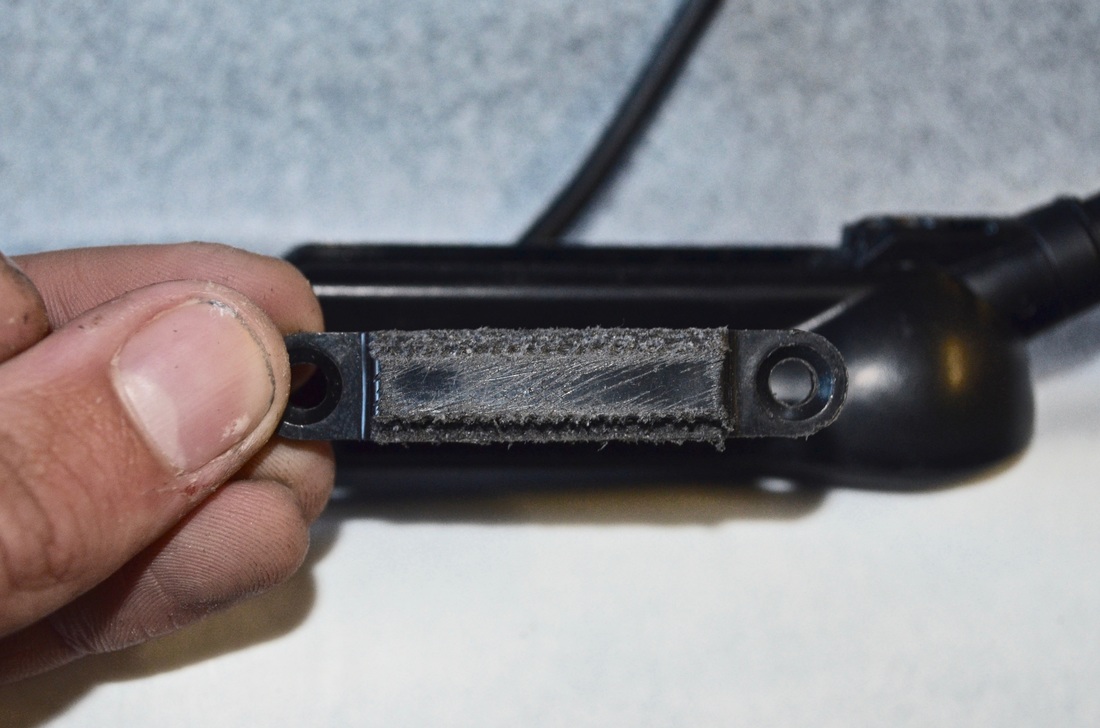
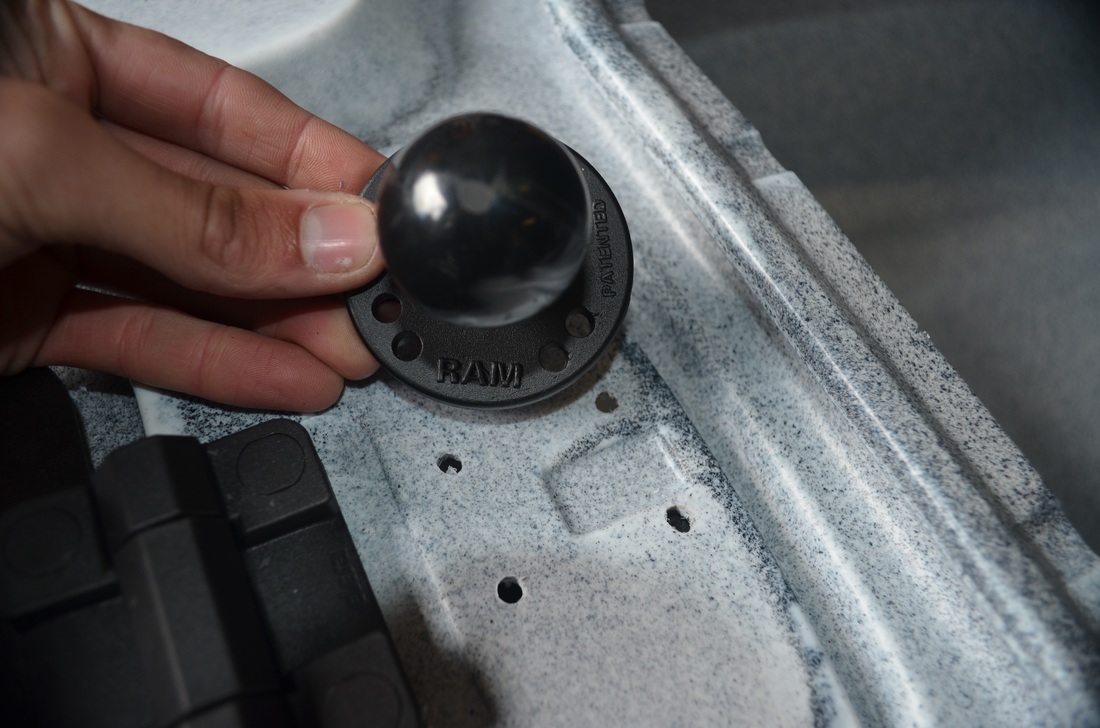
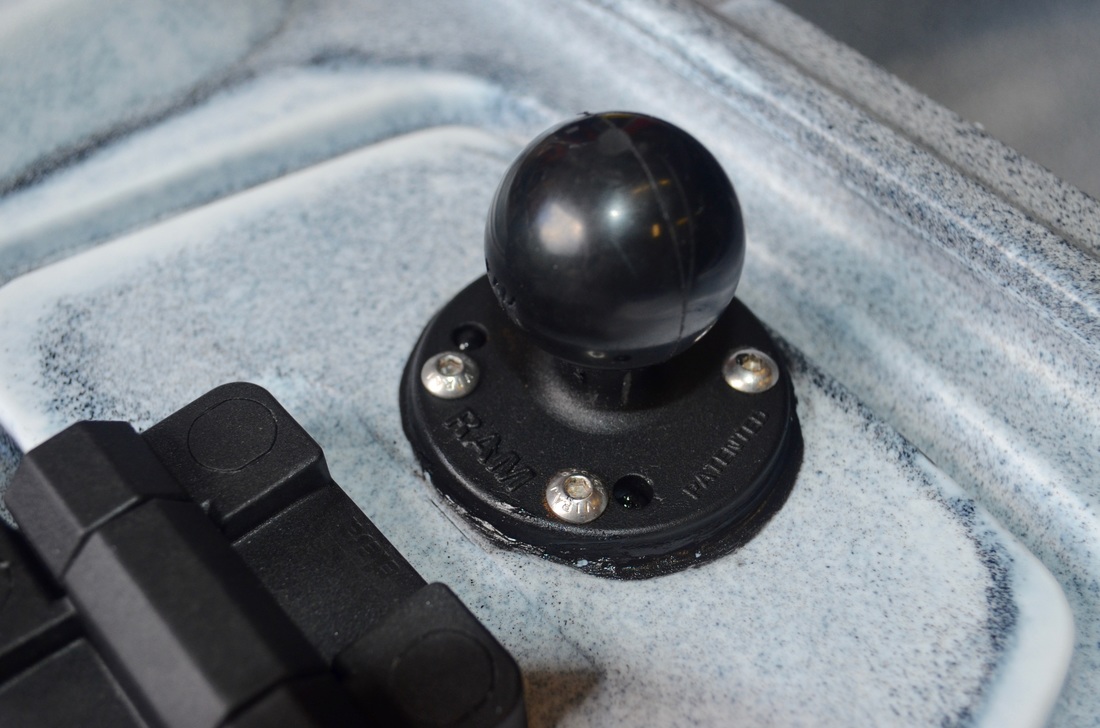
The double socket arm then joins the base ball mount to the ball on the back of the Dragonfly.  Fish Finder installation....done! The Dragonfly is running a Navionics+ card so i now have high definition nautical and sonar charts, as well as CHIRP Sonar and Downvision all at my disposal when on the water on the Rytmo! Now where are the fish..... 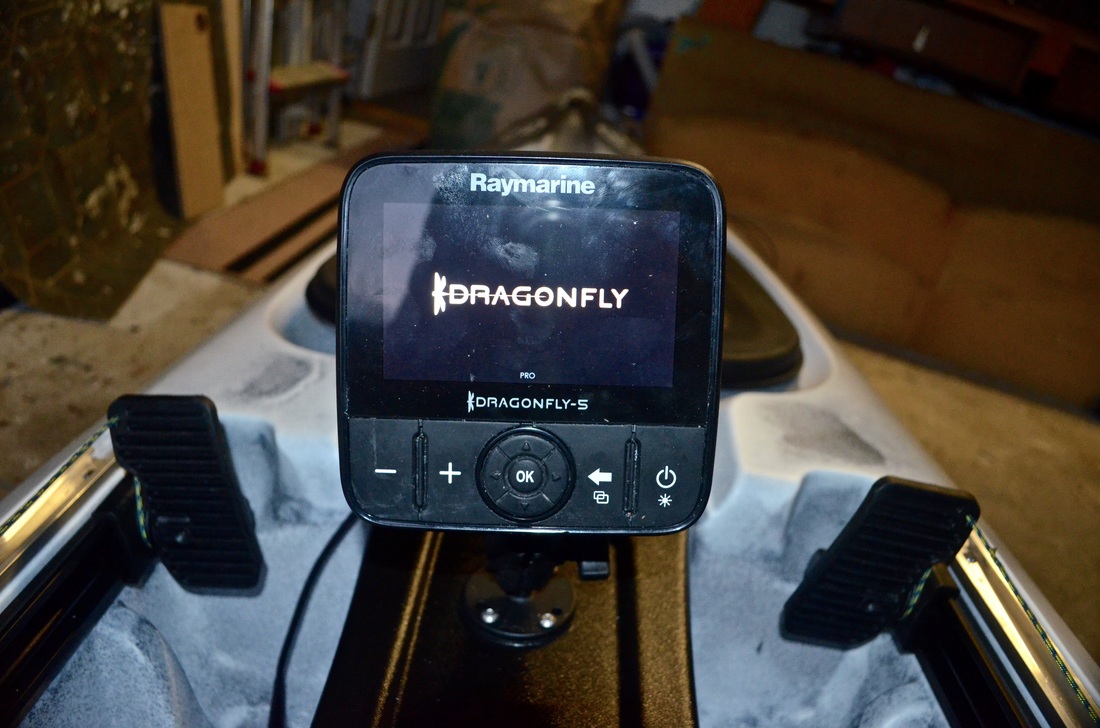 Storage CrateTackle and gear organisation on the kayak is important. At times kayak fishing can be chaos so it makes sense to organise this chaos to make things easier for yourself on the water. Storing your gear in designated places means that you will know where something is when you need it. The Rytmo has plenty of storage options. The bow hatch is great for storing a trolley and other gear that you don't need to access when on the water. The centre hinged hatch makes a great place to store tackle and gear you need regularly on the water, such as spare weights, rigs and lures. The centre rubber hatch is also useful for storing gear you need regularly, perhaps a good place to store bait out of the sunlight. The storage pockets in the footwell are really useful for holding a fillet knife, scissors and other tools. The rear tank well is shaped in a way to take a rectangular storage crate. Crates are a popular feature on fishing kayaks and they make a great place to store larger items of gear and tackles boxes. With a little modification, rod holders and gear retainers can easily be added. I managed to find a 20L storage crate at a local hardware store (Trago Mills). I used some sections of waste pipe to make some upright rod holders and some larger waste pipe to make an anchor holder. These were attached to the crate by drilling some small holes and using cable ties to pass through these and fix the pipe in place. 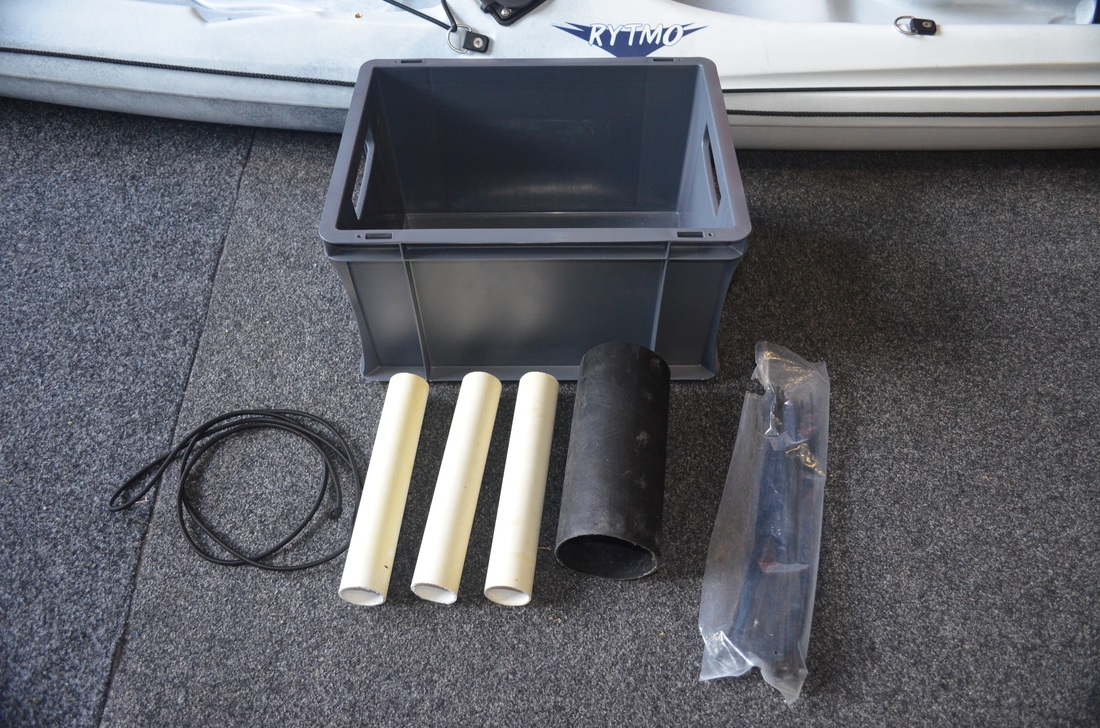 A few more holes were drilled and bungee added to make a chopping board retainer and a knife retainer. I also drilled several holes in the base of the box to allow any water to drip out of the bottom. 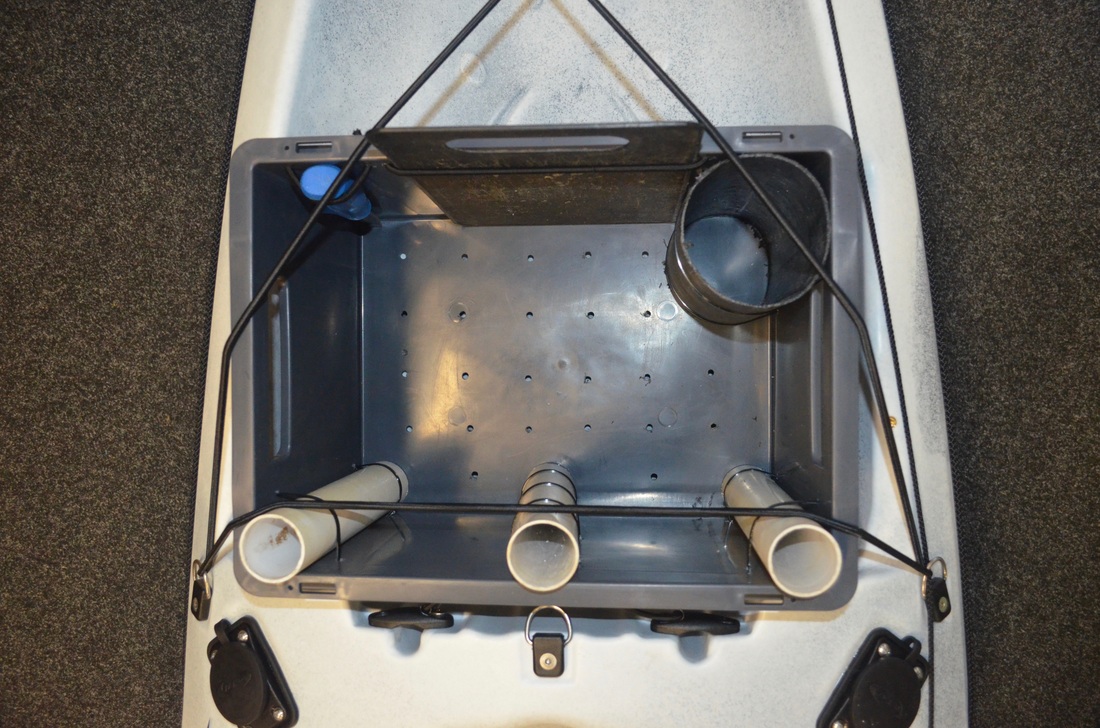 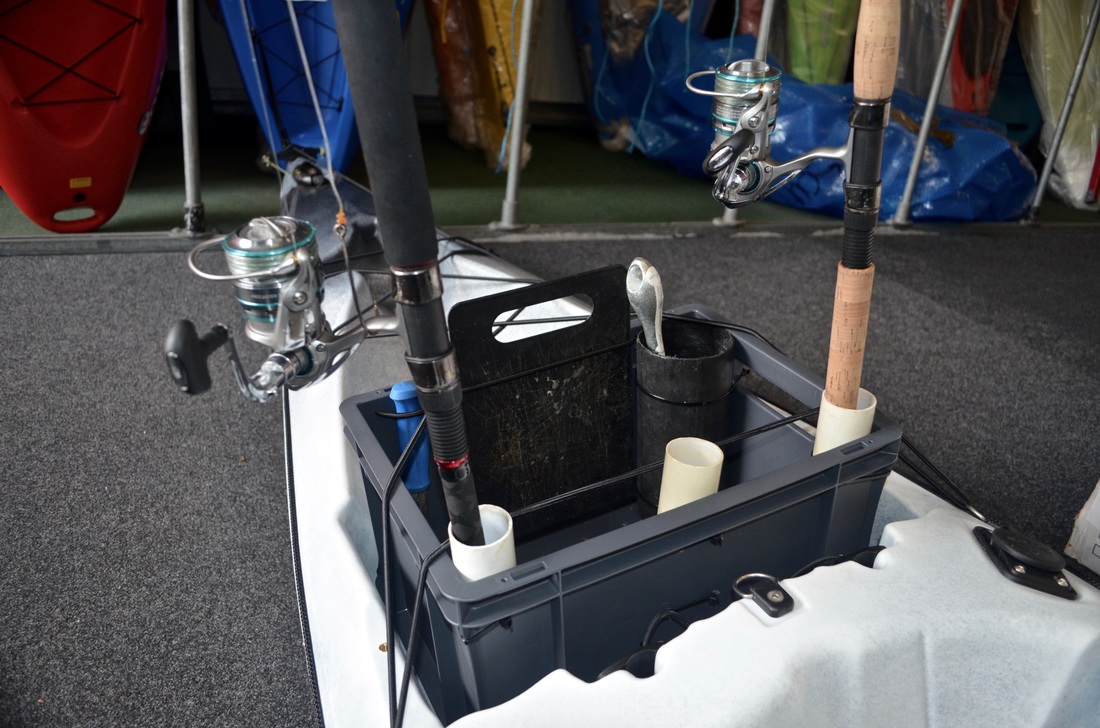 I really like having vertical rod holders. I find these much better for holding the rods whilst paddling as they are well out of the way of my paddling arc. Depending on which way the box is, the rod can either be directly against my back, or positioned further away with the box opposite to what is shown above. I prefer the latter as i find the rods easier to grab in this position. I now have a storage crate that will hold all my large items of gear such as my anchoring kit, chopping board, tackle boxes, spools of line and more! Rod RestI have been using a front rod rest for some time now and it has been a very useful addition on all my fishing kayaks. There are not any 'off-the-shelf' rod rests for fishing kayaks but there are several ways to make your own. I made one using a Ram Pole and Maver Rod Rest - see here for more info. All that i needed to fit to the Rytmo for this to be compatible was a 1.5" Ram Ball. The flat space in front of the centre hatch hinge was the perfect place for this. Mark out 4 holes, drill using a 5mm drill bit, apply plenty of sealant - i used Sikaflex here, and bolt to the Rytmo using M5 stainless bolts, washers and nuts.
Then its just a case of clamping on the Ram Pole Rod Rest. The works really well for fishing at anchor or when fishing on the drift. The rod tips can be held nice and low to the water so that you don't have to stare at a rod tip against bright sky, as is the case if using flush mount rod holders! The rest is also great to place a rod whilst baiting up or unhooking fish. Rod Rest...Done! 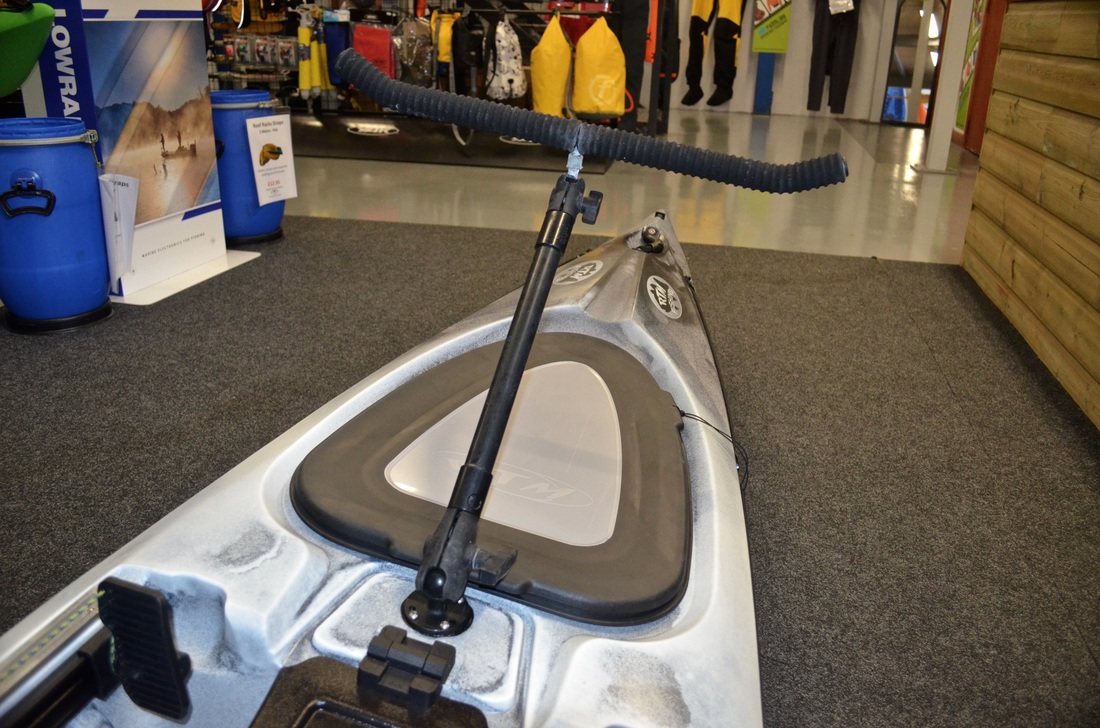 Go Pro / Camera PoleAfter experimenting with different camera angles on the Abaco and Tempo i have settled on an 'over-the-shoulder' shot being the best in terms of capturing the action. In order to put my Go Pro in this position i made a custom Ram Mount Go Pro Pole. I used the 1" and 1.5" socket ends from an 18" Extension Pole, but instead of using the composite pole supplied i used a carbon paddle shaft from a broken paddle! The paddle shaft was cut to around 1m in length but was not quite the right diameter to fit neatly into the socket ends, so i cut some short sections from the supplied composite pole to use as spigots to bridge the gap. A bit of Marine Goop holds it all together solidly. The pole then attaches to the kayak via a 1.5" ball base, and the Go Pro attaches to the other end of the pole using a Ram Custom 1-Inch Ball Go Pro Adaptor. The 1.5" Ram Ball Base was fitted to the Rytmo just behind the seat, beside the flush mount rod holder. As the area is inaccessible from behind i used Trifold Rivets to fix this in place, along with a good dollop of Marine Goop to seal the fitting. 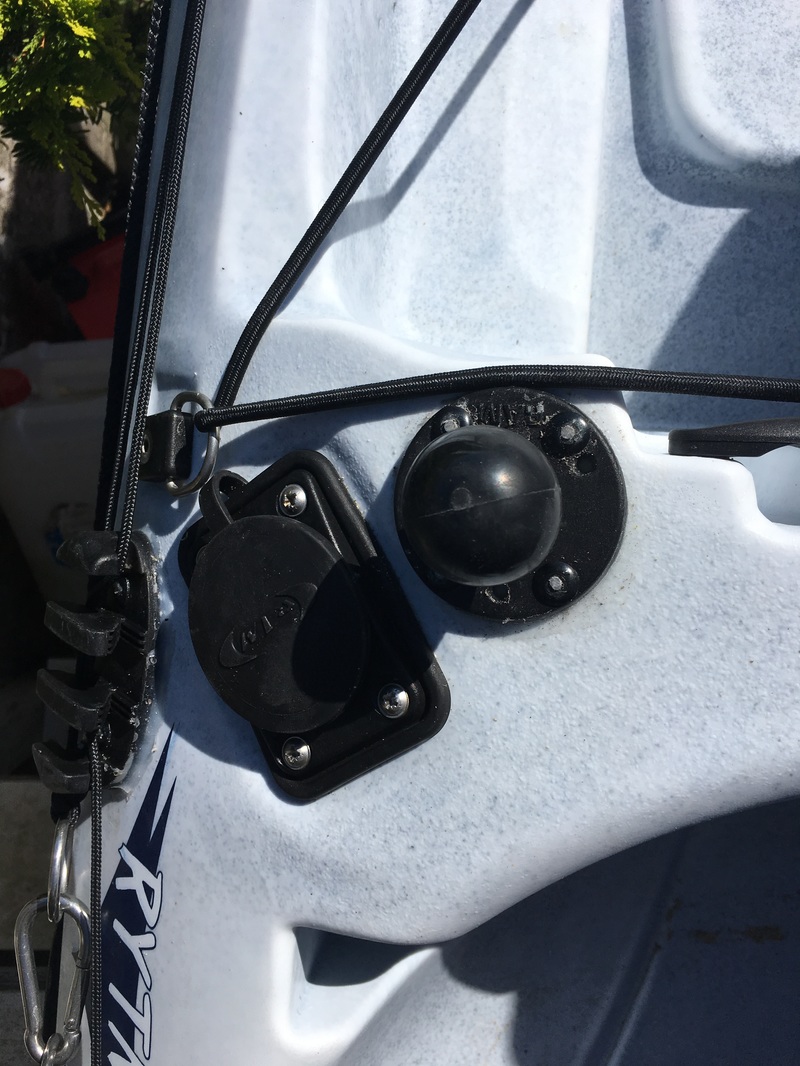 The Go Pro Pole now attaches to this so that i can capture all the action on the Rytmo! 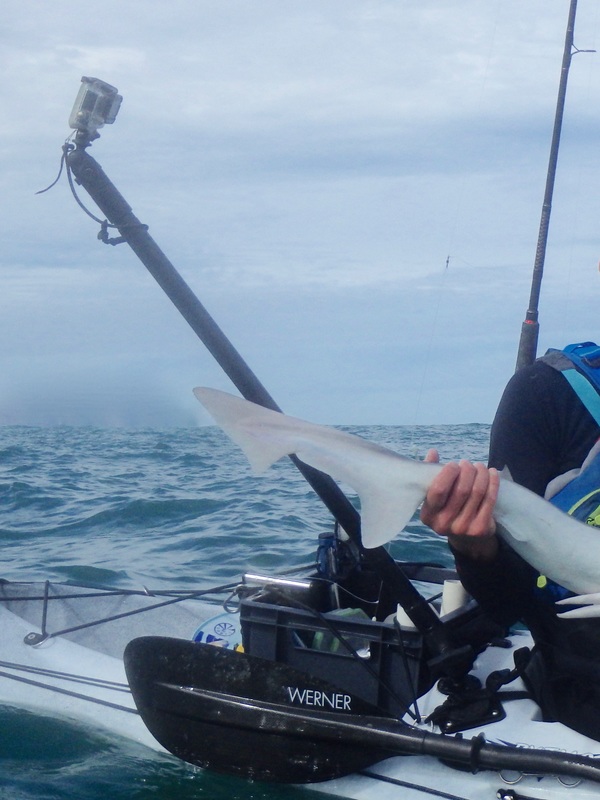 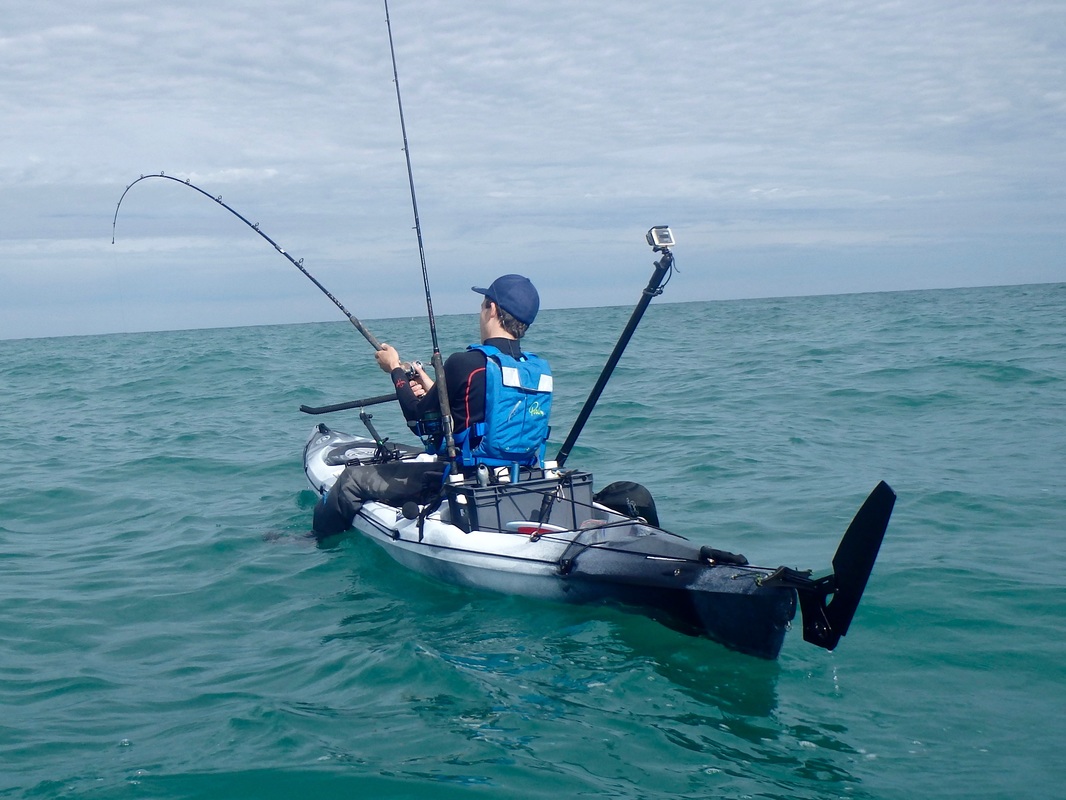 Other AdditionsThe only other addition i have made to the Rytmo is to add a Hi-Viz Rudder cover. The rudder on the Rytmo does not sit flush to the hull when hauled like some 'over-stern' rudder systems. It protrudes out from the stern at an angle so to make this visible when being transported on the car or when in storage i made a simple rudder cover using a bright coloured t-shirt and a length of bungee with bungee hooks on either end. I simply wrap the t-shirt around the rudder and use the bungee to hold it in place. Simple and effective. 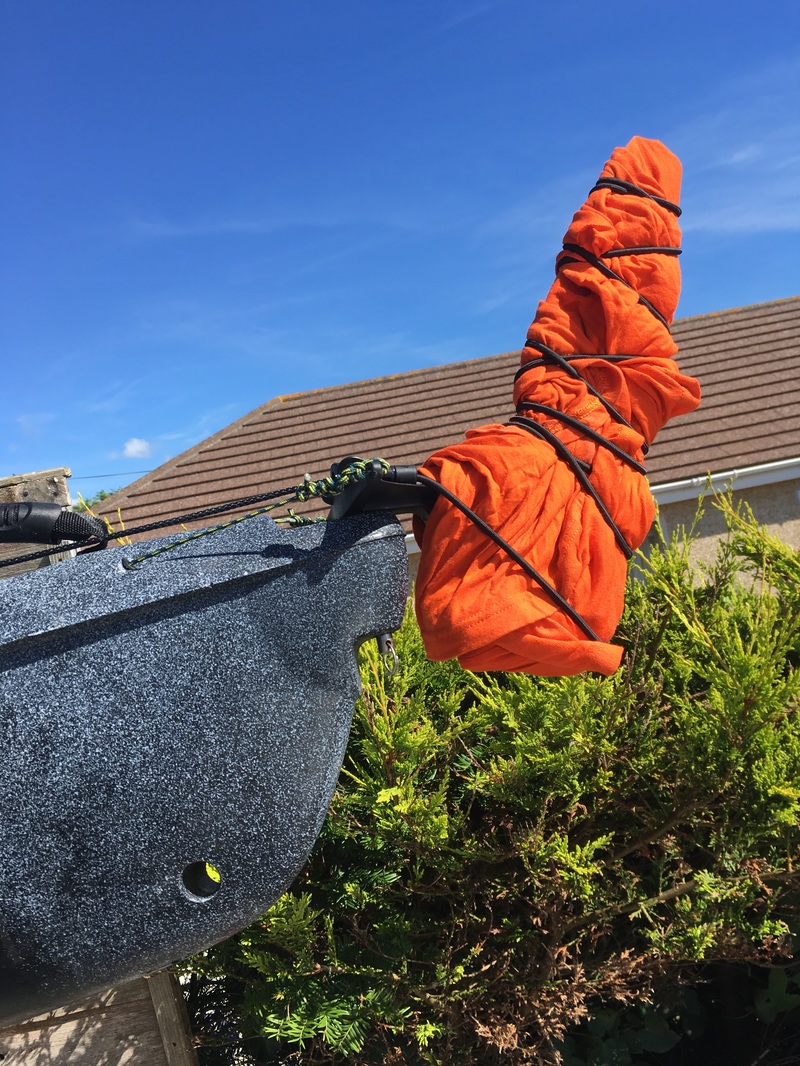 The Finished ProductThe Rytmo is now rigged for fishing! The addition of an anchoring system will allow me to target species that i wouldn't be able to whilst drift fishing or trolling. The fish finder/GPS chart plotter will be useful for locating fish shoals and fish holding structures, as well as marking locations i wish to return too. The storage crate makes storing gear easier and neater in the rear tank well. The rod rest is super useful when fishing at anchor or on the drift, as well for resting a rod on whilst tackling up or unhooking a fish. The Go Pro pole will allow all the action to be captured too! Time to go fishing! 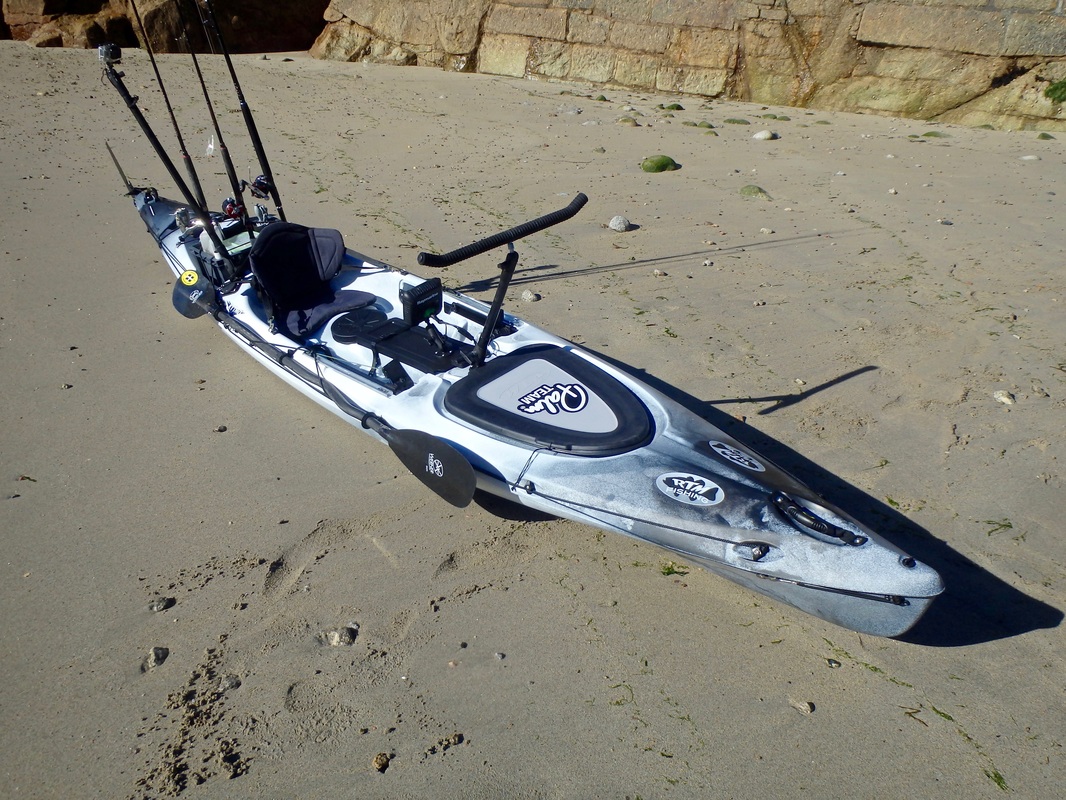 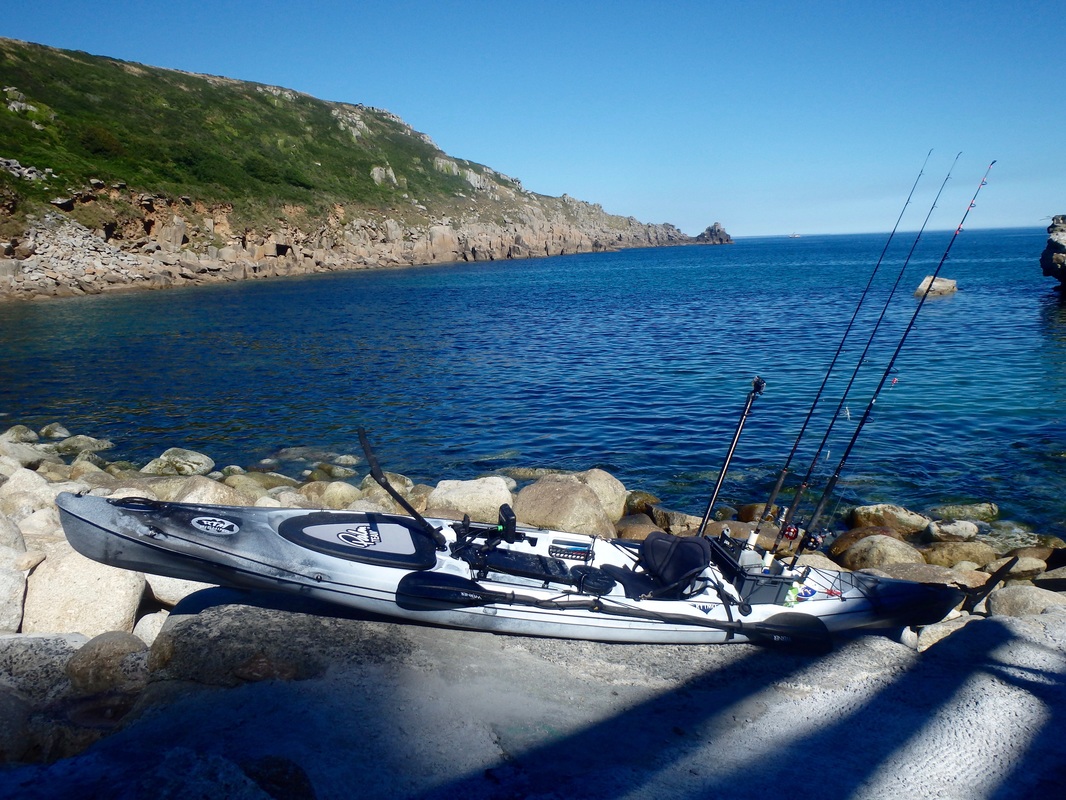
Jack
13/10/2016 19:10:04
Excellent. Thanks for the details.
Gary Symons
1/1/2017 14:17:11
Hi Liam
Cornish Kayak Angler
5/1/2017 21:56:14
Hi Gary,
Nick Redshaw
11/6/2017 15:11:06
Hi Liam
Cornish Kayak Angler
15/6/2017 20:47:07
Hi Nick, Comments are closed.
|
AuthorLiam Faisey 
My Tackle Shop
SPONSORS
Proudly associated with

Cornwall's only specialist kayak fishing shop
Archives
March 2023
Categories
All
Add my blog to your feed reader by clicking the button below
Get blog updates via email
Kayak Fishing Videos
Custom feed reader powered by FeedWind
Useful Links
Anglers Afloat
Cornish Shore & Kayak Fisherman Cornwall Canoes Palm Equipment Penzance Kayak Fishing Meet Info Saltwater Kayak Fisherman Magic Seaweed XC Weather 
|


 RSS Feed


|
|
Website powered by pasties and the hope of good weather!
© 2023 Liam Faisey
© 2023 Liam Faisey