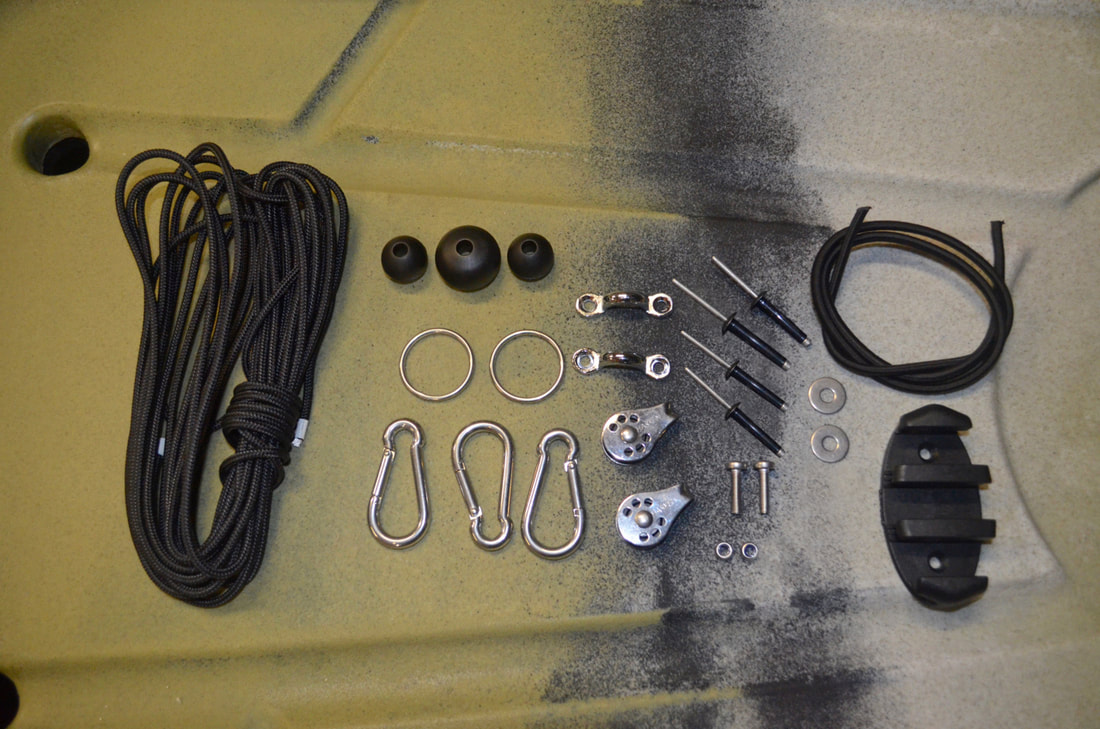
Anchoring SystemAn anchoring system allows you to fish stationary and this is particularly effective when bait fishing for certain species. It allows you to present a static bait on the bottom at your chosen spot. This can allow you to catch species that can't be effectively caught whilst drift fishing such as Rays, Conger, Hounds and Bream to name but a few. To safely anchor a kayak your anchor line need to enter the water at either the bow or stern of the kayak. This allows the kayak to sit in-line with the prevailing wind, tide, swell and any associated chop. Sitting in-line with the conditions allows the kayak to remain stable at anchor. The confines of a kayak make it difficult to manually reach to the bow or stern. This is where an anchor trolley comes in handy. An anchor trolley is essentially a pulley system which allows you to move the point of anchoring along the side of the kayak from the bow to stern. It allows you to set up the anchor line at the seating position and then shuttle it to the front or back of the kayak without you having to struggle to reach anywhere. There are various universal anchor trolley kits available but over the years i have refined my own system using high quality components. Components Required for the Anchor TrolleyThe parts used for my anchor trolley kit are:
Tools & Materials required:
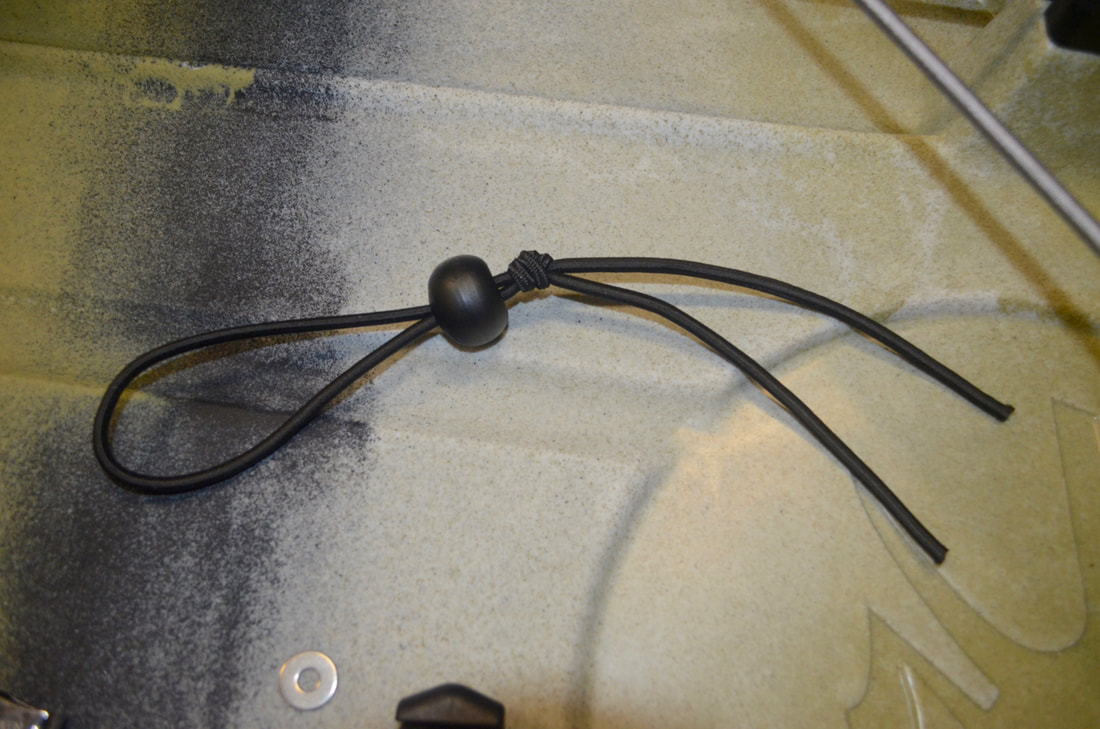
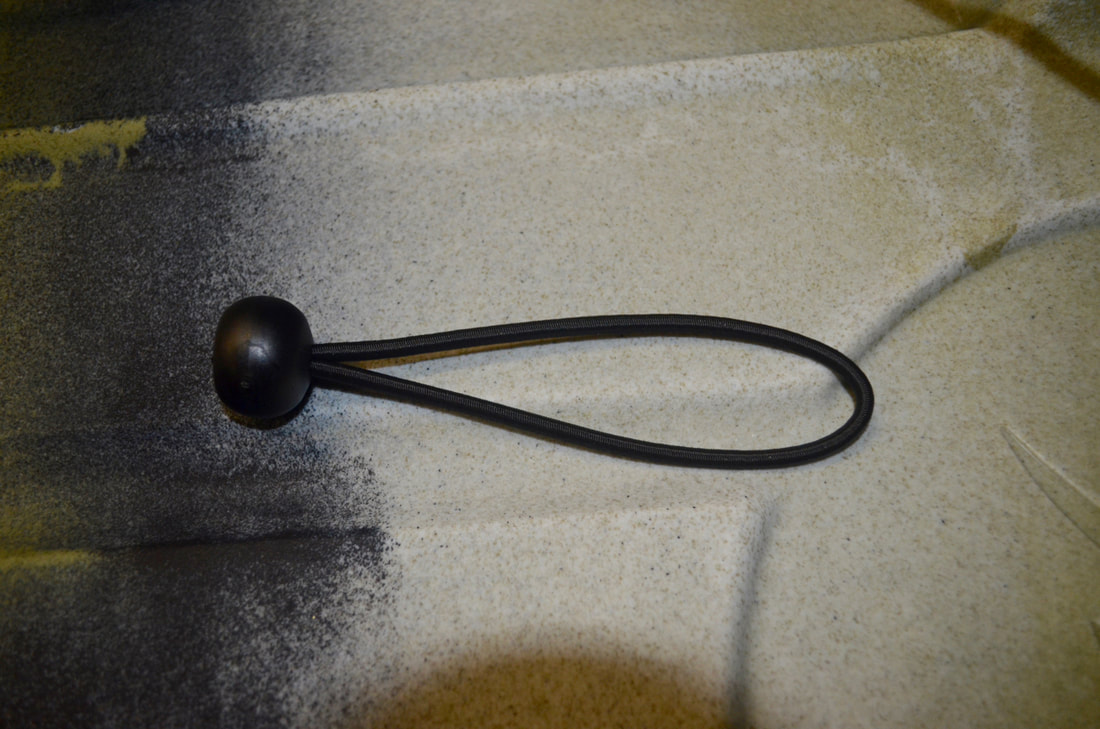
 Fitting an Anchor Trolley to the Hobie Outback 2019The first step is to decide which side to install the anchor trolley. I've opted to keep this the same as on my Hobie Revolution 16 and put it on the left hand side. It is then a case of fitting two pad eyes at either end of the kayak. These act as attachment points for the pulleys used in the system. I am using the Hobie Chrome Pad Eyes for this install. These pad eyes are used as standard on Hobie Kayaks so it keeps all the fittings looking the same. They also won't rust or break. Ideally they want to be fitted close to the bow and stern. I have drilled the holes for the bow pad eye around 4 inches back from the bow using a 5mm drill bit. 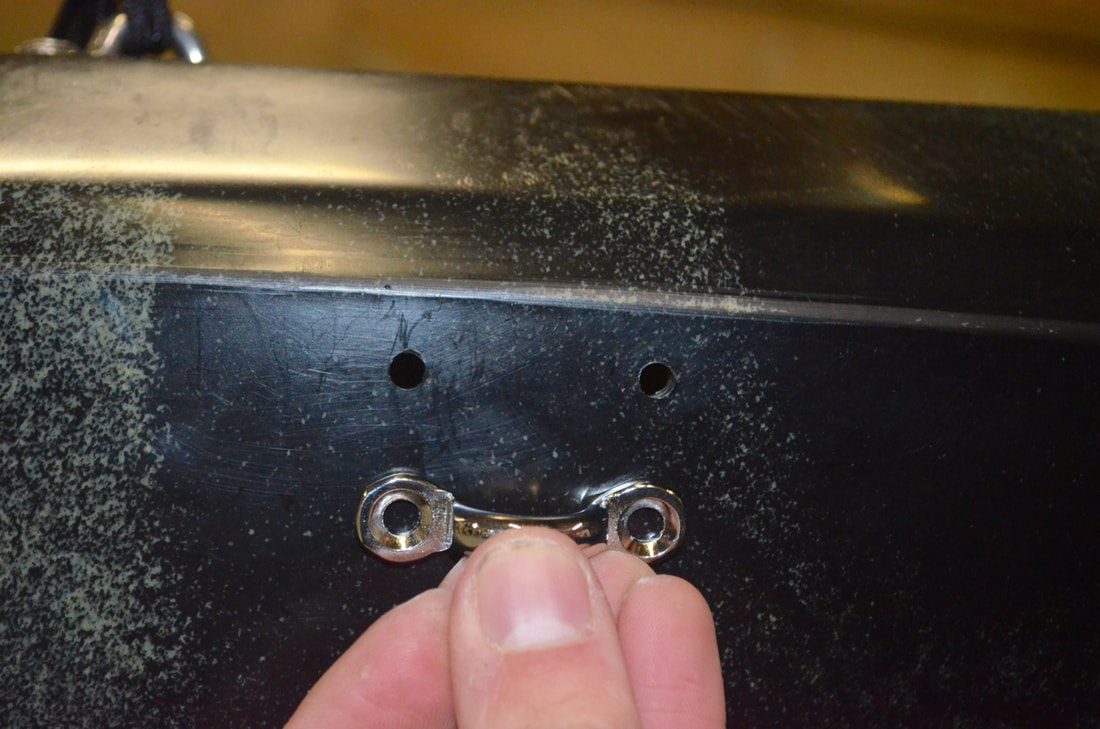 It is easy to access the back of this area through the bow hatch so i can use bolts with backing washers and nyloc nuts to attach this pad eye. I always use A4 (316) marine grade stainless bolts, washers and nuts to ensure no rusting with saltwater use. A dab of Clear Sikaflex sealent and adhesive ensures a strong, waterproof fitment. 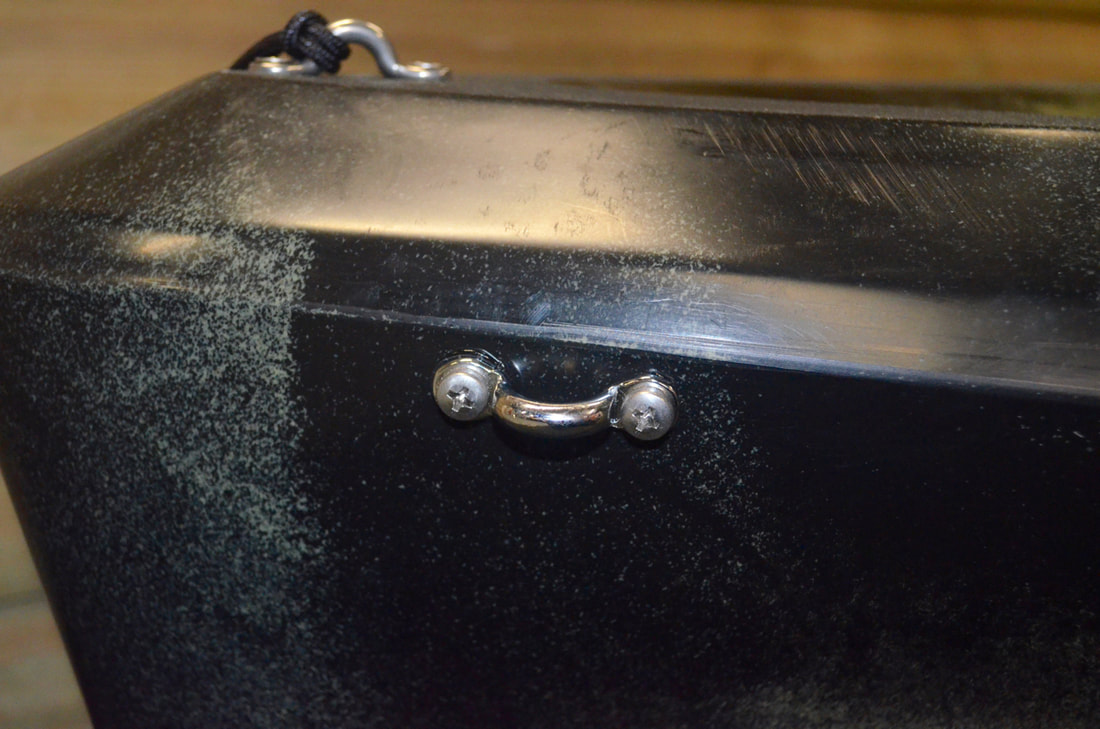 The stern pad eye is positioned a couple of inches from the back of the kayak. There is no access to the back of this area to use bolts so the next strongest method of fixing is to use Marine Trifold Pop Rivets. These are designed to work with sheet plastic/metal and offer a strong fixing for use on kayaks. The shaft of the rivet is split into 3 sections which splay out as the rivet is popped/compressed, preventing it from being pulled through the material.  A standard hand held pop rivet gun can be used to install these. Again use a dab of sealent to ensure a waterproof fitting. 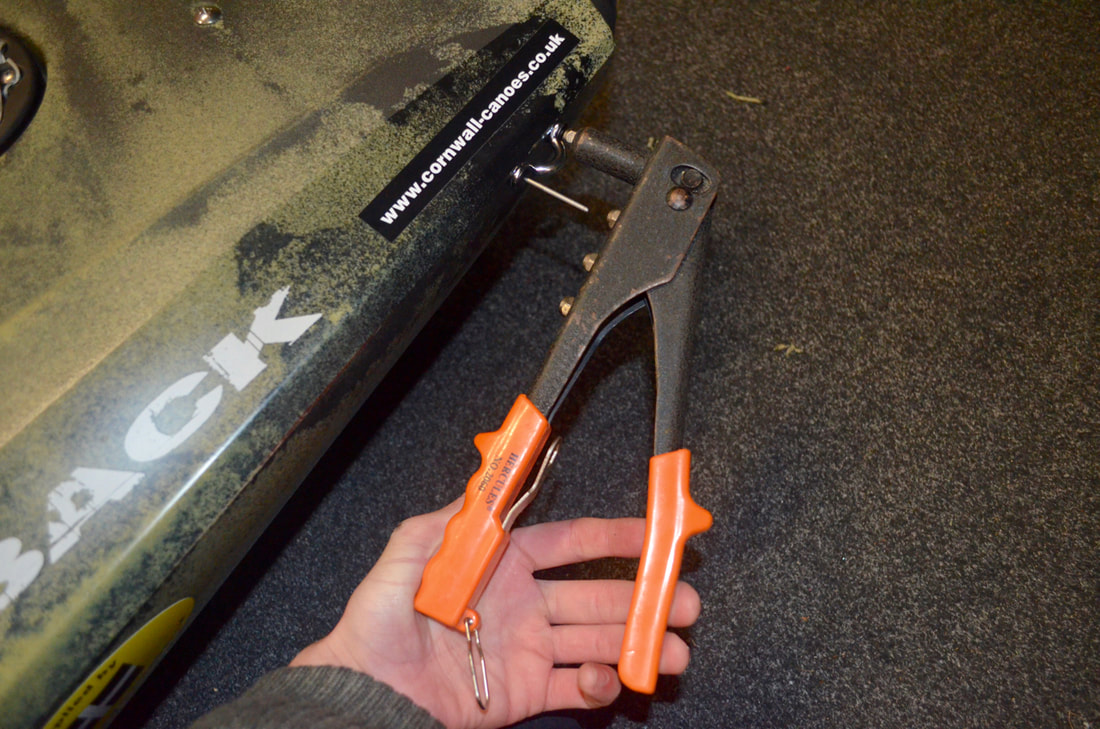 Once fully compressed the rivet shaft eventually breaks. 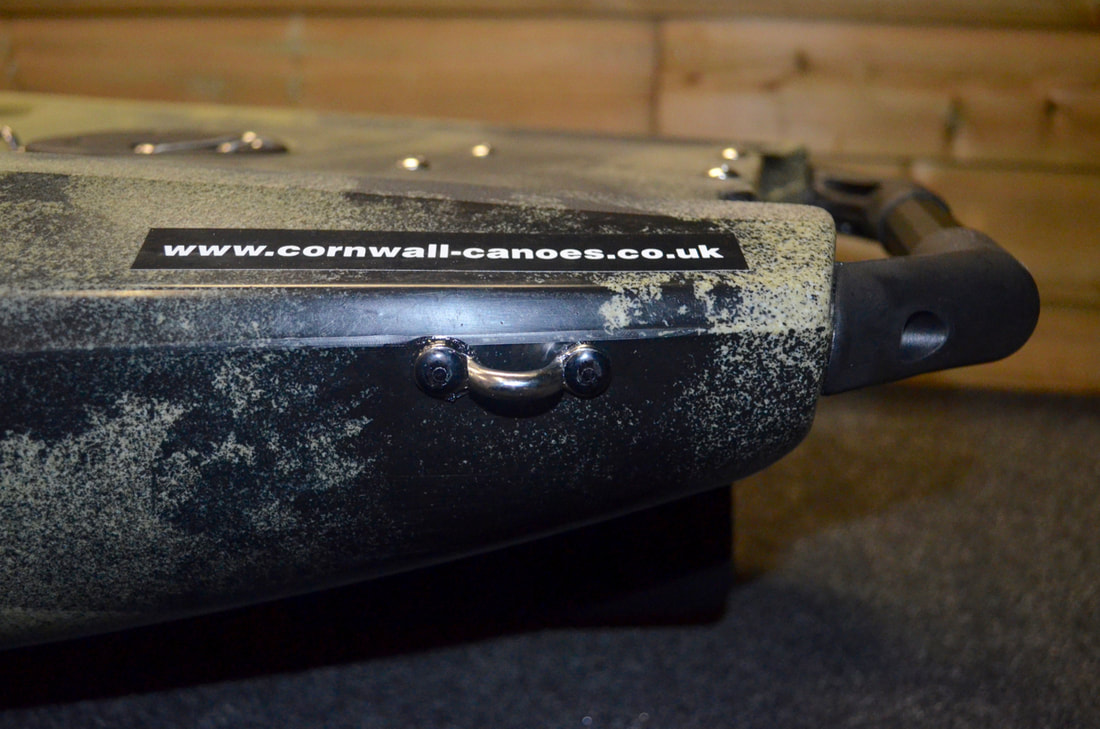 Next i form a bungee loop using a short length of bungee cord and the larger 32mm Parell Bead for 8mm lines. You can just squeeze the doubled up 5mm bungee through this. Tie an overhand knot in the bungee and trim the tags. Melt the tag ends with a lighter to prevent fraying. The knot then pulls into the bead for a neat finish. This loop is around 4-5 inches in length.
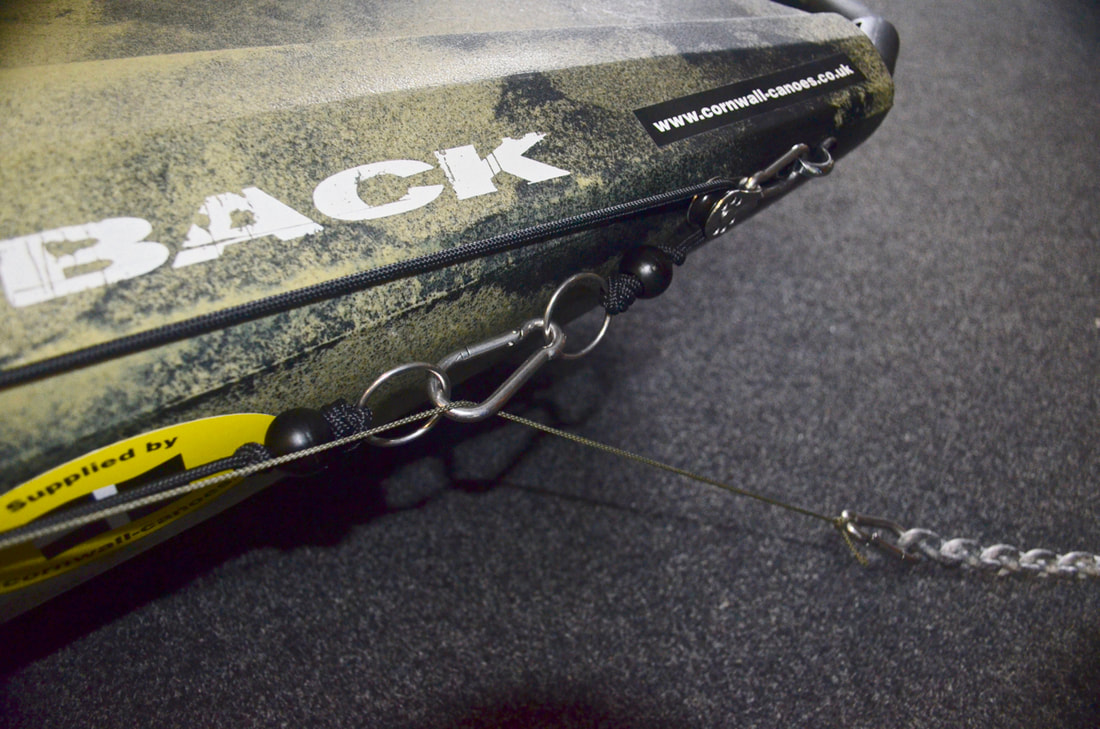
This loop then passes through the front pad eye onto which you clip one of the karabiners and one of the Harken Micro Block Pulleys. These pulleys are great - they are small, lightweight, made from high quality Stainless Steel and have ball bearings for a very smooth action. I clip a pad eye directly to the stern pad eye using another karabiner. The bungee at the front allows for some buffering in the system, which helps prevent the kayak jolting the anchor line in choppy waters. It also keeps the system taut to the kayak, which allows for smooth shuttling between the pulleys. With the pulley clipped directly to the stern pad eye, this allows the point of anchoring to be as close to the stern as possible. It is then a case of assembling the trolley cord loop. I use 5mm braid-on-braid as it is durable and does not stretch. Pass one end of the cord from top to bottom of the bow pad eye, and the other end from top to bottom side of the stern pad eye and bring the two ends together. this should see a continuous length of cord along the top side of the trolley system. To complete the trolley system we just need to join the ends of the cord using a karabiner, however the cord is not directly tied to this. I tie each end of the cord to a stainless ring which can then be clipped to the karabiner. This serves the purpose of allowing the trolley to be disconnected forming a tow rope / towing line. Unclipping the anchor trolley and leaving the karabiner on the bow side ring allows the line to be clipped to another vessel to tow your kayak. Likewise, if the karabiner is left of the stern ring then this can be clipped onto a kayak behind you so that you can tow them. This adds versatility to the system and may come in handy when you need it most. I also incorporate a smaller 22mm Parrel buffer bead against the stainless ring with an overhand retaining knot tied behind it. It's not essential but i like it. It can take sometimes take a few goes to tie the second ring in the right position to allow sufficient tension in the trolley cord once the rings are connected with the karabiner. Once happy with the tension, the tag ends of the cord can be trimmed and ends melted with a lighter to prevent fraying. 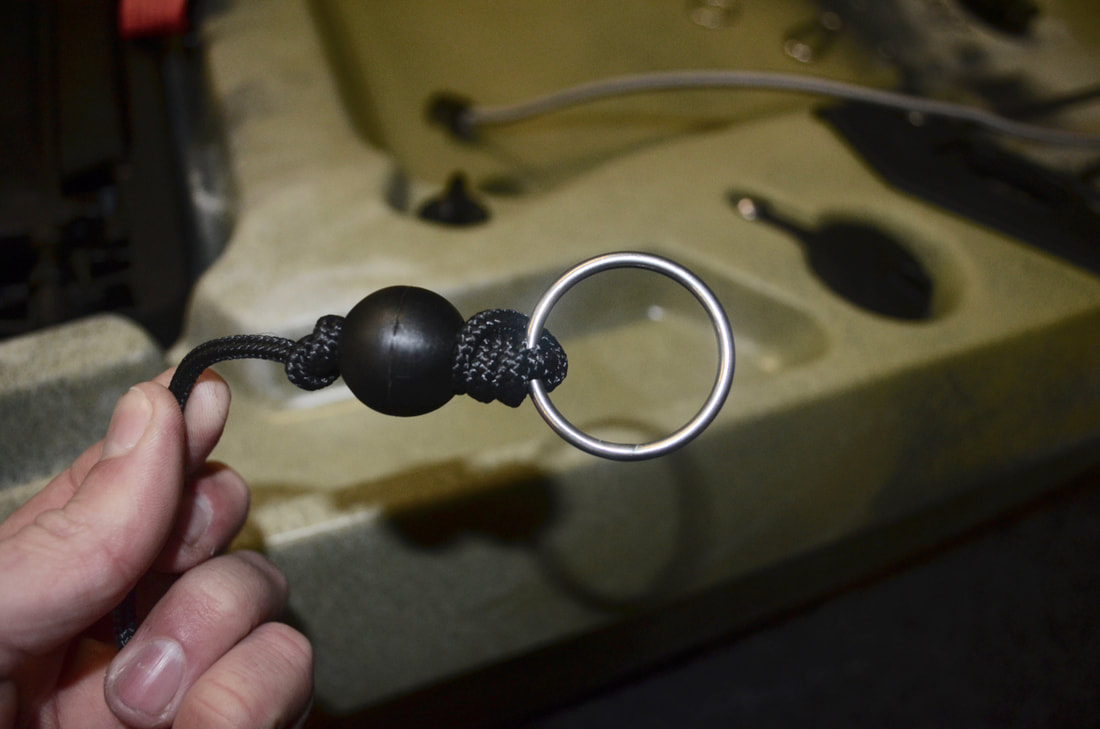 When assembled and the karabiner is shuttled to the bow it looks like this.... 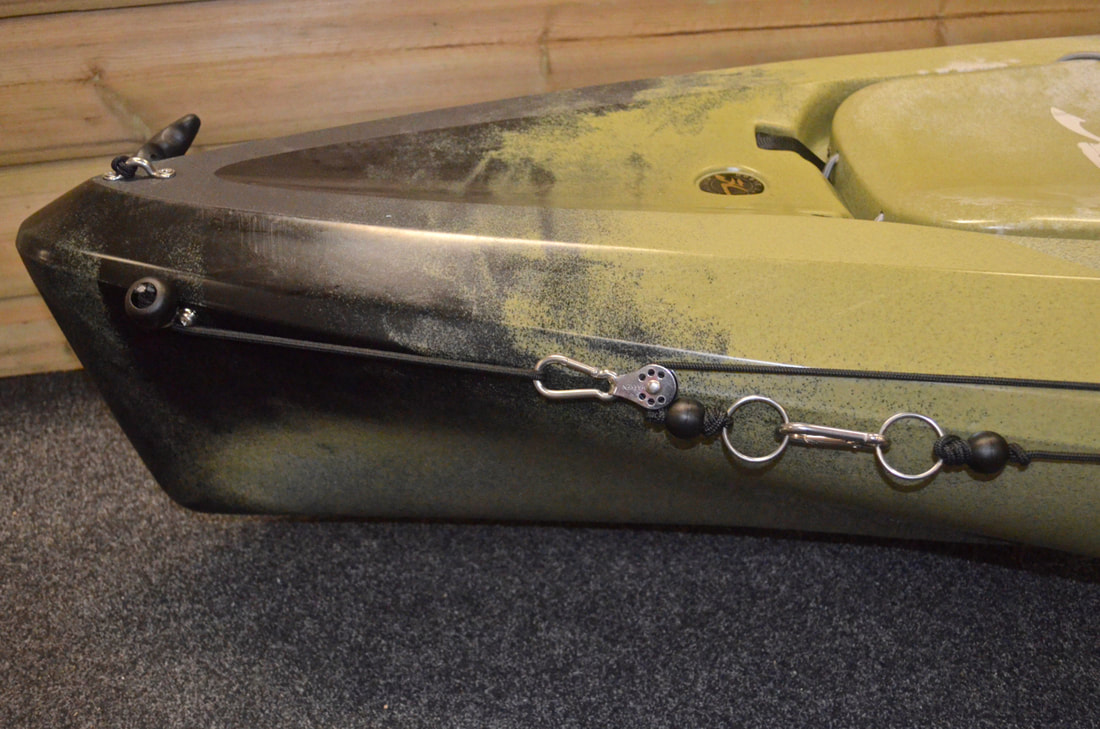 And shuttled to the stern it looks like this.... 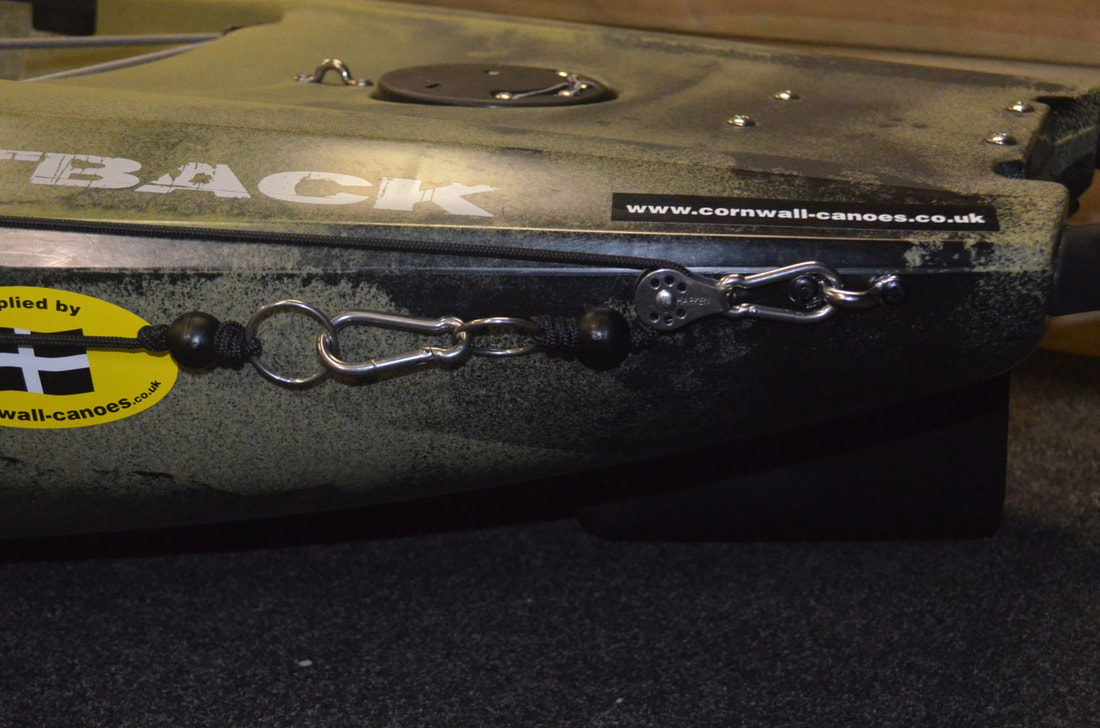 The anchor trolley is complete but it cannot be used effectively without a cleat to lock off the system and prevent it from running freely. I have always got on well with Zig Zag Cleats as the one cleat can be used to lock off the anchor trolley and also the anchor line. Some thought must be given to it's positioning. It needs to be within easy reach, yet out of the way of your paddling arc so that you don't catch your hands on it whilst paddling. It's also good if you can keep it out of the way of the seat/footwell area as this will be your route of entry for self-rescue should you need to climb back on the kayak after a capsize. A cleat can cause potential snagging so is best kept out of the area you would use to pull yourself back onto the kayak. I tend to place these just back from the seating area and the Outback has a nice flat area here for cleat installation. On the Outback this is a tricky place to reach the back of to use bolts/washers/nuts for fixing. I used marine trifold rivets and a dollop of Sikaflex to install this to the kayak. 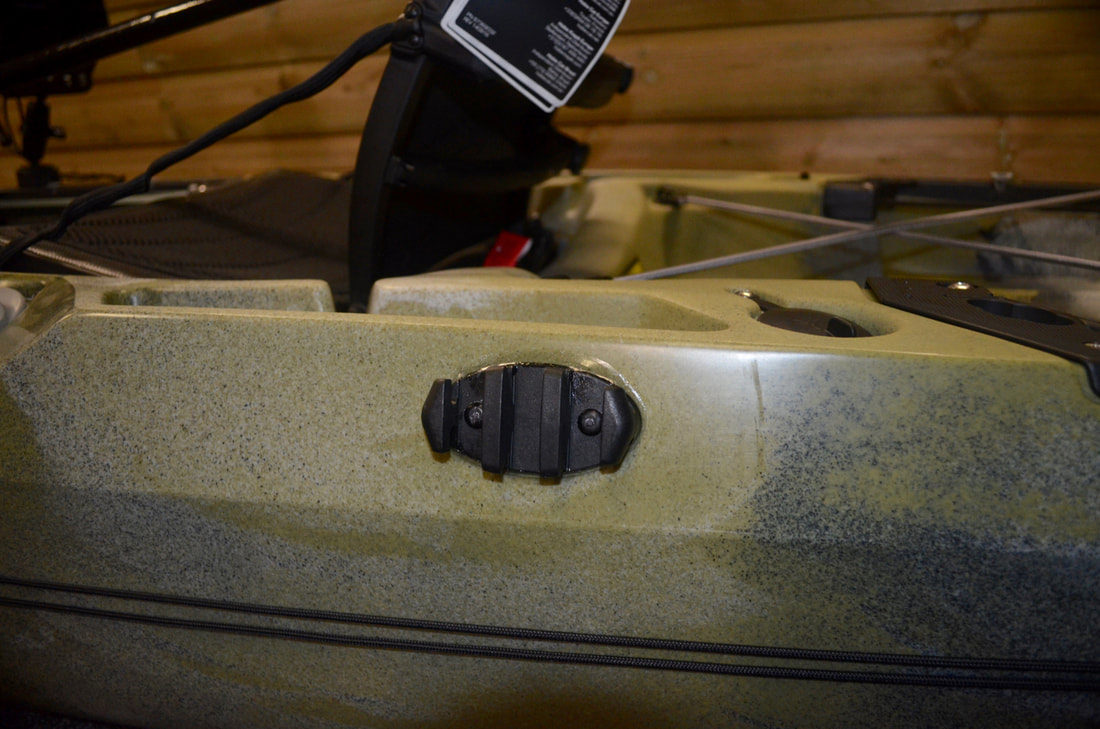 In this position it just allows for the paddle to sit in the holder with the paddle shaft flush against the cleat, although the Outback has a paddle holder on the right hand side of the kayak, so i can use this side of the kayak exclusively for the anchor trolley. 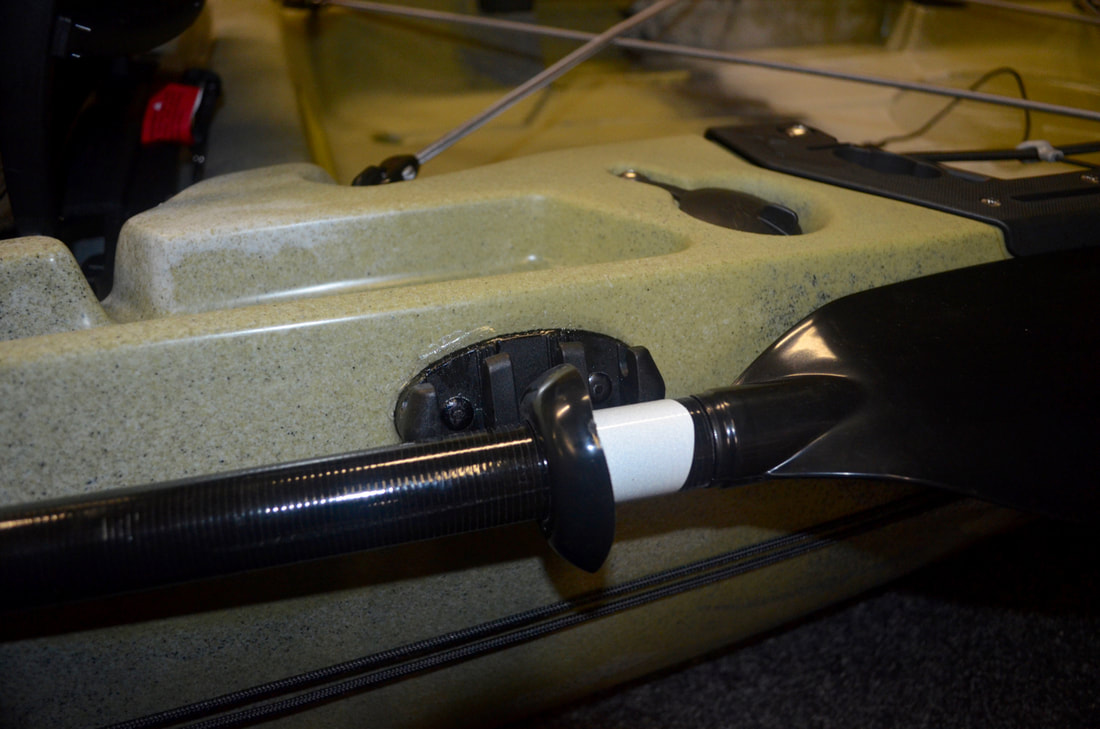 The anchor trolley line can now be 'zig-zagged' through the teeth of the cleat to lock the karabiner in the desired position. 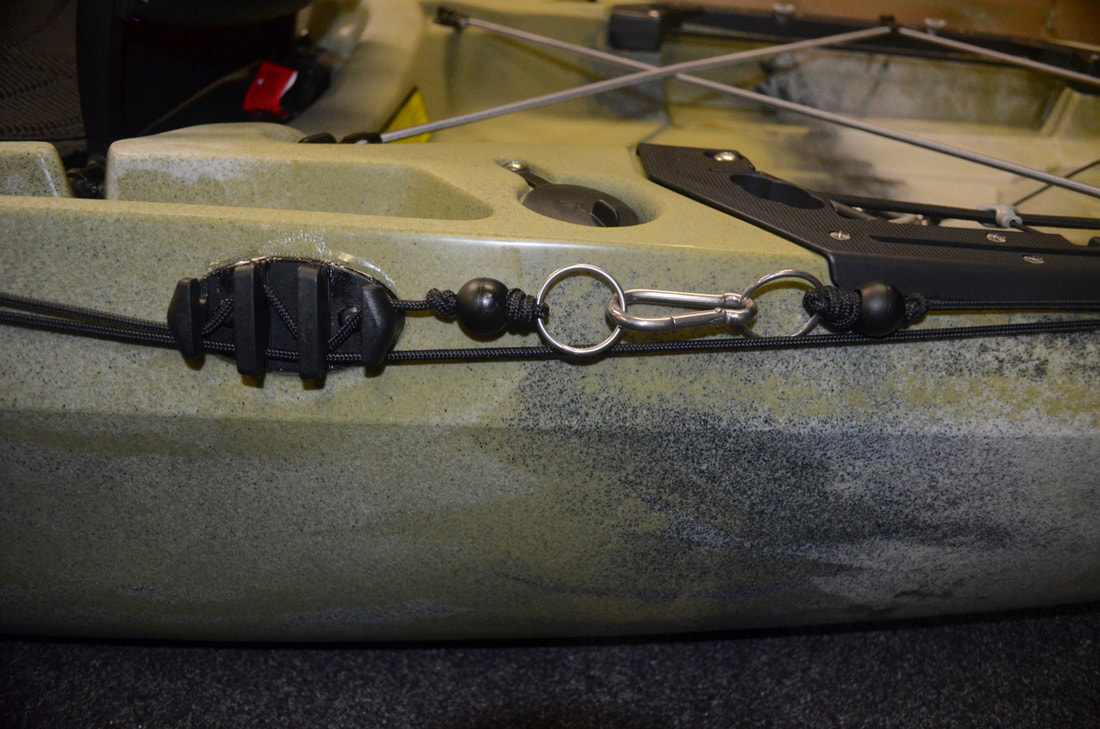 Using the Anchor with the Kayak Anchor TrolleyThe process of anchoring is now fairly straight forwards. Clip the anchor line into the karabiner and begin to lower the anchor to the bottom. Shuttle the anchor trolley karabiner (with anchor line now through it) to the stern of the kayak. Lock off the anchor trolley line into the zig zag cleat. Once enough anchor line has been let out (this depends on the conditions) then the anchor line can then be locked off onto the cleat too. The anchor line will now be running off the stern of the kayak.
The kayak will now be anchored and the kayak will point down tide/wind inline with the conditions, providing stability whilst riding any prevailing wind chop, tide and/or swell. 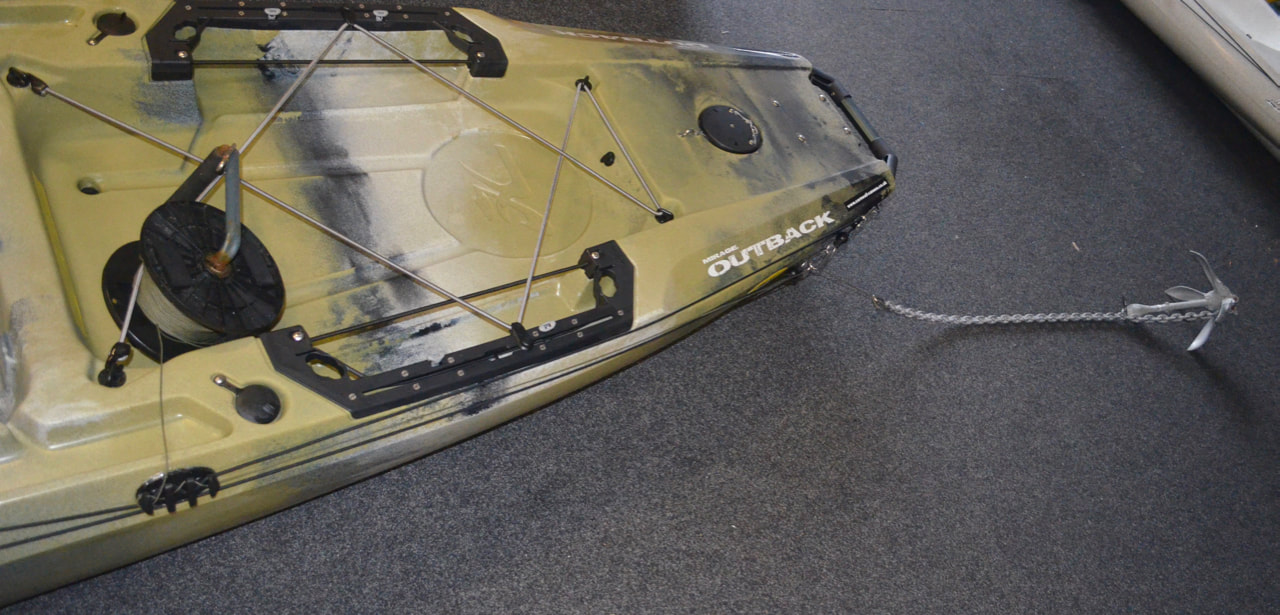 I use a DIY anchor reel to store my 1.5mm anchor line. This sits in the rear cargo area when in use as all the tension on the system is from the cleat backwards, with no tension on the reel itself. I use two types of anchor depending on what type of ground i am anchoring on. A 1.5kg folding grapnel anchor with 1m of 6mm short-link chain is great for mixed ground and rocky ground. A 1kg Bruce anchor with 1-2m of 6mm short-link chain is great for shallow sandy and muddy grounds. Sometimes a 2kg Bruce anchor is required for deeper sandy/muddy grounds or in faster tides. Both set ups use a small 1.5mm cable tie weak link to allow the anchor to trip and be pulled backwards from a snag, and this works most of the time. Some snags are just unforgiving and you have to cut free! The chain attaches to the anchor with a D-Shackle and the anchor line clips to the chain with a karabiner, making it easy to disconnect the anchor from the anchor line when on the kayak.  Using a Drift Chute / Drogue on the Kayak Anchor TrolleyThe anchor trolley can also be used to set up a drogue / drift chute off the bow. Drogues are great for slowing your drift in windy conditions. They 'anchor' the kayak to the water so that the kayak will drift at the same speed as the water current/tide as opposed to the wind. This works well when the wind is causing you to drift faster than the tide is beneath you. In wind against tide situations you can almost make the kayak stationary. On the flipside, in wind with tide conditions a drogue is less effective. I use the Hobie Drift Chute which is very good. It features a square mouth opening with a weighted bottom section and a floating top section which keeps the chute open in the water. This attaches to the anchor trolley with around 1m of cord and a karabiner. It simply clips onto the anchor trolley karabiner. 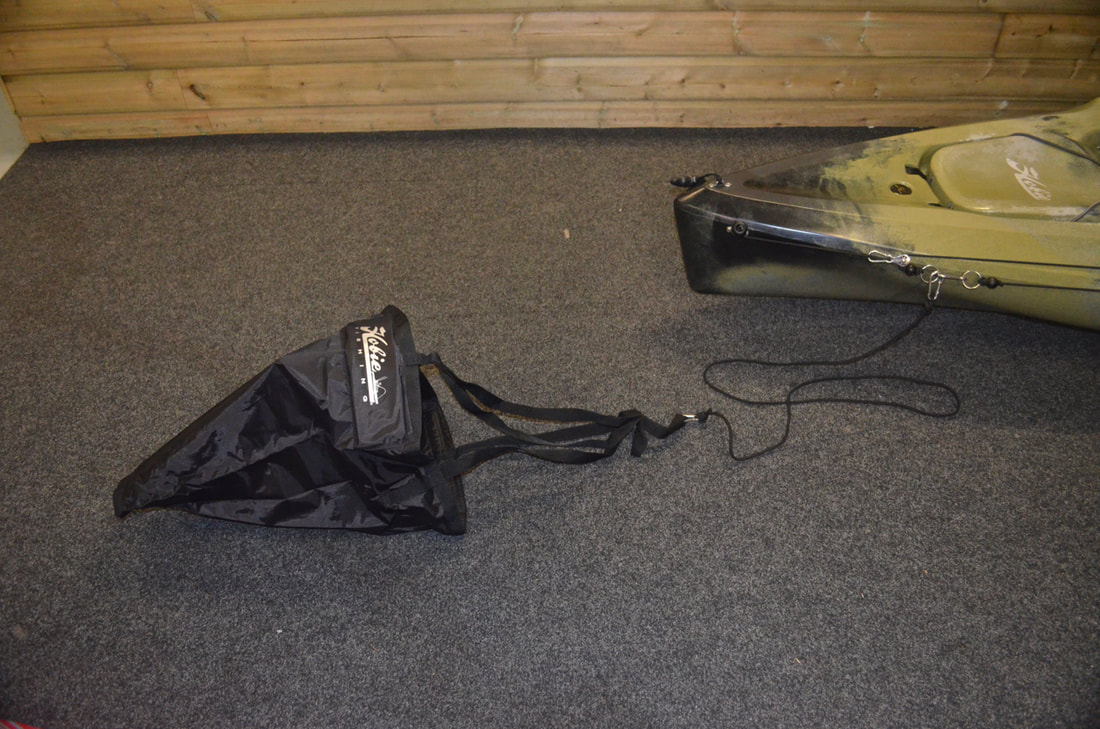 The anchor system is now complete and this will allow me to safely and effectively anchor my kayak from either the bow or the stern. It will also allow me to use a drogue/drift chute effectively for drift fishing. The anchor trolley also doubles up as an emergency tow / towing line too! A versatile system that is essential for fishing at anchor. The anchor trolley shown here costs approx. £65 but uses components designed to last and offer smooth and hassle-free operation. Expect to spend £15-20 for an anchor with chain, shackle and karabiner. Whilst i made my own anchor reel, off-the-shelf anchor reels filled with line are available for around £40 so for a full anchor system similar to what i have shown here then you are looking in the region of £120+. My first session on the new Outback involved anchoring and the system worked perfectly. I even caught a few Thornback Rays whilst anchored too.... result! 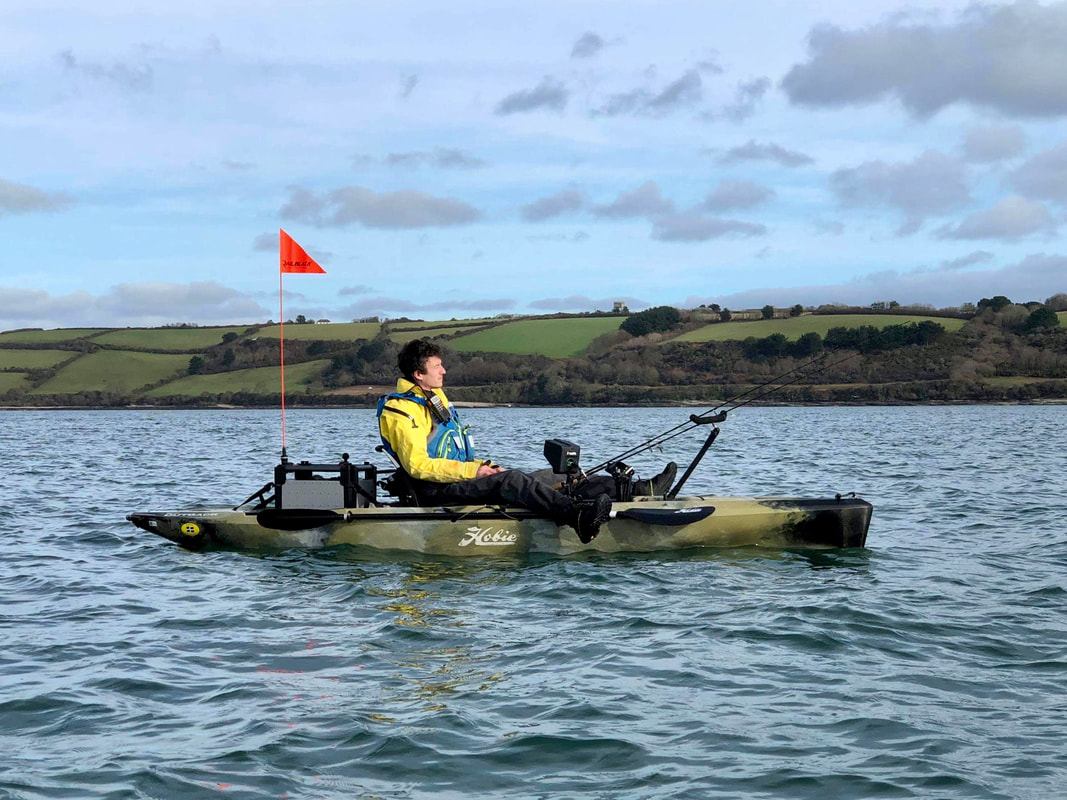 20/4/2019 09:45:29
Anchor played an very important role, when its comes to fishing from the kayak, thanks for sharing the DIY probably I don't need to go outside to set this on my kayak :)
Keith
24/8/2019 21:42:04
Hi mate, I also have the 2019 outback but use a different anchor system and get serious hulk slap when anchored at the stern, it drives me crazy!! Do you notice the same issue with this setup? 24/8/2019 22:18:07
Hi Keith, yeah it still gets hull slap. It’s down to the shape of the hull at the back of the outback. The only way to get around it would be to anchor from the bow but that can make things awkward when fishing.
Keith
29/8/2019 20:48:31
Damn!! Was hoping your method would solve the issue! 😁 the only other way I was thinking was to replace the rear grab handle with some sort of moulded fibreglass guard. Comments are closed.
|
AuthorLiam Faisey 
My Tackle Shop
SPONSORS
Proudly associated with

Cornwall's only specialist kayak fishing shop
Archives
March 2023
Categories
All
Add my blog to your feed reader by clicking the button below
Get blog updates via email
Kayak Fishing Videos
Custom feed reader powered by FeedWind
Useful Links
Anglers Afloat
Cornish Shore & Kayak Fisherman Cornwall Canoes Palm Equipment Penzance Kayak Fishing Meet Info Saltwater Kayak Fisherman Magic Seaweed XC Weather 
|


 RSS Feed


|
|
Website powered by pasties and the hope of good weather!
© 2023 Liam Faisey
© 2023 Liam Faisey