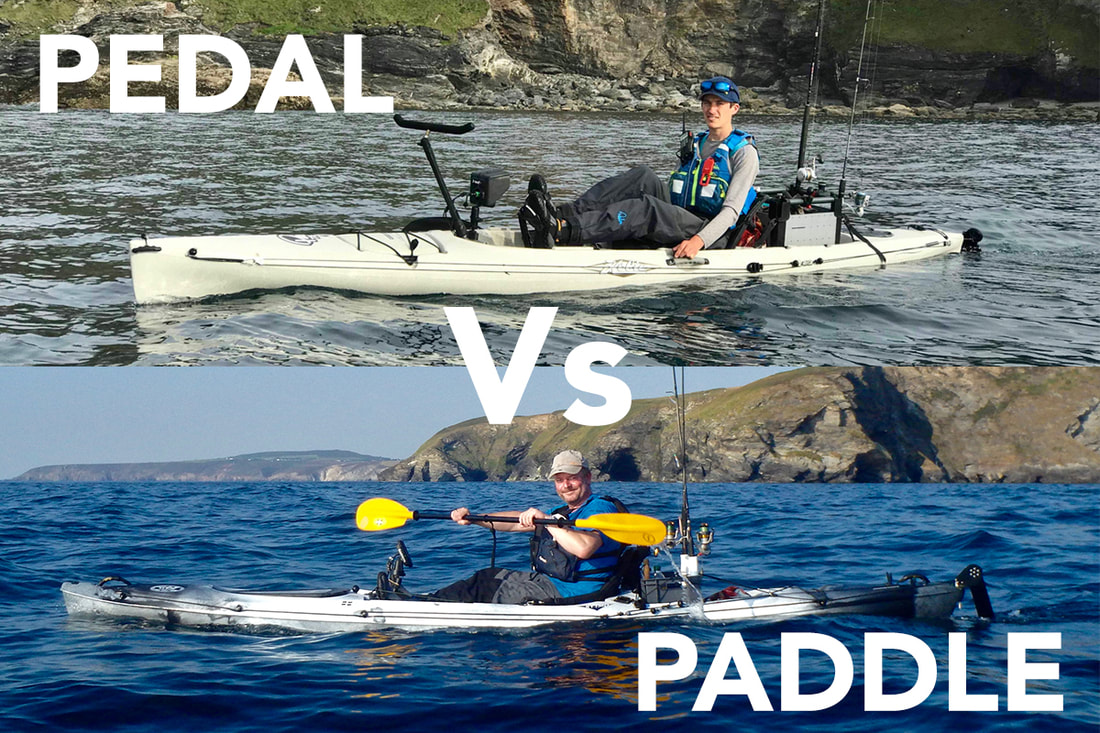
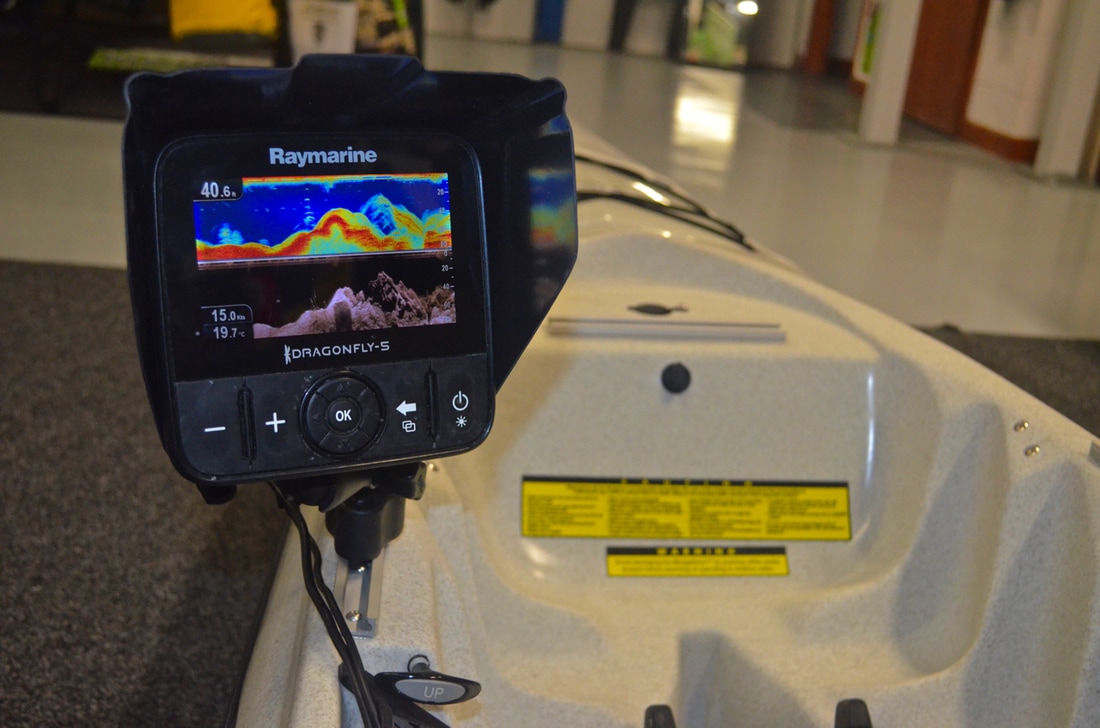
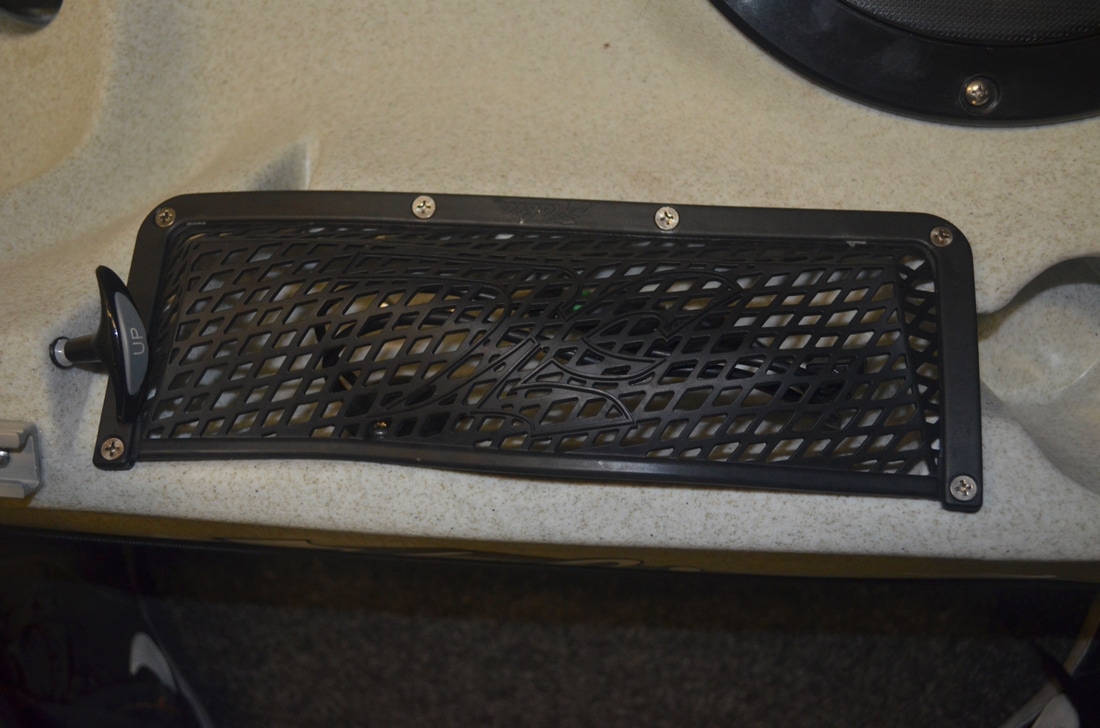
Fish FindersFish finders are great. They use pulses of high-frequency sound waves transmitted through the water to provide you with a visual representation of the world beneath your kayak! The sound waves are transmitted from a transducer and down through the water column until they get reflected off solid structure and any pockets or bubbles of air/gas. The solid structure may be the bottom, bottom vegetation or fish and other items within the water column. Air bubbles close to the surface may also show reflect the sound waves, as will the air within the swim bladder of fish. The sound waves hit these structures, bounce back towards the surface and are detected by the transducer. Using the timing between sonar transmission and sonar reception, the fish finder can calculate the depth at which the solid objects are located. The fish finder can also calculate the density of the structure the sonar hits based on the strength of the sonar return - harder objects reflect signals strongly, and softer objects show weaker returns. All this data is computed within the head unit and presented to the user on a visual display. The latest fish finders feature several sonar modes using sound waves over various frequencies, to provide the user with a very detailed image of the world beneath their craft. This information is very useful for fishing - you can select exactly where to drop your bait, or cast your lure, based on the bottom structure, bottom type and/or if there are fish showing below the kayak! Some units also include GPS chart plotters, which are great for plotting fishing hotspots, planning drifts, as well as for navigating on the water. Installing high-definition bathymetry maps to a chart plotter unit provides you with a detailed map of the seabed for easy navigation to likely looking hotspots such as reefs, drop-offs, banks and more! I have been using a fish finder for kayak fishing for several years and they certainly help you to catch fish! It was time to install one on the Revolution 16.... Raymarine Dragonfly 5-Pro Fishfinder and ChartplotterOver the last couple of years i have been using the Raymarine Dragonfly 5-Pro on my fishing kayaks. It has held up well and provides a great level of detail of the world beneath the kayak. The Dragonfly series uses the latest CHIRP sonar, which is great for showing objects in the water column. It also has a DownVision mode which shows the bottom structure in incredible detail. These two modes can be shown side-by-side on the bright display screen to give you plenty of info about whats going on beneath you. The Dragonfly 5-Pro also has a GPS Chartplotter, which provides a base map for plotting, storing and navigating too waypoints, as well as providing info on vessel speed and heading, with track plotting functionality too. The base maps which come as standard on the unit are fairly basic so i use the Navionics+ High Definition Charts, available on a micro SD card which slots into the unit. These upgraded maps show bottom bathymetry/contours at 0.5m intervals, providing a very detailed map of the seabed to use for navigating to this fishy looking marks! It was time to install this unit on the Hobie Revolution 16 using the 'Lowrance-Ready' fish finder installation system, which comes as standard on all post-2015 Hobie Kayaks. Components for Installation
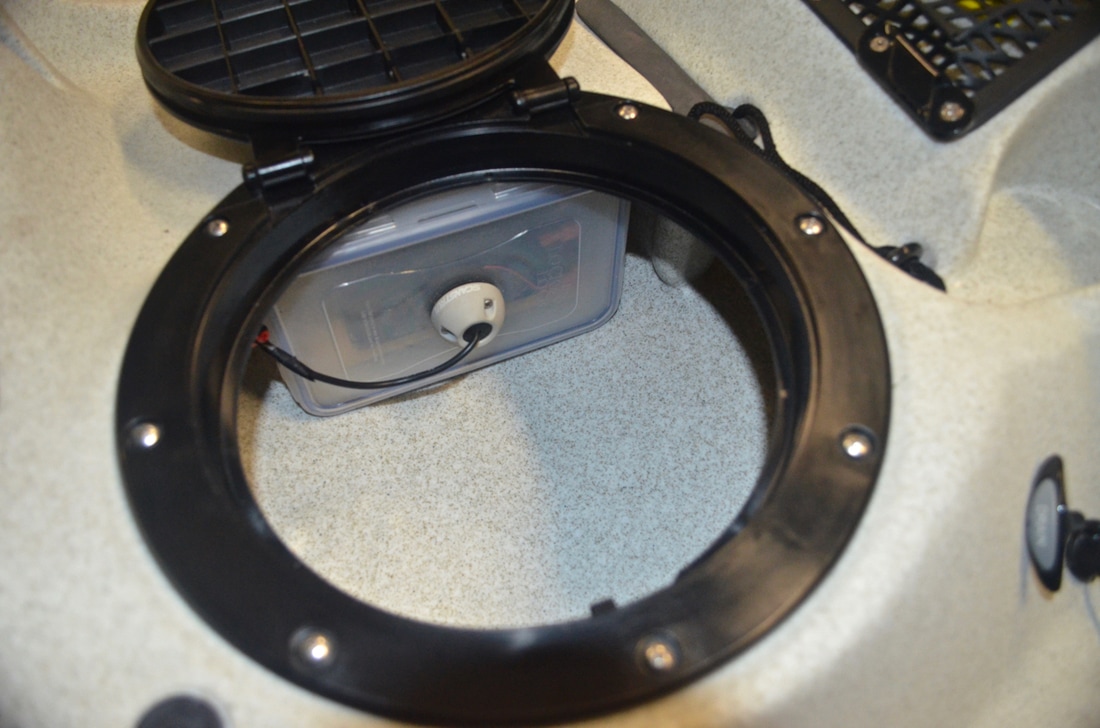
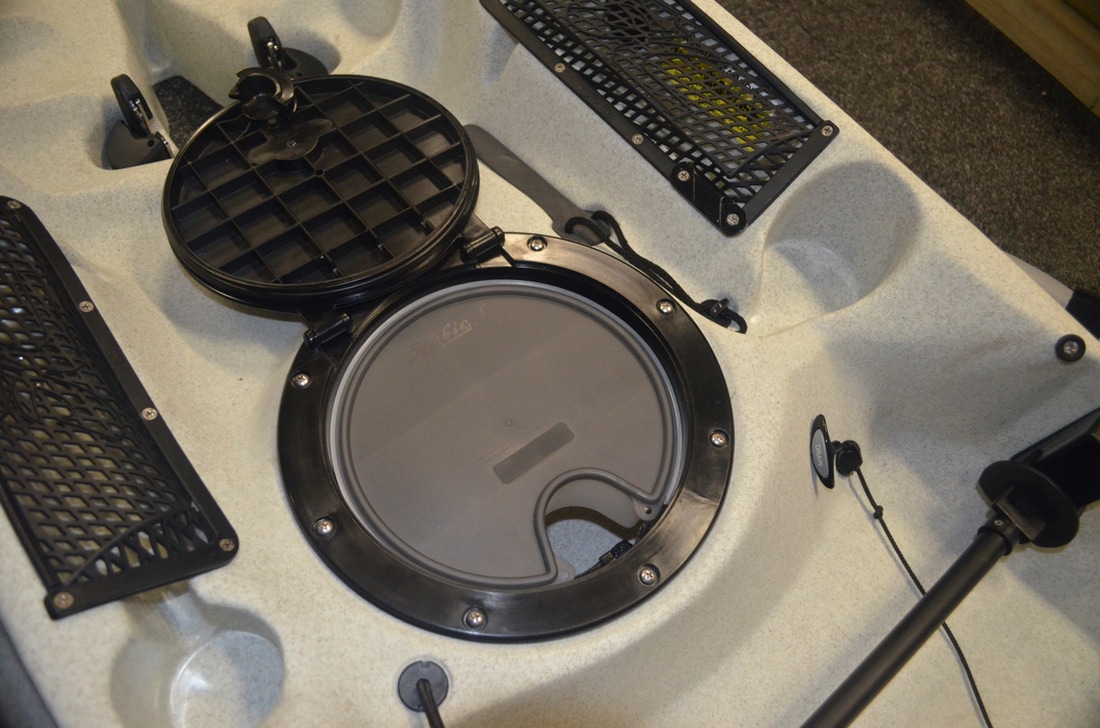
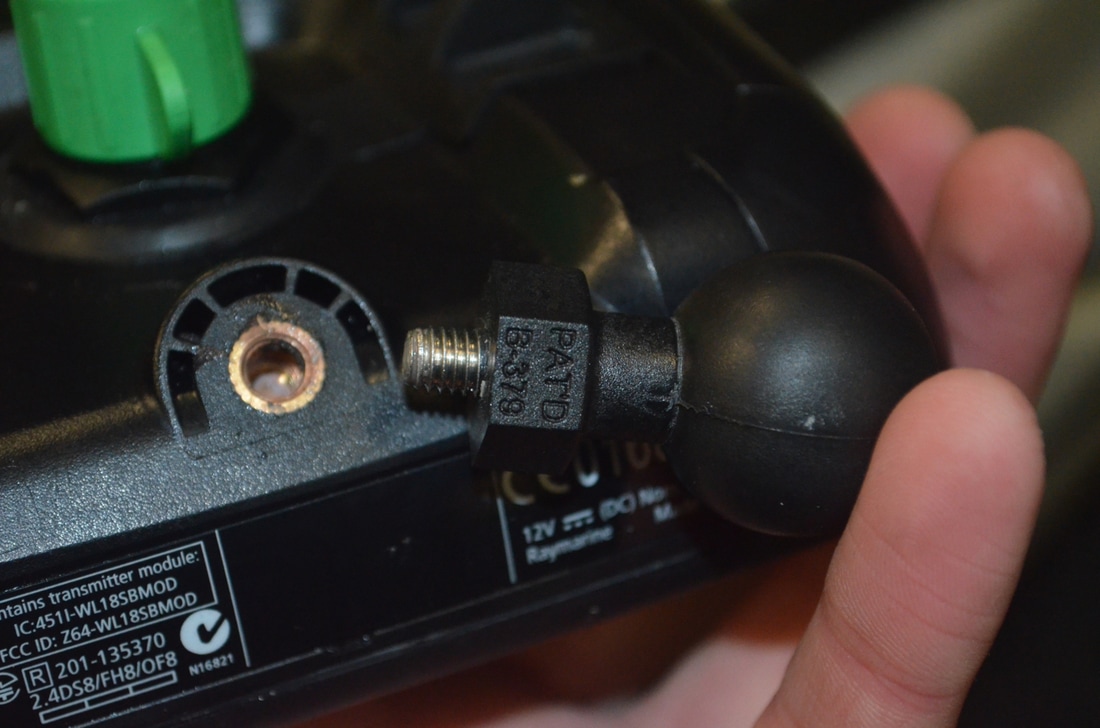
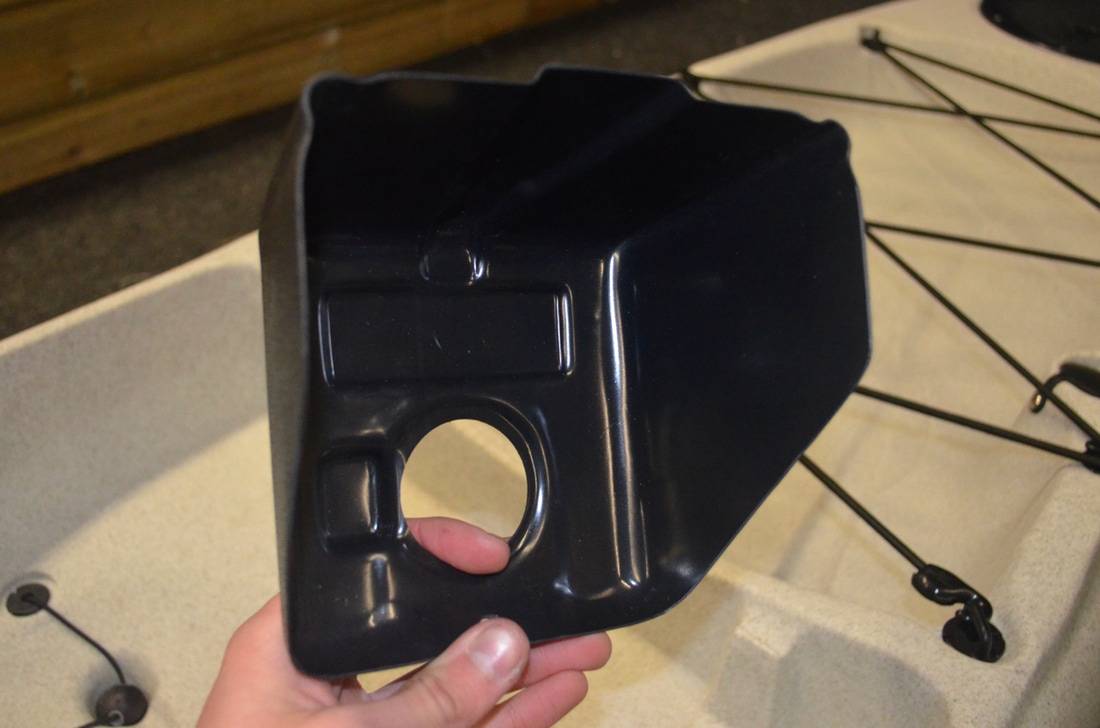
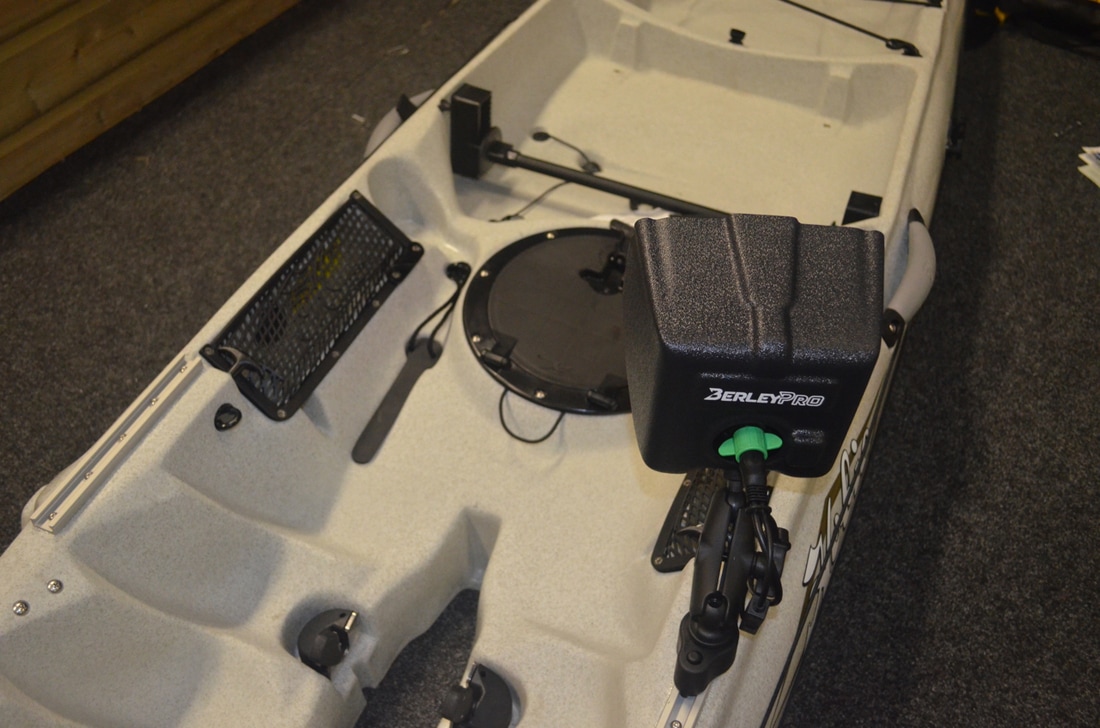
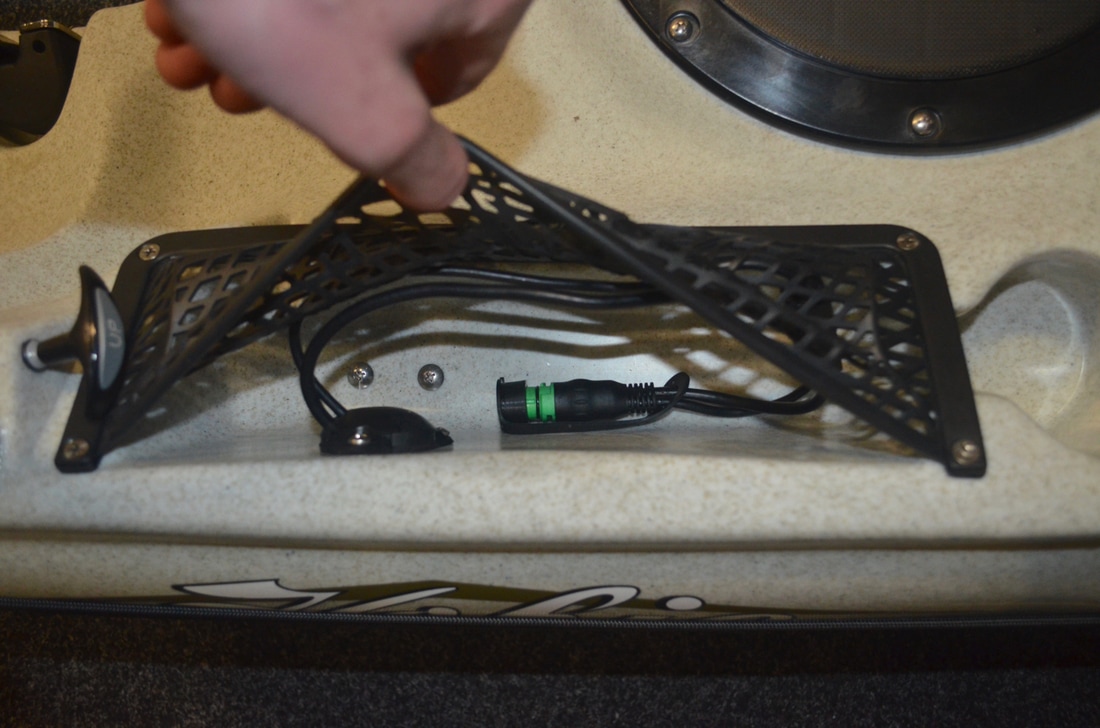
All components were purchased at Cornwall Canoes. 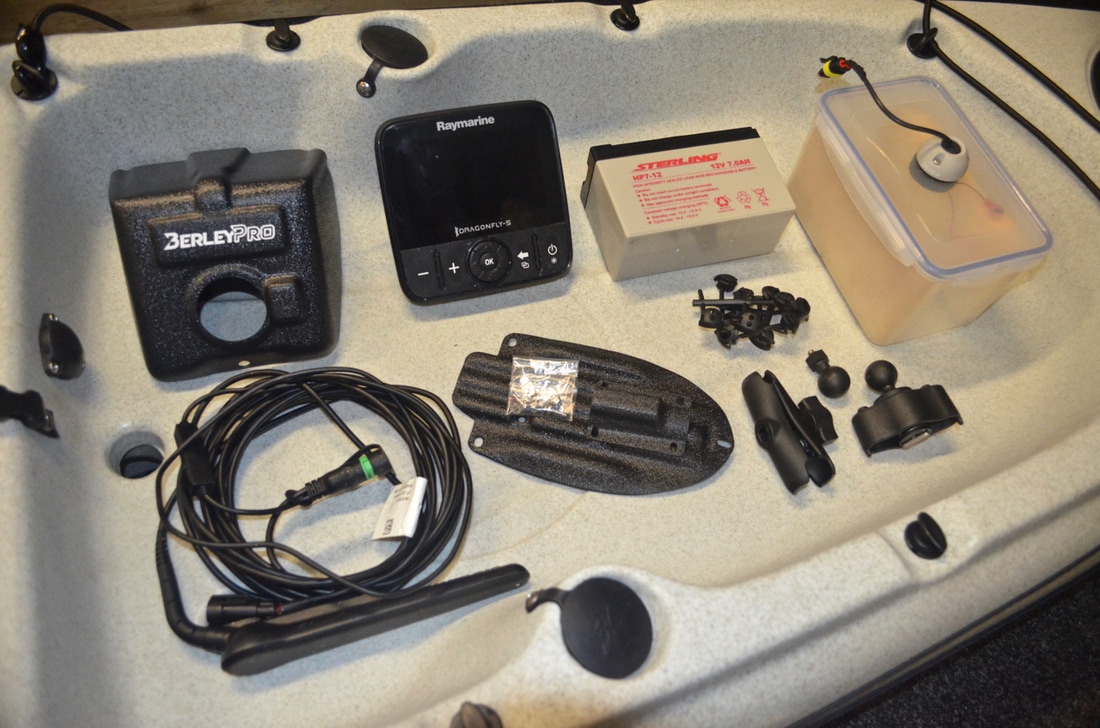 Installing the Dragonfly Transducer using the Lowrance-Ready SystemThe 'Lowrance-Ready' system is designed to make fish finder installation quick and easy. It consists of a transducer scupper hole in the underside of the hull, covered by a protecting plate, along with various deck seals for the fish finder wiring - one in the rear tank well above the transducer scupper for the transducer cable to go through, and one in each of the side pockets for the head unit wiring to go through. It comes as no surprise that the 'Lowrance-Ready' scupper hole is designed to take transducers for Lowrance fish finders. Luckily the scupper hole is just big enough to fit other manufacturers transducers in too, including the Raymarine Dragonfly! The transducer scupper is protected by a 'Lowrance-Ready' cover on the underside of the kayak.... 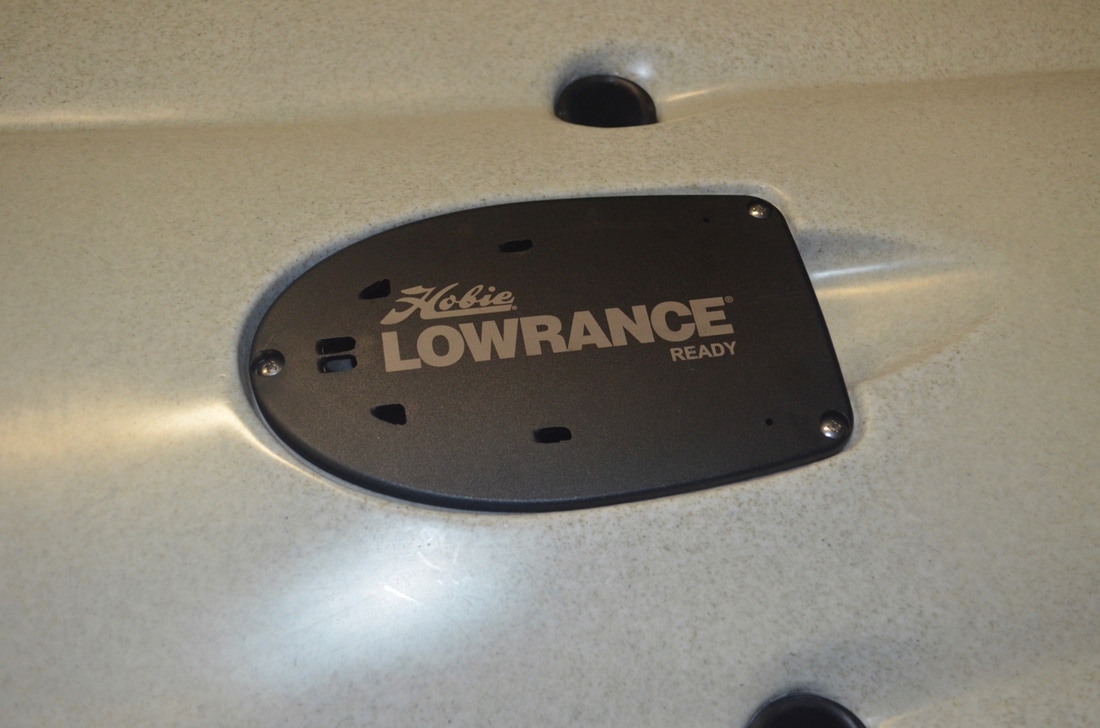 Unbolting the plate reveals the transducer scupper recess beneath. This is just long enough to house the Raymarine Dragonfly CPT-DVS transducer which comes with the Dragonfly 4Pro, 5Pro and 7Pro units. 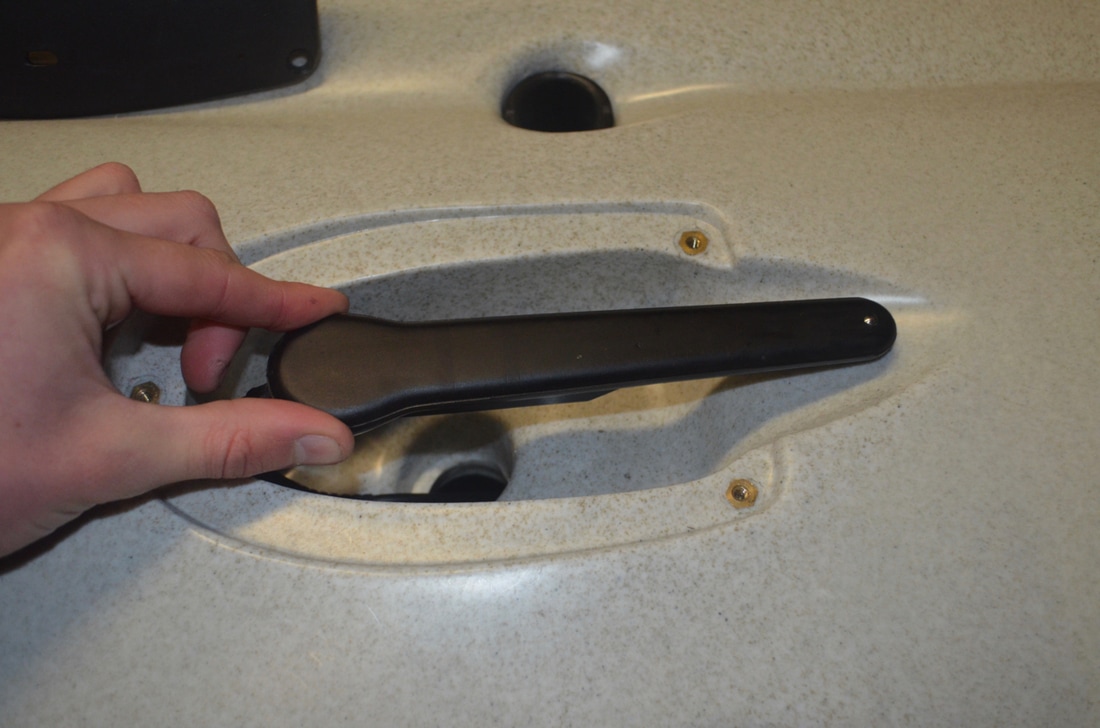 There are a couple of options for installing the transducer here - one uses the standard 'Lowrance-Ready' plate, and one uses the after-market 'Raymarine-Ready' plate from BerleyPro. Both methods are explained below.... Installing the Dragonfly Transducer using the Lowrance-Ready PlateAs we have seen, the Dragonfly CPT-DVS transducer for the 5-Pro just fits in the scupper recess. The transducer can actually be held in place by simply just putting the Lowrance-Ready plate back on..... but this is a very tight fit. The wire protruding from the transducer has to bend quite a lot in order for the transducer to sit within the recess enough to get the plate back on, and the wire to go back up through the scupper to the tank well. It causes the plate to bend a little in the middle but it would hold up fine. I haven't modified the Lowrance-Ready plate in any way here, simply just bolted it back on, with some gentle persuasion! 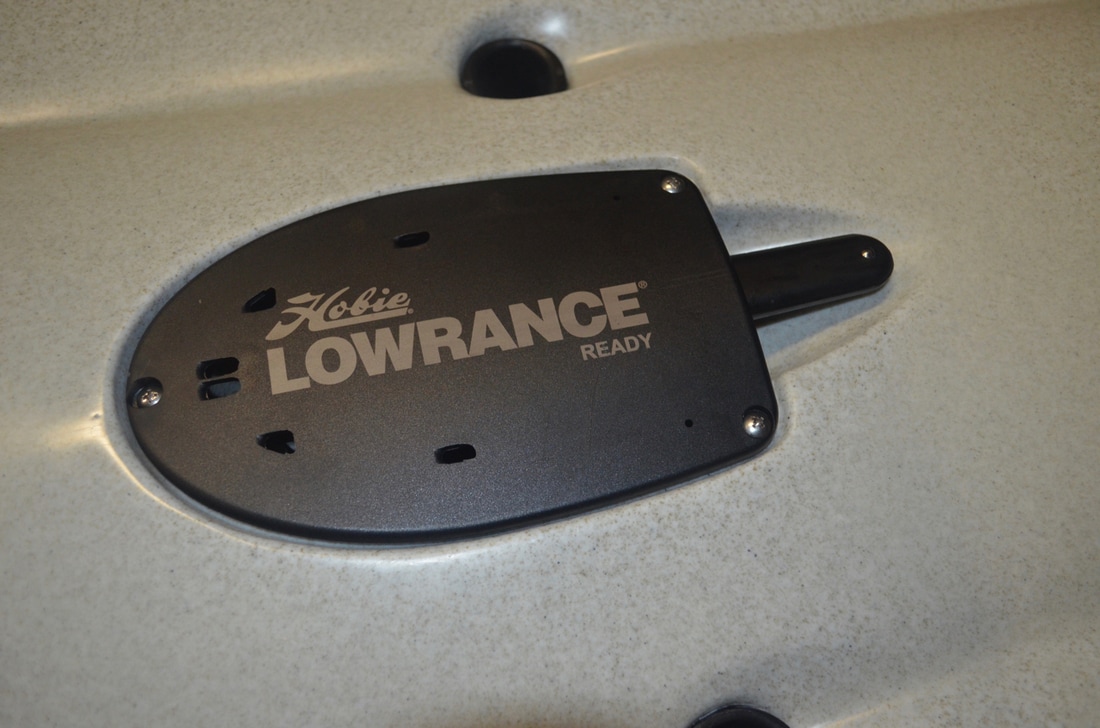 Installing the Dragonfly Transducer using the BerleyPro Raymarine-Ready PlateThe second method involves using a product which has been made specifically for this job, from a company called BerleyPro. BerleyPro are an Australian company who make specialised accessories for the kayak fishing market including a number of transducer mounts for the Hobie Lowrance-Ready system. Their Raymarine-Ready Transducer Mount was just what i needed! You can buy BerleyPro products from Cornwall Canoes here in the UK. The mount consists of a plate with bolt holes to match the Lowrance-Ready plate, along with a transducer top clamp and stainless bolts/washers/nuts to fix this in place. The mount is made from tough ABS plastic. 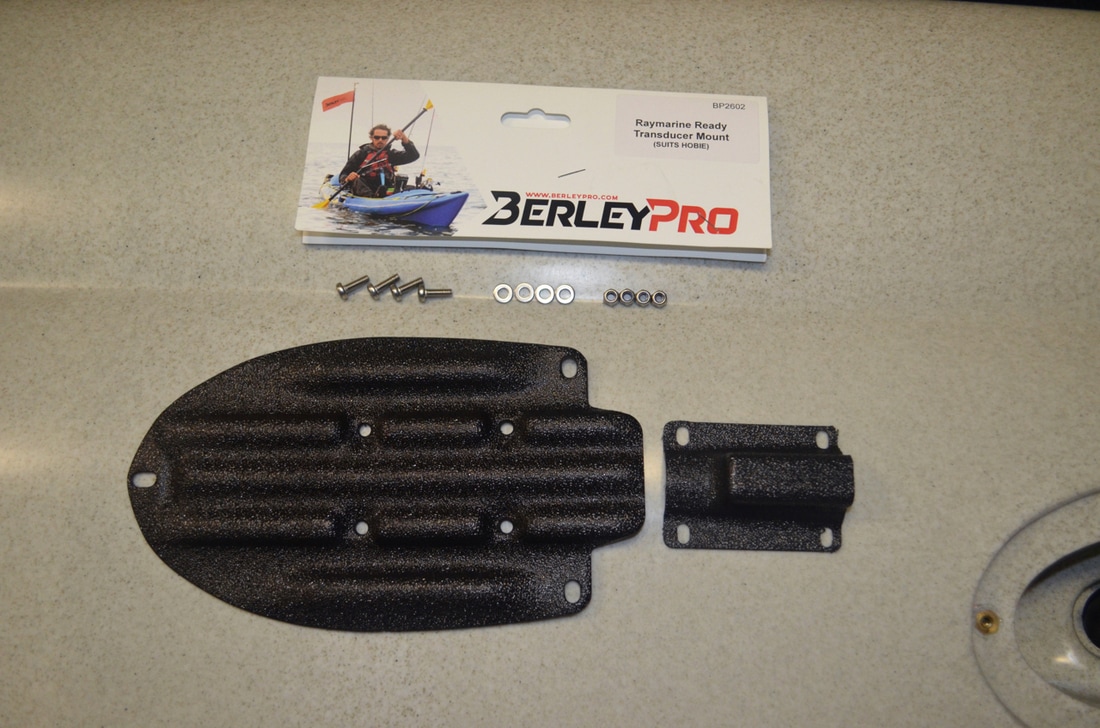 Assembly is very easy. Simply put the top clamp over the dragonfly transducer and then bolt the clamp to the base plate using the bolts, washers and nuts. The transducer is now held firmly to the plate... 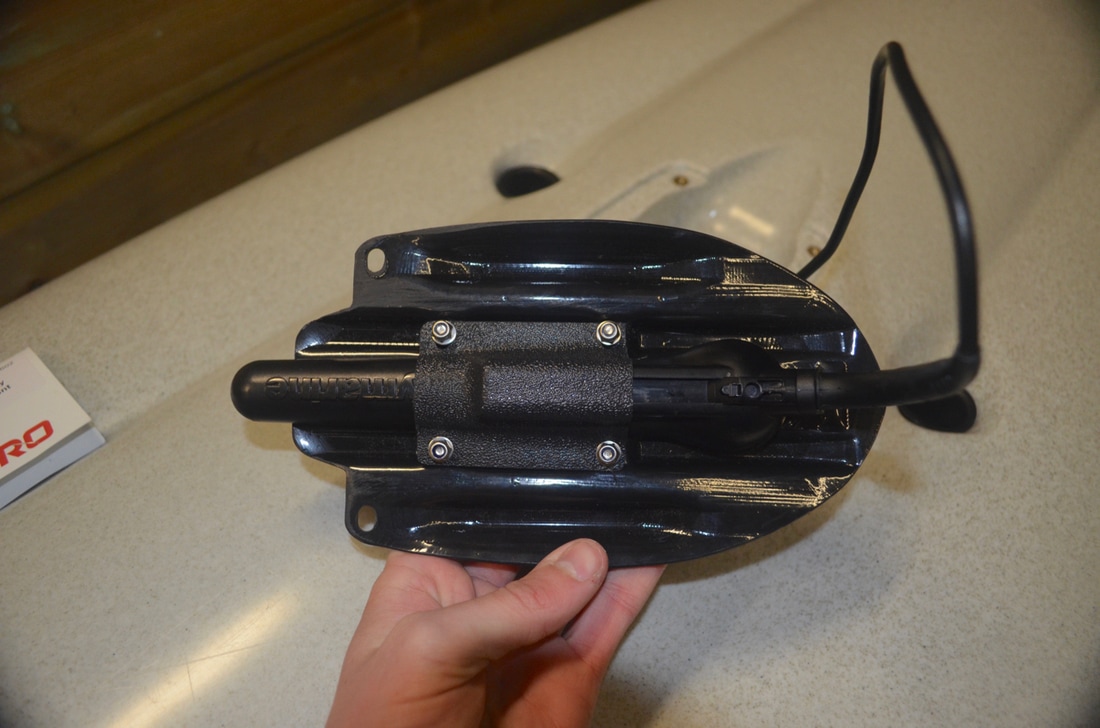 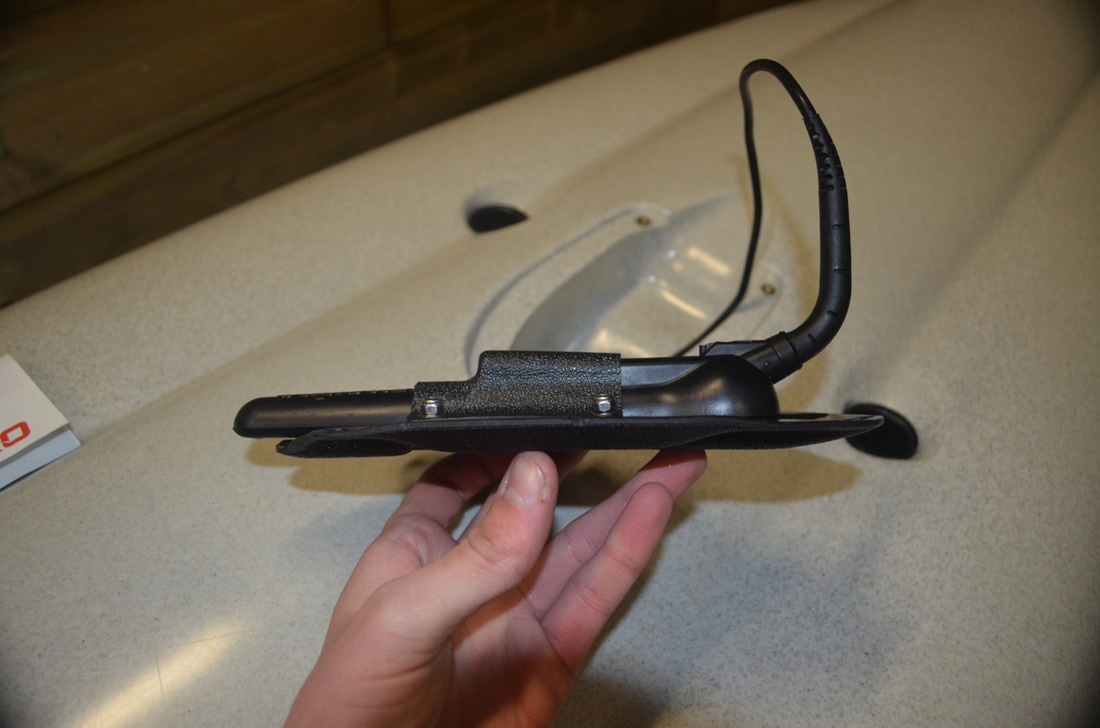 The transducer wiring can then be pulled up through the scupper hole into the tank well and the plate bolted back in place. This is a really tidy way of installing the transducer and is super quick and easy too! 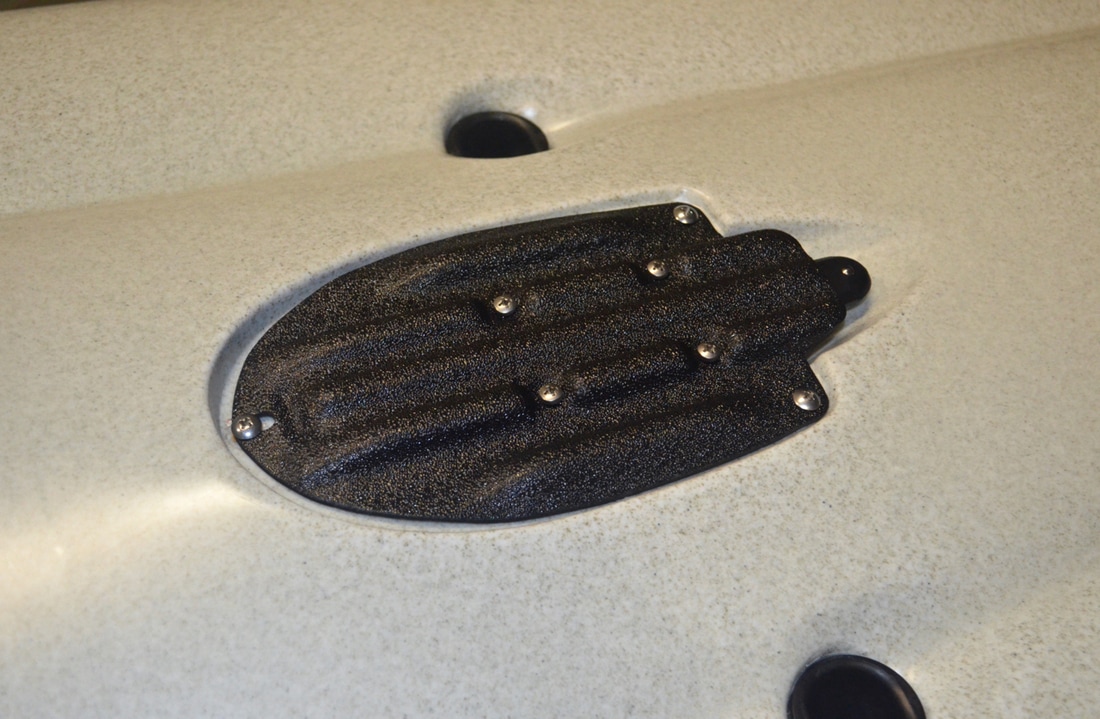 Onto the next step.... running the wiring through the kayak... Installing the Cabling for the Raymarine DragonflyThe Dragonfly wiring consists of a plug which connects to the head unit and from this one wire running to the transducer and another wire which will run to the power source - in this case a battery. The Revo 16 comes ready fitted with waterproof deck seals to wire in a fish finder. There are 3 in total - one located above the transducer scupper to run the transducer cable back into the hull, and one inside each of the side pockets to run the transducer and power cable from the head unit back into the kayak. The deck seals fitted are the Hobie 3-Way Thru Hull Wiring Kits. These consist of a plastic outer housing which holds 3 rubber inserts. This is then screw mounted onto the kayak, with a rubber gasket used to seal the fitting. Here is the one located in the rear tank well of the Revo 16. 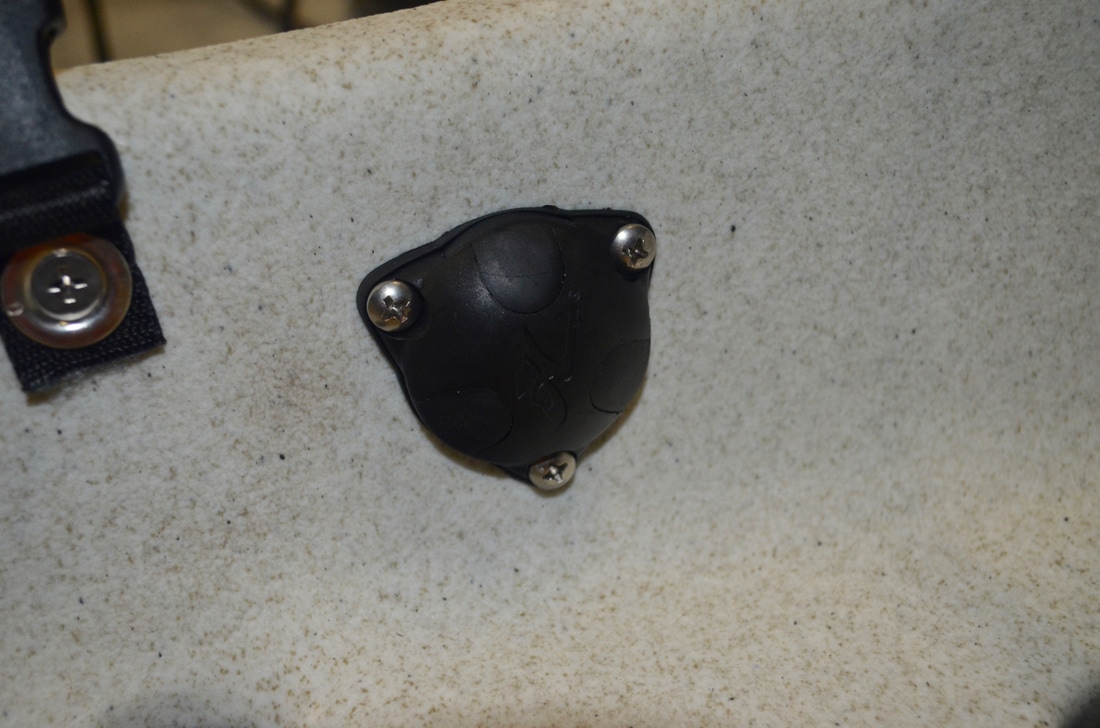 Unscrewing the thru-hull fitting allows you to remove the blank rubber inserts and swap them out for one of the various rubber inserts, supplied with the kayak, which have a hole for a cable to run through. There are numerous rubber inserts with various hole diameters to cater for various cable sizes. Some even have 2 cable holes so theoretically a single deck seal could allow up to 6 cables to pass through the hull! A slit in the insert allows for the cable to be placed into the hole. 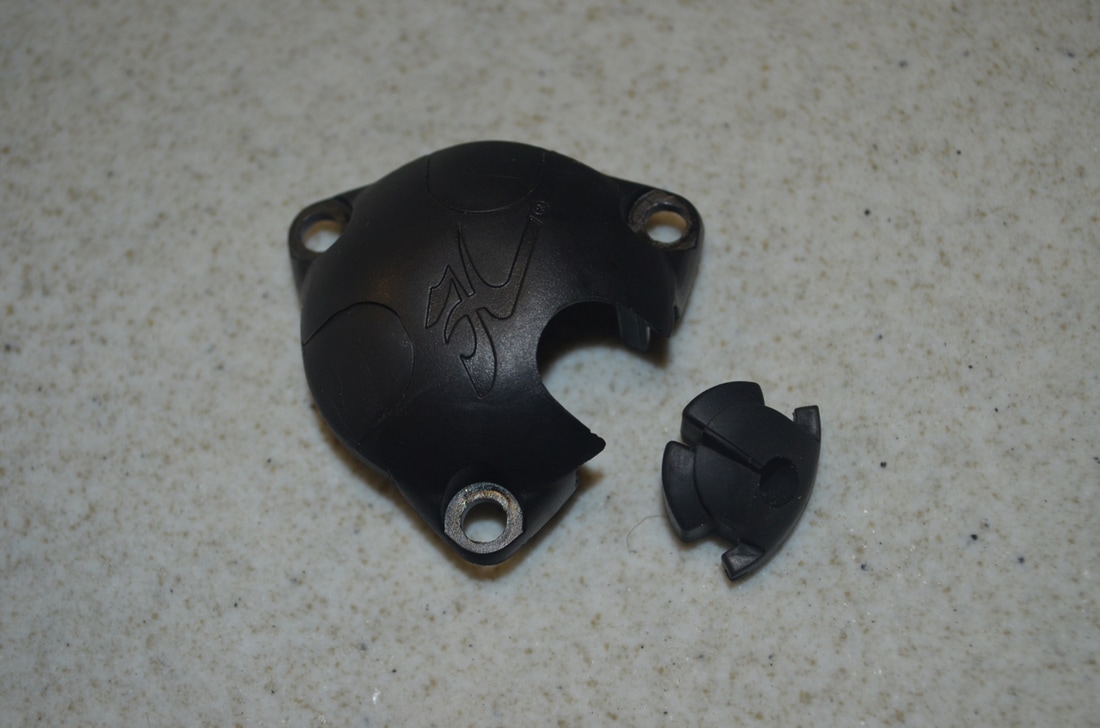 I found one just the right size for the transducer cable. It is then just a case of poking the connector and cabling into the hull (put the rubber gasket over this first!) until you are left with just enough to run from the Thru-Hull fitting to the transducer. The rubber insert can be pushed back into the plastic housing and then this can be screwed back onto the kayak on top of the rubber gasket. Neat and tidy. A smear of sealant could always be used where the cable needs the rubber insert to ensure a fully waterproof fitting. 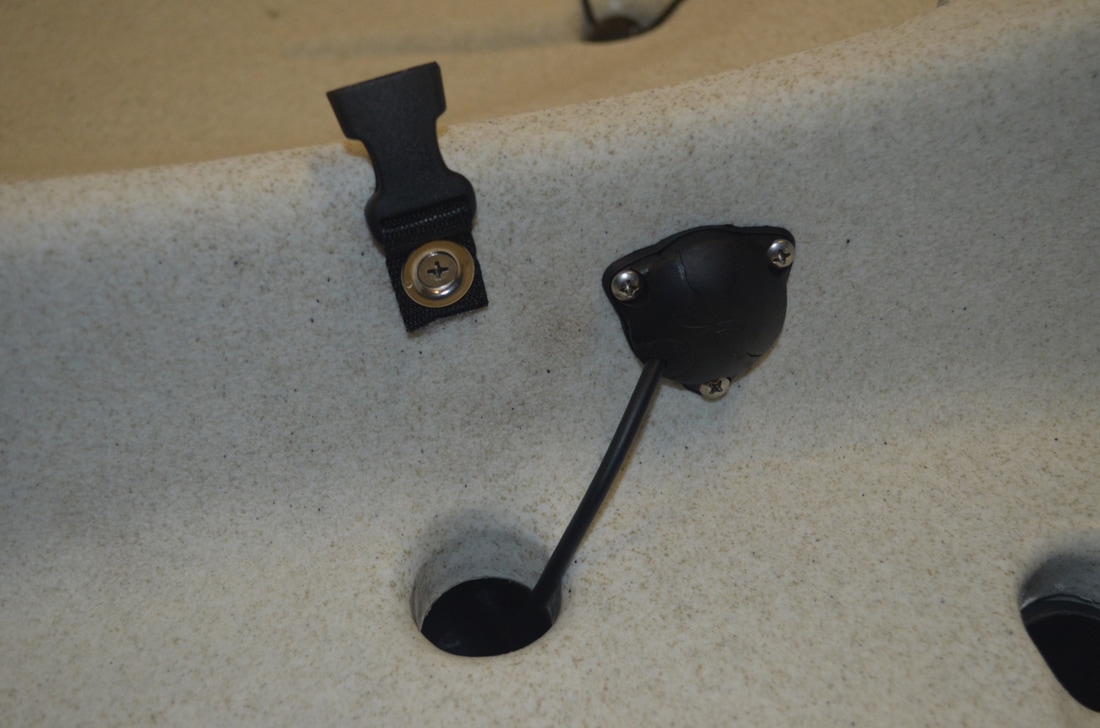 With the cabling inside the hull it is time to bring some back out so that the plug socket can be connected to the fish finder unit. There is a Thru-Hull deck seal in each side pocket so it's a case of choosing which side you want to mount your fish finder. I've gone for the left hand side but it can easily be changed at a later date if needed. 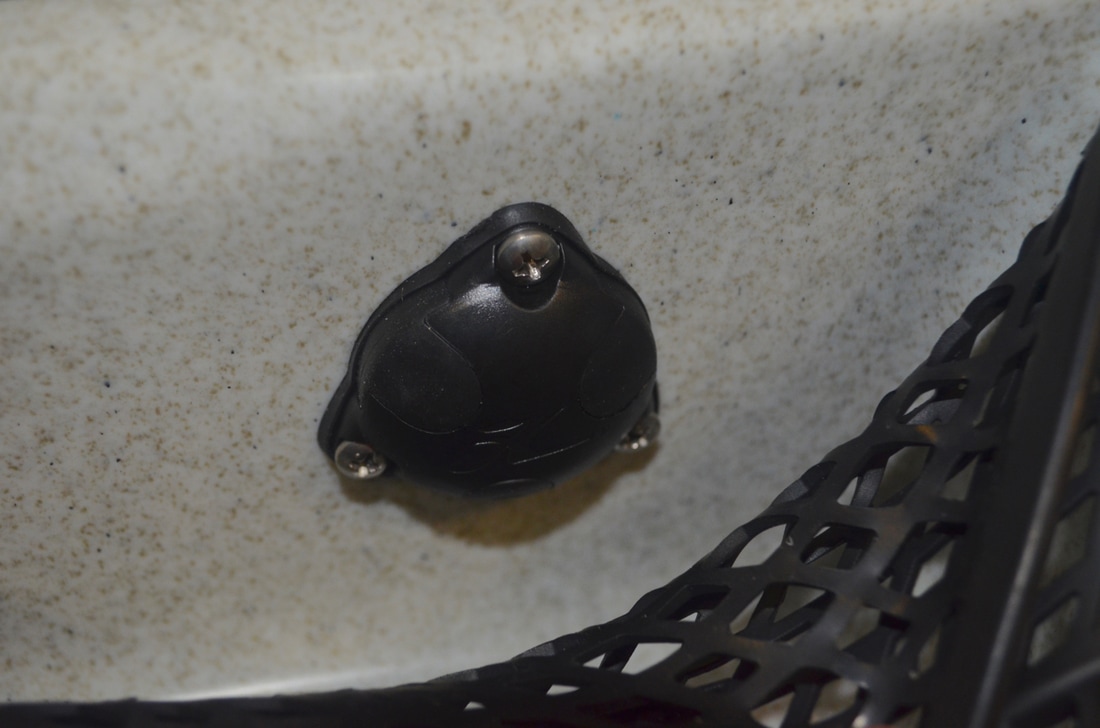 The process is much the same as with the tank well deck seal. Unscrew the fitting, remove the rubber insert and select which size you need. This time the transducer and power cable need to run back into the kayak through the fitting so i have selected a rubber insert which can hold two wires. 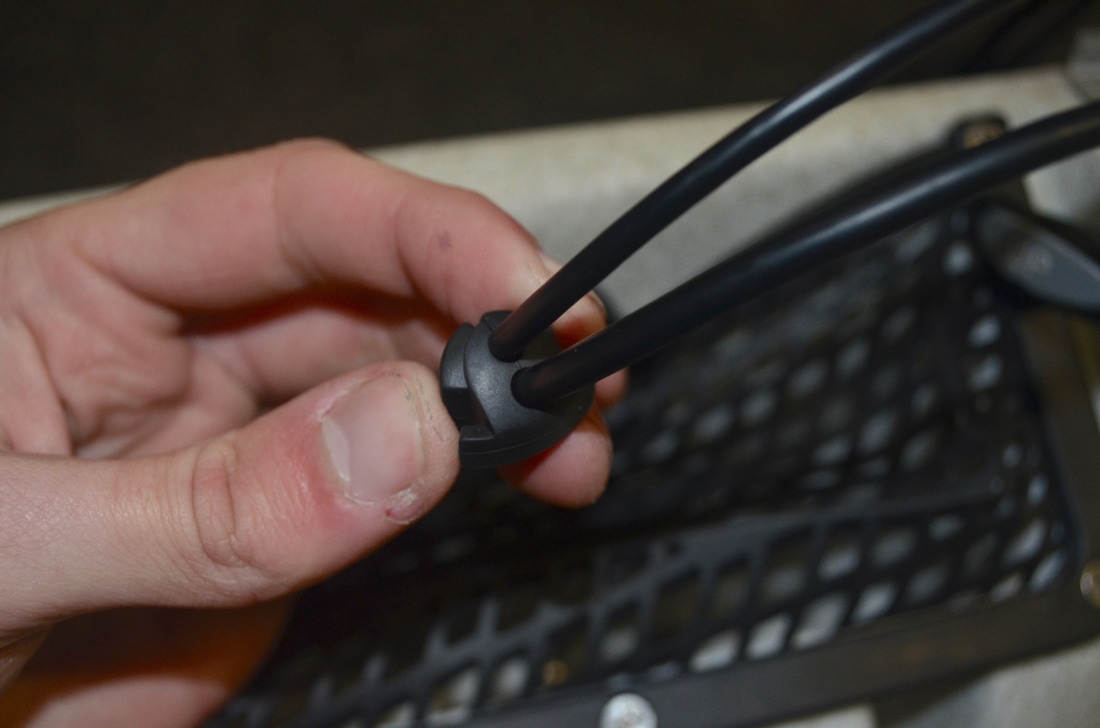 As before, put the rubber gasket over the wiring and against the hull then ensure enough wiring is through the fitting to reach the main unit (wherever this may be positioned) and then screw the housing back onto the kayak. 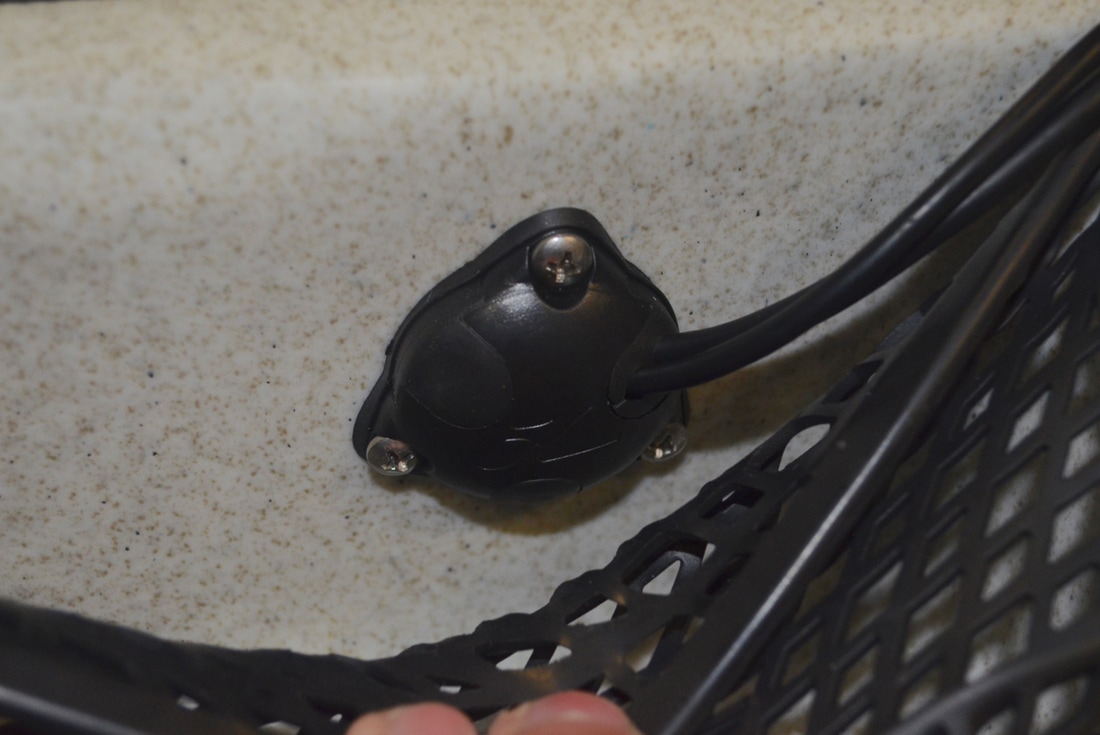 Inside the hull i was left with loads of excess transducer cable. To keep things tidy i have wound this into a coil, held in place with a couple of cable ties. 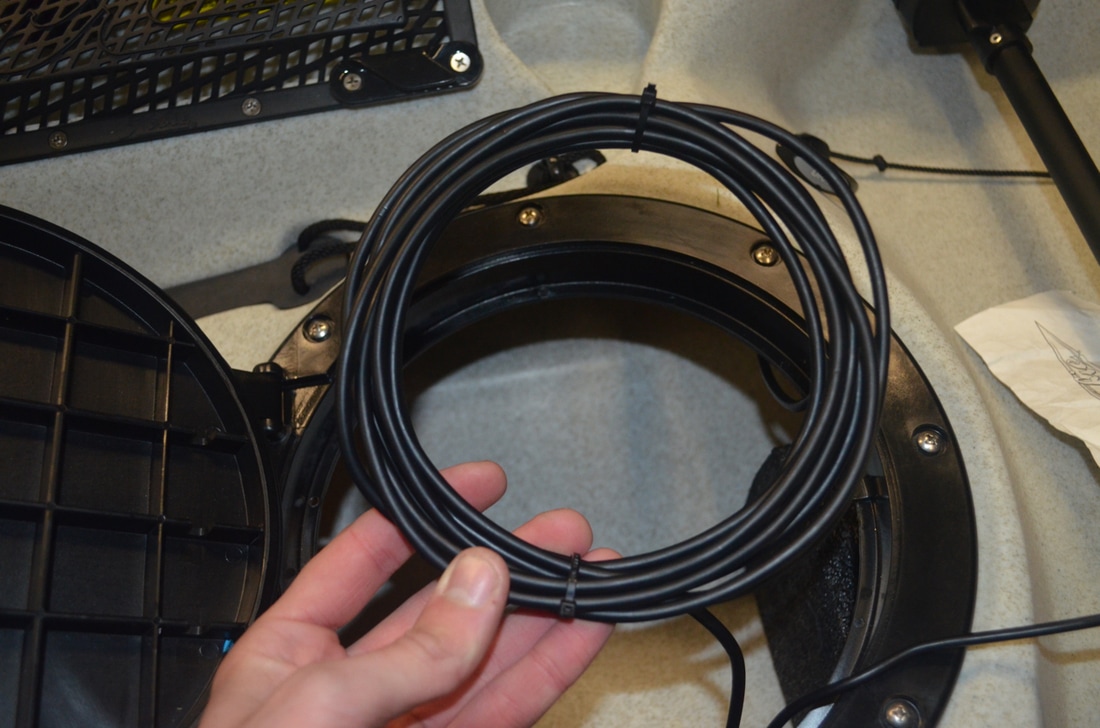 To keep this in a fixed place in the hull i have cable tied this coil to the seat well drain scupper hole inside the hull. This required first putting a cable tie around the scupper post and then a cable tie between this and the coil of wire - it was a bit fiddly but i managed it in the end. It won't be flying about in the hull during transport in this fixed position. 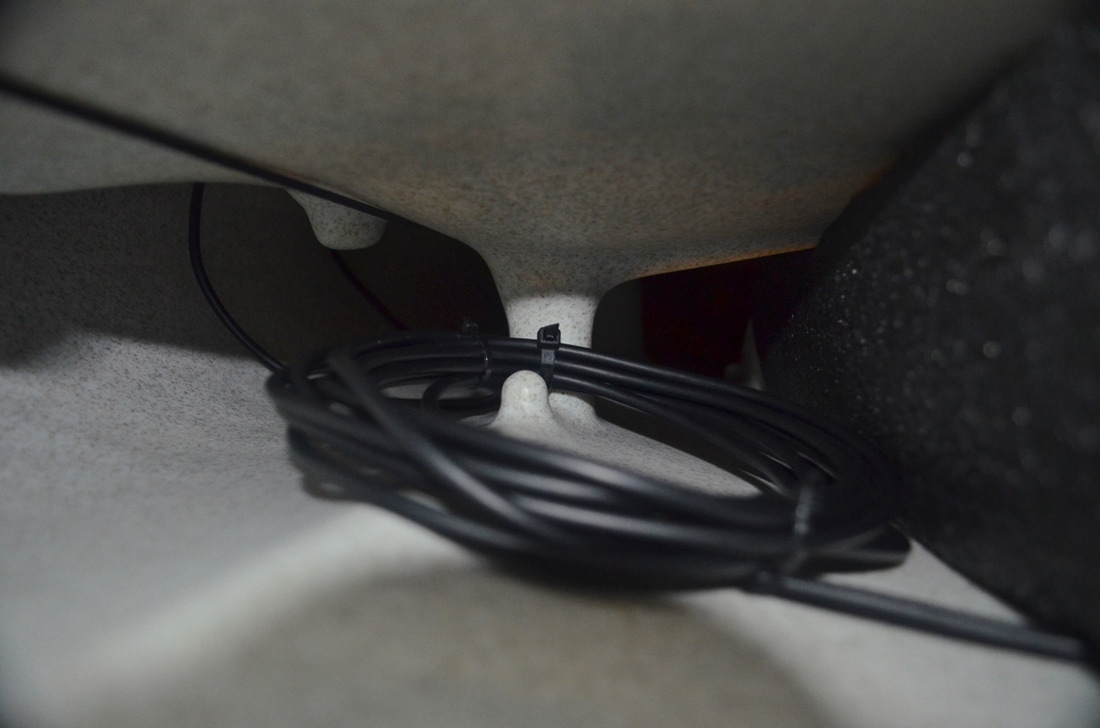 Onto the next step....the power source. Powering the Raymarine Dragonfly 5-ProI use a 12V 7aH Sealed Lead Acid (SLA) battery to power my Dragonfly 5-Pro. A full charge gives me at least 3 average day sessions on the water before i need to recharge, but i tend to recharge after each trip if possible. When i first installed the Dragonfly on my RTM Abaco a couple of years ago, i made a waterproof battery box to house the battery. The box was made from a Lock & Lock Watertight Rectangular Plastic Storage Container 1.9 Litre (HPL818), a Scanstrut Deck Seal DS16-P for 16mm connectors and 2-8mm cables, a 2-way Superseal Waterproof 12v Electrical Connector Plug and a couple of pieces of foam to hold the battery secure in the box. You can find out exactly how i made it by clicking here. The use of the Superseal connector allows me to quickly and easily unplug the battery box from the power cable on the Dragonfly, and switch the battery box between fish finders and kayaks if needed. This box has worked superbly!!   It fits nicely inside the centre Twist-N-Stow hatch where the two connector ends can be clipped together.  The box then sits really well on its side just forwards of the hatch. In this position the Hobie Gear Bucket can be placed back within the hatch, which actually holds the battery box perfectly in place!. Neat and tidy.
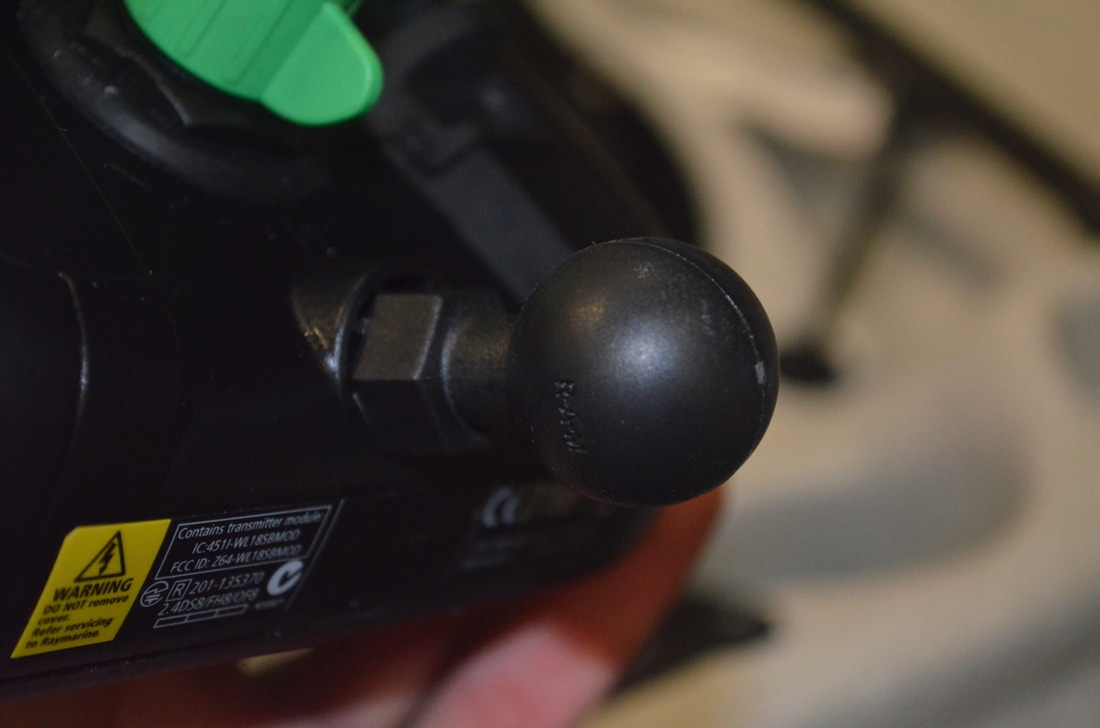
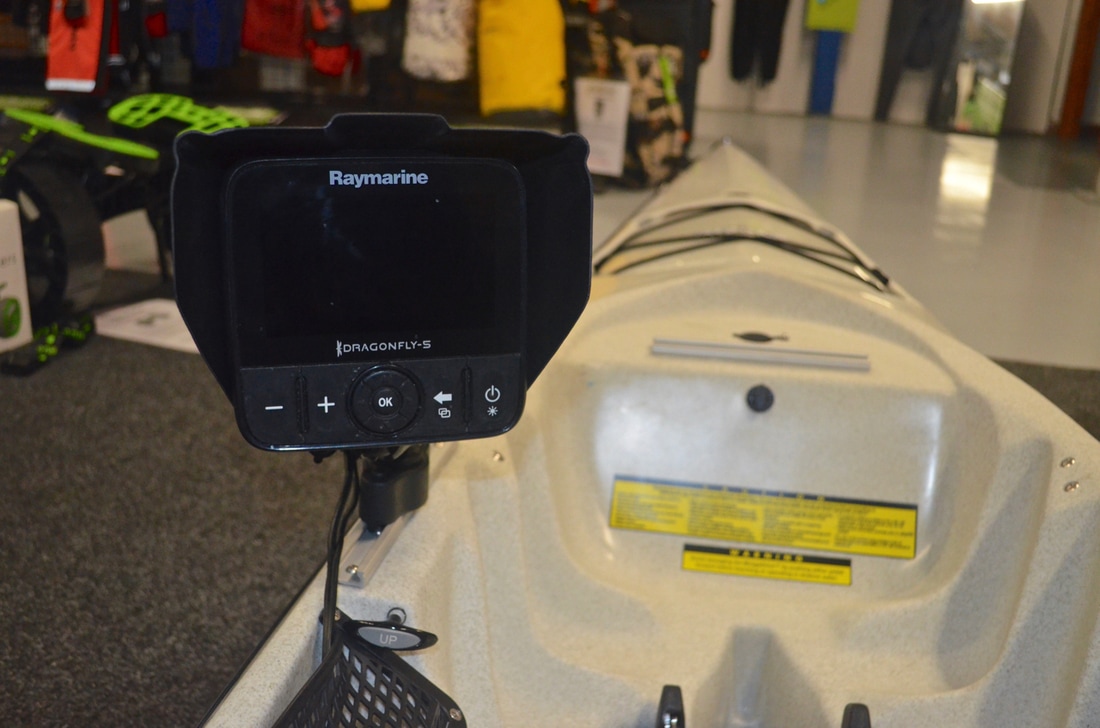
With all the wiring in place, all that is left to do is mount the main fish finder unit. Mounting the Raymarine Dragonfly 5-Pro Display UnitI have chosen to mount the main unit on the left hand side of the kayak. Just forwards of the side pocket there is a small flat area which can be used for mounting accessories. In this position i have mounted an 8" section of Yak Attack GearTrac GTTL90 - see here for more info. This low profile and versatile mounting solution allows me to easily fit and remove a track mounted fish finder mount. I have opted for using a RAM Mount fish finder mount. Ram mounts work on a ball and socket system, allowing for infinite adjustability in the positioning of the mount.  RAM make a Quick-Release Track Base with 1" ball which is compatible with the YakAttack GTTL90 GearTrac. The track base features a T-Bolt in its base which can be set in two positions - A (narrow) & B (wide). The track mount fits the GTTL90 tracks best on the wider B setting.  RAM also make a 1" Tough Ball with a M6 threaded bolt which screws straight into the head unit on the Dragonfly.
The two balls are then connected via a 1" double socket arm. The mount can be top-loaded onto the GearTrac in the desired position and screwed down until a solid mount is achieved. With the connector plug fitted to the back of the unit, the installation is complete....nearly!
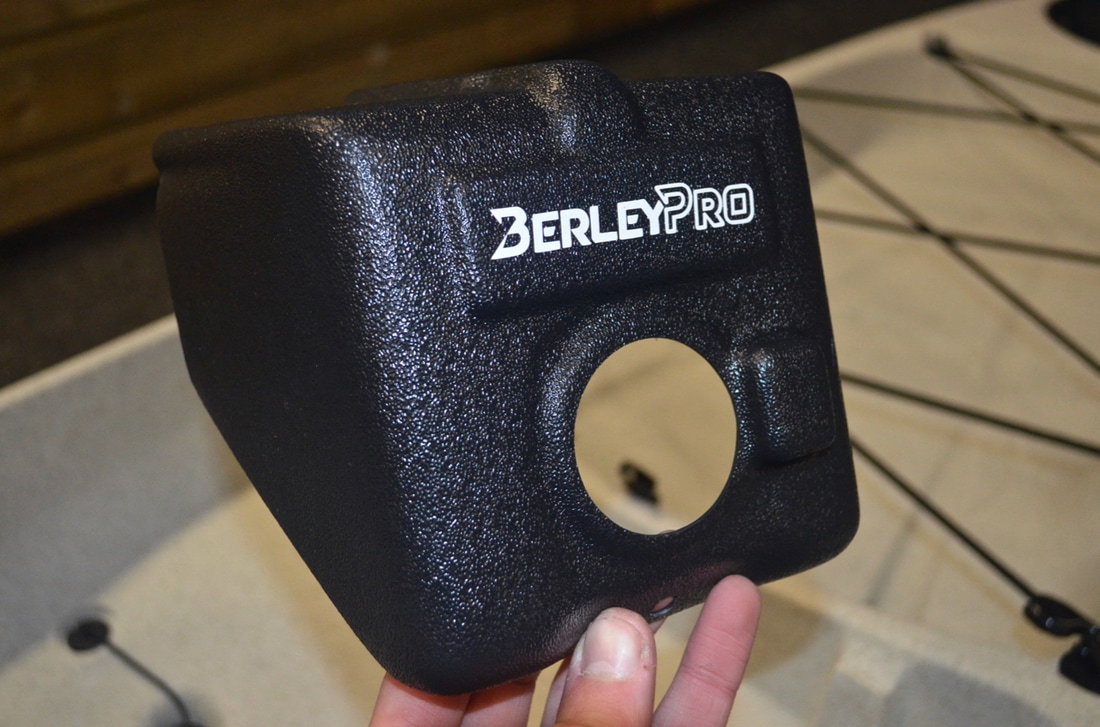
Adding a BerleyPro Visor to the Raymarine Dragonfly 5-ProI have added an additional accessory to this fish finder set up. BerleyPro manufacture an excellent range of fish finder visors. These visors shade the fish finder screen, allowing for the display to seen more clearly, especially in bright conditions. The visor also helps prevent splashes of water reaching the screen. Anyone who has a fish finder will know how annoying dried saltwater drips can be on a screen! You can get visors for all the popular fish finders, see the range Cornwall Canoes offers by clicking here.
Installation is very easy. Simply put the visor over the unit and screw the mounting ball back into the unit to hold it in place!  It looks pretty smart too.... 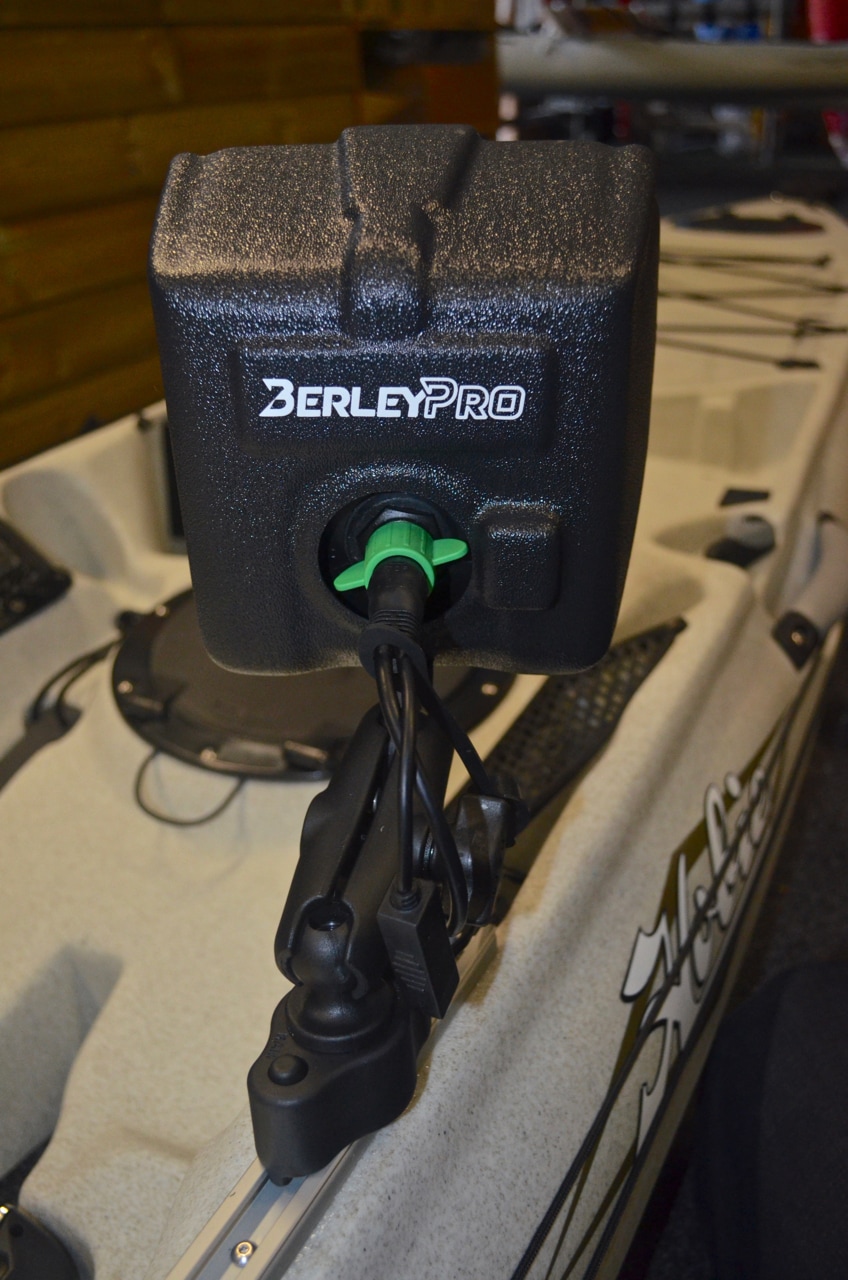
At the end of a session the fish finder and mount can be removed leaving behind just the cable to stow. This can be tucked away in the side pocket during transport and storage.
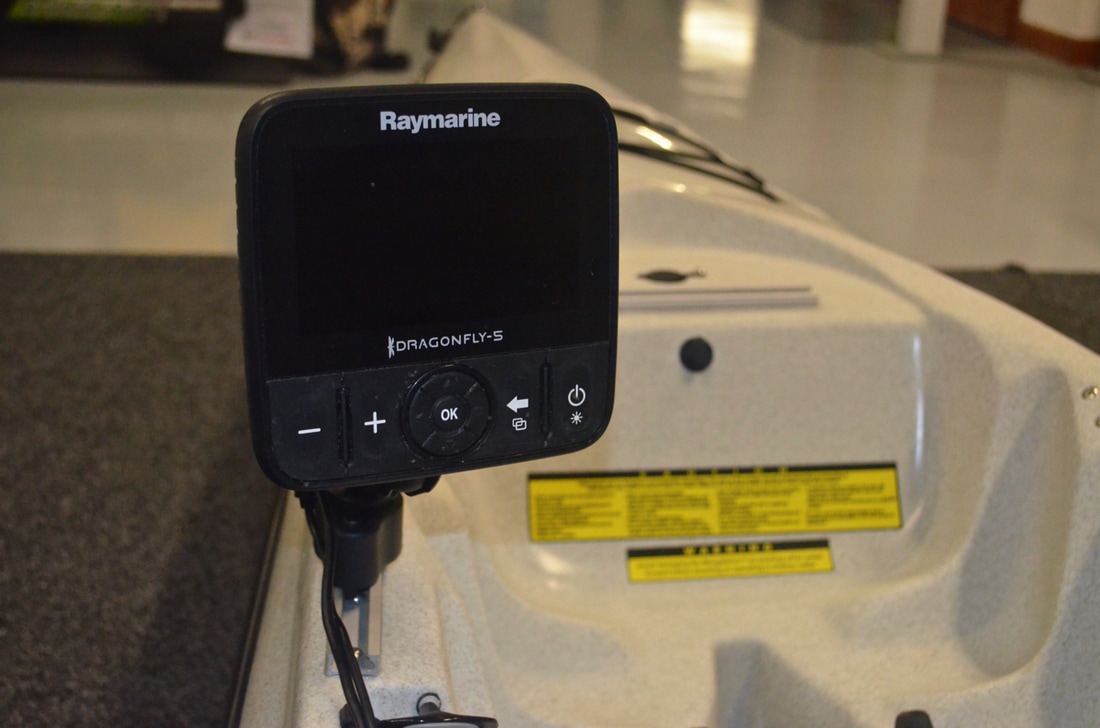
Whilst i have installed the main unit on the left hand side of the kayak, i do have a couple of the options for positioning if needed. I have installed YakAttack GearTrac on both sides, as well as in front of the sail mount at the front of the footwell. Installing on the right hand side is easy - just re-run the wiring through the other pocket Thru-Hull fitting and attach the fish finder to the right side track. If down the line i decide i want the fish finder up front, i can simply install a 3-Way Thru-Hull Wiring Fitting near the front track, run the wiring through this and attach the fish finder to the front track...simples! 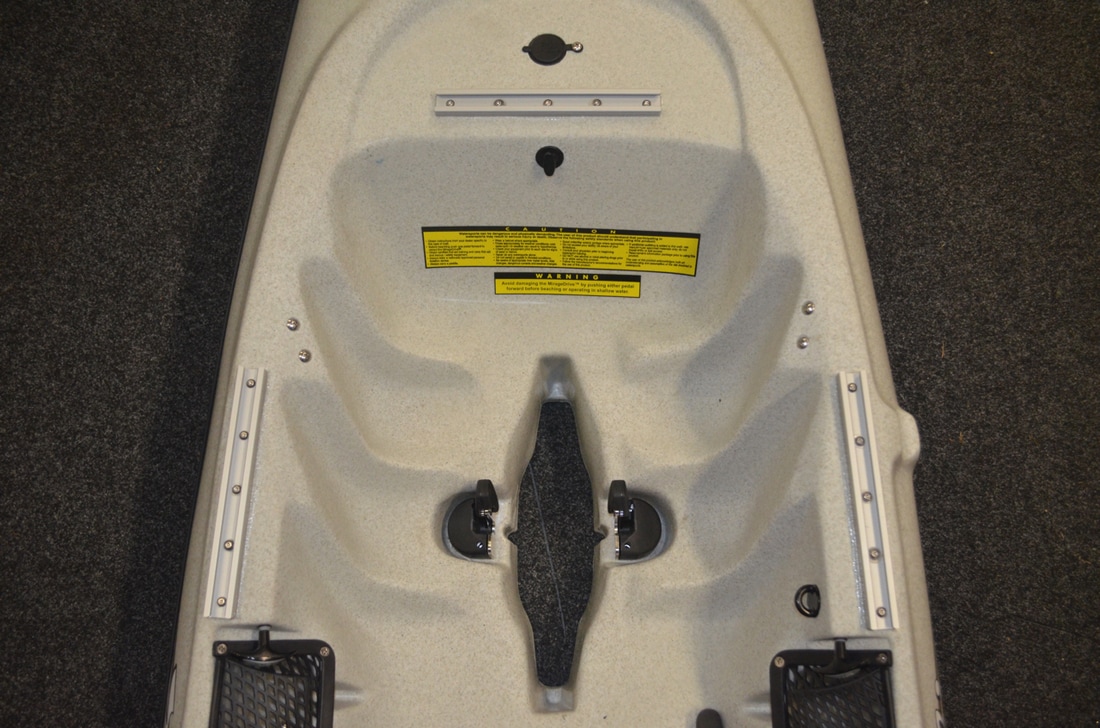 The installation is complete! The Raymarine Dragonfly is in a position that is clearly viewable and easy to operate whilst fishing and whilst pedalling. I now have CHIRP Sonar, DownVision and a GPS chart plotter with HD bathymetry maps at my disposal on the water, providing me with information which will help me to make informed decisions on where and when to fish.  Time to find those fish! On The WaterIt works absolutely perfectly! The unit is within easy reach whilst fishing and whilst pedalling. The transducer cover appears to have no effect on the transducer readings, with both CHIRP and DownVision modes working well. The display is easy to see even when the sun is out, and minimal water splashes get to the screen even when punching through chop. CHIRP Sonar and DownVision modes... 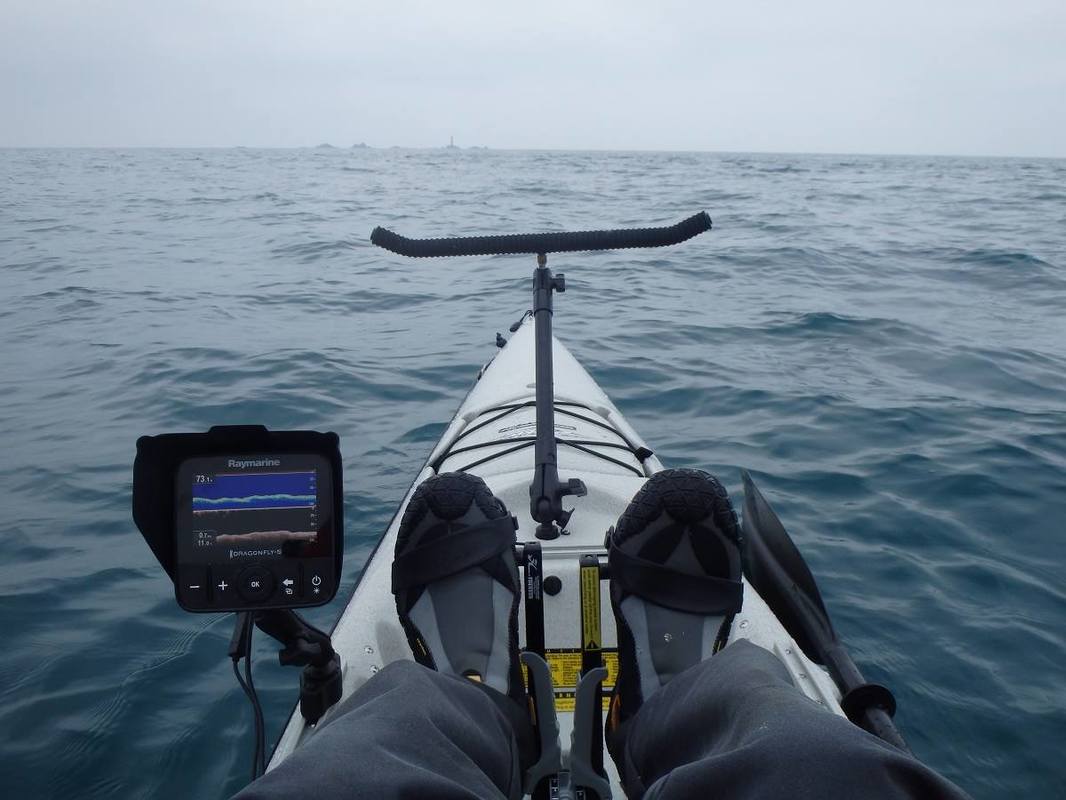 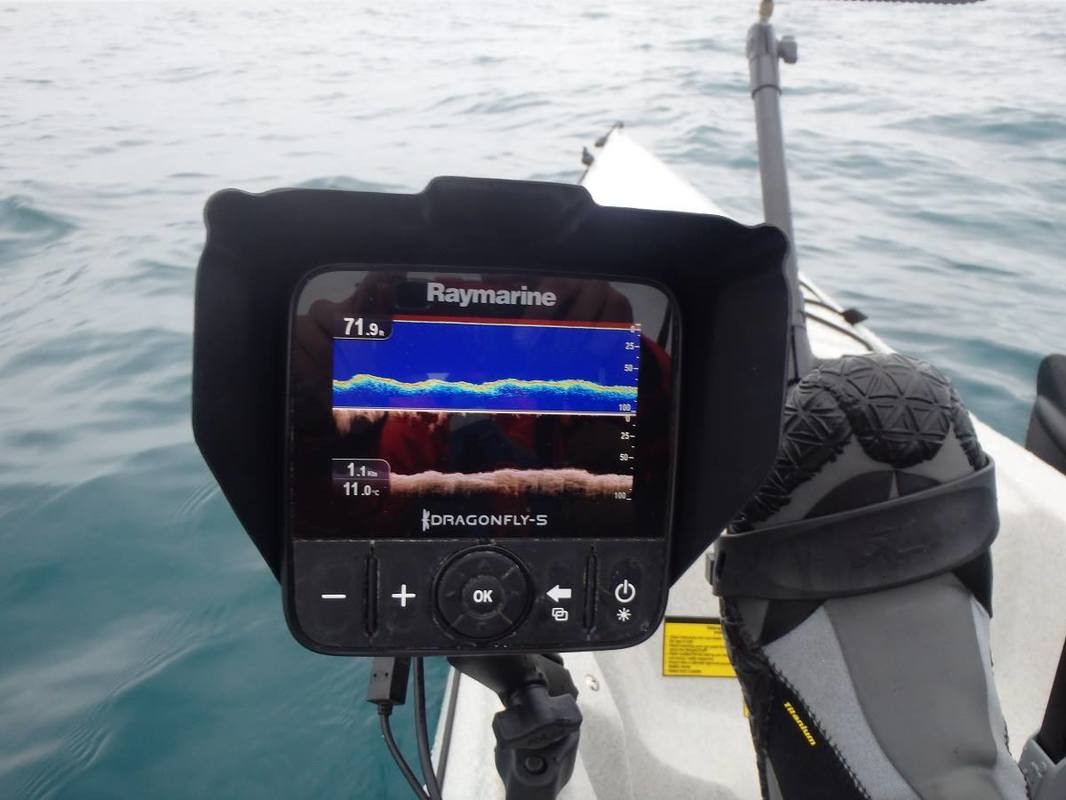 GPS Chart Plotter mode working.... 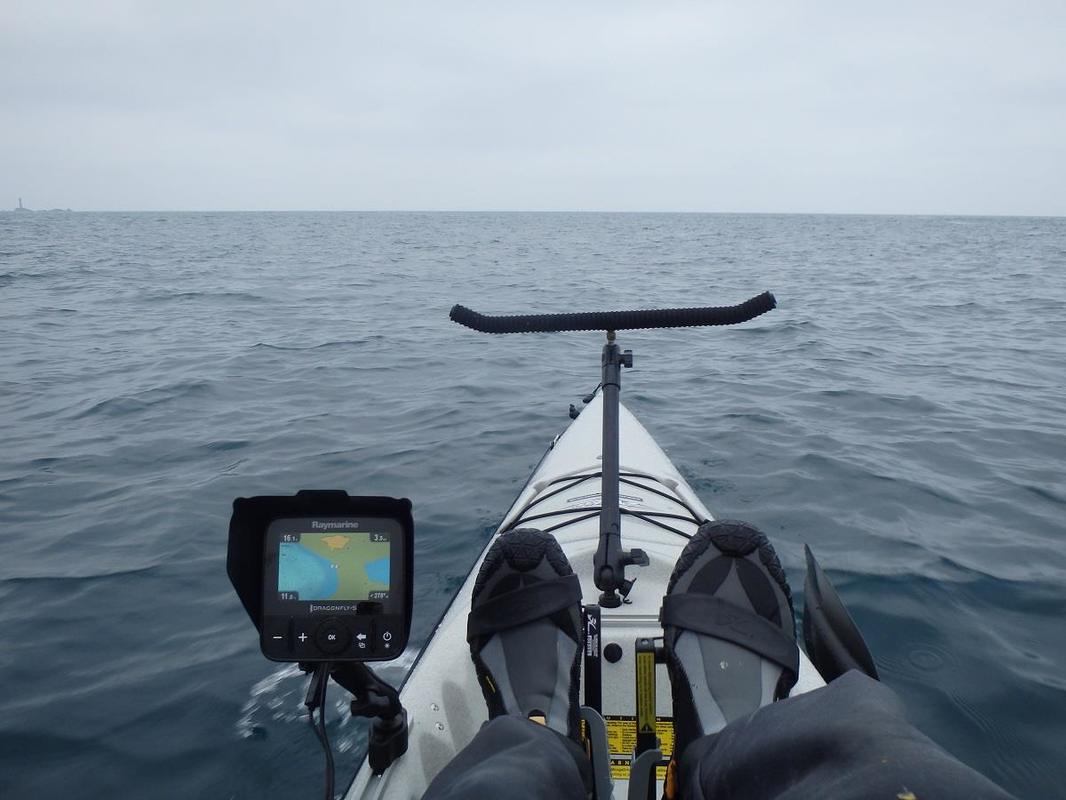 and it helps to find the fish too!  20/5/2017 09:10:45
Great post with a lot of detail, just what I need. My kayak isn't the as yours but it definitely helps me. Thanks for taking the time to do it. 18/7/2017 10:06:29
Thanks for shearing this informative blog which is helpful for many people.After long time I saw this type of articles.Your site is really nice.Keep it up...........
Giorgio
9/9/2017 08:55:22
Beautiful post !! precision and clean work !!! I'll get started from this job to install my fishfinder too !!
Kev
12/9/2018 14:04:17
£58.24 for the Berley Pro Raymarine cover plate...cough Comments are closed.
|
AuthorLiam Faisey 
My Tackle Shop
SPONSORS
Proudly associated with

Cornwall's only specialist kayak fishing shop
Archives
March 2023
Categories
All
Add my blog to your feed reader by clicking the button below
Get blog updates via email
Kayak Fishing Videos

Custom feed reader powered by FeedWind
Useful Links
Anglers Afloat
Cornish Shore & Kayak Fisherman Cornwall Canoes Palm Equipment Penzance Kayak Fishing Meet Info Saltwater Kayak Fisherman Magic Seaweed XC Weather 
|

 RSS Feed


|
|
Website powered by pasties and the hope of good weather!
© 2023 Liam Faisey
© 2023 Liam Faisey