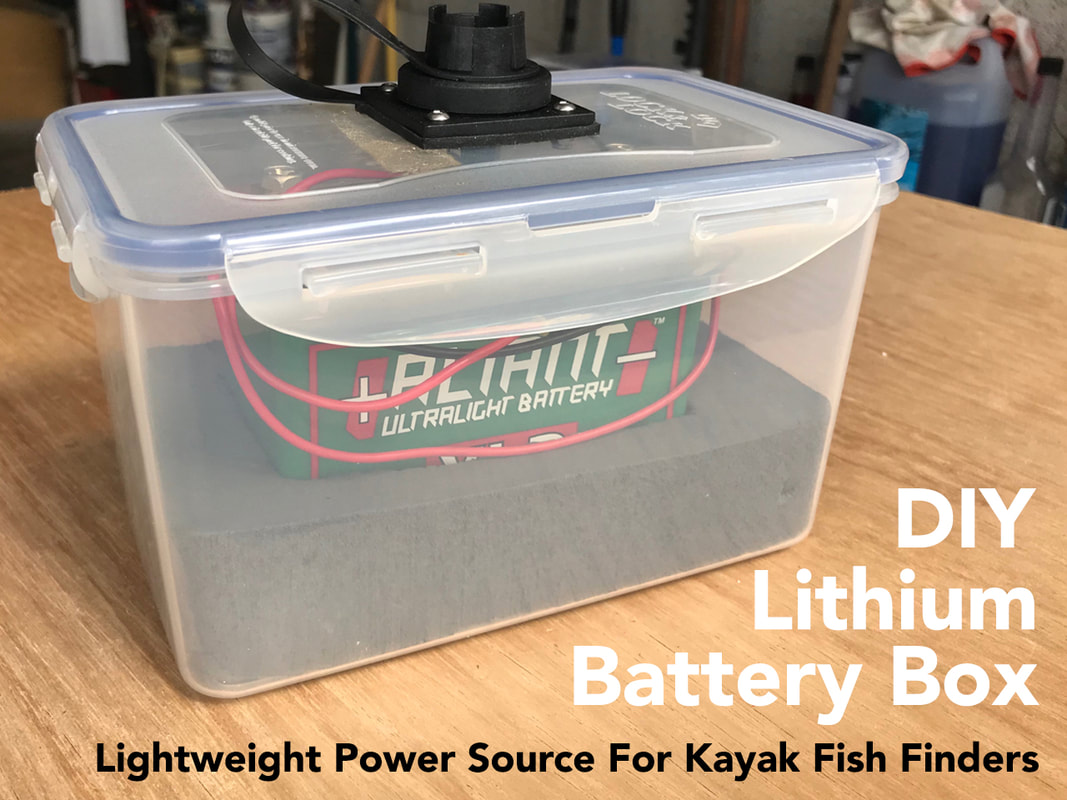
Lightweight Power Source for Kayak Fish FindersMy 12V 7Ah Sealed Lead Acid (SLA) battery has served me well over the last 5 years. It was inexpensive at around £20-25, but it is heavy. I built a waterproof battery box using this battery and in total it weighs in at exactly 1.825kg. This may not sound a lot but when you have to manually haul your fully-laden fishing kayak to and from the water to your vehicle, often several hundreds yards away or involving steep slipways or paths, then every 1kg of weight is very noticeable!! There is a solution.... Lithium. Not only is Lithium a great song by grunge rockers Nirvana, it is also number 3 on the periodic table of elements. It is a highly reactive alkali metal with a wide number of applications including use in rechargeable battery cells. Lithium-based batteries are used widely in modern electronics. Your phone will have one, so will your laptop and various other mobile devices. There are several types of Lithium batteries available, including Lithium Polymer (LiPo) and Lithium-Ion (Li-Ion). Lithium batteries are great.... they are lightweight and they hold a lot of charge for their size. So why are they not widely used on fishing kayaks? Safety Concerns and Disadvantages of Lithium BatteriesWhilst having several advantages, Lithium batteries do have some disadvantages. Lithium batteries are expensive and require a specialist charger to safely charge the lithium cells. The price of these alone puts many off using these batteries for kayak fishing applications. Lithium batteries can also be potentially dangerous with a risk of fire or explosion if overheated.... not a good scenario on a kayak! There are two main ways you can overheat a lithium battery:
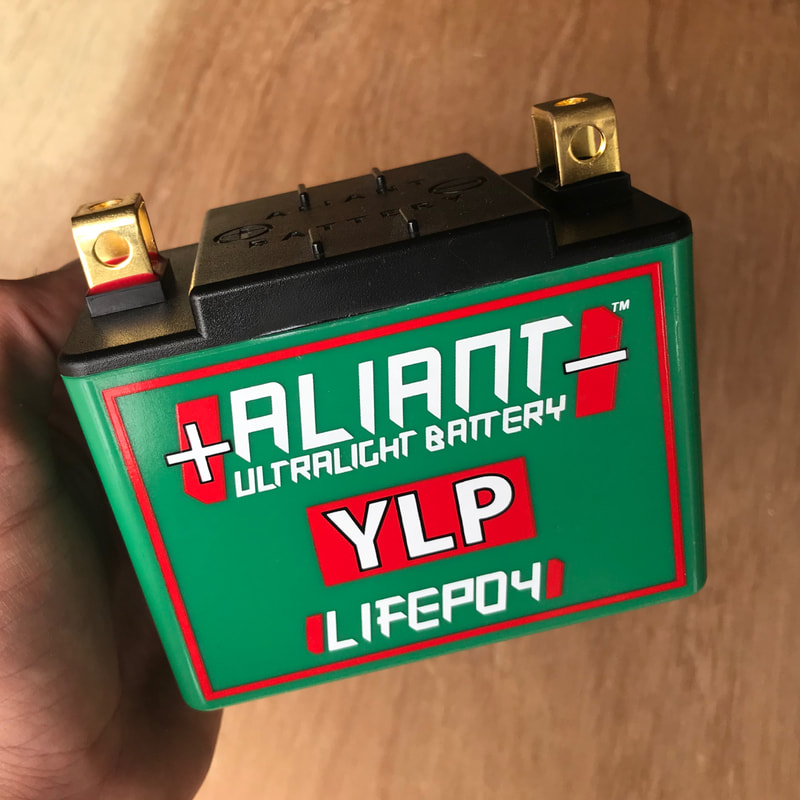
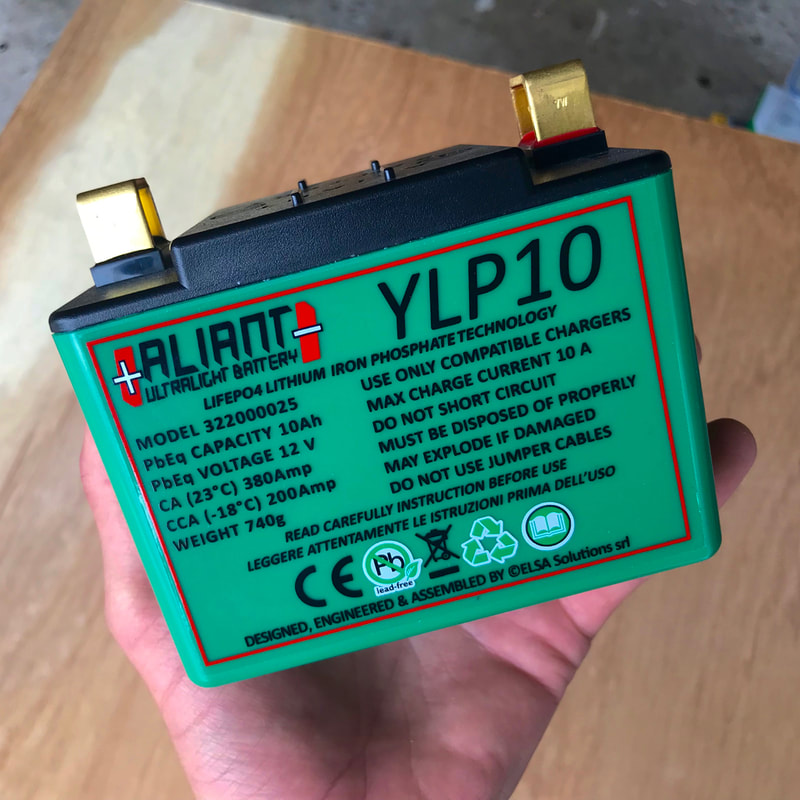
Overcharging or short circuiting a lithium battery must therefore be avoided at all costs. Luckily high-quality modern lithium batteries come in robust sealed housings and have integrated fail-safe features to minimise the risk of battery failure. A good quality charger will prevent overcharging. Housing a battery within a waterproof box will further prevent the possibility of short circuiting a lithium battery on a kayak. Why Lithium?The answer is simple.... i want to save weight on my already heavy kayak fishing set up. Lithium battery technology is advancing rapidly with the huge demand from the technological and now automotive industries and user-friendly lithium batteries for custom applications are now readily available. The price is coming down but they are still a fair step up from sealed lead acid equivalents. You can even buy 'off-the-shelf' lithium battery packs for kayak fishing from companies such as Nocqua and FPV but none are readily available in the UK and have to be sourced from the US or Australia. Ah well... i'll make my own! Sourcing a Lithium Battery for KayaksAfter some searching around i decided to buy an Aliant YLP Ultralight Lithium Iron Phosphate (LIFePo4) Battery. These are marketed as an ultralight motorbike starter battery as a direct replacement for the original manufacturers sealed lead acid battery, so i could see no reason why i could not use one to power my fish finder as a replacement for my sealed lead acid battery. Lithium Iron Phosphate batteries are generally regarded to be more stable and less susceptible to combustion in the event of battery misuse and mishandling, compared to other Lithium-Ion batteries. The Aliant YLP battery range uses safe Lithium iron phosphate technology with embedded 'Active Balancing' electronics control microprocessor unit to minimise risk of battery failure. The specifications were good too, with the battery performing well in both hot and cold temperatures, with up to 3000 charge/discharge cycles, low self-discharge rate when disconnected, fast recharging, no liquids or lead and it can be mounted in any position. The battery is all housed within a tough ABS shell with chunky well-separated terminals to connect wiring too. There are various sizes in the range and i settled on the YLP10 which has a charge hold approximately equivalent to that of a 10Ah SLA. According to Aliant it weighs in at just 740g with a size of 114mm x 69mm x 90mm! compact and lightweight... perfect!
I managed to pick up the YLP10 for £88 from www.sportbikeshop.co.uk which i thought was quite reasonable. It's not something that i can use straight out of the box on the kayak though. I'd need to house this within a good waterproof box to prevent any chance of water reaching the battery and potentially causing a short-circuit. I like making battery boxes..... Making a Waterproof Box for a Lithium Iron Phosphate BatteryA few online purchases (links below) and a trip to a local chandlery shop and i had all i needed to ensure my Lithium battery would be staying dry on the kayak. The items required are:
Tools used:
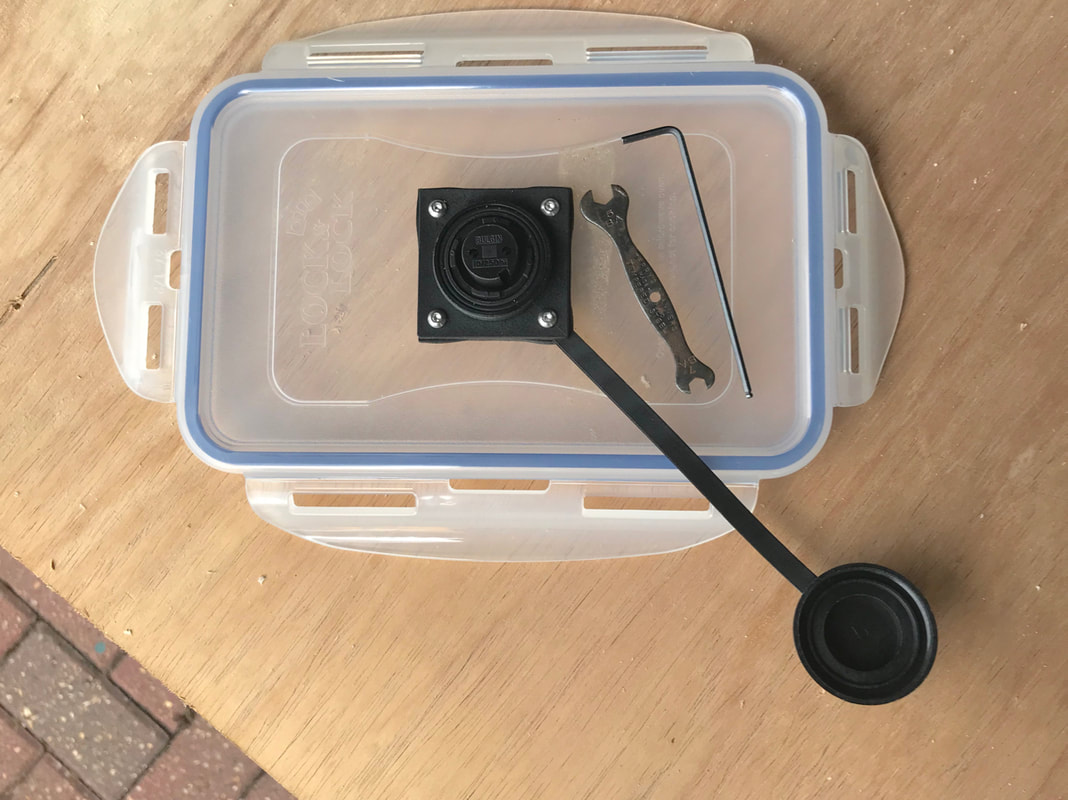
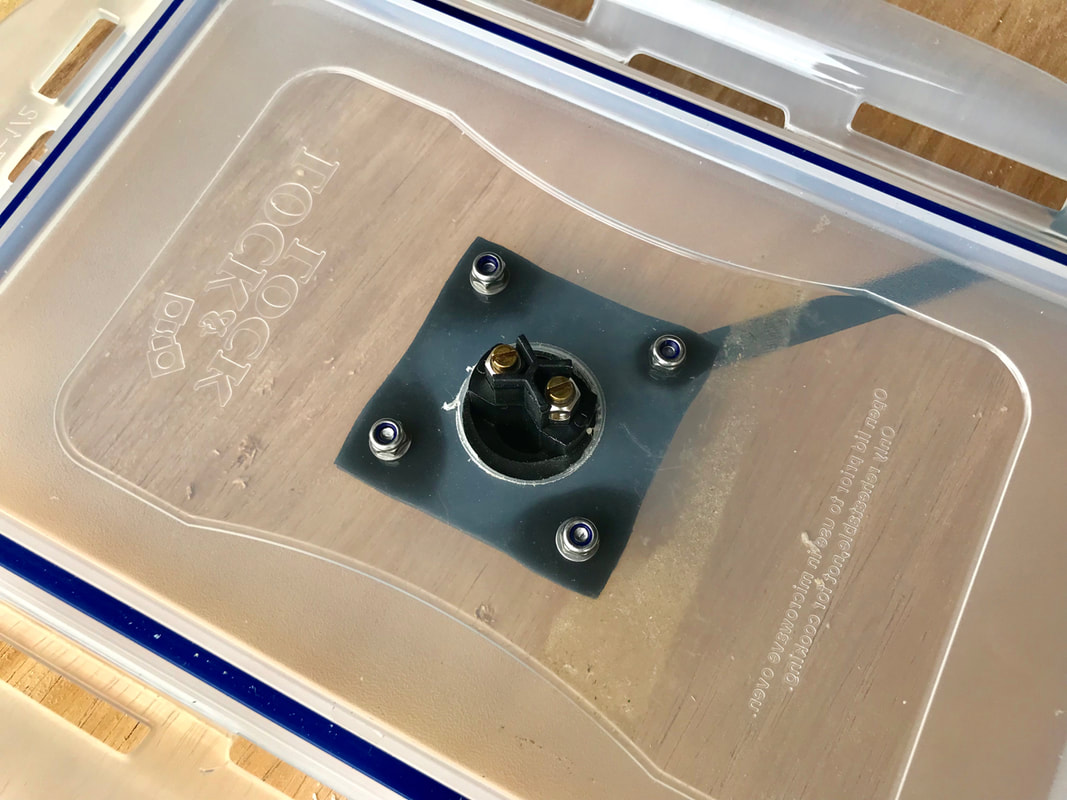
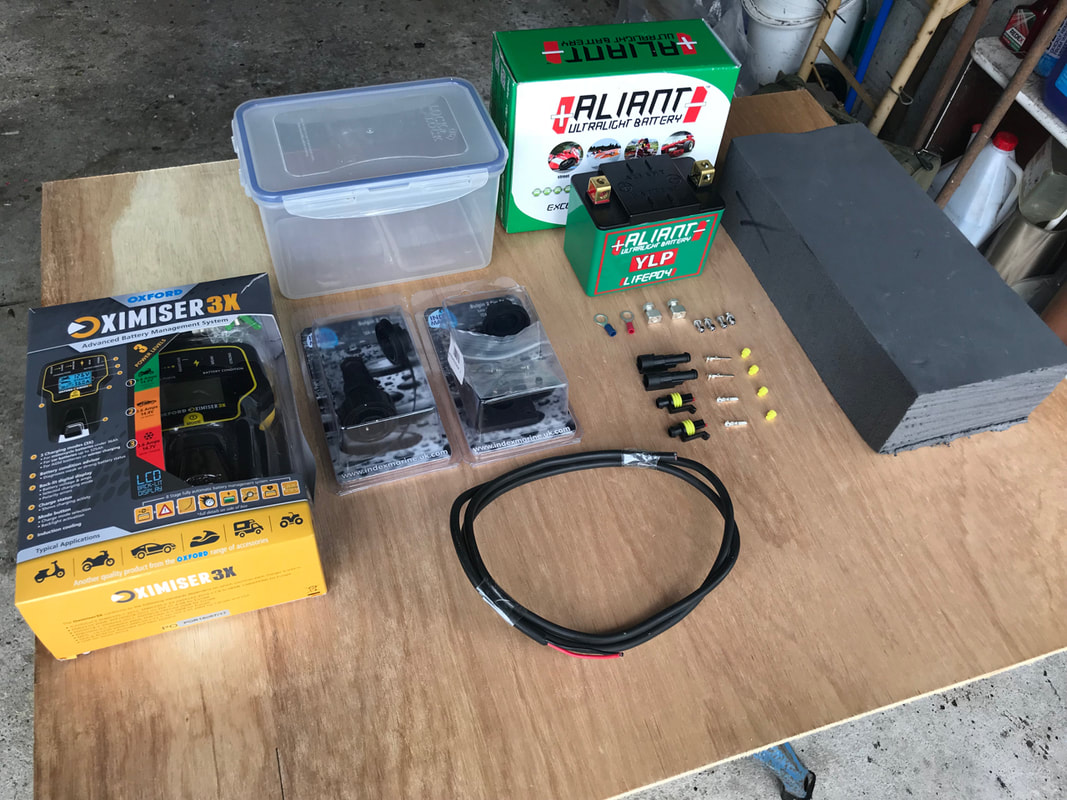 Making a Waterproof Battery BoxThe first step was to build the waterproof box to house the lithium battery. Previously i have used a Lock and Lock waterproof storage container to good effect as a battery box. I find the 1.9L HPL818 size ideal for the kayak and it would house the battery and wiring comfortably. 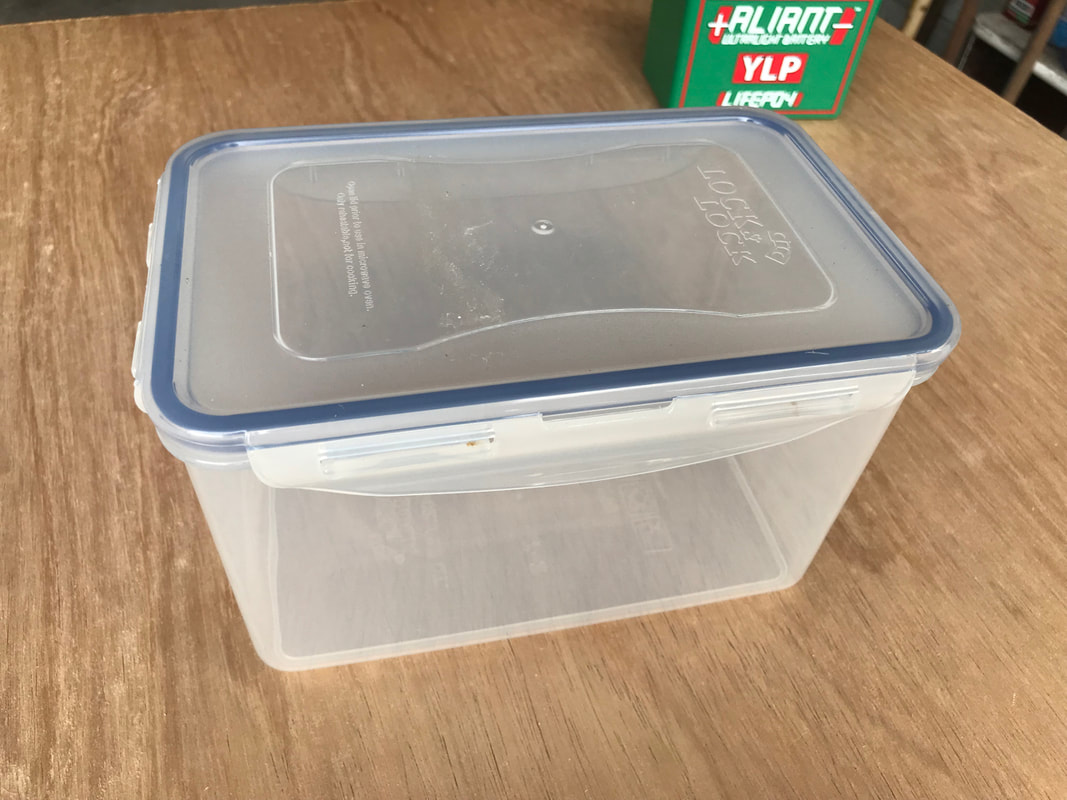 I would need a good quality waterproof connection between the battery inside of the box and the device connecting to it. I settled upon using a Index Marine Bulgin 2-pin Waterproof Plug and Socket. These components are made from glass filled nylon to military specification and are waterproof to IP68 rating, which is defined as resistant to submersion up to a maximum depth of 1.5m for up to 30 minutes. In the confines of my kayak hull, the Bulgin Plug and Socket should be just fine! 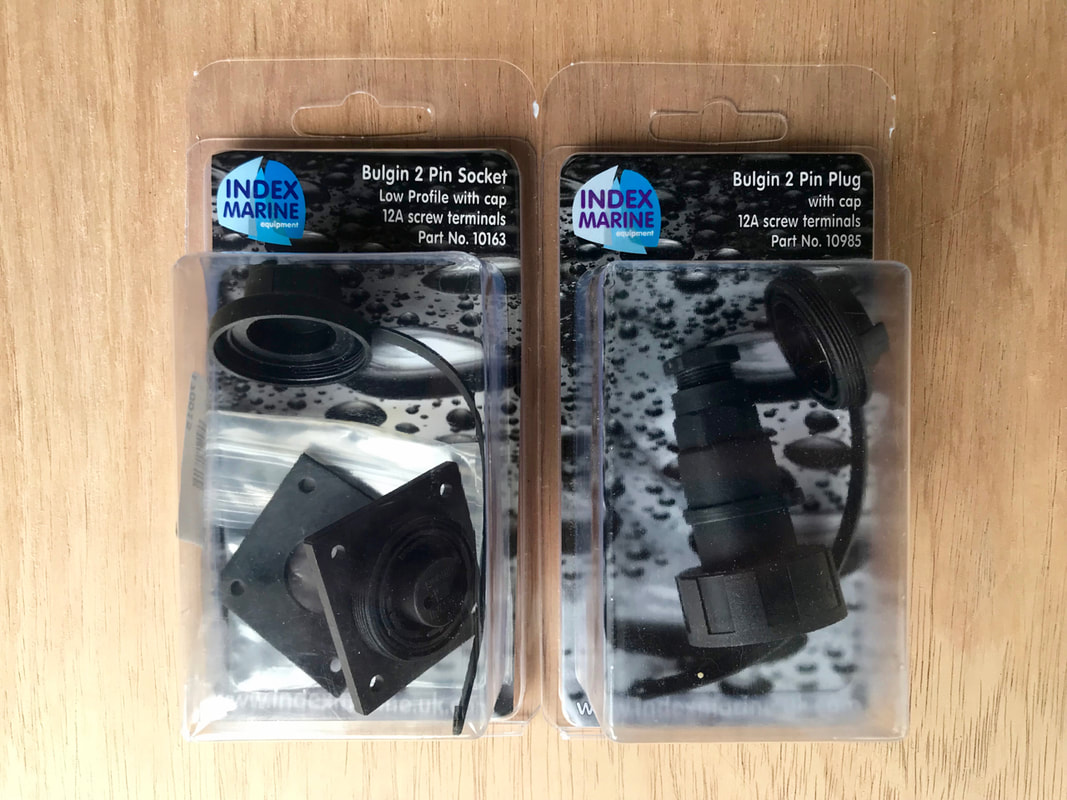 What i particularly like about these are the screw-on blanking caps to protect the plug/socket when not in use. Fish finder manufacturers need to take note of this... not many come with caps to protect exposed plug/socket terminals when not in use. This means i can seal off the socket on the box when not in use, maintaining its waterproof integrity, and also seal off the plug that will be left inside the damp salty environment on the inside of my kayak when not in use. The socket also comes with a rubber gasket for a good waterproof install onto a flat surface. 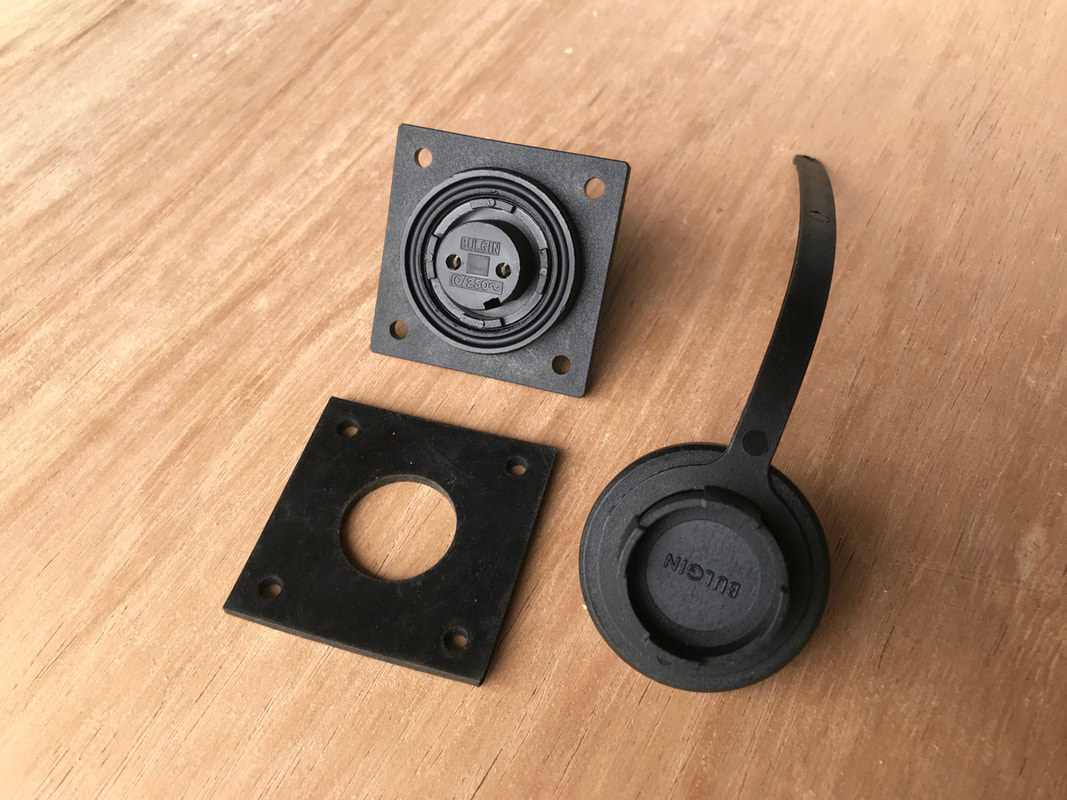 The topside of the blanking cap also doubles up as an assembly tool. Using it you can unscrew the socket to allow for wiring to be attached. 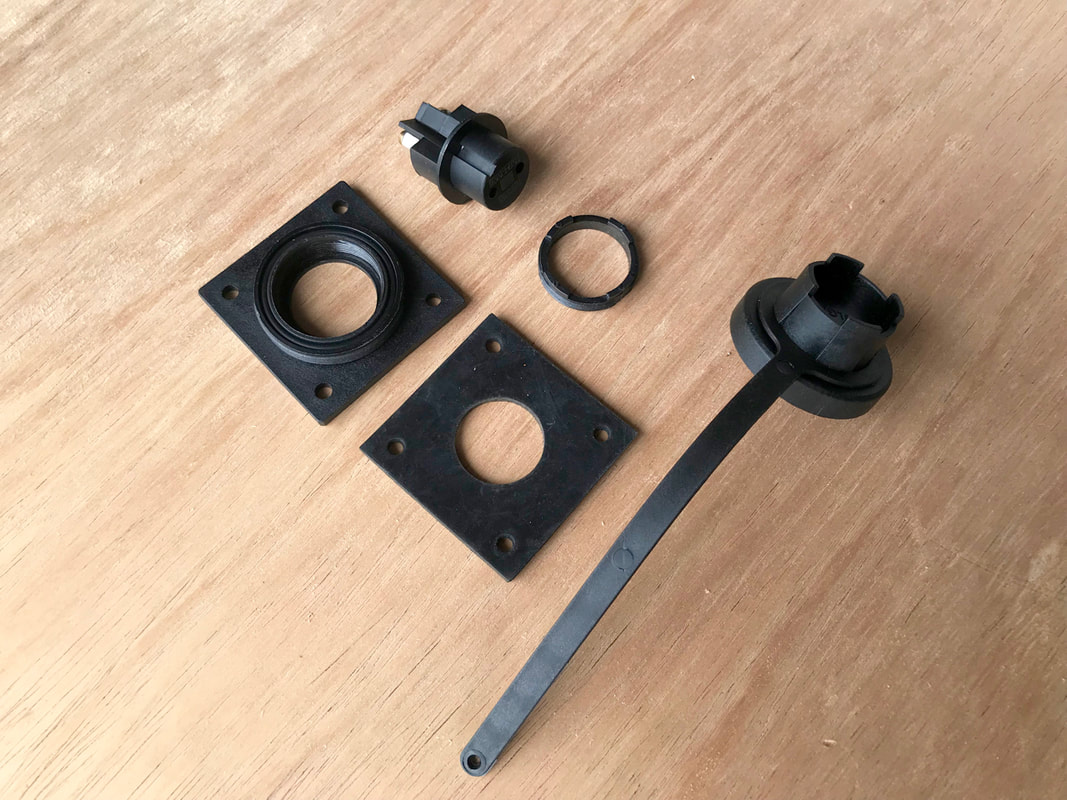 Before wiring, the socket needs to be fitted to the battery box. I used a 22mm hole saw to cut out a hole in the centre of the box lid. NOTE: the plastic is fairly brittle, so drill several pilot holes in increasing size before using a hole saw bit, to prevent cracking the lid. 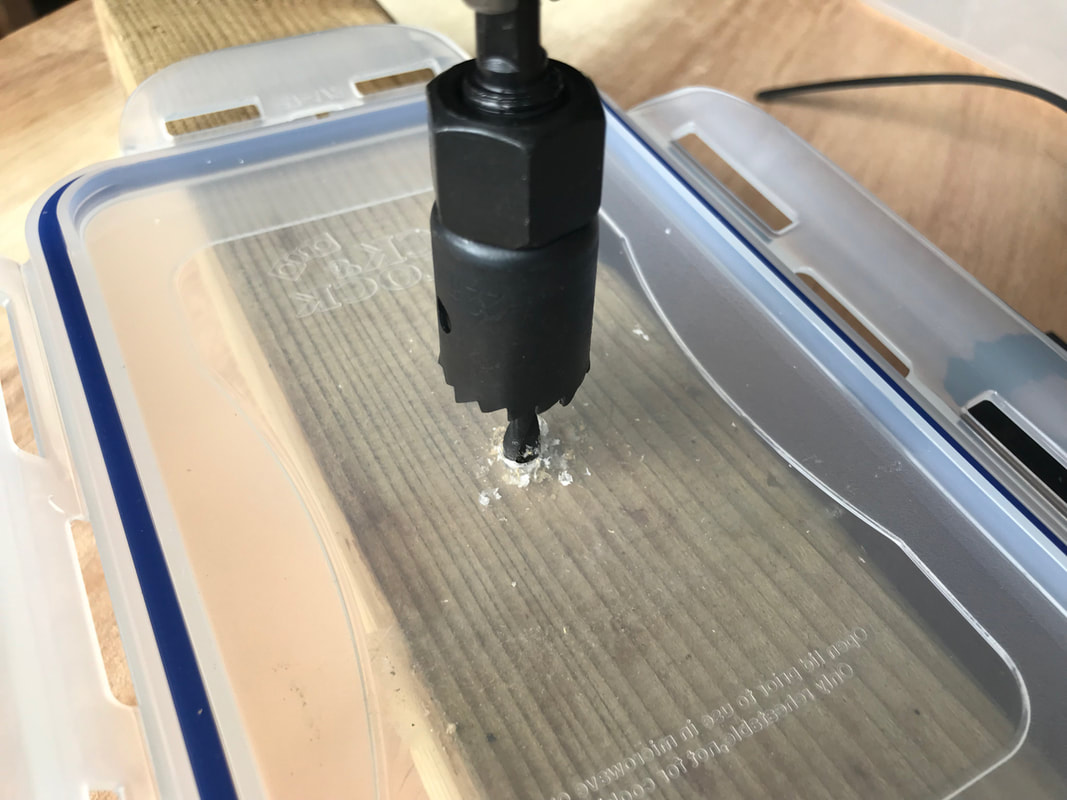 The rubber gasket can then be aligned with the centre hole and 3mm holes drilled for the bolts. 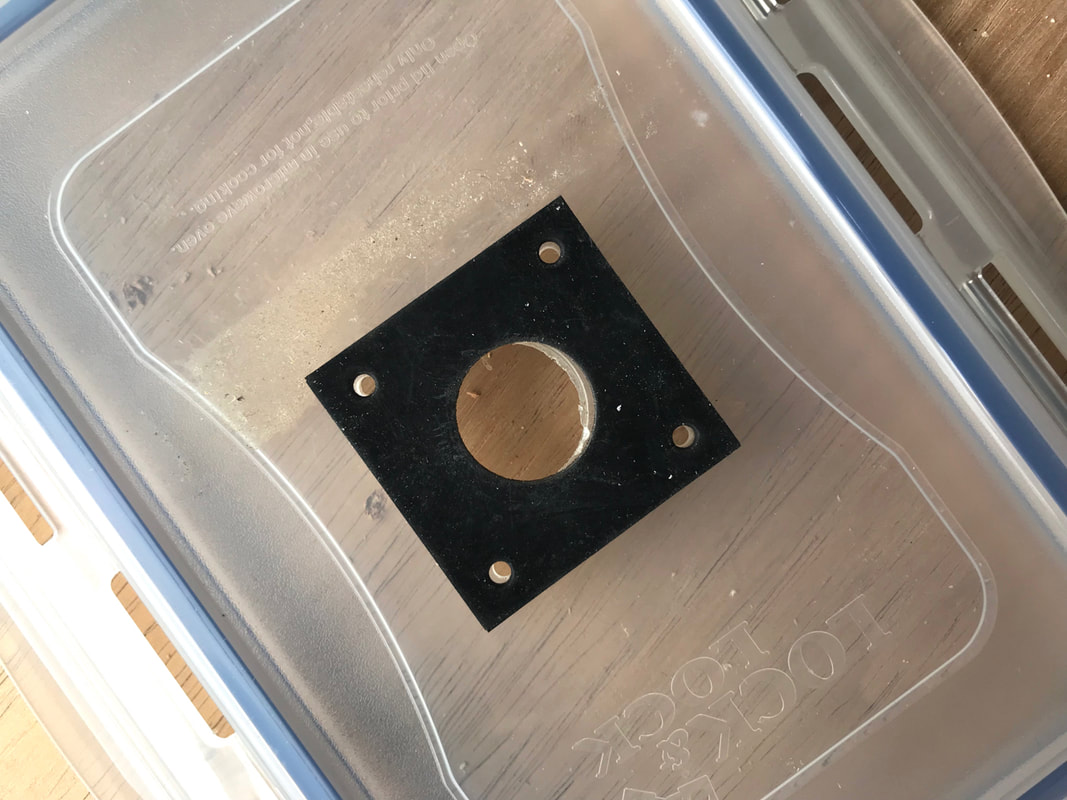 The bolts, washers and nyloc nuts can then be used to attach the socket to the box. A dab of sealant can be used between the rubber gasket and box lid to be extra safe.
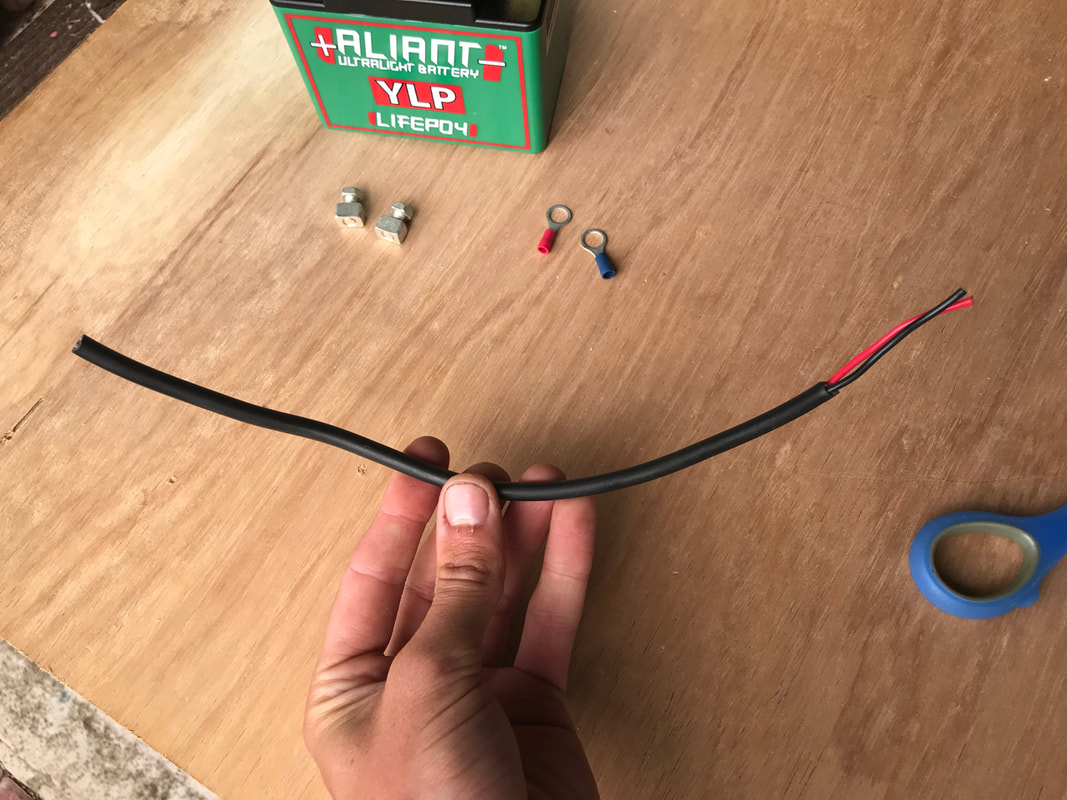
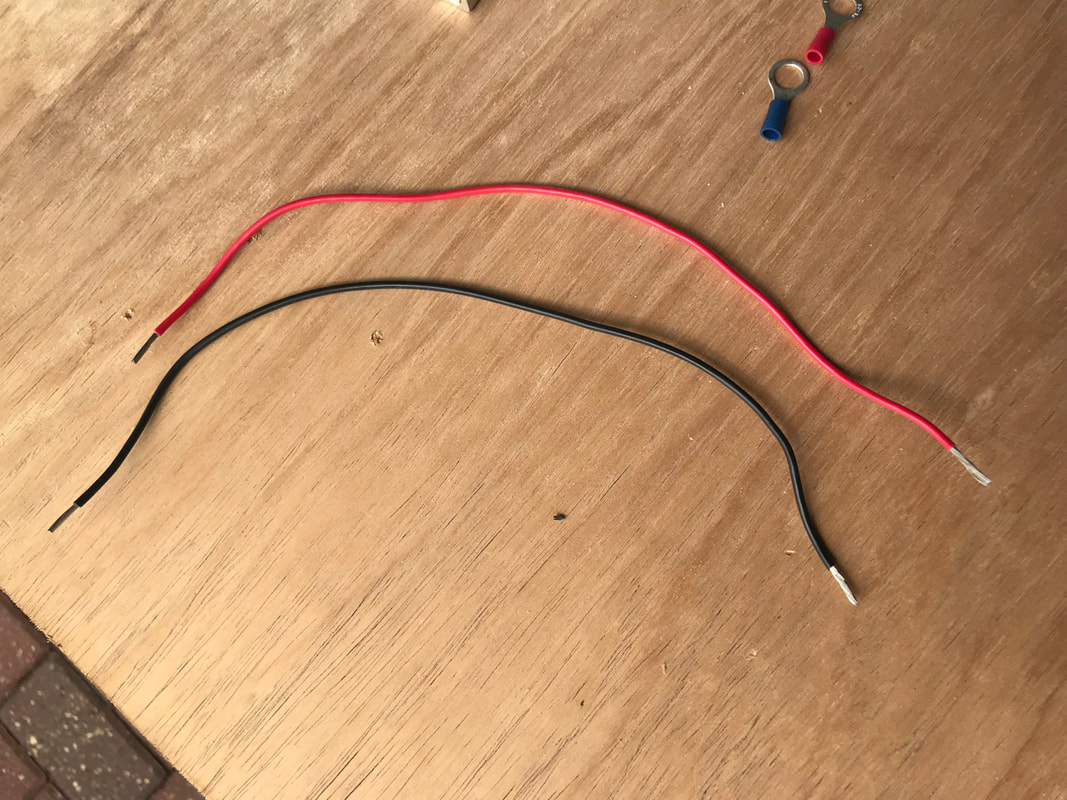
One waterproof socket fitted... 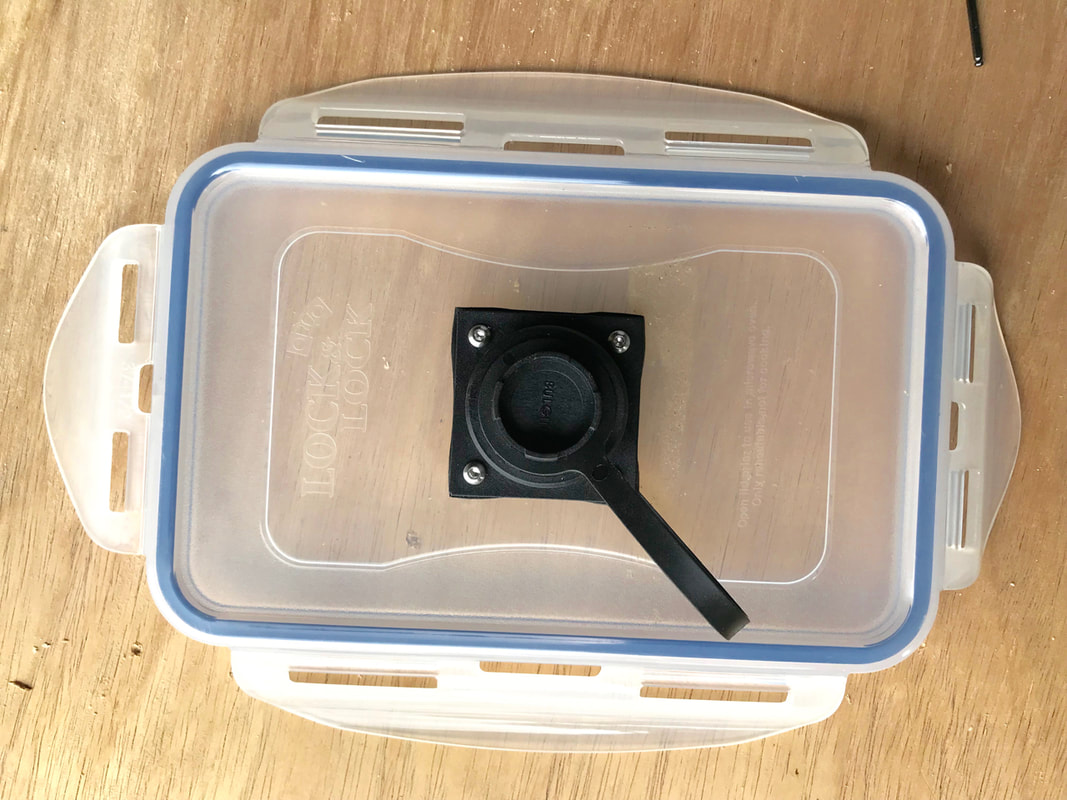 Wiring in the Lithium BatteryYou could straight wire the battery to the waterproof socket but then it would be permanently attached to the lid. I decided upon making it so i could disconnect the battery from the box. This serves two purposes - i could remove the battery completely from the box for charging, and if down the line i purchased a second battery for longer trips away (with no charging facilities) i could easily switch batteries within the box. To do this i have used AMP Super Seal 1-way connectors for 0.5mm-1.5mm wires (yellow seals). These are waterproof connectors, however they will be within the battery box so shouldn't ever be exposed to water. They are good wire connectors though. I opted for 1-way connectors over a 2 way connector to further minimise the risk of short circuiting. The positive and negative wires are connected via completely independent connectors rather than the same connector with little separation between terminals. Some easy and basic wiring is needed to set this up. Take a short length of twin core wire and carefully remove the outer black sheath with a blade or scissors, leaving the red and black wires seperated. Strip back approx 6mm of wire at each end of each section.
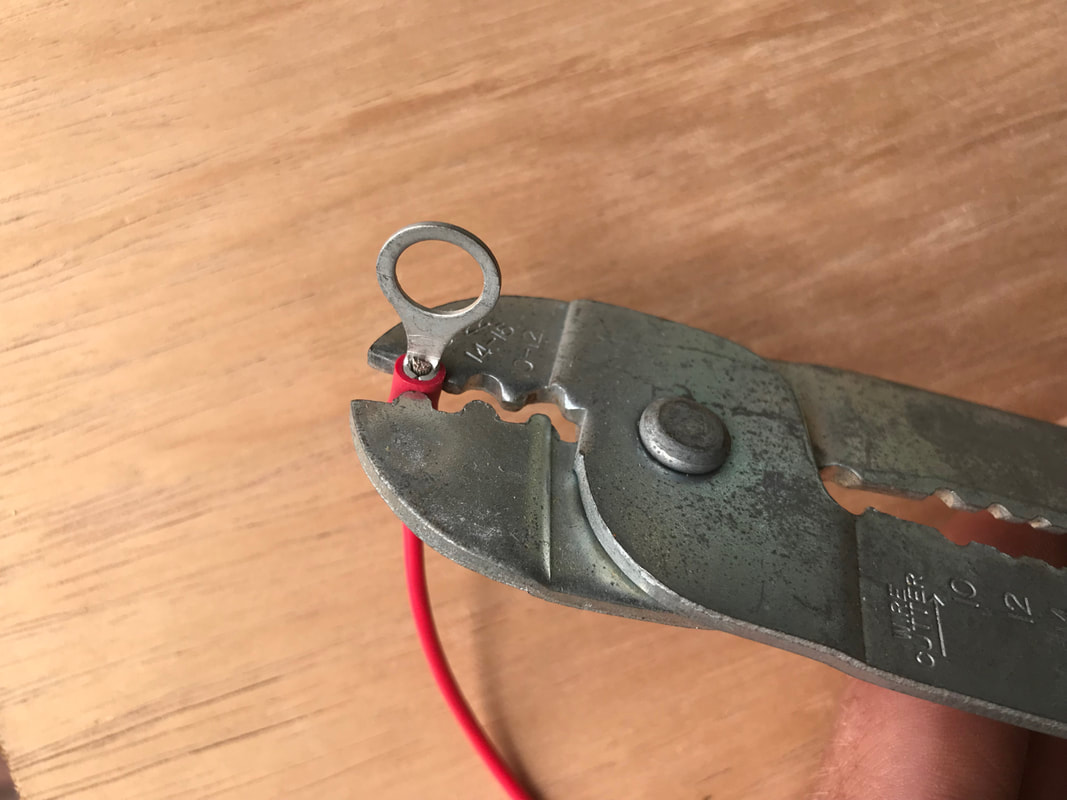
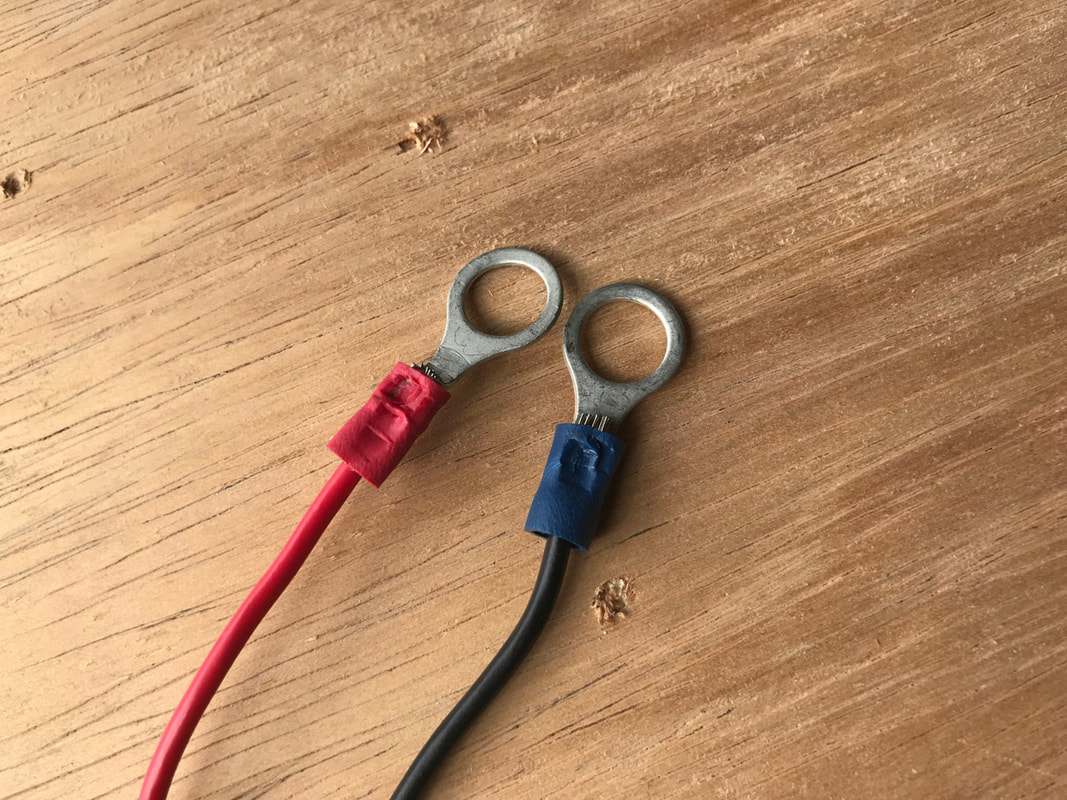
Crimp a ring terminal connector to one end of each wire.
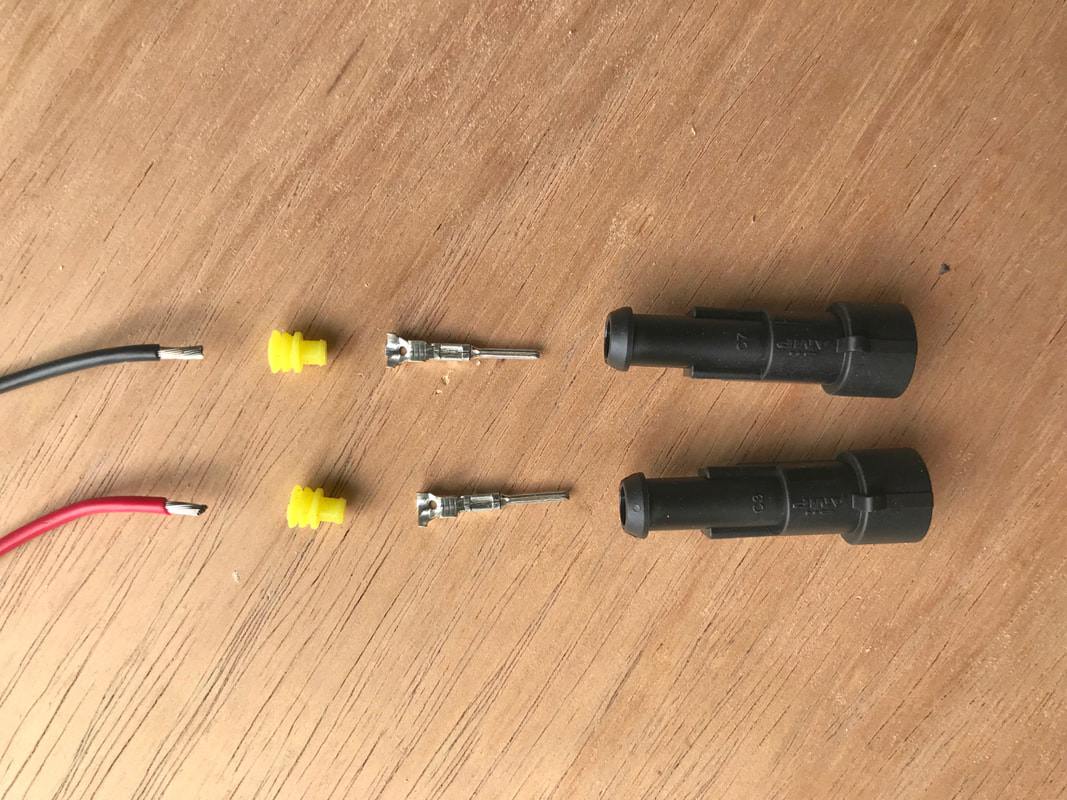
To the other end of the wires i fitted the male sides of the AMP 1-Way Super Seal connectors. These can be a little fiddly to fit. I brought a pack of 5 as i have in the past lost my temper assembling them and snapped a metal terminal - with 5 i have spares to play with! 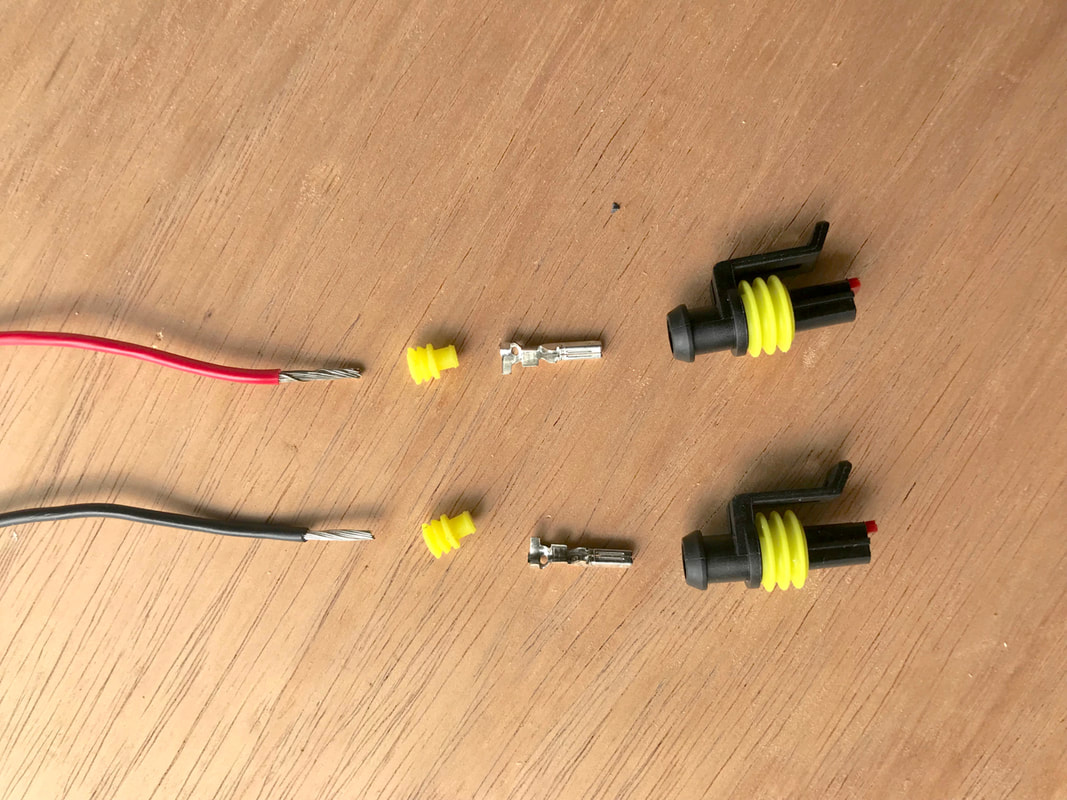 Firstly place the rubber gaskets over the wire, then carefully crimp on the female side of the terminal. 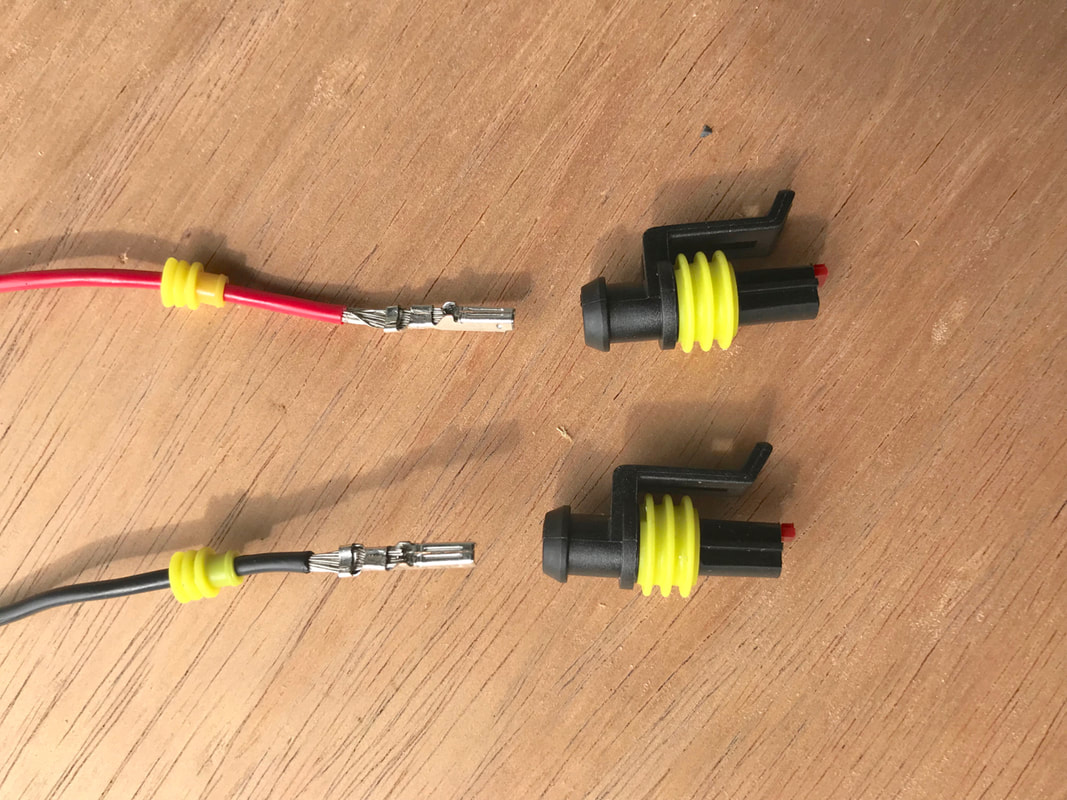 The female terminal then slots into the male connector which takes some patience to align correctly so that the metal terminal pushes completely into the connector. Once lined up and in position a red retainer on the end of the connector pushes in to lock the terminal in place. Gently pull on the wire - it the terminal moves out then it is not locked in place and you will have to pull out the red tab and re-try. Once locked in place the rubber wire gaskets then push into the connector to form a seal. 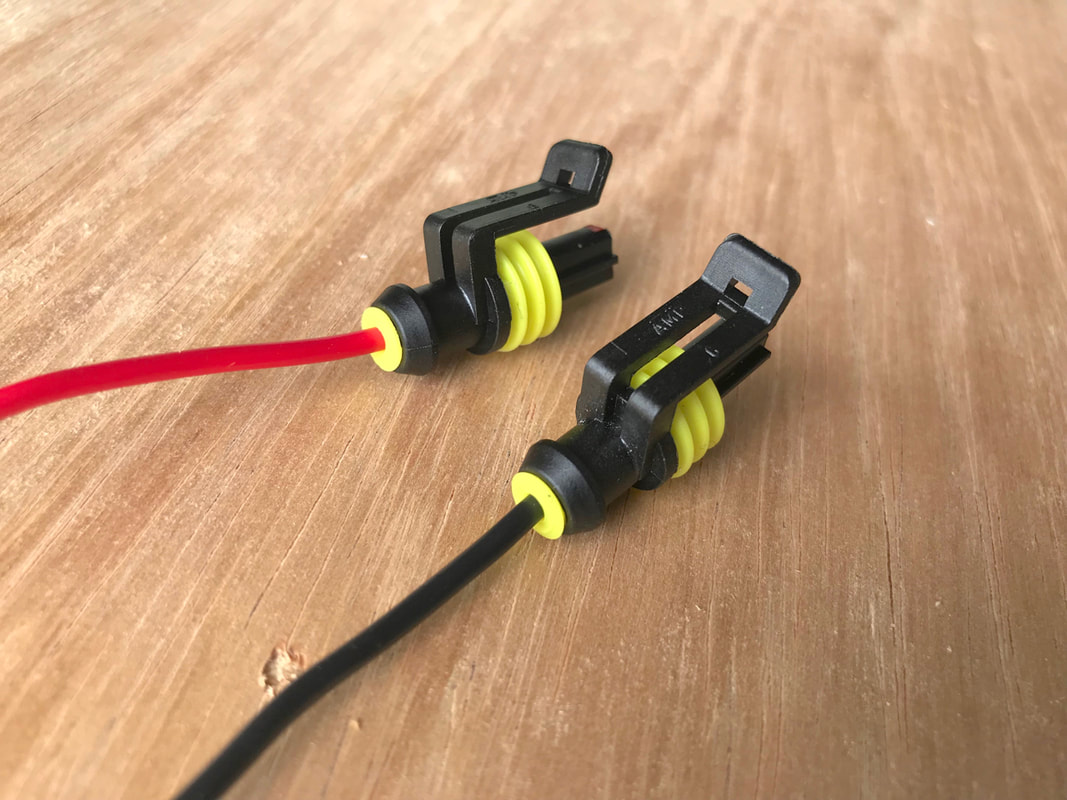 The wires now have a ring terminal at one end and the male Super Seal connector at the other. 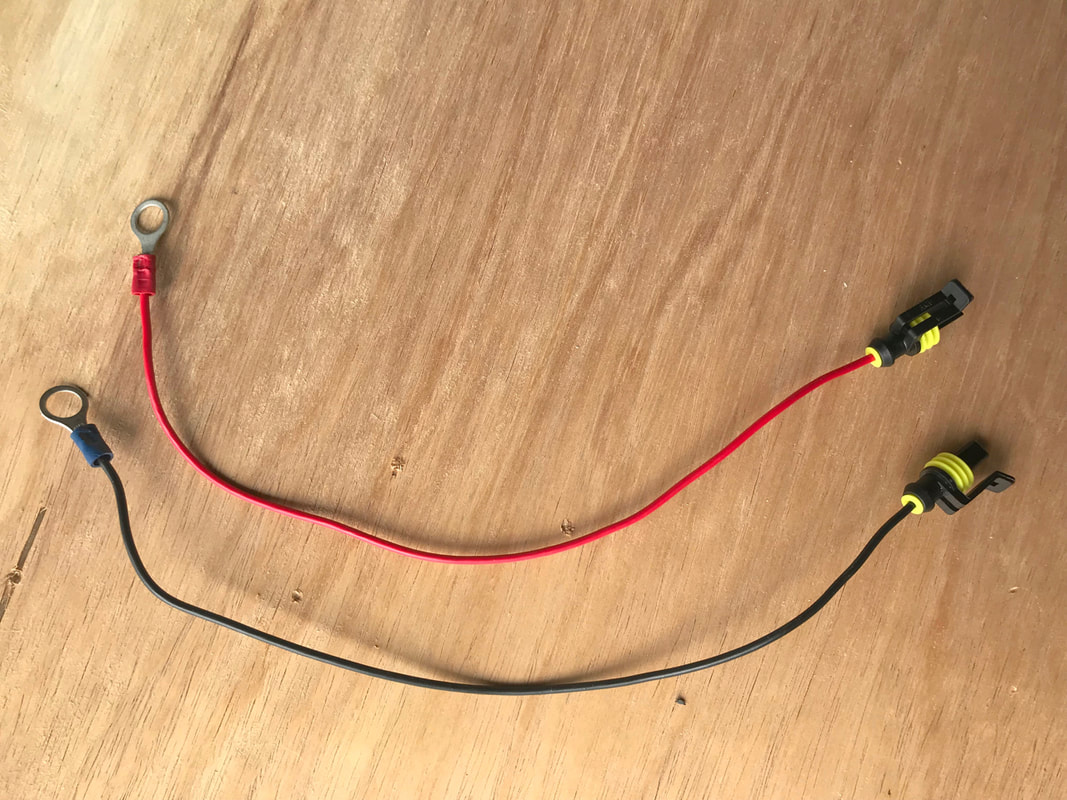 The ring connectors can then be attached to the terminals on the battery using the terminal bolts supplied with the battery. Red wire to red terminal and black wire to black terminal to make things easy and clear when connecting everything up!  That's half of the wiring done. Time to make the link to the socket in the lid of the box. 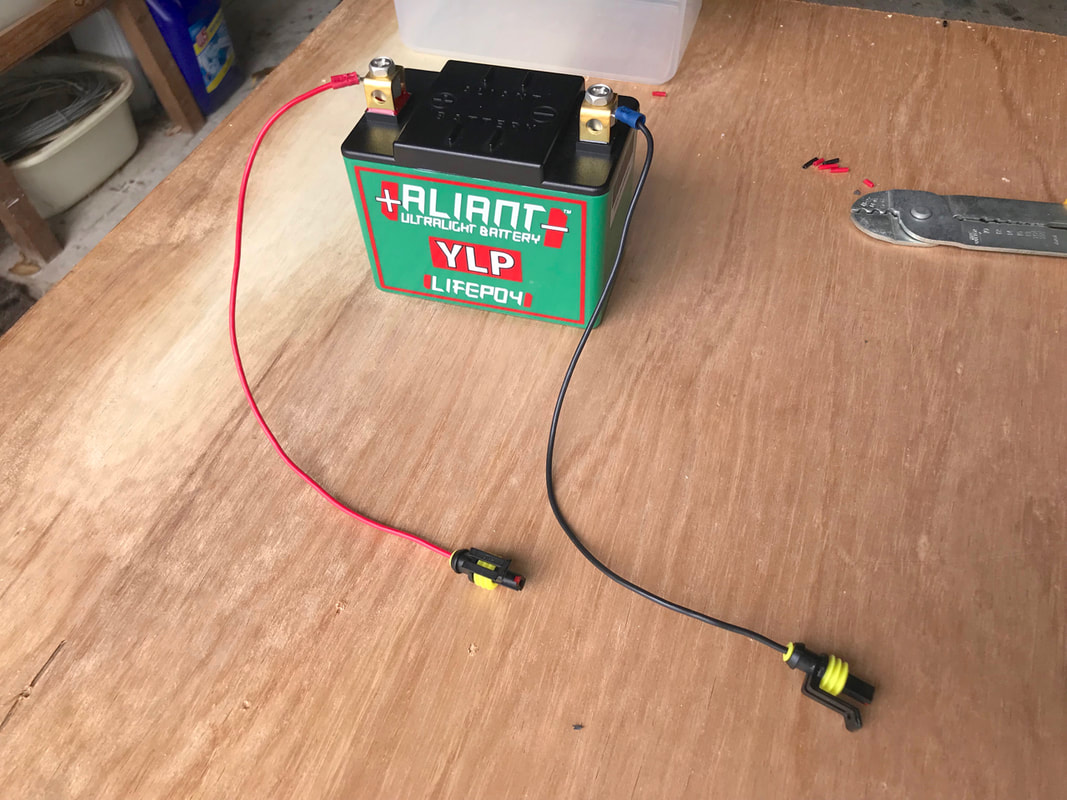 Take another short length of two-core wire and split into the red and black wires. Again strip back a few millimeters of wire at each end. 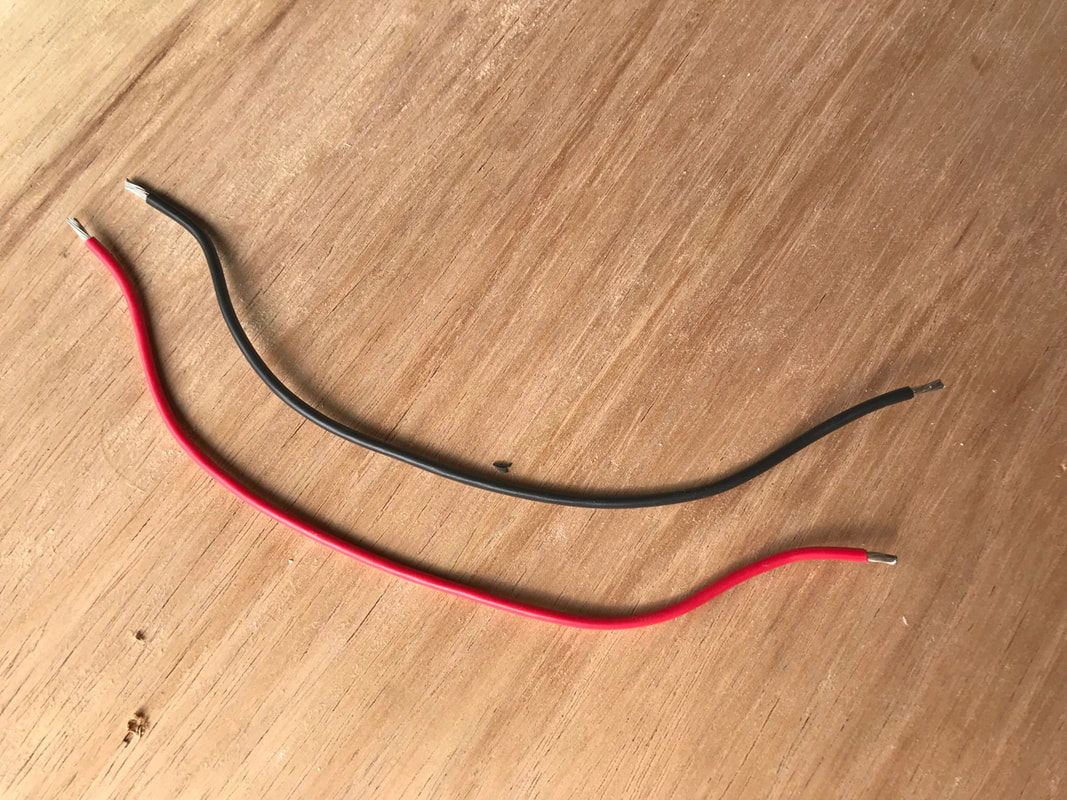 Fit the female side of the AMP Super Seal connector to one end of each wire - same protocol as the male side. Wire gaskets on, crimp on the male terminals, push into the female connector, lock into place and push the wire seals into the back of the connector.
The other ends of the wire can then be attached to the socket. The wire is held in place using screw down terminals for a strong fit. Take note of which side the positive and negative wires are attached to - the socket is marked for this so that they match up correctly with the wiring going into the plug from the device you wish to power. 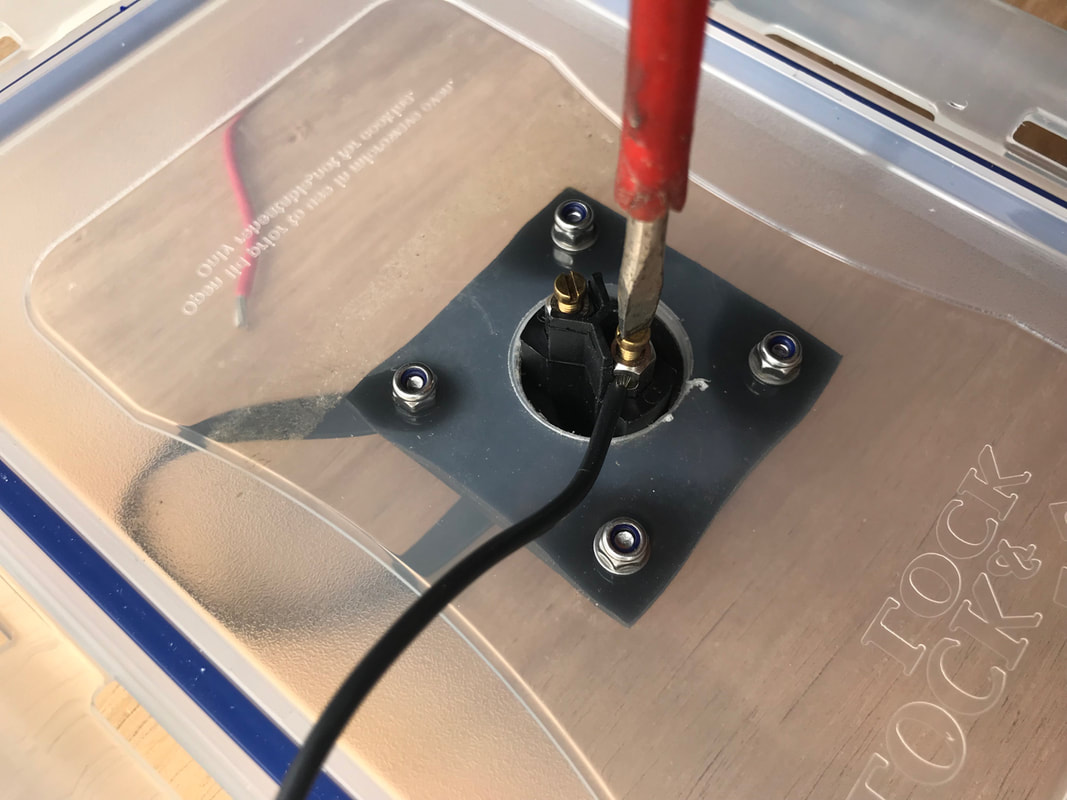 The socket is now attached to the two female Super Seal connectors. 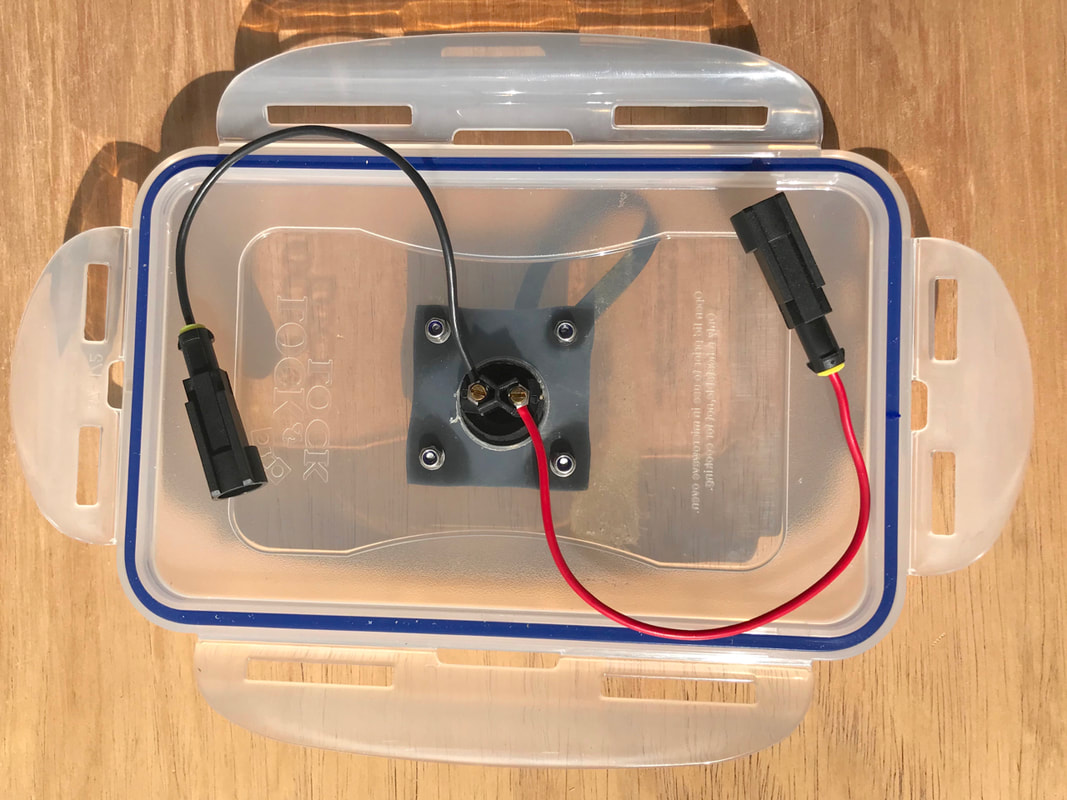 You can now connect the battery to the socket by connecting the super seal connectors like so.... 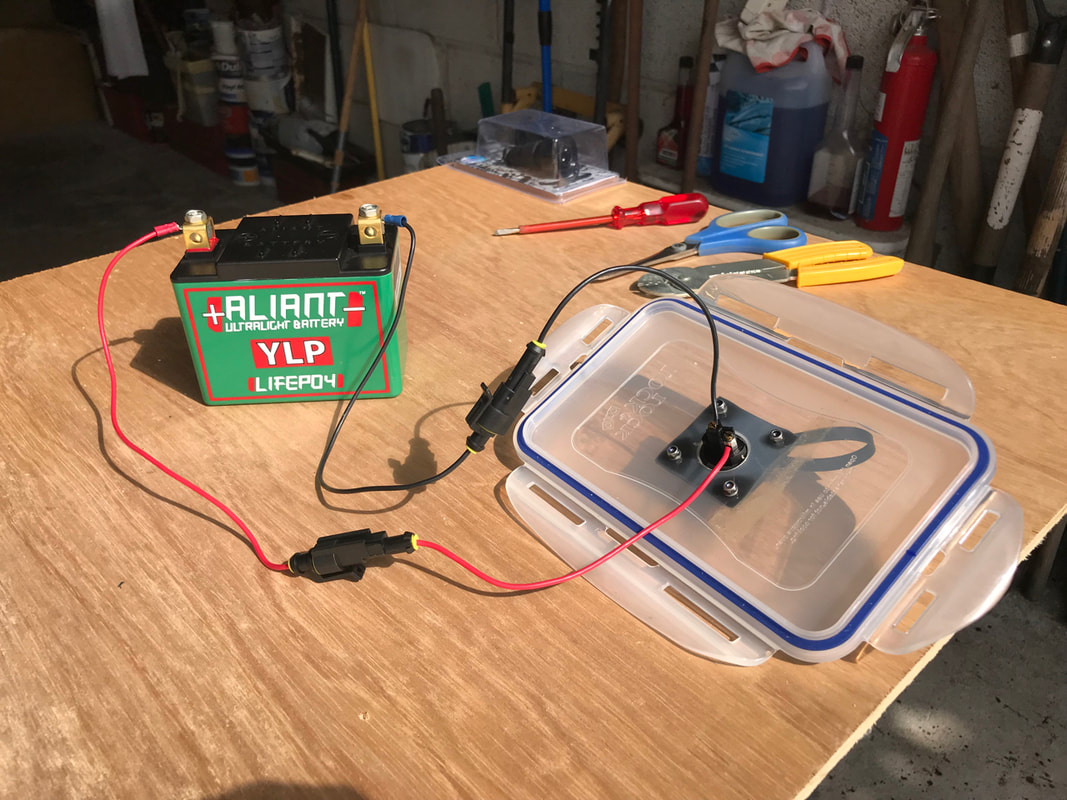 Now we are getting somewhere! To finish off the waterproof box i made a foam battery holder for the base of the box using a block of high density closed cell foam. You can buy thick blocks of this, or buy a garden kneeling pad as this uses this same foam.  I cut to shape using a hacksaw, sharp knife and scissors. It was trimmed to shape to be a good snug fit into the box and a good push fit for the battery into the foam hole. 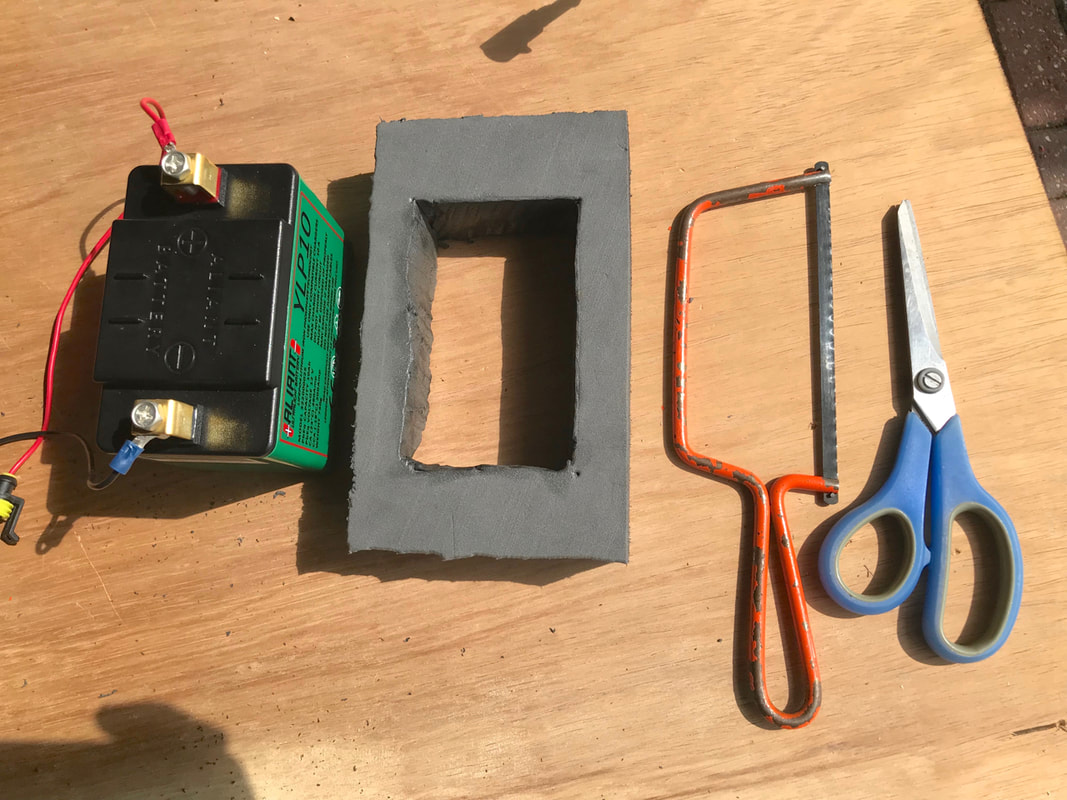 This serves to hold the battery in position and prevent it bouncing around inside the box potentially damaging the wiring or battery. 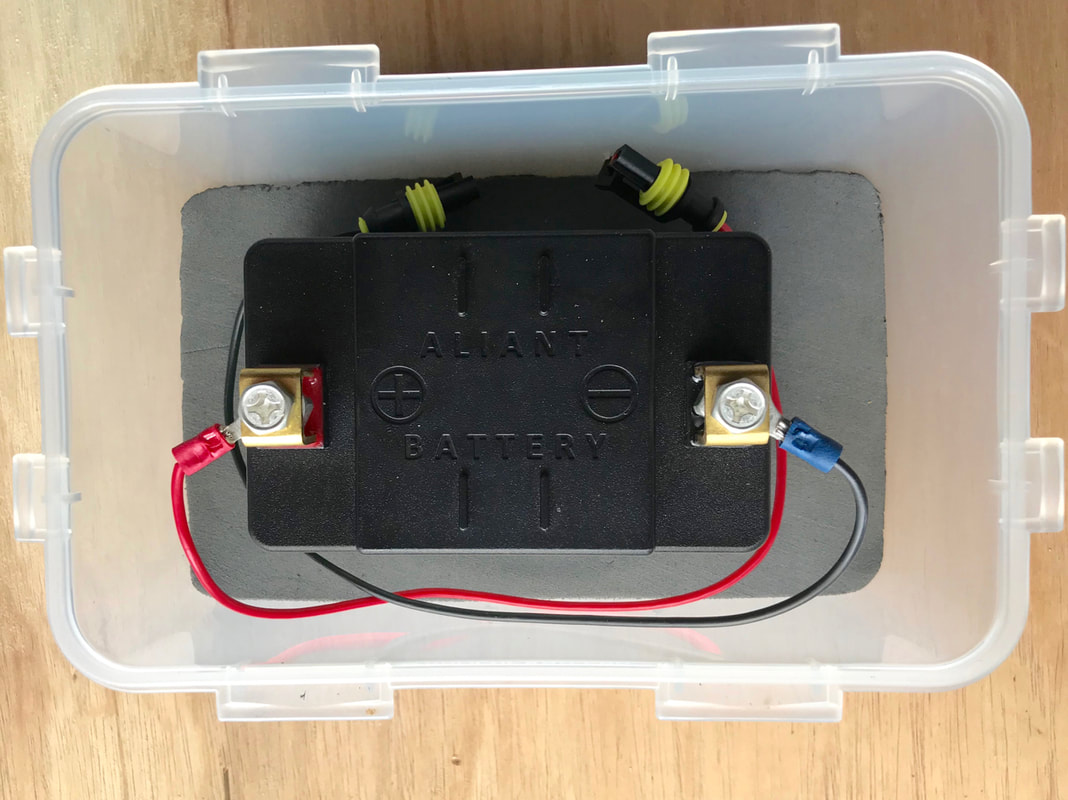 The lithium battery box is now complete! Waterproof and lightweight. 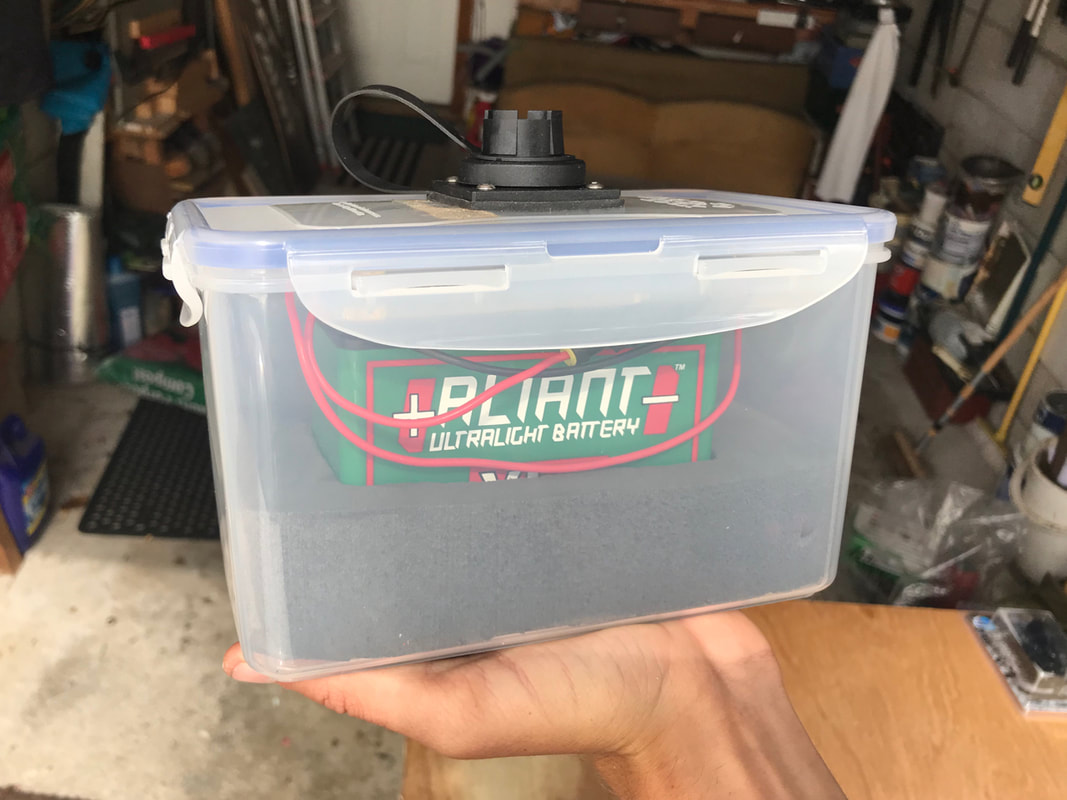 Fitting the Waterproof Plug to my Fish FinderIt was now just a case of fitting the Bulgin 2-Pin Waterproof Plug to the power cable of my fish finder. The plug comes with a screw-on cap to protect the terminals when the plug is not connected to the socket. As with the socket, the cap doubles up as an assembly tool and the top side features notches which can be used to unscrew the plug to gain access to the terminal connectors inside. 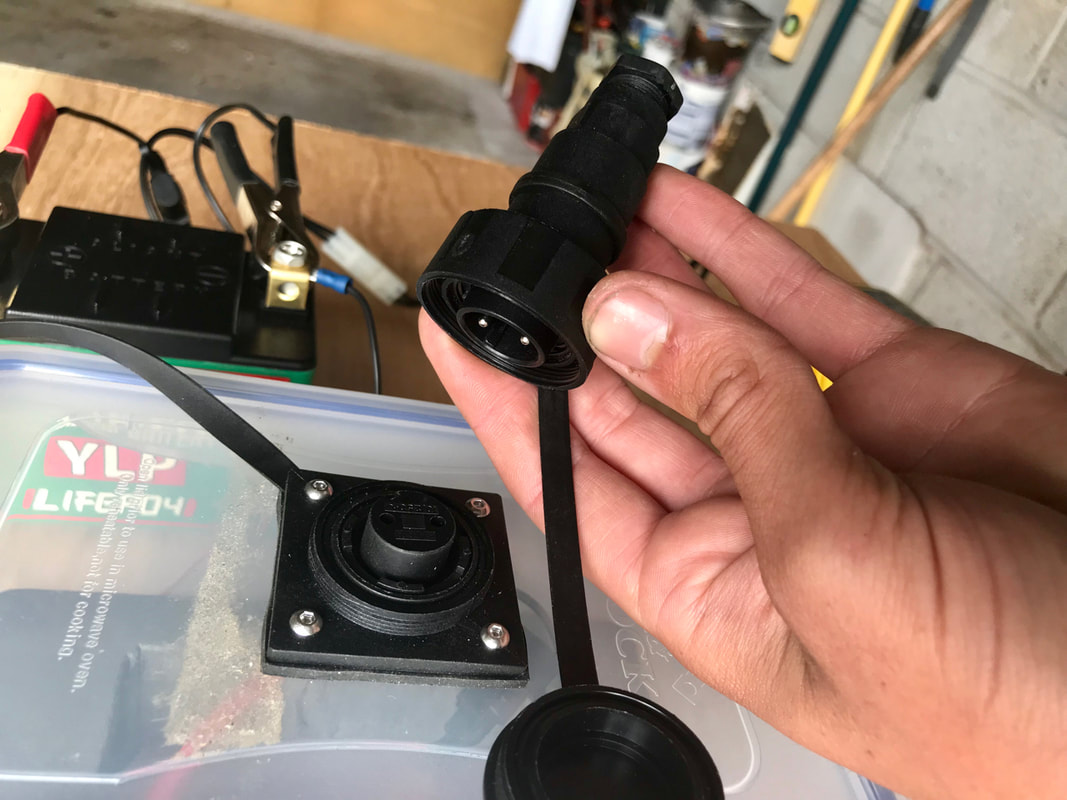 The top of the plug features a cable gland with rubber grommet which tightens around the cable running to the terminals as you tighten up the plug during assembly. 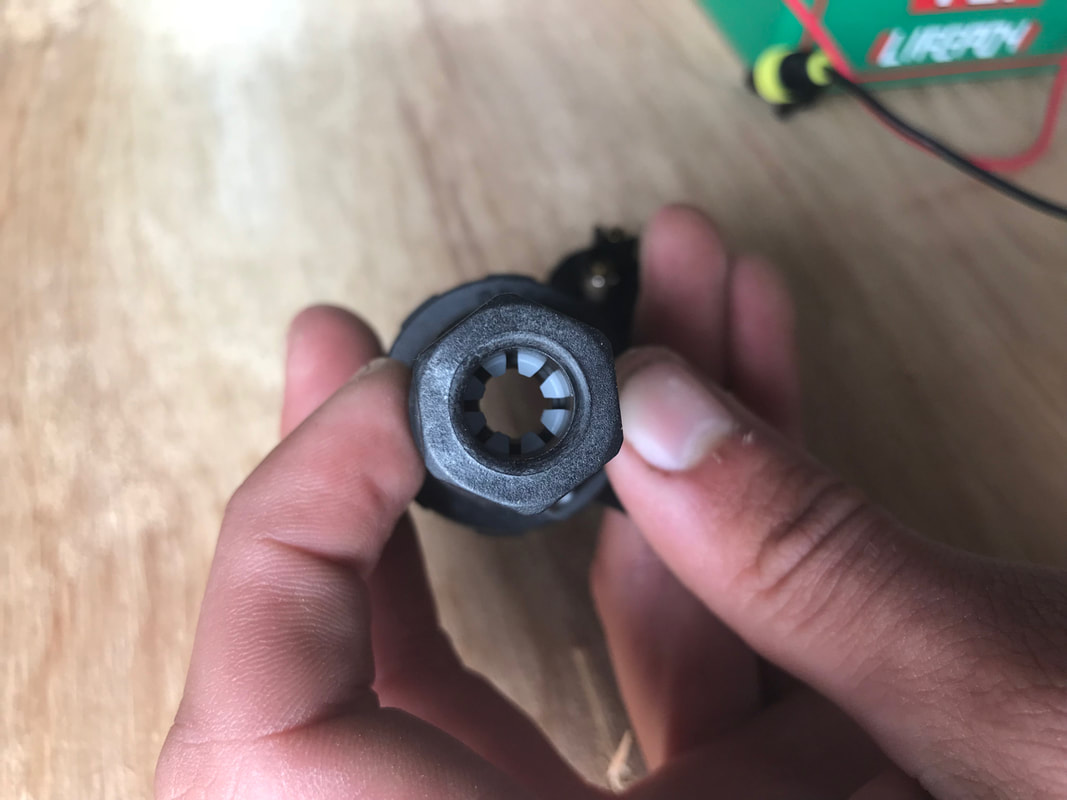 Assembly is straight forwards. Firstly dismantle the plug down to it's components. The top cable gland section doesn't necessarily need to be dismantled but i have done so in the below image for full component clarity.  Feed the cable through the gland at the top of the plug. Strip back about 1-2inches of the outer sheath from the end of the power cable on the fish finder, revealing the red and black wires. Strip about 5mm back from the ends of each of these too. Place the wire into the screw-down terminals on the plug and tighten up. Make sure you connect the wires to the correct pins to correspond to the equivalent terminal on the socket - positive to positive, negative to negative. The plug also features a notch so that it can only be plugged into the socket in the correct orientation. 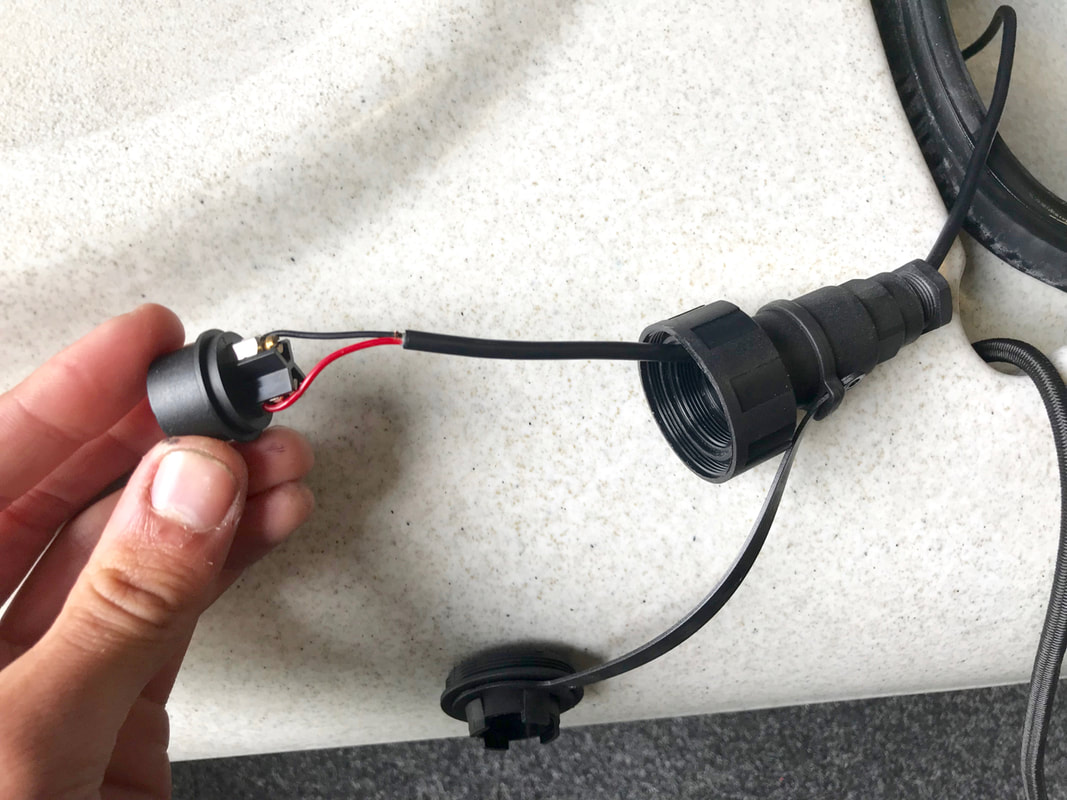 The terminal block can then be placed back into the plug housing, and the screw on retainer fitted using the cap to hold it in place. The top cable seal section can then be tightened down to seal the rubber grommet around the cable, waterproofing the plug. I smeared a dab of sealant around the wire where it exits the top of the plug for extra waterproofing. The plug can then be placed into the socket, and the rotating collar screwed down securing the plug to the socket with a waterproof seal.  Testing time and it all works as planned.... hurrah! 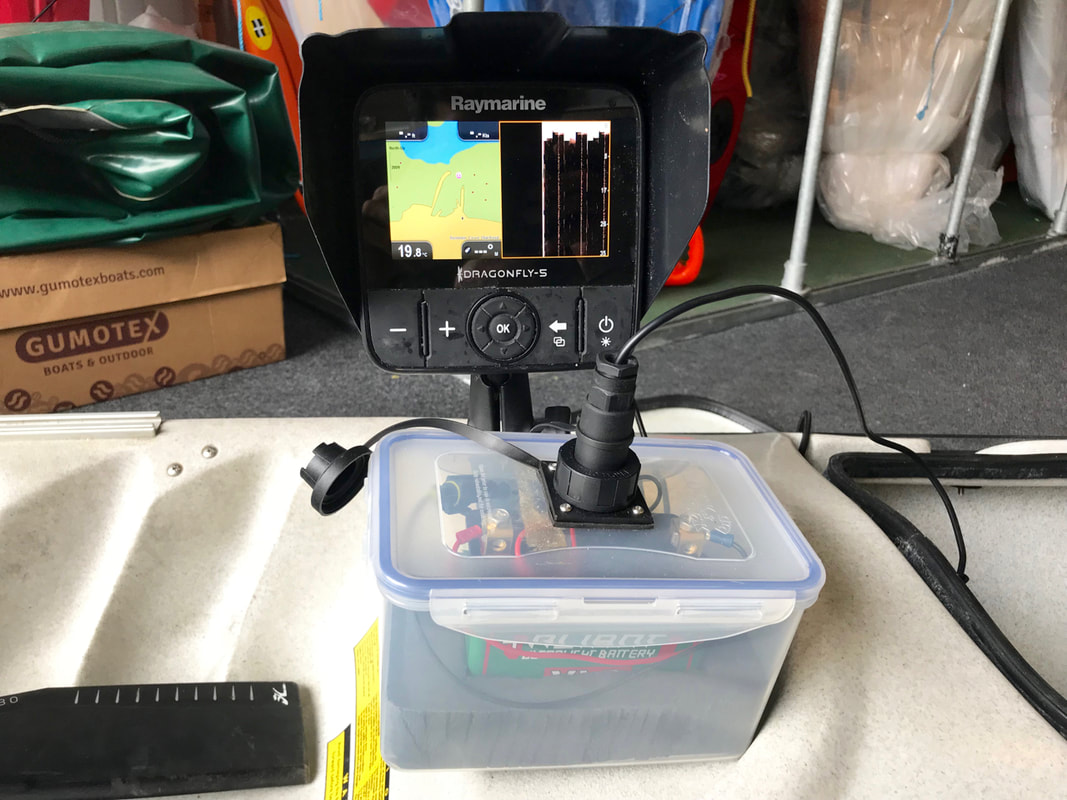 Charging a Lithium Iron Phosphate BatteryLithium batteries require a specialist charger to prevent the risk of damaging the lithium cells, which could potentially cause overheating and combustion or explosion. I settled upon the Oxford Oximiser 3X Advanced Battery Management Charger for the job. 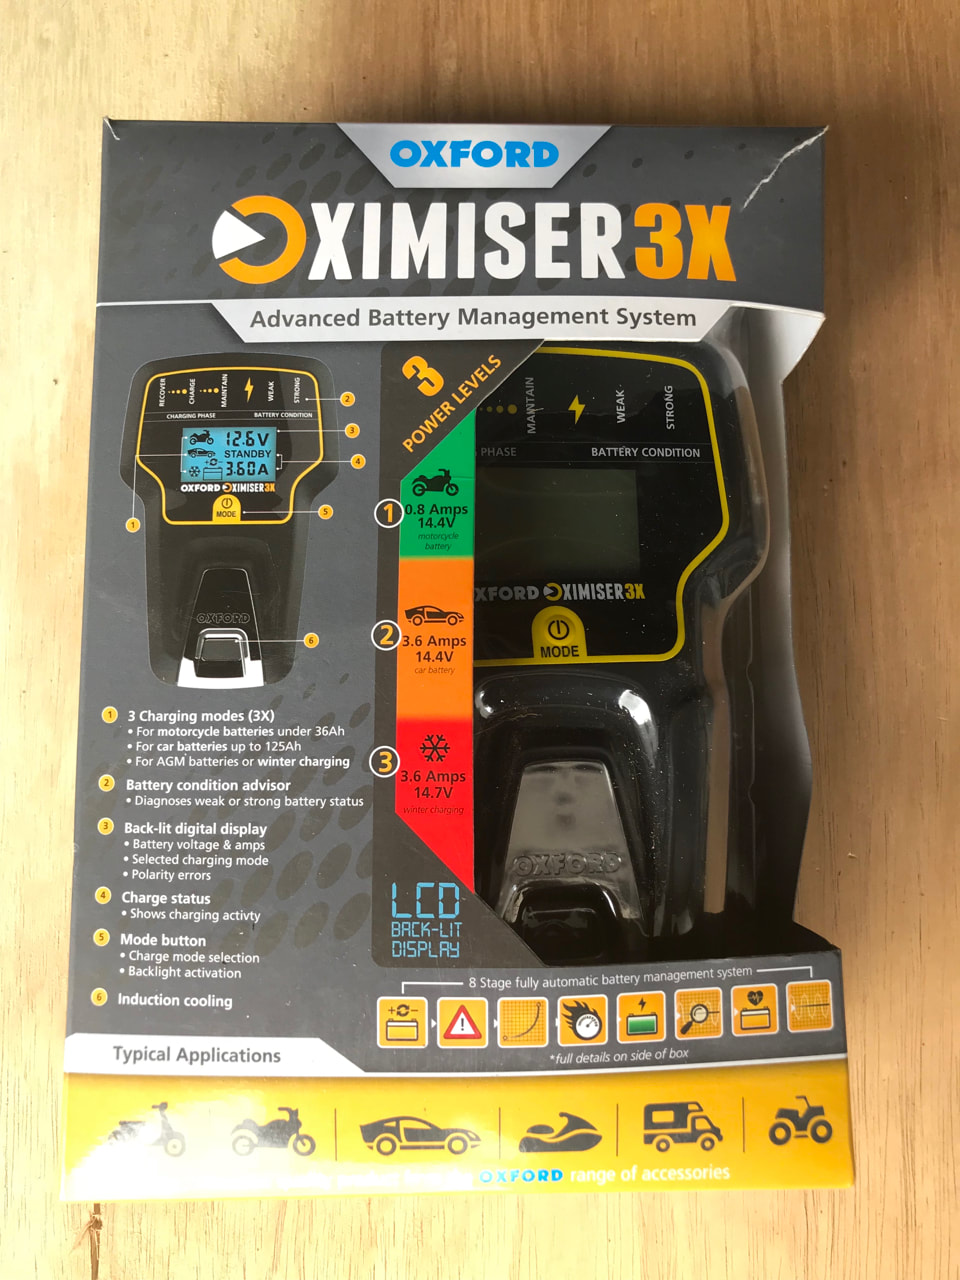 This charger is quite clever and is suitable for all 12V automotive batteries, including Lithium LiFePo4 motorcycle batteries, such as the Aliant YLP battery i have used. The charger offers an automatic 8-stage battery management system with three charging modes:
The motorcycle 0.8A 'trickle' mode will be ample for charging the small Aliant YLP10 battery - although the battery itself does state that the max charge current that can be used is 10A, so for faster charging the car 3.6A mode could be used. As the YLP10 holds the equivalent charge to a 10Ah Lead Acid battery, i'll stick with using the motorcycle mode for batteries up to 36Ah. Another point to note is that Lithium batteries can be damaged if continually trickle charged i.e. never disconnected from the charger and continuously charged as it's discharged with use. As i will be disconnecting the battery once charged, discharging the battery during use and then re-charging the battery there should be no issue. The charger automatically checks the polarity of the battery connection before charging to prevent cross-charging the battery. The charger also analyses the condition of the battery as either 'weak' or 'strong'. The charger provides a 'soft-start' to carefully recover deeply discharged batteries, and then offers a 'bulk fast charge' to quickly charge to 85% capacity and then an 'absorption charge' to bring the battery to a full 100% charge. Once the battery is charged the charger will gently maintain the battery at full charge until it is disconnected. All the info is displayed on an backlit LCD display for ease of use. Its not a cheap charger though but i managed to pick one up for around £60 online which i didn't think was all that bad. The charger comes with a couple of leads - one with ring terminals for permanent attachment to a battery or one with clips for easy attachment and removal from battery terminals, and this would be the one i would be using. It also comes with a wall mount holder too. 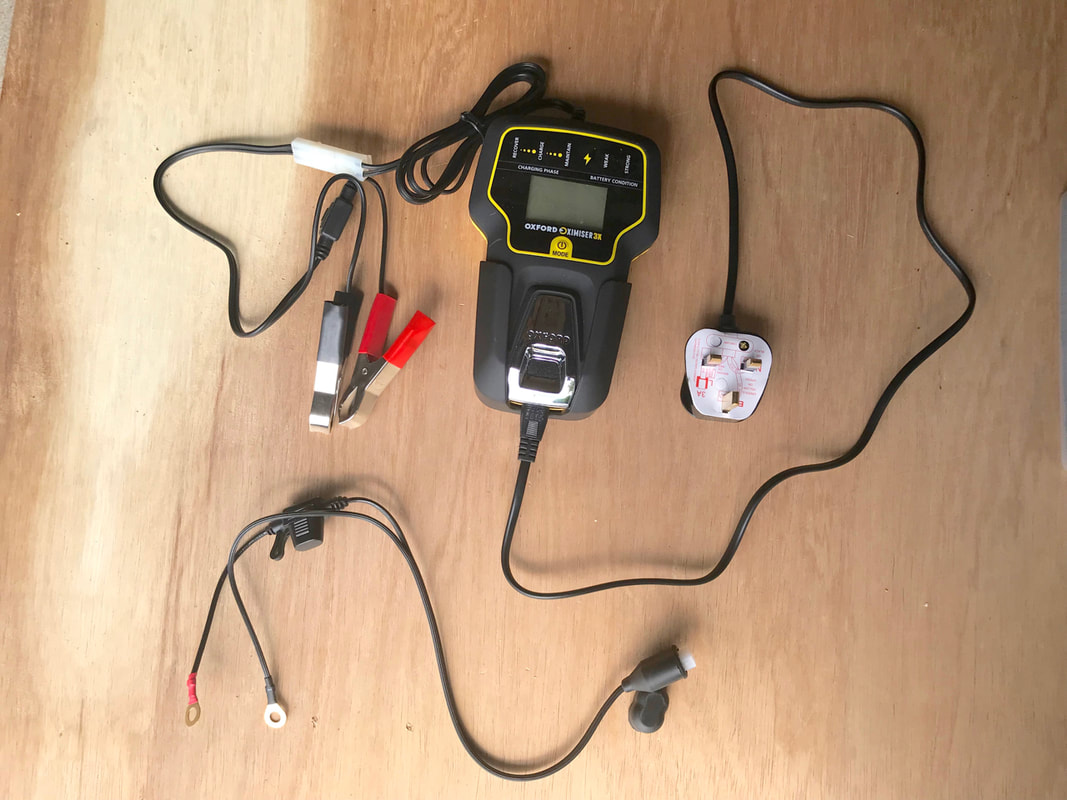 Simply plug it into the mains. Connect the clips to the corresponding terminals and turn the charger on. Press the power button to select the desired mode - in this case the motorcycle mode. Charging begins at 0.88A. 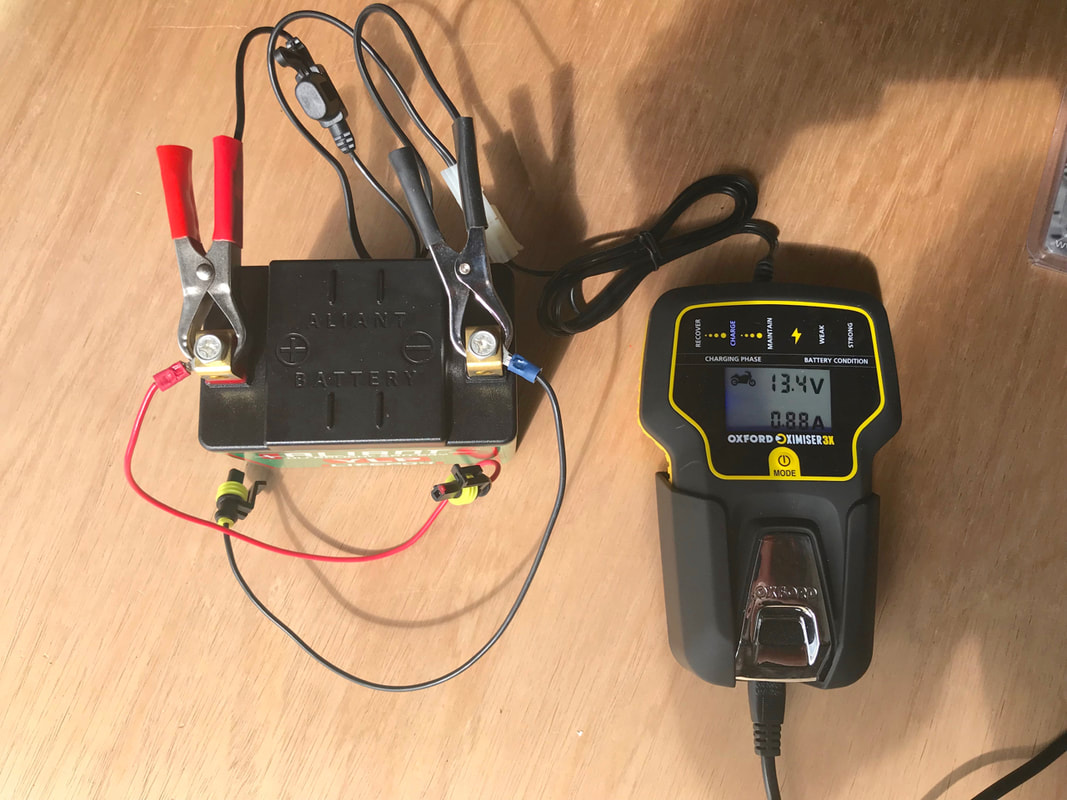 Once charged, the 'maintain' writing illuminates green and the charging amps drops to 0.23A to gently maintain the full charge until disconnected. This is a particularly useful function as Lithium Iron Phosphate batteries can be damaged if overcharged or continuously charged at higher amps. 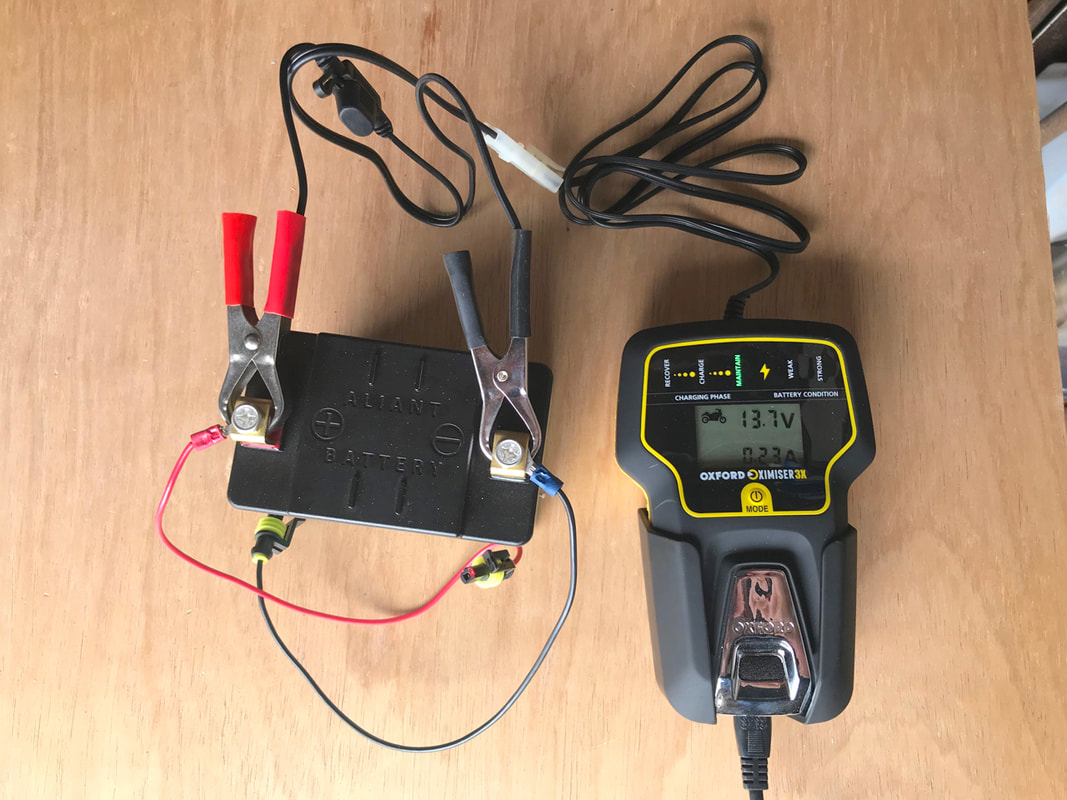 Turn off the charger, unclip the charging leads and the battery can then be connected back up to the battery box for use. Sealed Lead Acid Vs Lithium LiFePo4 Battery BoxThe waterproof lithium battery box is complete, testing has all gone well and i can safely charge the battery. So how much weight have i saved by using a LiFePo4 battery over a Sealed Lead Acid battery.... 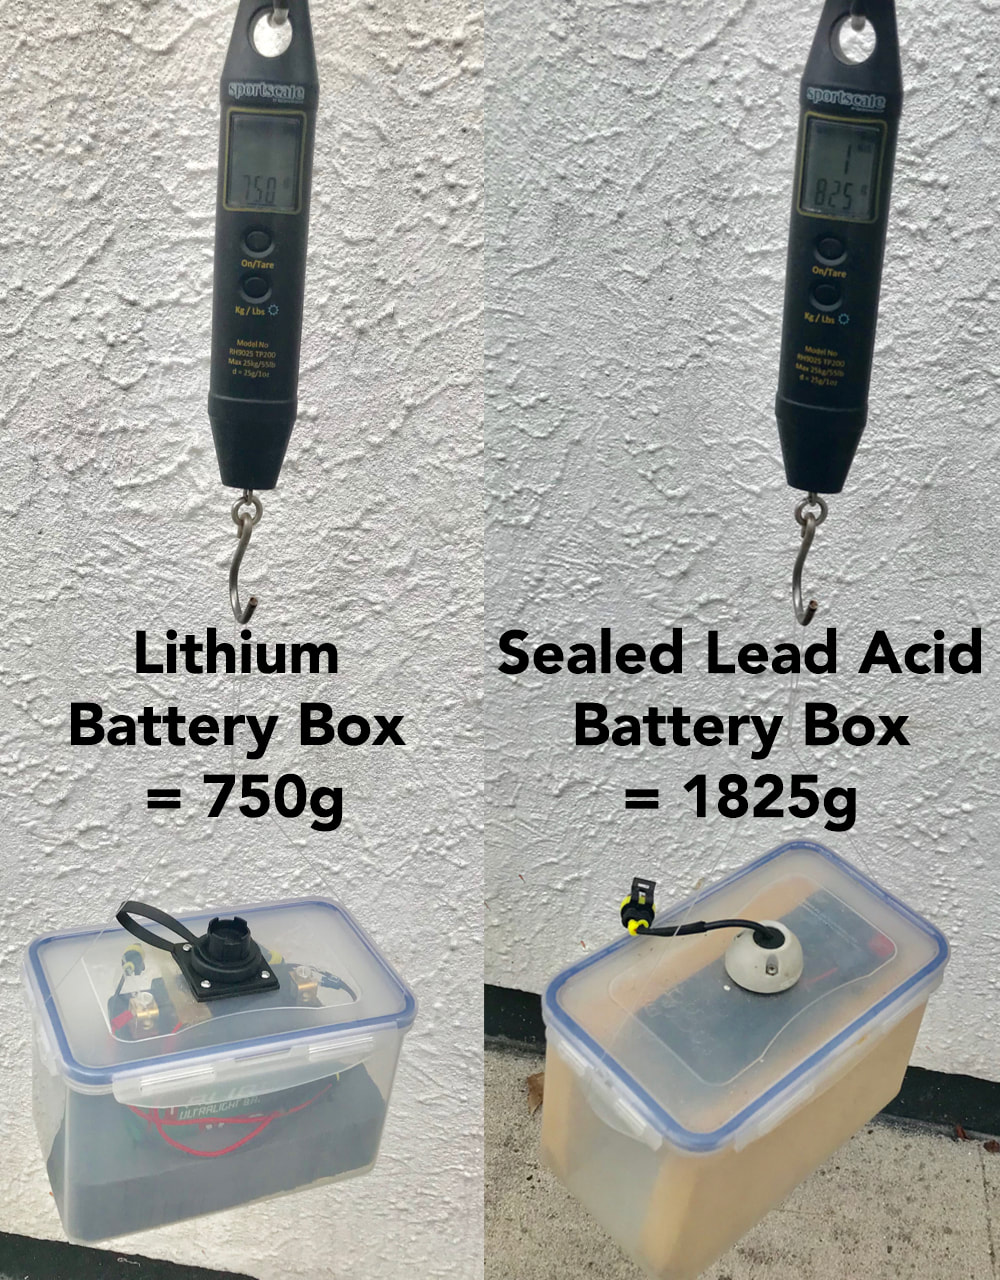 The complete Sealed Lead Acid battery box weighed in at 1825g compared to the complete Lithium battery box weighing in a 750g .... a weight saving of 1075g which is approx. 2lb 6oz and roughly equates to a 59% weight reduction. Just over a kilo of weight saving may not sound a lot but every little helps when hauling a heavy fishing kayak to and from the waters edge! Testing on the waterBefore use on the water I leak-tested the empty battery box by submerging it in a bucket of water and it remained 100% dry. I have been using the Lithium Battery Box since July and it has worked very well. The battery will comfortably power my Raymarine Dragonfly 5Pro for a full days fishing. I took the battery on a weeklong trip to Scotland and decided to see how long it would power my fish finder for before going flat. I managed about a day and a half before the fish finder reached low voltage before turning off - a total time of around 10-12 hours. This is ample for my day fishing trips. Aliant do produce larger batteries in the YLP range with the YLP14, YLP18 and the YLP24 which would offer longer run times for multi-day trips away from a charging facility, or to power larger and more demanding units. For now the YLP10 will be sufficient for my needs. Lightweight and compact, the lithium battery box easily fits inside the 8in hatch on my Hobie Revolution 16, however i choose to keep it in the bow hatch as there is a little more room there. With the lithium-ion cells housed within the sealed ABS battery casing and the battery housed within my DIY waterproof battery box, there is minimal risk of battery failure and/or short circuiting as a result of contact with water. The battery box is further protected by being placed within the hull of the kayak which is at worse damp and is unlikely to present a submersion scenario to the battery box. I feel confident that the lithium battery cells are suitably protected and the battery safe to use on my kayak. CostThe downside to a Lithium power source is the relatively expensive price compared to sealed lead acid batteries. The entire lithium battery box build cost around £190 compared to around £40 for a lead acid battery box equivalent. £150 for a 1075g weight saving.... it may seem a lot but i go kayak fishing enough to justify it and i'd happily spend that on a decent reel. I also launch from several unforgiving venues with steep slipways where at the end of the day you'd give anything for your kayak to be lighter when heading back to the car! FPV and Nocqua do offer ready-made lithium power solutions marketed for kayak fishing but these have to be imported from outside of the UK and this costs around the same as my DIY build if you want an off-the-shelf solution. My DIY Lithium Battery Box is proving to be a great addition to my fishing kayak and unless i encounter any issues, i can't see me reverting back to a sealed lead acid battery anytime soon! 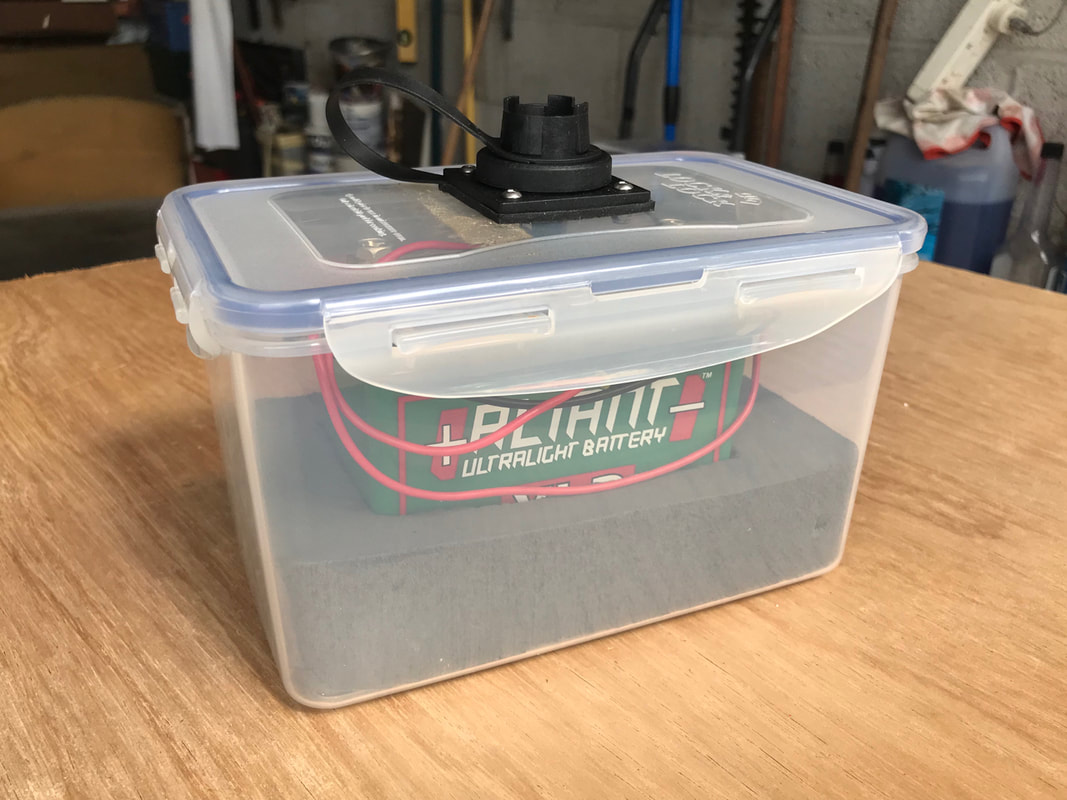 DisclaimerAs stated, caution and care must be exercised when using Lithium Power Sources in or around the aquatic environment. Lithium batteries can combust and/or explode if overcharged, or when short circuited which may occur when in contact with water. This article outlines a DIY waterproof battery box to house a lithium iron phosphate LiFePo4 battery for use on a kayak in the aquatic environment. I have outlined the method which has worked for me to waterproof the battery and i cannot be held responsible for any battery failure and any resulting damage/s which may occur as a result of your own battery pack build. I advise leak testing the empty battery box BEFORE using a lithium battery within it, by submerging the sealed battery box underwater and looking for water ingress. If water ingress is found then do not use the battery box, or seal the area that is leaking and re-test before use with a battery. Seek professional advice where necessary.
Alan
29/1/2019 20:51:47
Hi Liam,
Hello! Dear Client
Ian
3/6/2020 17:02:44
Thanks for sharing your expertise in finding a lighter power option for kayakers - really useful. I was wondering now that you have used it for about a year if you are still happy and if there was anything you would change or do differently? 6/6/2020 08:05:02
Hi Ian,
Michael O’Mahoney
21/11/2020 20:46:53
Thanks for a really informative and easy to follow article. I just bought a hummingbird helix 5 for my kayak which I use for ocean angling off Vancouver Island and this is exactly the solution I was looking for, however I will be using a 7 aH sla battery due to the higher cost of the LiOn type. Thanks again and “tight lines”. 6/2/2022 20:46:41
Hi - I was surfing and found this when I was looking for somehing else ! You have assembled the pins incorrectly with regard to the seals - this picture shows how they should be: Comments are closed.
|
AuthorLiam Faisey 
My Tackle Shop
SPONSORS
Proudly associated with

Cornwall's only specialist kayak fishing shop
Archives
March 2023
Categories
All
Add my blog to your feed reader by clicking the button below
Get blog updates via email
Kayak Fishing Videos


Custom feed reader powered by FeedWind
Useful Links
Anglers Afloat
Cornish Shore & Kayak Fisherman Cornwall Canoes Palm Equipment Penzance Kayak Fishing Meet Info Saltwater Kayak Fisherman Magic Seaweed XC Weather 


|

 RSS Feed


|
|
Website powered by pasties and the hope of good weather!
© 2023 Liam Faisey
© 2023 Liam Faisey